The South Padre Island Flip Flop Foodie Brownsville restaurants

Search The South Padre Island Flip Flop Foodie Blog!

Saturday, December 18, 2010

Cream Puffs

Unfilled puffs cooling (small in back tray - medium in front)
A few days ago I posted the recipe for the basic sweet Pate a Choux - for pastry puffs. Today is baking day!  I'll only be filling a few - the rest will go into the freezer to take with us to Austin (where I'll re-warm, fill, and glaze).  Today, though, the teen is very interested in having some filled with "cherry curd" instead of lemon curd.  I can't say I'm interested in making any from scratch...and I've never seen any on the grocery shelf locally, but what I believe he is looking for is something similar to the jelly in the middle of a jelly donut.  I'll be heading momentarily to the grocery store to pick up a can of Cherry Pie Filling - I think if I run it through the food processor, it will have a similar taste, even with some cherry bits.  Actually, sounds delicious.  Maybe a chocolate ganache topping?  Similar to chocolate covered cherries in nature?  We'll see how it goes.

Small puffs piped and ready to bake

I've made the dough and piped a set of very small puffs - and a set of medium puffs.

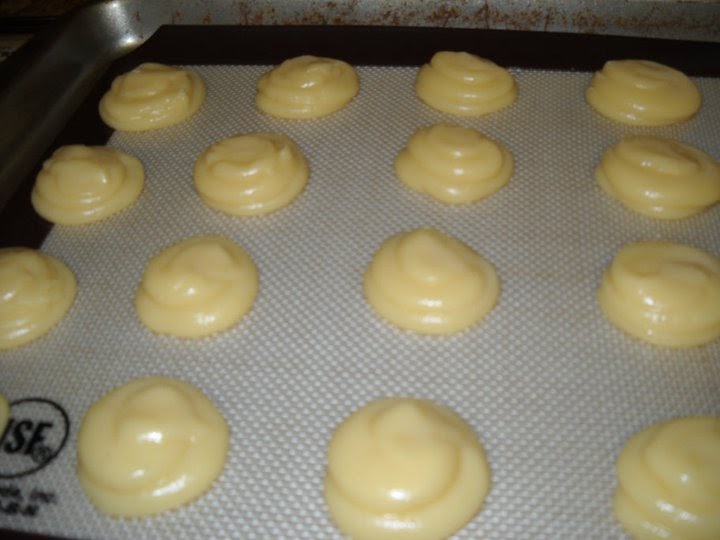
Medium Puffs Piped and Ready to Bake

I'll go ahead and put the recipe here again so it is easy to have in one blog post - and I will make it very specific to the way I did everything today...so you'll see small differences.


MINIATURE CREAM PUFFS (Pate a Choux)Prepare your pans - line shallow baking sheet with parchment paper - or use a baking mat (I did) if you don't need to draw out your circle sizes.  If you want to ensure you have uniform puffs - use a template to draw circles with a pencil on the parchment paper (leave at least 2 inches between circles) and then turn it over - you can see through the paper to pipe the dough!  I piped free hand today - small ones and medium ones!

Preheat oven to 425 degrees F.

Ingredients:
1 cup water
1/2 cup unsalted butter (one stick - I used salted butter today - that's all I had)
1 tsp sugar
1 cup unbleached all-purpose flour
4 large eggs (should equal 1 cup of eggs - if your eggs don't equal one cup of eggs - add an egg white or another egg to get it to the right volume - I had to add some egg white to get an exact cup today)

Method:
In a saucepan, bring water, butter, and sugar to a boil over high heat.  Immediately remove from heat.
Add flour and stir with a wooden spoon until mixture pulls away from the side of the pan. (takes just a couple of minutes). 
After flour added - it pulls away from sides of pan

Let cool for a couple of minutes to the point you don't curdle the eggs when you add them next (just about 5 minutes) OR you can move everything to the bowl of a stand mixer at this point which hastens the cooling process (me, I don't want another dirty bowl to wash - and I cooled my pan in a bowl of iced water which worked perfectly).

Add eggs, one at a time, mixing thoroughly after each addition with the wooden spoon until smooth.  It gets gummy looking and then smooths out...that's when you add the next egg.  And, believe me...you have to stir industriously...but, it's meaningful that way :-)  Be careful not to slop it out - those eggs are slick!
After egg added you work it, work it, work it

After eggs all worked in


Transfer batter/dough to a large pastry bag with a 1/2 inch round tip (if you are doing the miniatures - larger tip if larger puff) OR you can use a Ziploc bag (I prefer the freezer bags as they are sturdy and less likely to pop on you).  If you use that method, move the dough to one corner and twist down the excess bag so the dough doesn't move backwards when you pipe.  Snip the corner of the bag about 1/4 inch up, and start piping.
Prepared dough/batter in the bag - ready to pipe
Pipe batter into mounds - keeping at least 2 inches apart.  If you are using parchment paper, and your paper slips around, anchor it by putting a dab of batter in each corner between the bottom of the parchment paper and the cookie sheet.  It will hold it in place.  After all your piping is finished, smooth the tips of each batter mound with a lightly wet finger (put a little water in a ramekin and dab your finger to keep it moist while smoothing the tops of the batter mounds).
 
Bake at 425 for 10 minutes - reduce oven temperature to 350 and bake until puffs are golden brown - another 20 to 30 minutes. (the small ones took 10 minutes at 350 and the medium ones took 15 minutes at 350...so I imagine the original recipe is really pushing it for 30 minutes unless you are making some pretty big puffs).  They should feel light and hollow if you lift one off the parchment.  Mine turned out perfect...these are so easy folks :-)

Allow to cool on baking sheets placed on wire racks.

How to Fill:
Use a toothpick to make a small hole in the bottom of the baked puff.  Wiggle it around to make about 1/4" hole.  Fill piping bag (or Ziploc bag) with whatever you want to fill the puff with.  Pastry cream, homemade or store bought lemon curd, flavored whip creams, instant or cooked and cooled pudding, or as I'll be doing, a whipped jelly.  Snip the corner of the Ziploc in the same way you did when piping puffs - hold puff upside down in one hand and insert piping tip in puff hole you made - and squeeze to fill the puff with goodness.  Place hole side down on the same baking tray.  If you are using a cold filling, place tray in fridge while you make your glaze.

How to Glaze:
Vanilla Glaze:  1 cup sifted powdered sugar (confectioner's sugar), 1/2 tsp good vanilla extract, 1 1/2 to 2 tbsp milk or cream.  Whisk or stir until smooth.  Start with less liquid and add to get the consistency you want.  A thin glaze will dry to a light crust where a thicker glaze will dry in more of a dollop.  Spoon a small amount over the puff - or dip it in upside down...either way works.  Let glaze harden.

Lemon Glaze: 1 cup sifted powdered sugar (confectioner's sugar), 1/2 lemon, zested before juicing, 2 Tbsp. fresh lemon juice,   Whisk or stir until smooth.  Spoon a small amount over the puff - or dip it in upside down...either way works.  Let glaze harden.

Chocolate Glaze:  In a medium heat-proof bowl, place 4 oz. rough chopped semi-sweet or dark chocolate (make sure it's of good quality).  If you want a really shiny glaze, add 1 tablespoon light corn syrup to the bowl.  In a small saucepan, bring 1/2 cup heavy cream just to a boil and immediately remove from heat.  Pour cream over chocolate and allow to sit for a couple of minutes.  Stir until mixture is smooth.  When it is a dipping consistency, spoon a small amount over the puff - or dip it in upside down.  Refrigerate to harden the chocolate.

Serve same day as filled for best results.  All cream-based fillings must be refrigerated until served.  Unfilled baked puffs may be kept in airtight container in fridge for one or two days - and frozen for up to 6 weeks.  Bring to room temperature on rack before filling after thawing.  Can be recrisped at 350 for 5 minutes, cooled and filled for best flavor after freezing.

Bon Appetit Y'all!!!
StumbleUpon

Friday, December 17, 2010

Small Oven - No Oven?

I was watching a House Hunters International show on HGTV earlier this week and they were talking about how many European and tropical Caribbean homes have no ovens.  This was not new news to me...but it really struck me because all of the next 5 days I will be baking cookies and other holiday goodies...and almost every single item requires an oven.  Yikes...how do you do without?  Even if you have an oven...what if it is small, like a toaster oven?  Are there counter top ovens that can bake a good cookie?  I switched over to the Martha Stewart Show, which I had DVR'd earlier...and had to laugh - there was a Breville "Smart Oven" being touted as being able to bake cookies and cakes!  Which, then, led me down the mental path...cookie pans would have to be really small....I guess 9x13 pans wouldn't work...you'd have to miniaturize everything!

I have a friend who lives in Italy and she has mentioned having a small stove from time to time...but I never really thought through the challenges a baker might have without the appliances I am accustomed to having ....it is just expected to have a big oven in the U.S. - even two ovens (I had that in a previous home - it was wonderful!).

This all led me to thinking about recipes for small ovens...and crock pots!  There are tons of recipes out there for crock pots....less for toaster ovens and small ovens.  I think it boils down to adjusting to smaller cookie sheets and being creative in adapting recipes to small space appliances.  I must say, it makes me happy that I live where I do, which enables me to churn out large quantities of Christmas treats.

I have two recipes that I am going to make this year which could be prepared in a small Italian or Dutch kitchen...or on a tropical island with no built in oven (assuming you have a crock pot and a toaster oven!).

My children love Apple Butter.  The December issue of Martha Stewart's Everyday Food has a recipe for crock pot Apple-Pear Butter.  I'm making it today or tomorrow.  The grown kids will each get a jar for their home and I'll have one in my fridge.  Love, love, love it on a fluffy hot buttered biscuit with a side of fried breakfast sausage (which I also like to dip in the Apple Butter).  Yum, can't wait for that one.

This week-end, I will make miniature cream puffs.  I'm thinking, on a small tray - these could quite possibly be done in a toaster oven that has the ability to set a temperature. (Not all do)  After these cool, I'll fill with lemon curd and glaze them.  If I get really industrious, I might make pastry cream, and fill them like eclairs...topped with a yummy chocolate icing.  We'll see how that goes...depends on my piping skills.  It's easy to make the dough (a classic pate a choux)....and pipe little mounds of dough...but I've had trouble with the longer eclair shape before - they were not consistent, no matter what I did!  That was a long time ago, though...surely I've improved?

Here's the basic recipe for a cream puff...and look for the other recipes and photos over the next couple of days.  Just wanted to let my international readers know "I'm thinking of you"... I'd love to know what YOU cook in a tiny oven for the holidays.  The whole idea is very intriguing. 

MINIATURE CREAM PUFFS (Pate a Choux)

Prepare your pans - line shallow baking sheet with parchment paper.
If you want to ensure you have uniform puffs - use a template to draw circles with a pencil on the parchment paper (leave at least 2 inches between circles) and then turn it over - you can see through the paper to pipe the dough!  Me, I'm a free-hand piper...you get what you get!

Preheat oven to 425 degrees F.

Ingredients:
1 cup water
1/2 cup unsalted butter (one stick)
1 tsp sugar
1 cup unbleached all-purpose flour
4 large eggs (should equal 1 cup of eggs - if your eggs don't equal one cup of eggs - add an egg white or another egg to get it to the right volume)

Method:
In a saucepan, bring water, butter, and sugar to a boil over high heat.  Immediately remove from heat.
Add flour and stir with a wooden spoon until mixture pulls away from the side of the pan. (takes just a couple of minutes).  Let cool for a couple of minutes to the point you don't curdle the eggs when you add them next (just about 5 minutes) OR you can move everything to the bowl of a stand mixer at this point which hastens the cooling process (me, I don't want another dirty bowl to wash).

Add eggs, one at a time, mixing thoroughly after each addition with the wooden spoon until smooth.  It gets gummy looking.

Transfer batter/dough to a large pastry bag with a 1/2 inch round tip (if you are doing the miniatures) OR you can use a Ziploc bag (I prefer the freezer bags as they are sturdy and less likely to pop on you).  If you use that method, move the dough to one corner and twist down the excess bag so the dough doesn't move backwards when you pipe.  Snip the corner of the bag about 1/4 inch up, and start piping.

Pipe batter into mounds - keeping at least 2 inches apart - if your paper slips around, anchor it by putting a dab of batter in each corner between the bottom of the parchment paper and the cookie sheet.  It will hold it in place.  After all your piping is finished.  Smooth the tips of each batter mound with a lightly wet finger (put a little water in a ramekin and dab your finger to keep it moist while smoothing the tops of the batter mounds).

Bake at 425 for 10 minutes - reduce oven temperature to 350 and bake until puffs are golden brown - another 20 to 30 minutes.  They should feel light and hollow if you lift one off the parchment.

Allow to cool - and I'll get back to you on my fillings and icings later ...or you can Google the tons of options you'll find online!  I'll tell you now, I'm leaning towards lemon curd filling with a simple lemon sugar icing.  However, I have been known to change my mind at the last minute ;-p so stay tuned!

Bon Appetit Y'all! StumbleUpon

Wednesday, December 15, 2010

My Favorite Fruit Salad

Everyone has a favorite fruit salad - and so do I!  The basic recipe for this salad came to me via a girlfriend of my ex-husband's brother.  I've made it many different ways (seasonal fruits) but the "sauce" remains consistent and the grated apples - they are key.  People are always surprised to find the sauce is yogurt based.  For many years I hid the yogurt from my kids (because they don't like yogurt) - but they liked this salad!

It would be a great addition to a Christmas breakfast or a Christmas dinner either one.  Try it, I bet you like it!

JOHN'S GIRLFRIEND'S FRUIT SALAD ALA ME!

Slice and dice a bowl of fruit of your choice.  Try to include fresh berries if possible - they really add to the dish.  My usual combination is:
Sliced strawberries
Halved seedless grapes (both green and red)
Cantaloupe chunks
Blackberries
Blueberries
Plums, and/or Peaches if in season
Banana slices (added at the last minute)
Grated cored apples (grate on large side of box grater - with skin on - also at the last minute)

Spiced Honey Yogurt Sauce:
12 oz. low fat vanilla yogurt (or if using plain yogurt, add good vanilla extract to taste)
2 teaspoons honey
1/2 teaspoon ground cinnamon

Whisk sauce ingredients together and toss with fruit - make sure everything is covered so the apples and bananas don't oxidize (if you need to - you can toss the grated apples with a teaspoon of lemon juice to delay oxidation - but bananas, really need to be last minute).  Serve immediately.  I frequently prep everything except the bananas and apples in advance.  I almost always prep the yogurt in advance so the cinnamon and honey and vanilla yogurt flavors have the chance to get all snuggly.  It sounds so simple - and it is.

It's delicious - betcha love it!

Bon Appetit Y'all!!!StumbleUpon

Sunday, December 12, 2010

Amish Friendship Bread

Every few years I go through the "I want to make Amish Friendship Bread" stage.  It is a wonderful Christmas morning treat...a great "stand alone" food gift ...and/or a lovely addition to a baked goods "tray", especially if you bake it in small molds.  Well, the urge has hit me again...so here I go!

I started on December 8th because it takes 10 days to get the starter fermented just right...and then I have it available to bake for my cookie trays and have starter to take with me to Austin to bake fresh for Christmas morning...or just fresh baked to give to my family while I'm there.

If you start now - you'll have a batch ready for Christmas baking - it is not too late!  I love this versatile recipe.  You can make it "as is" (the basic cinnamony bread) or you can add nuts, dried fruits, fresh fruits...all sorts of suggestions for additions may be found online.  Just Google Amish Friendship Bread recipes AND images....and you can spend a good while perusing the options!

Here's the recipe I use for a starter.  Someone gave it to me many years ago - with a cup of starter.  I can't wait to make my first batch of bread from this starter next week-end :-)

AMISH FRIENDSHIP BREAD STARTER

INGREDIENTS:
1 envelope (1/4 oz.) active dry yeast
1/4 cup warm water (110 degrees F)
3 cups unbleached all-purpose flour (divided over the 10 days) - 1 cup for day one
3 cups white granulated sugar (divided over the 10 days) - 1 cup for day one
3 cups warm tepid milk (divided over the 10 days) - 1 cup for day one
   (I take the chill of with a quick zap in the microwave but don't get it too hot or you'll kill the yeast)

DIRECTIONS:
1.  In a small bowl, dissolve yeast in warm water.  Let it stand about 10 minutes. Do not stir...just let it sit.
2.  In a 2-3 quart glass or plastic bowl (just not metal) combine 1 cup flour and 1 cup sugar.  Mix thoroughly with a hand whisk so lumps don't form when milk is added.
3.  Stir in 1 cup milk and the dissolved yeast mixture to the flour and sugar bowl - mix thoroughly, but slowly, with wooden or plastic spoon until smooth.
4.  Cover loosely and let stand - it should get bubbly.  Let it stand out of cold drafts - like you would a rising dough.  Many people use gallon size Ziploc bags for this process...and I have, as well...instead of stirring, you squish, squish, squish.  Each day, you let the air out (the yeasty air) that makes the bag puff up before you squish.  Beware of explosions!  Double bagging is a good option if you go this route (I don't recommend this route).

On Days 2 through 4, stir starter with a wooden or plastic spoon.  Leave out on the counter - do not refrigerate.  Keep loosely covered (I put a dishtowel over my bowl)

Day 5: 
Starter on Day Five - after feeding

Stir in 1 cup flour, 1 cup sugar, and 1 cup of tepid milk to your fermenting mix.  Loosely cover and return to the counter storage position.

Days 6 through 9:  Stir starter with wooden or plastic spoon.  Loosely cover and return to counter storage position.

Day 10:
Stir in the final 1 cup flour, 1 cup sugar, and 1 cup milk.  You end up with 4 cups of starter.  Remove 1 cup to make your first bread immediately.  Divide the remaining starter into 1 cup containers.  Give 2 cups to friends along with this recipe below.  Store the remaining 1 cup (your extra cup) in the fridge so you will have "starter" on hand.

After you have a supply of starter.  Day 1 becomes:  "take the starter out of the refrigerator and stir".  Then follow the rest of the instructions above - starting with Day 2.

AMISH FRIENDSHIP BREAD

Ingredients:
1 cup fermented starter
1 cup vegetable oil
3 eggs
1/2 tsp salt
1 1/2 tsp. good vanilla
2 tsp. ground cinnamon
1 cup white granulated sugar
2 cups unbleached flour
1 1/2 tsp baking powder
1/2 tsp baking soda
I add a grating of fresh nutmeg (about 1/4 tsp - not on the original recipe)

Mix all ingredients thoroughly, by hand (do not over beat).  If you want to add nuts or fruits or even chocolate chips - this is the time to do it.  Many recipes also call for a small package of instant vanilla pudding. 

Grease two loaf pans or bundt pans with butter, sprinkle with sugar instead of flour (I use colored red sugars for holidays), divide the batter between the two containers, and bake at 325 degrees for 45 minutes to 1 hour.  Cool 10 minutes, remove from pan and cool on smooth rack.  OR...

Prepare muffin pans or cute little molds perfect for one or two people (one in my family).  You'll have to adjust your baking time dependent on the volume of the pans used.  Fill molds about half way.  Try one closely-watched batch to determine cooking time (a toothpick comes out clean or crumbs attached)...then you can set your timer after that.

I also used very tiny molds...I overfilled them and they weren't as pretty.  They tasted good - but not as pretty as the other molds.  Key to all molds...don't overfill.  I'll try them again this year in hopes they don't rise above the edge - I may even add the pudding mix for a denser version for the tiny molds...and have bite size bits of friendship bread :-)  Here are photos of some of the molds I used last time I did this.  


I know this may sound overly complex for a few loaves of bread.  I only do it every 3 or 4 years...I have a hard time finding anyone who wants the starter.  It's a 10 day commitment during a busy time of year.  I enjoy having the starter for a while...then we get tired of the sweet bread and I end up tossing it down the drain.  I've read that you can freeze it, but wouldn't that kill the yeast?  Maybe not...I'm not a big bread baker - don't use much yeast.  Of course, frozen yeast dough does rise when you take it out to thaw...so my assumption must be wrong.  Maybe I'll test it out this year and see if it works a few months down the line!

Also, please note - Amish historians apparently say this "bread" is not traditionally Amish...but, the tradition of sharing baked sourdough bread with a sick neighbor is what the Amish call Friendship Bread.  Whatever you do with the excess - or your baked product - it's a great Christmas bread...so just have fun with it! 

Bon Appetit Y'all!!!

UPDATE December 22, 2010

Here are some photos of the Amish Friendship Bread I baked this morning.  I used green and red sugars in the molds...the green looks a little strange...I like the red better :-)

Red and Green Decorating Sugar in the greased molds before baking make these Christmassy looking
The little molds seen above - filled only half way with dough
Molded some dolphins with leftover cakepop chocolate coating
Made some vanilla/cinnamon glaze to decorate with - poor snowmen - didn't fare too well!
Decorated with glaze - piped from a Ziploc freezer bag
Dipped the tiny ones in a thin glaze which will dry to a very thin crisp shell - yummy

StumbleUpon

Tom & Jerry's

Photo Source: http://www.spadre.com/tomandjerrys.htm

About halfway through the South Padre Island Christmas Parade, the teen-ager was chomping at the bit to go eat.  I think it was moving a little too slow for him.  Note to self:  get there earlier - stand closer to the start of the parade instead of the end of the parade :-)

So, I succumbed to his "looks" and said, do you want to leave after the Port Isabel HS band passes by?  YES he nearly yells.  He asked if we could eat at Tom and Jerry's (we were standing slightly north of them) and I said, "well, it's a sports bar...and loud...are you sure?"  He responded yes and so we walked down there and, of course, it was quite empty due to everyone being outside looking at the parade....except for the bar area, of course....several people there watching a game.  So, I told the host we were a party of two...and we were led to a table back by the kitchen...despite the many empty tables by the windows. <sigh>  I will say, they might have been set up for reserved parties.  Later I noticed festive people going to those seats.

The cigarette smell was overwhelming and I really wanted to leave before ordering.  It was so loud, though, I couldn't have discussed it without it being a "top of the lungs" discussion.  I just decided to suck it up.  I need to say I've only been to Tom & Jerry's once before... a couple of years ago.  I got so po'd that I never returned.  The hubby and I went one Fall afternoon - it was nearly empty - the service was slow - I ordered the special of the day, which was the Mexican Plate...and they were "out of salsa" so I had none to put on my taco.  I joked with the waiter that The Blue Marlin was just a couple of doors down, couldn't someone get some since the Mexican Plate WAS the special of the day?  He looked at me like I was a bother and walked away.  I really was so angry with the sucky customer service that I barely nibbled my food and left in a snit.  Never returned.  Wouldn't have this time except the teen had his heart set on going there. <sigh, the things we do...>

Thanks to our outstanding waitress, Emily, I endured the loudness from the bar, the smoke, the Lakers/Bulls basketball game in the background, and sitting at a less than prime table.  A sports bar is just not my idea of fun.  Everyone is different...and I am so past that stage in my life.  We don't even watch sports in our immediate family (well, I watch Longhorn football...but that's it).  We'd rather watch gymnastics or ice skating :-)  Go ahead, laugh it up...that's just the way we are.

Anyway, back to Tom & Jerry's....  Emily was sooo good with the teen.  He tried to order a medium rare "Tom's Big Burger" (he always asks for medium well, so what the heck???) and I said "you mean, medium well, right?"  He gave me "the look" and said "no, medium rare...I want it moist and juicy".  After back and forth about food safety and undercooked ground beef, he got the stubborn look on his face and nearly growled at me...both the waitress and I could see he was not happy about being questioned!  She told him that hamburgers were really better cooked a little more - that it would be better not rare.  He turned on me and started to argue that he wasn't a baby and to stop treating him like one, he wanted it medium rare.  I told him I cared about his health and that wasn't a good idea.  Emily stepped in and told him "I'm 25 and my mom still cares about me and would tell me the same thing - it never ends - she's your mom!".  I don't think he was happy about any of it...a tired teen-ager who hasn't been fed is not the most rational person in the universe.

I ordered a Patty Melt with Swiss cheese and onion rings instead of fries (I knew I would pay for that much onion later, but it just sounded good).  The food came out pretty quickly which was a really good thing considering it was nearly 8:00 and lunch was hours ago.  The teen inhaled his and said it was really good.  I ate a little more slowly...and I had only one very small complaint.  The bottom side of my sandwich was a heel of bread.  I'm not a fan of the heel and I've never been served a heel in a restaurant in my entire life!  Nonetheless, it was an exceptionally tasty patty Melt...perfectly cooked onions, double meat.  So large, I couldn't finish it.  Generous serving of tasty onion rings...also couldn't finish.  It was a good meal.


I probably won't go back to Tom and Jerry's only because of the noise and cigarette smoke.  There are too many places I can go without having to endure that smell.  I think, however, my middle son would like it.  Sports bars are more his thing than mine :-)  Here's a link to the menu.  They seem to have a good variety...and their customer service has certainly improved (and it wasn't just my waitress - I observed good service all around - bar and restaurant areas alike).  There were obviously a lot of locals that night as the parade wound down - big crowd by the time we left...everyone seem to know everyone else.  That has a lot of value to me.  I like going to local "spots" where people are greeting each other (staff and patrons alike)...it feels very welcoming.  Just can't endure cigarette smoke - previous smokers, we're always the most intolerant :-)

It is hard to rate this using my usual scale...the food was good - so I'd give it a 3 - but I probably wouldn't want to go back...so I can't really say my flip flops would be interested in parking under their table again.  <shrug>  Many thanks to Emily, our waitress...she made the experience so much more enjoyable than it would have been otherwise.  She rocked!

Tom & Jerry's Incorporated on UrbanspoonStumbleUpon

Friday, December 10, 2010

El Valle - The Rio Grande Delta

http://riograndebook.com/
I blogged about going to the book signing and slide presentation by Seth Patterson for his new book "El Valle" - a dynamic visual display of all things Rio Grande.  So, you might ask, why I am writing about it again? 

Frankly, it is worthy of a blog post all of its own.  Have you looked at a copy of it yet?  If you haven't, you are missing out on one of the most beautifully photographed coffee table books I've ever seen.  Add to that the illustrious contributors eloquently describing the land, people, plants, animals, food,  and LIFE displayed in the rich confines of the Rio Grande Delta.  It almost defies description...you just have to see it to "get it".

Every page presented in English and in Spanish... every caption for every picture in both English and Spanish - wow, now that's a challenge!  Truly a labor of love.  I read that every school library in the Lower Rio Grande Valley would be receiving a copy of this book.  What an incredible gift to those born and bred in this culture...or newly arrived.

My favorite pages?  Of course, the chapter (page 140) on The Origins of the Mexican Plate Special!  Well, okay... maybe not my favorite - but in the top ten :-)  Definitely the birds...indescribable.  This book drew me in, first visually, and then with the sheer volume of intriguing information contained in each and every chapter.  The birds, the Laguna Madre, the Barrier Islands, the fish, the insects...I admit I haven't been able to make it through the entire book.  It's like a rich dessert...one that is best nibbled in small, memorable bites.  I spent an hour, just thumbing through it today.

I don't have a coffee table...small condos with limited floor space often don't.  I put my copy on the book shelf.  I take it down at least once each week and study the photos that capture my attention that day.  The photos lead to the learning of El Valle's history; my roots - although I was never encouraged to embrace them as a child.  Now, I find myself wanting to know more and more about the area.  I couldn't have found a more enchanting text to study than Seth Patterson's El Valle.

Compiled with an artistic eye, obvious quantities of patience and passion... perhaps the best resource, or remembrance, any visitor to the Rio Grande Valley would want.  Don't waste your dollars on cheap souvenirs...spend the best $50 of your life buying THIS souvenir of the Rio Grande Delta (yes, it's really a delta, not a valley).

Today, I ran across a familiar name as I flipped through the book.  The father of a dear friend in Austin,  wrote a section for the book (Sabal Palm - Page 64 - by Jimmy Paz).  "Could it be?", I thought when I saw his name...so I sent her a text to inquire.  I knew he had worked with the Audubon Society for many years.  Sure enough - it is!  What a wonderfully small world this is - strands constantly intertwining - enriching our lives through happenstance (this is the dear friend who introduced me to my husband!  She is also the one who brought me to South Padre Island for the first time - where I fell head over heels for a strip of sand).  So......serendipitous!

Joni, at Paragraphs on Padre Blvd, has El Valle in stock, as does (I would imagine) Seth's mother, the most lovely Scarlet Colley, at her Dolphin Research and Sea Life Nature Center in Port Isabel.

Don't delay...get your copy today.  It is worth twice what you will pay for it....it is THAT good.StumbleUpon

Thursday, December 9, 2010

Zeste's...a Little QC Never Hurts!

Note:  October 2013.  Zeste Café and Gourmet Market is out of business. A great loss for the island.

Yesterday I found myself preparing to write a review on a location I hadn't visited really recently...had a couple of hours to spare...so I jumped into the car and braved the high winds for a short trip to the island.  I ended up making 3 food-related stops :-)  No surprise there! 

I hadn't taken the opportunity to write a review on Zeste's since I hadn't been by the shop recently.  This was a good excuse to head that direction for some Quality Control before commenting on, what I knew would still be, their delicious goods.  I had recommended them on a previous blog or two...so thought...I should go check out the goodies in their case today...and the specialty food items currently on their shelves!

So, first stop... Zeste Cafe and Gourmet Market.  I had a craving for some of their Orzo Garbanzo Feta salad.  I haven't had any since having it at the SPI Farmer's Market and I needed some.  Need/want....whatever!  I know I could make it (or something quite similar) myself...but I knew I'd make too much and would be eating it for days.  It just seemed easier to bite the bullet (not a hard bullet to bite!) and stop in at Zeste's for my fix.  Since I can't manage to walk in and just buy the one thing I've come for, I also indulged in a small container of Artichoke Parmesan Dip.  My friend, Trina, made hot Artichoke dip this week-end and I've been thinking about it all morning...so I blame that for my epicurean impulse purchase.  I can't figure out what forced me to purchase the bottle of Bellino Anchovies packed in olive oil...so I won't even pretend.  I just wanted them.  Oddly enough, I would say "no" if you asked me if I liked anchovies.  Because, I don't...on my pizza or visibly identifiable in or on my food.  However, the underlying punch a melted down anchovy adds to many recipes is delicious.  So, since I rarely have them when I want them...I grabbed the last small bottle from the shelf.  My hubby will be glad...he likes anchovies :-)

They have a more limited selection of packaged food items than my previous stops...but still very good quality.  More inside seating now (hence less shelf space) - and a larger selection of wines...still good stock of microbrewery and imported beers.  It is what it has always been... a lovely gourmet shop, unusual on a little island.  The one thing I've never done is actually gone, sat down, and had a meal there.  I generally go for the deli case salads, a cheese, or a specialty food item.  I solemnly promise myself I will stop in for tapas some week-end night...the menu looked delicious.

I highly recommend Zeste's for any resident or tourist foodie - walking in the door just feels "good".  You'll find Zeste at 3508 Padre Blvd... it is the "red roofed" building on the East side of Padre Blvd, headed north from the bridge.  They reportedly make beach picnics to go, and had a selection of picnic accoutrements for sale as well.  I might not think of a beach picnic on such a chilly day...but if I wanted some specialty oils, salts, ladyfingers, cheeses, crackers, or dips and chips...that's the the place I'd go!

When I left Zeste's, I was craving enchiladas, because it was untropically chilly/windy today and it was past lunch time, so I stopped in at Cap'n Roy's...had an extremely generous serving of beef enchiladas, rice, beans, and a small side of lettuce and tomatoes (which I topped with salsa).  I waddled walked out to continue my mini journey, filled with good food and the sense of well-being it provides.  It didn't hurt that the entire bill, including a nice glass of iced tea, was under $10!

Note:  Harlequin Gourmet Chocolats is also out of business.  My next stop was Harlequin Gourmet Chocolats for "dessert" and to pick up a stocking stuffer for "someone special".   My treat was a deliciously decadent Coconut Cream Truffle.  I really, really tried to hold off eating it until I was home so I could truly enjoy every delectable morsel with the requisite closed eyes....unfortunately, the siren song of chocolate lured me upon the rocks.  I had no more than touched the front of my tires on the bridge heading home, than I found the truffle unwrapped in my hand and it heading north to my mouth.  It's like crack.  I couldn't help myself.  I had it completely finished before I made it to the post office in Port Isabel.  Oh.... I'm so ashamed. HA! Not really.  It was some good good chocolate!

So, all of my stops received an A+ on this brief excursion.... or on the SPI Flip Flop Foodie rating system....

5 – OMG – that was outstanding!  I can’t wait to go back J

Zeste Cafe & Gourmet Market on Urbanspoon

Cap'n Roy's on UrbanspoonStumbleUpon

Wednesday, December 8, 2010

What Do You Get a Foodie For Christmas?


Photo Source:  Google Images
 What do you get a Foodie for Christmas?  I put together a little list of a few items I think most foodies would enjoy...and just anyone who enjoys good food!

Gift Certificates - Locally, I would think Zeste Cafe and Gourmet Market and Cactus Flower would be awesome  because they have tools and ingredients you frequently have trouble finding down here!  An unusual kitchen tool or ingredient is highly desirable!

A gift of a meal at one of the island's excellent restaurants - now THAT would be a splendid gift certificate to receive!  Cafe KranzlerPadreRitaVille, Wild Fork Italian Bistro, Sea Ranch to name a few.  YOU know what your friends like.

Harlequin Gourmet Chocolates - Create a gift box of a variety of their superior truffles - possibly even one of their hand crafted chocolate boxes for someone really special!

Make a Cake Pop Basket - Buy the Cake Pops book by Bakerella at Paragraphs on Padre Blvd, add a cake mix, can of frosting, pop sticks, a block of Styrofoam, some melting chocolates, clear treat bags, and a variety of fun sprinkles.  Anyone who likes to bake clever things would love this!  Most of the items for making cake pops may be found at the Port Isabel Wal-mart in the back of the store where the Wilton products are sold.


Photo Source: Google Images

Handmade food gifts - no one appreciates a handmade food item like a Foodie!  Do you make your own jam or your own salsa?  Put it in a pretty jar, tie a ribbon on it, make a nice label...voila...an excellent gift.  Baked goods from local Farmer's Markets are a plus as well. You can also make a jar of cookie mix by layering dry ingredients in a clear Ball jar - print out the recipe, label and ribbon or raffia around the lid...again, a great treat.  I know I used to BUY them in Austin at specialty gourmet stores for $10 and up.  You CAN do it yourself!  A nice homemade bread with a ribbon around the loaf - just a wonderful gift.  A tray of a variety of homemade cookies - I used to make them for all of my neighbors.  Preserved Valley Lemons for Middle Eastern food lovers, chocolate dipped pretzels for those that like a salty/sweet treat, homemade pickles, the possibilities are endless.  There's nothing like a gift you make with love! 
Photo Source: Google Images

Photo Source: Google Images
A subscription to Food Network's magazine, Southern Living, Bon Appetit...or any other food related magazine.  OR, the newest cookbook - all the popular chefs seem to have a new book out.  Joni at Paragraphs can order anything you need - but start now!  I know I love receiving a cookbook with great photos :-)  Some excellent choices might be The Good Housekeeping Illustrated Cookbook or The Betty Crocker Cookbook (ringbound), or one of the many beautifully photographed Southern Living Recipes books.  The Joy of Cooking is a classic every foodie would enjoy having (if they don't already have it!)

Go to Zeste's or Cactus Flower or Tastefully Simple website (or even Wal-mart in a pinch) and select some gourmet or specialty items (food items and preparation items) to make up a Foodie Gift Bag or Basket or Bucket....pop in a bottle of wine or some unusual beer...fill in the gaps with seasonal fresh fruit from one of our excellent Farmer's Markets, wrap it in some nice cellophane wrap and make a big gorgeous bow...awesome gift.
Photo Source: Google Images

Local consultant for Tastefully Simple, Karen Mackesey, can help you pull together some delicious additions to a food basket - or you can purchase a complete gift basket or gift selection pre-packaged by Tastefully Simple.  I put together my own food gift basket last year for my Mom's Christmas gift and she particularly loved the Tastefully Simple food items.  She still raves about all the goodies!

Pampered Chef items - Nice quality food preparation equipment - unique items you can't hardly find anywhere else locally.  I know there is at least ONE local consultant (I saw her car driving by) - you can find a consultant at this link.

This is the time of year to share good food thoughts and good food items.  Prepare now for a Foodie Christmas!
Bon Appetit Y'all !!!
StumbleUpon

Monday, December 6, 2010

A Cold and Windy Day at the Cafe on the Beach


Photo Source:  www.palmsresortcafe.com

Today my hubby and I wandered over to the island for lunch.  He hadn't gotten to the beach since being home so I suggested we go to the Cafe on the Beach at the Palms Resort since it was beachfront.  He was amenable and off we went.  Wowzer it was chilly and we were both in short sleeves and no jacket.  I was, of course, in flip flops.  Brrrr...the windy overcast day was not very inviting!

We were regretting our decision shortly after ordering a big glass of iced tea!  The patio heaters were not putting out much warmth and the wind was cutting through every possible crack and crevice of the drop protectors that acted as a wind break.  My hubby moved over to my side of the table so we could share body warmth and ordered coffee, getting rid of his iced tea.  Our nice waiter finally told us the propane was empty (hence the lack of warmth) and, if we were cold, he would get a new tank.  We both nodded our heads vigorously!  Once that little snafu was taken care of....ahhh, the warmth was exquisite... we could enjoy the view of the crashing waves and the intrepid kite surfers!  I couldn't believe how many were out there catching air over the waves...full body suits of course :-)  It was very cool to watch.

John ordered the Spinning "Crispy" Chef Salad (Julianne ham, turkey, provolione, kalamata olives, hearts of palm & Maytag bleu cheese tossed with honey mustard dressing or your choice of dressing. Served in crispy homemade tortilla shell.) and I had a Chicken Teriyaki sandwich with fresh grilled pineapple (the Teriyaki sauce was excellent with just the perfect viscosity not to make the bread soggy) and a side of delectable freshly made potato chips sprinkled with Parmesan cheese....yummy.  We were both quite hungry and gobbled down our food.  It was delish!

I know it is challenging for folks who come to the island on cold dreary days when the wind is like a sandblasting machine on the beach...but this is a lovely way (when the propane heaters are on) to enjoy the beautiful view and a nice meal beach side!

SPI FLIP FLOP FOODIE RATING:
3 1/2 – Pretty Darn Yummy - I feel my flip flops wanting to head back from time to time


Cafe on the Beach at the Palms Resort on UrbanspoonStumbleUpon

Friday, December 3, 2010

Parrot Eyes

As I drove over to the island this morning to get my nails done (at Venus Nails and Spa with Jenny of course!), I was next to a white vehicle with a Parrot Eyes sign on the side...it stuck in my mind when my appointment was finished and I was feeling hungry!  See, advertising does pay :-)

This is only my second visit to Parrot Eyes.  I don't know why I don't go more often.  It's really tasty, well-priced, and what a lovely view on this gorgeous day!  It wasn't crowded, and most people were sitting out on the deck.  I didn't feel like being around a crowd - so I sat inside.  The staff are very friendly and attentive at Parrot Eyes - my drink order was taken immediately and I was provided a menu with the daily specials pointed out.  All within moments of being seated.

The specials are every day, I was told...and they are just $5.00.  Well, you can't beat that!  There was a taco plate, an enchilada plate, a pasta plate...and some others which didn't stick in my mind.  The first time I went there was last Fall - and I had a Cobb salad.  I remember it being very good.  Today I selected the $5.00 enchilada plate.  Very basic - no substitutions - 2 cheese enchiladas with a beef chili sauce, rice and beans.  I was almost surprised at how good they were!  Heavy cheese on top (just the way I like it) - the chili was good - and the tortillas thin and tender.  Excellent!  The ice tea was good (you may recall, I'm picky about my iced tea) - fresh and tasty.  The outstanding item on the plate, though, was the bowl of beans.  I had expected the typical refried beans...but these charro style beans were exceptional...with onion and bacon and quite spicy!  The rice was just so-so but when I added it to the brothy beans...frankly, I could have made a meal of those two items together.  The rice toned down the spice a bit - and it was just a perfect side!  I cleaned my plate and walked away full as a tick for a total of $7.52 plus tip. What a great deal.
 
I've driven by with the consideration of stopping on other occasions, but they were awfully crowded (Summer time).  I bet I won't wait another year to stop in!  Fall and Spring are likely the optimal times for locals to swing by - I'll leave it to the tourists for summer time fun!


Parrot Eyes on Padre Blvd

This is a fairly new facility, I'll add.  Very nicely done.  My photo didn't turn out so well - I'll try to get a better one...or better yet - look at their very nice website.  Their original business of recreational watersports has been around longer than the restaurant.  I remember it from when we used to vacation here.  My nephews reported they stopped in for a meal there and greatly enjoyed the tropical atmosphere.  I particularly liked looking out the huge windows at all the pelicans and bay views.  It's on the canal side that leads into the Laguna Madre.  There is a gift shop, pool tables, a bar/nightlife scene...lots to make folks happy.  I definitely recommend it whether you are a local, a Winter Texan, or a tourist!

SPI FLIP FLOP FOODIE RATING:

3 1/2 – Pretty Darn Yummy - I feel my flip flops wanting to head back from time to time!

Parrot Eyes on Urbanspoon

StumbleUpon

Thursday, December 2, 2010

A Wonderful Night!

After 3 days of not leaving the house thanks to a "bug" of some sort, I made myself get up and go out this evening.  I made the grumbling teen go with me.  I think we are BOTH glad we did!

We started the evening at an amazing book signing and presentation by Seth Patterson, author and photographer for the most gorgeous and interesting book, "El Valle" .  What an amazing young man.  He speaks with such passion about the beauty that surrounds us in the Rio Grande Delta (yep, it's not really a valley - it's a delta!).  I love it when I learn something I never knew - and tonight I learned a LOT!!!  A charming and talented young man.  Paragraph's on Padre Blvd hosted the event and it was standing room only.  What a great turn out.  Wine and cheese in the courtyard, visiting with neighbors, meeting new folks, renewing acquaintances with others...just a lovely event.  Thanks Joni (oh, yes, and happy birthday to you!).

After leaving, the teen and I went to PadreRitaVille for an excellent meal, with outstanding service, entertaining music, and "ta da"....fresh hot beignets for dessert!  Yummmm, what a great topping to a fabulous evening.  The teen gave the 1/2 pound burger two happy thumbs up - and I had my usual AWESOME nachos...with fresh guacamole and sour cream...just delicious.


Hot beignets at PadreRitaVille

The whole evening was like a magic elixir...from having to drag myself off the "sick couch" to "singing along" with Micheal at Padre RitaVille...what a difference some island breeze, Christmas lights, and good company can make!!!

A good night was had by all!

PadreRitaVille on UrbanspoonStumbleUpon

Wednesday, November 24, 2010

Peanut Butter Crunch

When I was a little girl in the 1960's, the Austin public school cafeterias sold an "extra" dessert called Peanut Butter Crunch.  It was my favorite thing they had - the nearest second were the yeast rolls they served almost daily!  I never wondered, at the time, how they were made, I just knew we were all excited when they were available!  However, as I got older, I thought about them...my sisters and I talked about them...everyone who remembered them always ended the conversation with "I sure wish I had the recipe for those". 

In the late 1970's, one of my co-workers brought a tray of them to work one day.  I thought I had died and gone to heaven!  She said they weren't difficult to make, and I wrote down the recipe.  At the time, I didn't even consider owning a candy thermometer...and my Peanut Butter Crunches never turned out the same.  I even put them in a cook-book we made at work and used a "number of minutes" for the cooking time, instead of a temperature.  One of my co-workers said "hey, I made your recipe and they turned out hard as a rock".  Lesson learned - recipe testing is important!  I got to the point I would not share it with anyone...it was top secret!  MINE always turned out "pretty much" right because I had gotten the "look" down - but I couldn't communicate that in writing.  And, they weren't 100% consistent.

After time, I became a better cook, and I learned to cook sugar syrups to temperature...or you could end up with rock candy instead of chewy bars!  So, really, if you are going to make this recipe - make sure you have a candy thermometer - it makes all the difference!


I'm sharing this recipe now - because it is my children's favorite dessert - and I want it to be available for them to make themselves.  If you love peanut butter and chewy things - you will love this confection!  I've made them as a bar, I've made them as a drop cookie, and I've made them in mini-muffin pans.  They are good any way you make them.

This would be a wonderful addition to a cookie tray at Christmas, a dessert buffet at Thanksgiving, or individually wrapped for a bake sale.

I hope you love these as much as my family loves them...I can't believe I'm releasing my recipe publicly...my friends will laugh, because I've kept it so secret after the private cook-book debacle! (although I'm sure you can Google it and it's in a dozen different places!)

PEANUT BUTTER CRUNCH

Ingredients:
1 cup light Karo syrup (store brand corn syrup has worked fine for me as well)
1 cup granulated white sugar
12 oz. creamy peanut butter (I prefer Peter Pan or Jif - and I've tried all brands)
5 cups Kellogg's Corn Flakes (again, I've tried store brands - these just work best)

Method:
In a pan large enough to hold the final product completely, mix the corn syrup and granulated sugar together and bring to a boil over a medium heat.  Cook until candy thermometer reaches 210 to 220 degrees F.  - stirring frequently - be very careful not to splatter or touch the hot liquid with your fingers!
Remove from heat as soon as it hits 210 degrees, and carefully stir in the peanut butter until smooth.  Add five cups of corn flakes and fold until well-coated - reaching to the bottom of the pan and folding the sauce over the flakes.  It's industrious work - but the payoff is great :-)  Don't worry if you hear the flakes crunching a bit.
Spread in 9x13 pan, pressing into corners, and smoothing the top.  May spoon into mini muffin pans or drop onto wax paper coated cookie sheet using a medium cookie scoop for easy mounding.  Allow to cool at least 2 hours at room temperature. (I'm laughing as I write that - I finished these last night and within 30 minutes 3 people had cut pieces out of the pan....two hours...riigghhhtt!
Recipe doubles very well!  I made two pans last night.  Gotta say, they are pretty darn awesome!

Scooped into a mini muffin pan for individual servings

I've decorated them a variety of ways - put some holiday sugar on them while still warm, I've drizzled chocolate across them - my kids really just prefer them without any enhancements.  That speaks well of a good dessert.  It's chewy and gooey and I've never had anyone say they didn't like them (if they like peanut butter).

Hope you enjoy this - and, as always, Bon Appetit Y'all!StumbleUpon

Tuesday, November 23, 2010

Dirt Cake

My friend, Sandy, made this back in the late 80's and early 90's, and it is so delicious that I've decided to make it in a clear trifle dish for one of our upcoming parties.  Normally, Sandy served it in a lined flower pot because the topping of crushed Oreos looks like dirt (hence the name).  Sandy used to put a silk flower in the middle.  It was always a hit when she brought it to a pot luck or for someone's birthday at work.

It's not really a cake at all - it's more like a creamy rich pie with oreo layers instead of crust.  I think it will be a pretty presentation in a trifle bowl with the "dirt" layers visible instead of hidden in the flower pot.  I don't have a picture, because I haven't made it yet...the party's a few weeks out.  However, I'll post it as soon as I do.  It's a delicious concoction and so easy to make, you'll love it! 

I just wanted to share it now - in case you need an EXTRA Thanksgiving dessert - you might want to give this great no-cook treat a try!

DIRT CAKE

INGREDIENTS:
2 small packages Oreos (I'm not sure they come in large and small any longer - so I'm going to buy 2 of the only package I see on the shelf these days - I can save left-over crumbs for another recipe)
2 8-ounce packages Cream Cheese - softened
3/4 cup sugar
1/2 stick butter (4 Tbsp) - softened
1 small package Instant Chocolate pudding
1 small package Instant French Vanilla pudding
2 3/4 cup milk
1 tsp. vanilla extract
12 ounces Cool Whip

METHOD:
Crush cookies - set aside. (Use food processor OR a Ziploc gallon-size bag and crush with your wooden rolling pin)
In small bowl, cream the butter, cream cheese, and sugar.
In large bowl, mix puddings, vanilla extract, and milk.
Add creamed mixture and mix thoroughly.
Add Cool Whip and mix thoroughly.

Layer cookie crumbs and pudding mixture - ending with cookies.

(Line flower pot and decorate with silk flowers for serving alternative - makes it look like dirt)

Bon Appetit Y'all !!!StumbleUpon

Monday, November 22, 2010

Bacon Cheese Bread Bowl

Lots of people like to serve an hors d'oeuvre while folks are waiting for the final preparation of the Thanksgiving dinner.  Lots of us eat in the middle of the afternoon, long after breakfast, and the masses might need a little snack while they wait.  There's always the healthy crudite tray...but, if you are looking for something to wow the crowds, you might consider this recipe.

My friend of over 30 years, Pamlets, gave me this recipe after I sampled it at one of her fun Ornament Exchange parties.  It was "eyes rolled back in the head" good.  I wish I'd gotten the recipe for ALL of her hors d'oeuvres...because they were all delicious!  She's definitely a hostess with the mostest.  Hopefully, she won't mind my sharing this delectable warm appetizer recipe.  It's a GREAT addition to anyone's appetizer table!  I know my family loved it...my notes show I served it for Christmas Eve appetizers in 2003 - geez, I'm anal about keeping lists of what I serve...  Whatever!!!  As Popeye said, I yam what I yam :-)

BACON CHEESE BREAD BOWL

INGREDIENTS:

1 loaf Round Hawaiian Bread (cut off top and scoop out bread - save top)
1 package Bacon, fried crisp and crumbled (I used a 12-14 ounce package - I use a regular or thin  slice,not thick, as it is easier to crisp and crumble)
8 ounces Colby Jack cheese (grated)
1 cup Parmesan cheese (grated)
1 cup mayonnaise
1 small onion chopped (I would say, finely chopped)
1 clove garlic chopped (or 2 tablespoons if using prepared) - that's what the recipe say...but one clove of garlic is a lot less than 2 Tbsp - so maybe she meant 2 teaspoons...I made it with a fresh garlic clove - a large one - finely minced.

METHOD:

Mix all ingredients together and add to bread bowl.  Place top on bread bowl and cover (wrap) with aluminum foil.  Put on cookie sheet and bake at 350 degrees for 1 hour.  If still not quite hot enough after baking time finishes - can put in microwave for a minute or two.

Serve with crackers or, my preference, toasted baguette rounds.  This is scrumptious!!!

Bon Appetit Y'all!!!StumbleUpon