The South Padre Island Flip Flop Foodie Brownsville restaurants

Search The South Padre Island Flip Flop Foodie Blog!

Monday, November 2, 2015

Battling Cancer

A dear friend set this up for me - I am sharing it here.

I started preparation for a Stem Cell Transplant on November 1st.  There is no cure for this disease, Multiple Myeloma, but there is a chance for longer life and better quality of life through certain procedures we hope.  I have lived away from home since July to be closer to quality oncology care; only being able to journey to my home at the coast once each month.  It has been, and continues to be a grueling endeavor.  I am up to the fight, though.

I appreciate the support of the many kind souls who have helped me (and my husband and children) in so many ways.  I sure hope this transplant results in my being able to return to doing the things I love - blogging, baking, cooking, decorating artistic sugar cookies, and enjoying time with my family.

Thanks for all of your support!StumbleUpon

Friday, July 31, 2015

On Hiatus

Medical issues have resulted in a several month hiatus for me. I hope to return sometime soon. Please keep checking back!


StumbleUpon

Wednesday, June 17, 2015

Pikachu - Gotta Eat 'em All!


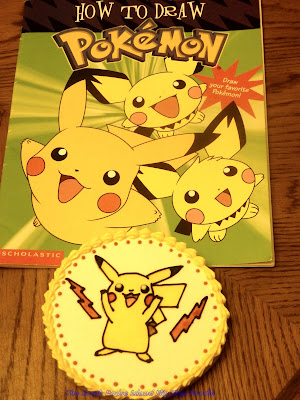
My granddaughter always likes to make cookies when she visits...and eat those cookies too!  I noticed she had a "how to draw" book in her suitcase from home and asked if she thought we might make one of those Pokemon on a cookie?  She thought that was a grand idea.

Because we are so busy going to Schlitterbahn at the Beach (she is a Boogie Bahn addict), the project has taken several days.  I had Vanilla Bean Sugar Cookie dough in the freezer because I knew she was going to want to bake.  We rolled out a few cookies together (she now understands that is very hard work).  We cut and baked and waited for the next day.  Then, we made royal icing together (again, "gee Grandma, no wonder it takes so much time to make your cookies" - yep).  I base coated the cookies because she recalled not enjoying that last year.  She did, however, like eating one of the cookies where the base coat fell over the edge.  We ended up with three large 5 inch circles and a few stars to play with.

Today we decided to decorate (is it sad that it took us all morning to finish one big cookie?).  She is so happy with the cookie she is just bouncing up and down wanting to eat it.  I asked if she didn't want to wait and show it to Grandpa when he got home from work.  "Yes, Yes!" she yells and runs back to her Kindle where she is building some incredible roller coaster on her farm in Mine Craft!  There is a plane and an UFO involved as well.  She is very creative!

So, anyway, I'm not great at drawing in general and my hands were particularly shaky today so I printed off a couple of copies of the Pikachu she selected for the design and I used the tissue paper method of tracing the design onto the dry royal iced cookie.  I think I first saw the technique on SweetAmbs' blog and I know I have seen Haniela demonstrate it, as well as others.  The technique is easy to Google.  In a nut-shell, you use white tissue paper (like the kind used in a gift bag) and trace the image onto the tissue paper with a food color marker.  Then, you re-trace (using food color marker of course) on top of the cookie.  The first trace may or may not go through the tissue paper, the second tracing transfers the image to the cookie very easily.

I also thought it would be better to paint the cookie so my granddaughter would have a better chance at participating.  I explained how painting a cookie with food color worked - she thought that was pretty cool and asked how I got the food color on the M&Ms I used on her Paint-Your-Own Easter cookie.  I am enjoying the teaching - she is always so wide-eyed in wonder.  Montreal Confections was the creator of the PYO cookie using the M&Ms...and boy were they a hit!

She and I both painted portions of the cookie and she helped select all of the colors and guided me on any specifics of the Pikachu that I was unfamiliar with.  The we decided to add some of the lightening bolts.  I think Pikachu has some kind of shocking power ... so, of course, that was added.

After she returned to her Mine Craft creation, I outlined everything in black piping consistency royal icing and made up a small amount of red and yellow for a border.  She is very happy with the end result...and can't wait to eat the cookie!

It was fun - and a day I hope she looks back on when she is older and thinks "you know that day we made Pokemon cookies Grandma?  That was so fun".  It's what we live for!

Bon Appetit, Y'all 
- and thanks for reading my blog all these years!


StumbleUpon

Saturday, May 30, 2015

Dirty Rice


I love Dirty Rice from Pappadeaux's Restaurant.  I've never eaten it anywhere else and really didn't know much about it other than it appeared to be a really spicy dish with rice and sausage.  My husband mentioned Dirty Rice the other day which put a bug in my brain to add it to our weekly menu!

Seemed like it would be fairly simple.  I felt like I had the basics on hand, having bought a chub of pork sausage in last week's shopping.  Next step would be seeking out a good recipe.  I started with a search for the recipe from Pappadeaux's.  Knew it wouldn't likely be out there, but hopefully something close.  What did I immediately discover?  OMG!  Chicken Livers. Gizzards. WHAT???  Ewwww.

I put it aside for a bit then went back to search for other recipes for Dirty Rice.  Low and behold, everything I found had chicken livers.  I repeat, ewwww.

I am not a liver fan - whether it be cow or chicken.  It's a no go in my kitchen.  My first job was in my family's meat market and handling liver was just the thing the guys thought would be funny for the boss's daughter to have to do.  I repeat ewwww.

I waited until the day of the Dirty Rice entry on my weekly menu to arrive, thinking I'd just try it with the pork sausage and use the Emeril Lagasse recipe I found on Food Network.  The more I thought about it, the more I realized that the undefined taste I enjoyed so much in the restaurant just might be chicken livers.  So, I put on my big girl panties and hied myself to the grocery store to find a plastic container of chicken livers.  Hey, chicken livers are pretty darn cheap!  My friend says they use them to fish with.  Gracious, I'd rather handle a worm!

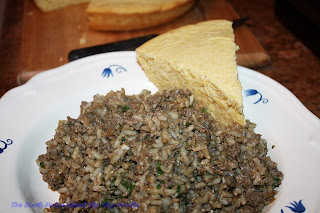
I didn't take photos of the process because, truly, I didn't expect to find it was something I was going to recommend.  I grabbed photos at the end after I made Mr. Flip Flop give it a taste.  He said it was good but spicy!  Anyway, onwards.

I got home and pulled up the recipes I'd marked and made the final decision to do the Emeril thang.  I had some Essence on hand, brown rice instead of white because that's how we roll, and I grabbed a green bell pepper at the store because we usually eat red bell pepper.  I'm not really a bell pepper fan but my husband is, so the way we compromise is to buy the milder red version.  It works okay - especially if I cut the pieces large enough to pick out or make them so small I can't identify them.  I don't mind it as a background taste, just don't like biting into one.

Here'e the link to the Emeril Lagasse original recipe and then the way I made it outlined below.

Dirty Rice
based on Emeril Lagasse Recipe

Ingredients:

3 Tbsp Vegetable Oil - divided
1 1/4 pound chicken livers, washed, drained and patted dry
1/2 pound original pork sausage (Owen's brand is good)
1/2 large yellow sweet onion - cut into large chunks
1/3 green bell pepper, seeds and white membrane removed - chunked
2 stalks celery, large chop (use tops too)
2 tsp. minced garlic (I used 4 cloves through a garlic press)
1 Tbsp Emeril's Essence (available on most spice aisles at the grocery store)
 but if not found, there is a recipe for the mix at the link to his recipe above.
1 tsp ground pepper
1 tsp kosher salt
1 can (14.5 oz) Swanson's chicken broth
2 bay leaves
4 cups brown rice - used 2 bags frozen rice in steamable bags (had 2 cups each)
1 cup long grain white rice - used 1/2 bag of the frozen stuff leftover from previous meal
1/4 cup finely chopped Italian Parsley

Method:

Heat a large skillet or deep Dutch Oven with 2 Tbsp of the vegetable oil over a medium high heat.

In a food processor, pulse chicken livers until small chunks (just takes 3 or 4 pulses).  There's a method to my madness - I didn't have to touch the livers in a manual chopping process.  It worked!

Add the sausage first to the hot oil, crumbling into small pieces and then add the chopped liver pieces to the pan.  Saute until brown for 6 to 8 minutes.

Rinse the liver juice from the processor bowl (you probably don't need to but I just had to).
Add the onion, bell pepper, celery, and garlic to processor bowl and pulse a few times to obtain a fine chop, but not a puree.

Add the last tablespoon of vegetable oil to the meat mixture and add the vegetable mix, scraping down the food processor bowl to get it all.  Stir in Essence, salt and pepper and cook for 5 minutes until everything is well incorporated and softened.

Add the chicken broth and bay leaves, stir mixture, scraping any bits from bottom of pan.  Bring to boil, reduce to simmer for 5 minutes.

If you are using frozen rice - pop it into the microwave for about 60 seconds.  Should be cold, but not frozen.  I put all the bags in at once.

After the broth has simmered for 5 minutes, add all of the rice and stir together thoroughly.  The rice should absorb any excess liquid.  Continue simmering for about 5 or 7 minutes until liquid is absorbed.

Remove from heat, remove the bay leaves, add the chopped parsley and serve.
In the pan right before the addition of parsley

We had skillet cornbread with our meal and it helped to offset the spicy heat that was burning my tongue a bit.  The brown rice made everything a slightly different texture and my recipe didn't dry out as much as I have had at the restaurant.  To me, that was a good thing.

We really liked it and I'm sort of over the ewww-ishness regarding chicken livers.  My hubs loves liver, but I don't think it will ever be a staple on my weekly menus!  Dirty Rice, though, I can handle!

Quite delicious and you really can't see pieces of liver.
If I wasn't so opposed to white rice, it would have
likely looked more like you are used to seeing it!
We're a brown rice family though!


Bon Appetit, Y'all!!!


StumbleUpon

Tuesday, May 19, 2015

Homemade Marinara Sauce

Yes, I snuck in some carrots!


We love pasta and it can always be counted on for making a quick week-night supper.  I am generally fine using a good quality jarred Marinara sauce, but always kick it up by adding things we enjoy - extra basil, ground beef seasoned with garlic and onion... that sort of thing.

My granddaughters, however, inform me their Dad never uses pre-made sauce.  He always makes his own.  So, I decided I would make the effort and make some sauce of my own, freeze it, and have it available for those days this Summer when the grand-kids are here and pasta is on the menu.

I've done it before but it always seemed to not thicken.  Today's effort is going to involve a longer cook-down time, hopefully reducing more of the water from the sauce.  Dinner tonight is to be an all vegetable sauce over Cappellini.  So, let's get started!

Debbi's Marinara

Ingredients:

1 28 oz. can crushed tomatoes
1 28 oz can whole peeled tomatoes
1 15 oz can diced tomatoes
1 6 oz can tomato paste
3 cups water
2 Tbsp extra virgin olive oil
1 1/2 medium onions - medium diced
2 small carrots - small diced
1/2 tsp dried oregano
3 cloves garlic thinly sliced with my Martha Stewart Garlic Slicer/Press
3 cloves garlic rubbed with kosher salt to make a paste
2 of my ice cubes of olive oil with fresh basil
1 Tbsp granulated sugar

More fresh basil to finish with
Salt and pepper to taste

Method:

Add olive oil to bottom of stock pot and heat on medium.  Add onion and carrots and sprinkle with salt.

Cook gently until soft but not browned (about 6 to 8 minutes).  Add all of the garlic, the dried oregano and the "ice cubes" of olive oil and frozen fresh basil (see this post for how to preserve your fresh basil).

Stir for about 3 minutes to soften garlic.  Do not let it brown.  Add some pepper at this point - I added a large pinch.   If you like a little kick to your sauce, this might be a time to add some red pepper flakes.

Add tomato paste and stir for 2 to 3 minutes to remove the raw taste, then add the large cans of crushed and whole tomatoes.  Finally add the cubed tomatoes, sugar, more pepper if desired, and a few pinches of salt.  Mix everything thoroughly.
My husband grew up where they can
Red Gold tomatoes - if they have it
at our grocery store - I always try
to use their products!

Add three cups of water (I rinse my tomato cans with about a cup of water - so this amount is an estimate) - stir to combine.

Bring to low simmer for one hour.  Check for taste - add more salt and pepper if it tastes too bland.  You want to season little amounts throughout the process, remembering that as it reduces, it becomes more concentrated.  An "average" amount of salt now, might taste too salty at the end of the process.  Be conservative.
You can see how much it has reduced.  All the veg is nice and
soft and ready to move to the  next step!

Continue on simmer for another hour.  Check to ensure all vegetables are falling apart soft.  If so, use an immersion stick to blend everything to a "roughly smooth" texture and allow to cook another hour (three hours total - as a minimum - I let it go for a total of 5 hours on a very low heat for the last two after blending).

Taste for final salt and/or pepper needs - add some fresh basil  - amount determined by your taste (roughly chopped or torn leaves) and allow to cook for 10-15 more minutes.  Serve over pasta at this point or cool completely and bag for freezing.  I made dinner with some of the sauce, bagged up 3 FoodSaver bags full for the freezer, and loaded up a jar for the fridge (which will be used within the week).  This sauce had a wonderful texture and a light, summery taste!

All-in-all a good day of cooking.  The house smelled great. Dinner tasted delicious.  Mr. Flip Flop said it was very good ... alls well that ends well!

Bon Appetit, Y'all!!!


StumbleUpon

Monday, May 18, 2015

Saving Fresh Basil...for later use!


I always have more fresh basil than I can use from my little pots on the deck.  Every year I think "I need to find a way that works to preserve this basil"!  Yet, I never do.  Either bugs or the first cold snap gets them and I start over the next Spring.  Drying has never garnered a happy result and none of the other "saver" systems seem to work for me.

This year, I bought some plastic ice cube trays from the dollar store and tried the "freeze in olive oil" method I'd heard of in the past.

The unfortunate thing was the ice cube trays were hard plastic.  When I banged them to get the olive oil and basil ice cubes out - the trays cracked and broke.  I was able to get the cubes out with a sharp knife along the edge - but lesson learned.  If you want to try this, get some soft plastic ice cube trays that bend so you may twist and pop out the end product...otherwise, you will be throwing away the ice cube trays!

I did these a few weeks ago and didn't take pictures, but it was a really easy process.  I harvested all of the basil that had new growth starting - my plants looked bare, except for the baby leaves, but they have already filled out again (per the photo at the top) and it will be time to harvest again very soon.  I'm always pinching them back so they don't flower and seed as well.

Once I had my "harvest" - which was the amount of a loosely packed freezer size Ziploc bag - I brought them in and rough chopped on the cutting board.  I equally divided the chopped basil between each ice cube compartment and added olive oil to fill just below the edge of the compartment.  I placed the ice cube tray on a small baking sheet and popped it into the freezer and left it over night.


The next day I took them out and began the previously mentioned debacle of getting them out of the ice cube tray.  I did realize that the longer I messed with them, the more the warmth of my hands began to melt the olive oil, which allowed some to slide right out.  They did eventually all come out, but then I had leaky olive oil cubes.  I refroze on the baking sheet for about thirty minutes to take care of the warmed olive oil and then quickly transferred them to the quart-sized Ziploc freezer bag for storage.

I'm so pleased with the outcome.  I'm using a couple of these for the first time as I make a new Marinara Sauce recipe.  I'll post the link as soon as I finish writing the post!  For now - this was a viable way to preserve my Spring and Summer basil harvest.  I envision popping these cubes into various food preparations calling for both olive oil and basil!  Love having an option beyond dried basil in my food supplies! (I also think you can do pesto this way - but I haven't tried it...YET!)

Bon Appetit, Y'all!!!


StumbleUpon

Saturday, April 25, 2015

Vanilla Citrus Roll-out Sugar Cookies

Simple miniature daisies coated with Lemon Drop Glaze
with a small yellow center piped from thickened, colored glaze.
When it is Spring, my head thinks of lemony desserts.  Happens every year.  The tart sweet combination of lemon and sugar is a flavor explosion for me!  I decided to make a recipe for a roll-out cookie dough utilizing some of my favorite flavors.  I think it turned out fairly well and is really just a simple rendition of the most popular cookie dough I make, the Vanilla Bean Sugar Cookie.

These cookies are great with a simple lemon glaze or they can be beautifully decorated with royal icing flavored with either vanilla or fresh strained lemon juice.  Yum.

Here's what I did.

Vanilla Citrus Roll-out Sugar Cookies


Ingredients:

1 cup butter - room temperature
1 cup granulated sugar
1 large egg - room temperature
1 Tbsp Vanilla Bean Paste
1 Tbsp Cream
1 tsp Lor-ann's Lemon Emulsion
Zest of medium lemon (finely zested - with a Microplane - don't get the pith!)
Juice of that same lemon (after zesting) - should be about 2 Tbsp

3 cups All Purpose Flour - unbleached preferred
1/4 tsp. baking powder (may use up to 1 tsp of baking powder if you want a higher rise)

Method:

In bowl of a stand mixer, cream together butter and sugar until well mixed.  
Add egg and mix until incorporated.  
Add vanilla bean paste, cream, lemon emulsion, zest, and juice of lemon.  Mix until smooth.  
Measure flour and add baking powder to flour, stirring to combine throughout.  
Add 1/2 of flour mixture to mixture in bowl and mix on low setting of stand mixer.  
Add the rest of the flour after all incorporated, again on low.  
Stop and scrape all the way to the bottom, pulse again.  
Re-check for crumblies on the bottom of the bowl and scrape up into dough with a spatula.  
Pulse again to fully incorporate all dry ingredients.  Don't over mix.

Love the flecks of lemon zest and vanilla bean that show in
the dough.  Wonderful flavor!

Divide dough in half, pat into a fat pancake shape, and wrap each half in plastic wrap.  
Chill in refrigerator for at least an hour.  Roll between two sheets of parchment for easier rolling of this sticky dough.  If you need to roll on the bench - flour generously to avoid sticking, or add an additional 1/2 cup of flour to the dough when mixing the dry ingredients in.  I always place my baking sheet with cut-outs on it into the freezer for about 15 minutes.  Since this is such a soft dough, I want to ensure the butter firms up and doesn't spread too much when baking.  After the freezer time, it is easy to brush any excess flour from the cookies with a pastry brush before baking.
Dip cookie cutter in flour so it doesn't
stick in this sticky dough.


Bake in a preheated 350 degree oven until the bottom edge of the cookies are just barely starting to turn a light brown.
That can take anywhere between 10 and 18 minutes, depending on the size of the cookie and the particular pan I'm using.    These minis took about 12 minutes.

Remove when done and place pan on a cooling rack.  
Rest for at least 15 minutes.  
Remove from cookie sheet onto a cooling rack until completely cooled.  
  
I made a batch of  Lemon Drop Glaze and dipped the cookies upside down, placed on rack over the lined baking sheet and allowed to drip down the edges.


With the leftover glaze, I added more sifted powdered sugar and 2 drops of AmeriColor Electric Yellow gel color, and stirred until it was thick enough to pipe.  Using a #3 tip, I piped a little yellow circle in the middle of the daisy.  They were completely dry within 4 hours and able to be stacked between sheets of waxed paper in a container for storage.
Use at least a #3 tip so the zest doesn't clog the tip.
I had one of these this morning - it is a 2 or 3 bite cookie (if you are dainty - one bite if you aren't).  Wonderfully fragrant and full of flavor, enjoyed with a hot cup of tea or coffee.  These are not going to hang around very long I'm afraid!!!
Bon Appetit, Y'all!!!

StumbleUpon

Friday, April 3, 2015

Paint-Your-Own Cookies

Ready to package!


This is really just a quick share!  If you want to learn how to make these cute cookies, there is a wonderful tutorial online via Montreal Confections' Patreon page.  It is a subscription - but for as little as $1 per month you can have access to many of her tutorials.  I enjoy learning from Marlyn and I bet you would too.  She was the original creator of the PYO (Paint-Your-Own) cookie - often copied in the cookie world!  She always says she's happy for people to learn and use her designs.  I do think, however, it is important for cookie artists to attribute the source of their design ideas in social media.  That's why you often see my posts including where I learn things.  I'm a little creative...but not THAT creative.  The link to her YouTube channel above shows samples of the types of PYO cookies you can learn to do on her Patreon Channel.  The actual tutorials are on Patreon at this point.

These were my first PYO cookies.  I made them for my grandkids and some friends of my oldest son...everyone seemed happy to get them!  They were also happy to see I had used my Vanilla Bean Sugar Cookie dough.  It's the family favorite.  These cookies were really large and sturdy.  They measured 6 1/2 inches tall and were rolled 3/8" thick.  I only used 1/4 tsp. of  baking powder to prevent spread (but I used a tiny bit so I would have some lift - it's a fine line)!

Simple designs or more intricate.
You can gear it more towards
the age of the child by piping
larger patterns, easier to paint
and stay in the lines...
although staying in the lines
is not at all necessary!

A little tag stapled to the top of the packaging gives
instructions on how to activate the colors.
I loved that this particular project used
food color air-brushed M&Ms for the color dot
instead of more royal icing..
Tasty addition to the PYO line-up!
 Thanks Marlyn, for sharing your creative genius with the world.  I have learned so much from Obi-wan Marlyn!!!

Happy Easter Everyone!!!  May you be blessed with spending the day with your family and/or friends!  Those who don't celebrate Easter - just have a marvelous Sunday!

UPDATE:
I just received a photo of one of the painted cookies.  Yay!  Thanks for sharing the art work :-)

Photo Courtesy of James Harris


StumbleUpon

Tuesday, March 31, 2015

Easter's on the Way!

A very light violet royal icing stenciled onto base-coated
cookies - these three were all using Designer Stencils
products.  The flowers were learned by taking  two
different classes on Craftsy - SweetAmbs Sweet Elegance
and Wilton Piped Flowers.

Cookie show and tell time.  I've been working on these Easter cookies for the last few days.  I needed to have them finished by today and I met the deadline.  This isn't everything but I did end up with three dozen that I'm happy with!  I've been taking a lot of "online classes"... Montreal Confections, McGooU, Craftsy, and a lot of quickie tutorials I see on Facebook and YouTube.  Most of these were planned based on something I've learned online.  So, here we are!

I love the baskets of flowers I made based on my class at McGooU.  The basket and handle were piped white with a PME 1.5 tip and then, when dry, painted with a mixture of copper AmeriMist color, some gold petal dust and even a little pink in the middle one - gave it an interesting depth of color.  I like that there is some bare cookie showing with visible flecks of vanilla bean seeds in my Vanilla Bean Sugar Cookies.  I worked on flowers every time I had extra stiff icing.  Stored in air-tight containers, piped royal icing flowers last for a really long time!  I keep several containers on hand for days like this.  Love the look!  My grandkids will love eating the "candy flowers".

Montreal Confections posted a video for this project this week on her Patreon channel.  Patreon is a wonderful way to support artists you admire.  I enjoy getting tutorials before others and sometimes they are available only to Patrons.  It's a worthy cause in my book.

I had already baked these little guys and was overjoyed to see her detailed visual on decorating them pop up.  I think they turned out cute and I used most of her technique but made a few slight changes.  I didn't cut out and use her template, but I did print it out to look at it while I piped.  I also did not want to drag out my airbrush so I used some dry orange petal dust to lightly highlight the edges of their cheeks and wings.  Love the depth it gave.  I also used dry luster dust on the cheeks...it was a deep pink with a little sparkle.  This cookie cutter is from Wilton and actually has a bow tie for the little chick.  I bake really thick 3/8" cookies and should have rolled the bow-ties thinner.  After I decorated them, they looked funky because the stuck up so high, so I opted not to use them.  I'm happy with how they turned out - very cute little chicks.

Next up, also learned from Montreal Confections, were these cute 3-D bunnies using a cutter from Chicago Metallics.  I had learned my lesson from the chicks and cut these guys at 1/4".  I would cut the hind legs even thinner if doing again. Pretty much followed Marlyn's tutorial except that I piped a dot of dark gray and lay in a pink 4mm sugar pearl for the eyes and then, using a needle tool, I dragged a bit of the dark gray into eyelashes...so these are girl bunnies :-)  Marlyn showed grass down by the bunny feet but I liked the idea of painting on some flowers.  I used a very fine paint brush (I finally found one I love) and just did little dot flowers. They remind me of the beautiful wildflowers currently being seen on Texas roadways and acreage.  Also loved this little project (especially that they stand up so easily).  The paint brush I found at Michael's or Hobby Lobby I'm sure.  It is a LaComeille 18/0 Liner #7350.  I love that it has a thicker handle with a tapered grip which allowed me to hold it in such a way that I had a bit more control.  I tend to get shaky hands :-)

I make chicks every year.  Nothing new here beyond some little wings I piped on.  I found this tiny little carrot cutter in my box of Easter cutters.  I used some leftover icing to pipe the carrot and then used orange food color to paint some stripey looking color - going for a more realistic carrot!


I don't know where I got this bunny cutter with a tail.  I saw lots of people using this cuter this year but using it face-forward.  I was working on trying out some stencils and decided to do the rear-facing bunny on the left and some bunnies stenciled onto an egg on the right.  Stepping away from the "expected" with these two.

These were all stenciled and painted with food color as well.  The bunny ears and eye lashes were painted, the flowers and grass on the left also painted.  The center bunny was stenciled, then dots piped for flower centers and leaves/stems painted two shades of green.  The bunny on the right utilized half of a stencil which I masked off using Press 'n' Seal so the eyes and ears didn't end up with a design on top of them.  These are some of my favorites.

A simple stenciled bunny.  She's pretty in purple.  Very light purple!


By the time I got to these last three cookies I was getting weary.  I used a glass etching stencil for the hummingbird over the flowers.  Trying to hold the stencil still while changing colors with my palette knife was challenging, but it turned out nicely.  The butterfly was stenciled in light blue and then I highlighted with painted accents using that new extra fine paint brush.  The flower spray on the right was the same stencil I used on the bunny above except I didn't paint it.  I was really tired by this point!

Thanks for checking out my cookies - I keep thinking I should start a second blog just for cookies but, darn it, I'm just too lazy!  My blog is kind of like my life - scattered with a variety of interests - I enjoy sharing whatever I find that I like!

Bon Appetit, Y'all!!!


StumbleUpon

Friday, February 27, 2015

Liam's Steak House & Oyster Bar


I remember wanting to go to Liam's for the last two "event" dinners...and Mr. Flip Flop groaned about putting on "real clothes".  We have REALLY gotten into the casual mode over our years at the coast!  This year, I thought "heck, it's the island, wear what you want"!  We sure aren't trying to impress anyone. LOL!  If you have 'em, put on some blinged out flip flops and go on with your bad self.  We saw folks in their work clothes, tropical shirts and shorts, dresses, slacks, etc.  The island is well-known to be a "no tie zone" so no one should let the fact that they didn't bring any upscale clothes with them on vacation stop them from eating at one of the finest restaurants on the island.

The service was outstanding, the food was exceptionally delicious, and while a bit pricey, it was worth every dollar spent.  A great addition to our list of places we will go for celebratory dinners.


We decided to skip alcohol since it was a week-night and his shift Friday was likely to be long and arduous.  So, we splurged instead on an appetizer of Calamari - a beloved favorite.  This dish was outstanding.  Light textured crust and a generous plate of perfectly cooked nuggets of squid tentacles and rounds made us both smile!.  Topping this dish with delicious slices of large green olives lightly dusted with Parmesan cheese was a surprising, yet scrumptious, addition to the plate.  A crock of warm and spicy, chunky tomato dipping sauce was the perfect complement for the Calamari.  Two huge thumbs up.


They also served a hot loaf of French bread with a scoop of soft butter.  Delish!  Best of all, the service was prompt and attentive, but never intrusive,  The table setting was minimalist and lovely (you know I'm always checking out the dishes) with a crisp white tablecloth giving it the steakhouse vibe.  The decor was definitely coastal, centered by a gorgeously appointed wooden bar with several people seated there sipping drinks.  Quiet and "restrained" - which is a nice switch from some of the more hectic environments you sometimes find on a tourist concentric island.

Now, on to the rest of our dining experience.  Mr. Flip Flop ordered the Prime Rib.  It was served with asparagus and a loaded baked potato as well as a bowl of au jus.  There was a small condiment bowl of creamy sauce, but I didn't even notice it until I was looking at the photo.

The angle of the photo above (because I'm leaning across the table while my spouse rolls his eyes at my wasting his time with photographs of his plate of food) makes the really quite large piece of meat look smaller than it really was.


This angle gives a better idea of how thick and meaty this delicious prime rib actually was.  He said everything was very good and he had to bring home part of the slab of meat as it was so big and thick.  I'm sure it was the breakfast of champions before work this morning!  The man loves eating leftovers for breakfast.


Now, I had heard the Cobb Salad was outstanding, so my decision was basically made before I arrived. The only thing I had to decide upon was my choice of beef filet, chicken, or shrimp as one of my toppings.  It was a deliciously classic Cobb so my brain wanted to go with the chicken.  However, those who raved about this salad had specifically raved about the Filet Cobb - so I went with that.  I am so happy I did.  It was too huge to finish but I did put a healthy dent in it.  I also made sure to eat every bite of the tender, melt-in-your-mouth filet, the perfectly ripe avocado, the boiled eggs, and as much of the bacon and bleu cheese as I could.  I was about to pop.  I now know why my lady friends raved!


I will have to say I am glad it was a little dark in Liam's... I asked for my filet to be medium and that's a little more edging towards medium rare in my opinion.  However, it was probably the better service for the meat - it literally melted in my mouth.  Really glad I couldn't see it all that well at the time though!!!


Bottom line...go there.  It was delightful and everything I could ask for (except a view) upon the occasion of my 22nd wedding anniversary!  I give it my highest rating and will be back again soon!  They are a small venue, so reservations are recommended during the busy times on the island.  We fortunately didn't need them  - but it wouldn't hurt if you want to avoid a potential wait!  I didn't see a single soul hurrying through their dinner!  Be safe, not sorry!

SPI FLIP FLOP FOODIE RATING:

5 – OMG – that was an outstanding meal!  I can’t wait to go back 


Liam's Steakhouse and Oyster Bar on Urbanspoon


StumbleUpon