The South Padre Island Flip Flop Foodie Brownsville restaurants

Search The South Padre Island Flip Flop Foodie Blog!

Friday, September 27, 2013

King Bob's Birthday 2013


I was so happy to be invited to the 2nd Annual King Bob's Birthday party on the beach!  Bob's wife, Sally, puts on a great party...which included beach-front umbrellas and lounge chairs in front of Wanna-Wanna, ice chests filled with icy libations, yummy snack trays. Sand Castle Queen of the Island, Sandy Feet, her very entertaining "sand slaves", and a bunch of interesting people to talk to!  I really enjoy meeting new friends.  I also love talking to people who have moved to the area and find out where they come from.  There's always a story...I just love hearing the tales!
I enjoyed using some of my stencils on the minis!  These
came from Designer Stencils

My offering was a set of cookies made for King Bob (Bob's 71st birthday and his 1st anniversary of retirement makes him King of the Day!).  The cookie set included a large layered cake-shaped cookie, some crowns for the king, and a few minis to fill in the set.  He was kind enough to share the cookies and it seems the Acorn Squash Sugar Cookies were a success.  Even my trial with a new royal icing recipe seemed to work out okay (I didn't have time to taste a dry cookie before leaving for the beach so I wasn't sure how taste and texture would be after drying...risky on my part but...whew...it apparently worked).  Nothing makes me more happy than people enjoying my treats!
These were drying to the very last minute!
Photo by Sally Scaman
I was having a big hair humidity day...the
curls were blowing wildly as Sally snapped
a photo of me and Bob and the box of cookies

While a lot of the United States is enjoying Fall weather, folks on South Padre Island are enjoying one of our favorite times of year.  The beautiful days of September and October are PERFECT beach weather.  So, it being a perfect day on the beach, I'll just end the post with a slew of photos featuring Sandy Feet, Dennis,and Ken working hard (did you know, it's important to place your beer higher than the sandcastle...else you fill your can with sand???) Enjoy!

This stuff is hard work!
Things are shaping up as the creative genius kicks in!

Hot work when you are working on the side where there is no wind!

Sandy Feet carving the King's Sculpture
Dennis (L) and Ken (R) carving supporting castles on each side
of the King Bob sculpture 
(yep, they are a lot more than just sand slaves - 
they are talented sculptors themselves).  
This is the status when I had to leave.


Following Photos from Sally Scaman
The King and his Pampered Princess
The Sand Sculptors (behind)
Bob and Sally...beach royalty.  Great party and Fabulous Sand Sculpture!

Bon Appetit, Y'all...and May Your Day be Filled with Sunshine!!!StumbleUpon

Thursday, September 26, 2013

Squash Sugar Cookies, Take Two!


Undecorated allows you to see how nicely they
are rolled and cut as well as the bits of squash and
spices in this wonderful Fall-ish cookie!
In early August, Ian asked for a spice cheesecake for his birthday.  I didn't recall having a recipe for a spice cheesecake but we looked back at the blog because he remembered I had made one before.  We found a 2010 recipe for Squash Chocolate Cheesecake.  He said "yes, that's the one"!  I was so surprised!  Squash? I asked of the "vegetable-hater"... Yes, he confirmed...that's the one.  Fortunately, I've got a couple of cups of roasted and peeled acorn squash in the freezer - it's a wonderful staple to have on hand for sweets (I use it often in lieu of pumpkin) and as a wonderful addition to soups.  The recipe only called for a cup of the squash, so I decided to re-make the Squash Sugar Cookie recipe, I had also done in 2010, with the remaining squash.

I noticed, when reviewing that recipe, that it didn't include any egg.  Huh?  Was that a mistake?  I tried to find the source recipe and it is no longer posted on the B&B Recipe web site.  Hmmmm.  I set out some butter and followed the recipe and I have to say "this MUST be a mistake"...the dough was way too crumbly.

After 2 1/2 more years of baking experience since I developed that recipe, I knew of a couple of tweaks that would make a much nicer cookie...still keeping the sweet flavor of the squash silently in the background.  So, here's the recipe I ended up with.  The texture is now perfect for rolling and I can only apologize if anyone tried to make the one I posted in 2010!!!  I try to be very careful...but sometimes mistakes happen...and I think that may have been one of those times.

Printable Recipe

Squash Sugar Cookies, Take Two!

Ingredients:

1 cup butter, softened
1 cup granulated white sugar
1/2 cup drained, dry, roasted acorn squash (I squeezed the squash in a cotton kitchen towel, twisting until quite dry - then I pulsed it in the food processor...I remember the previous cookies having some long strands of squash - the food processor didn't truly puree the squash, but it did cut the long strands)
1 large egg
1/2 tablespoon vanilla bean paste
1 teaspoon ground cinnamon
1/4 to 1/2 teaspoon freshly ground nutmeg
1/2 teaspoon ground allspice
3 cups unbleached all-purpose flour
1 teaspoon baking powder
1/2 teaspoon fine sea salt

Method:

In the bowl of a stand mixer, cream butter and sugar until combined.  Add squash and mix until combined.  Add egg and vanilla bean paste and mix until well incorporated.

In a 4-cup measuring cup, mix all of the dry ingredients with a whisk and add to the wet mixture in the mixer bowl.  Mix just until blended.

Divide dough in two parts.  Form a disk and wrap each half in plastic wrap and refrigerate for at least 1 hour - preferably 2 or 3 hours for a nice rolled cookie.

Preheat oven to 375 degrees Fahrenheit.
Remove dough 5 minutes prior to being ready to roll the dough.  Roll either on a lightly floured surface or between two sheets of parchment paper.
Use your favorite cookie cutter to cut various shapes.  Place on a parchment lined cookie sheet or on a baking mat lined cookie sheet.  Bake for 8-10 minutes, depending on thickness (some thick cookies that were cut with a large cutter took 13-14 minutes to bake...light brown along the bottom edge is the indicator).  Allow to cool on rack before decorating with a glaze or buttercream frosting....or royal icing if you want to decorate nicely!


These are a great Fall flavored spice cookie with an unusual cookie ingredient.  However, they are great any time of the year.  They are an awesome cookie!  The photos I took were of the naked cookies...the next post will include some of these that I baked recently and decorated for an on-the-beach birthday party.  Keep an eye out for that!

Bon Appetit, Y'all!!!


StumbleUpon

Wednesday, September 11, 2013

Vanilla Bean Cheese Cake

The saga of Mr. Flip Flop requesting cheesecake for his birthday continues.  This year, he requested a simple vanilla cheesecake.  Drat...I so like experimenting.  HOWEVER, since I am on a vanilla bean paste kick (still) I decided to modify our family's favorite basic recipe and eliminate the chocolate and supplement the vanilla extract with some vanilla bean paste.  So, with these few tweaks...here's the "new" recipe!

Happy Birthday dearest husband...you bring tremendous joy and love into my life... I look forward to growing old together (which, obviously, is drawing closer and closer LOL!!!)  Hope you enjoy your cake!


VANILLA BEAN CHEESECAKE
Adapted from Marble Cheesecake Recipe 
Austin American-Statesman, 1974

1 1/2 cups graham cracker crumbs
1/4 cup granulated sugar
6 tablespoons salted butter, melted

3 8-ounce packages cream cheese, softened
1 1/4 cup granulated sugar
1 teaspoon pure vanilla extract
2 teaspoons quality vanilla bean paste
4 eggs
1 cup heavy cream

Preheat oven to 325 degrees Fahrenheit.

Combine graham cracker crumbs and 1/4 cup sugar with hand whisk in a mixing bowl.  Break up any lumps.  Add melted butter and mix until all crumbs moistened.  Press in bottom and 1 3/4 inches up the side of a 9-inch spring form pan (I usually wrap the spring form pan in foil on the outside before making the crust...just to ensure there is no butter leakage).  I prefer to press the crust using a flat-bottomed metal 1-cup measure.  Works beautifully!  After crust prepared and in pan, set aside and begin filling.

In bowl of a stand mixer with paddle attachment, beat the cream cheese, 1 1/4 cup sugar, vanilla extract, and vanilla bean paste on medium speed until smooth and fluffy.  Add eggs, one at a time, with mixer on low just until blended.  Add cream and continue beating on low speed just until blended.  You don't want to put a lot of air in it at this point.

Pour mixture into prepared crust and allow to sit a minute or two.  I run a sharp knife through to pop any bubbles, taking care not to touch the bottom of the crust.

Place on rack in middle of oven and bake for 60 to 75 minutes or until the center appears nearly set when gently shaken.  Remove from oven and let sit on a cooling rack for 15 minutes.  After 15 minutes, very gently run a sharp knife around the edges and then release the spring to loosen the sides of the pan. 
Yay...sides released and nothing stuck!

Cool 30 more minutes on rack, then oh so carefully, remove the sides of the pan to avoid getting crumbs on the cheesecake. 

 
I leave mine on the base...I have NEVER successfully removed a cheesecake from the bottom of the spring pan....I don't care how many YouTube videos I watch!  Chill cake several hours.  Makes 16 servings (well, not in this house...more like 10 LOL!!!)


There is a note on the original recipe that the top of this cheesecake typically cracks during cooling.  I kept my fingers crossed that this wouldn't happen...and it didn't!  I have a 75% crack rate (I don't really measure...but that sounds about right) for cheesecakes.  I noticed this one does have some bubbles that surfaced in the middle though...and my crust went a little higher than usual (I don't measure that either).  Like I always say...it is what it is!


Bon Appetit, Y'all!!!StumbleUpon

Wednesday, September 4, 2013

Crescent Roll Explosion Apple Tartlets


What do you do when you've had a sort-of crappy day, get home with loads of groceries and find a can of crescent rolls exploded in the grocery bag?  (The end of the can blew off...really...just exploded!)

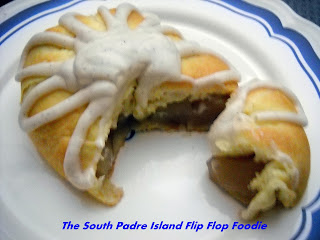
If you are me, you gently rescue the dough, make 4 squares out of the 8 triangles (pinching/pressing the seams together), spoon in some canned apple pie filling (I used Lucky Leaf), pull the dough over the filling to make a "purse"...pinch all seams thoroughly... bake for 20 minutes at 350 degrees until golden brown.  Allow to cool.  (These crescent rolls were H.E.B. store brand reduced fat...worked perfectly)
Two were round, two were elongated...the dough was not consistent...
but, considering it had exploded, no surprises there!

While cooling, mix up an icing/glaze consisting of about 2-3 Tbsp heavy cream, 1/2 tablespoon vanilla bean paste, a dash of cinnamon, and 1/2 to 3/4 cup confectioner's sugar until thick and smooth.  Load into a zipper sandwich bag and snip the end...drizzle all over the dumpling-like dessert.  It was so freaking delicious!  E-Z P-Z!!!

I was so irritated in the beginning and all smiles at the end of it all!  My husband nearly licked his plate and smacked his lips!  That's a good sign.

Inside the "explosion tartlets"...yummy!


Bon Appetit, Y'all!!!StumbleUpon