The South Padre Island Flip Flop Foodie Brownsville restaurants

Search The South Padre Island Flip Flop Foodie Blog!

Wednesday, February 27, 2013

Shrimp Boil

I've had a lot of shrimp boils in my day...but this may have been one of the best ones and easy to throw together!

Twelve people, a six-month old who had had enough fun for the day, an ocean-front condo with seating for 5...hmmmm.  No biggie - we could make it work!  We dragged in the balcony table and chairs, covered both tables with wax-backed butcher paper (double layer) and threw all of the food on the table.  Literally!

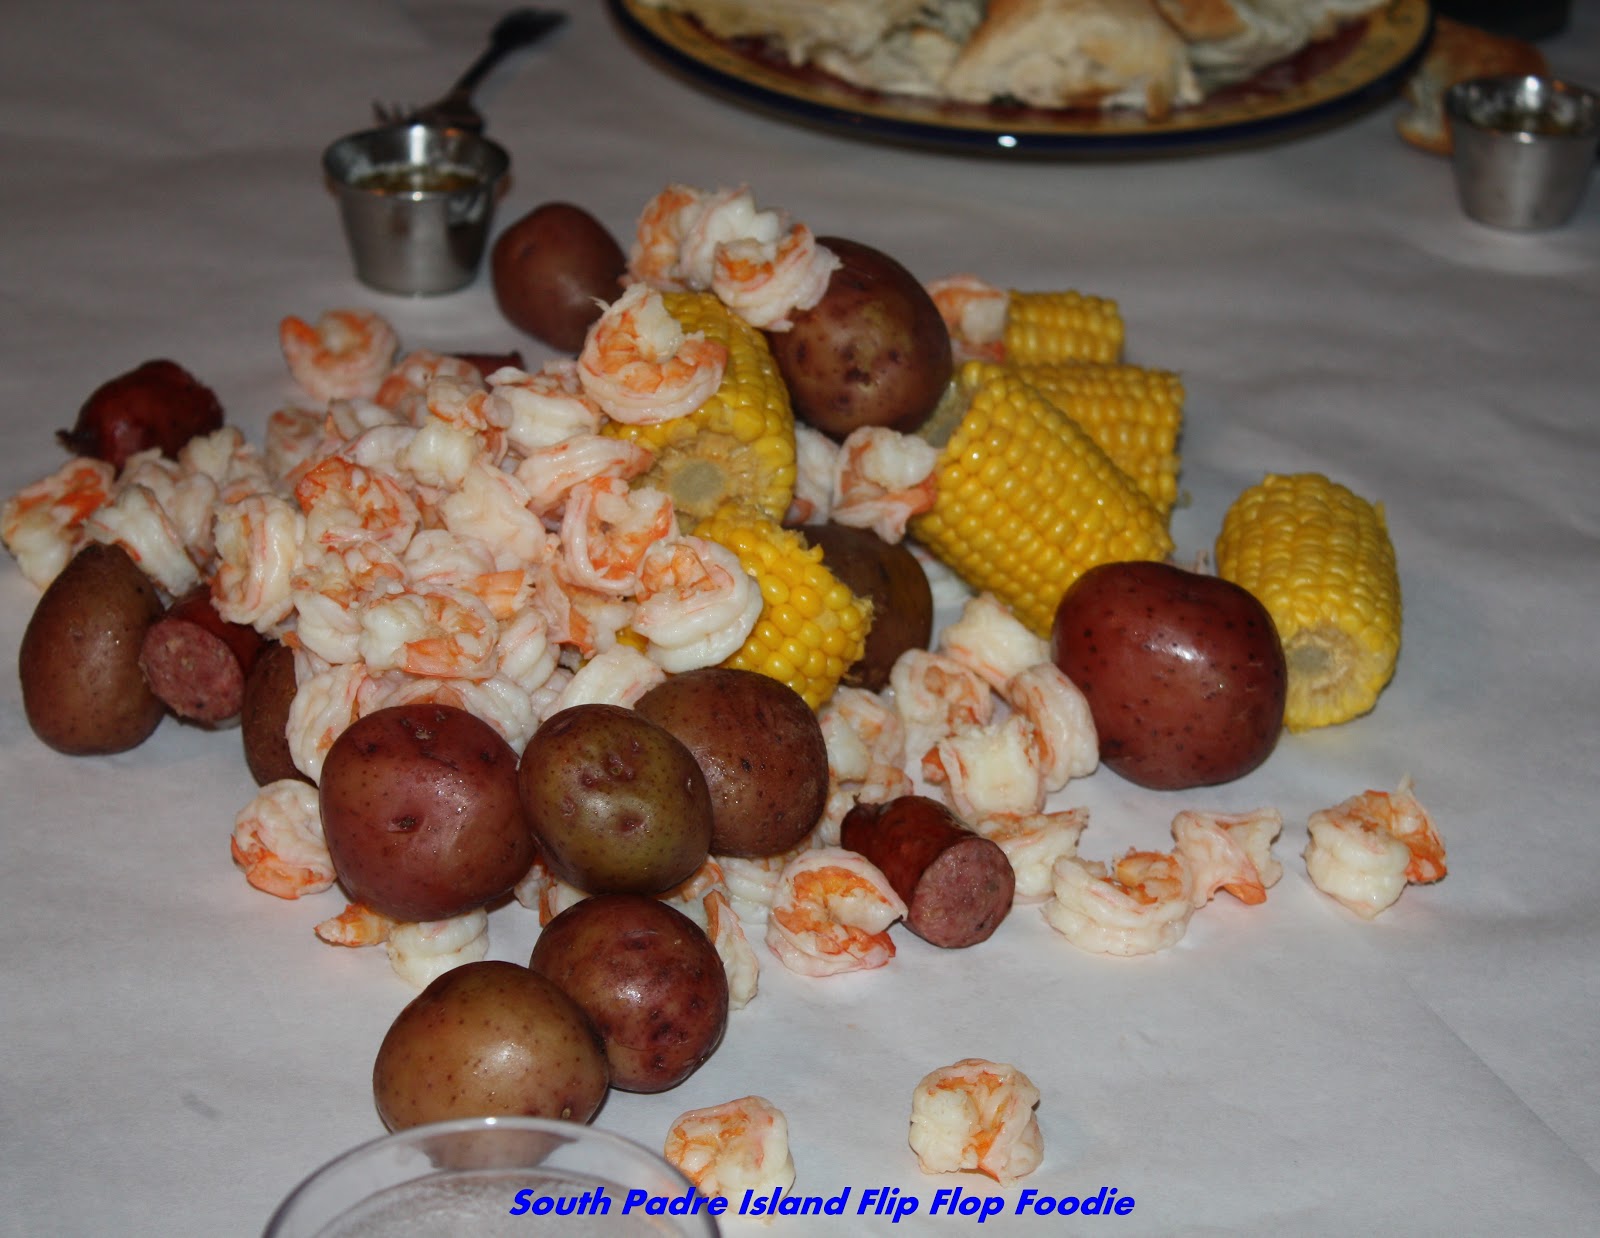
We used a big "turkey fryer" pot filled 2/3 with water and two packages of Zatarain's Crab and Shrimp Boil.  Started it to boil and first put in a bag of clean new potatoes and let it go for 15 minutes or so...next went the frozen corn (24 pieces) and then, 5 minutes later, three pounds of sausage chunks.  I prepped the 4 pounds of fresh shrimp purchased near the docks at Port Aransas by peeling, butterflying, and deveining (because my sister doesn't like to peel them and see the vein...so, like a good sister, I cleaned them for her).  Once the shrimp were added, they were finished cooking in 3 minutes or less and everything smelled so incredibly delicious!

We melted 3 sticks of butter and placed in little ramekins around the table; my sister-in-law, Lana, mixed up 2 bowls of cocktail sauce and toasted two loaves of French bread.  We put out a container of my homemade pasta salad and dinner was ready!

We carefully transported the extremely heavy boiling pot to the floor on top of towels, lifted the strainer basket up over the sink and let it drain.  With a towel underneath, my oldest son transported it to the table and we tossed it down the middle of the two tables.  One table got more potatoes and corn and the other table got the majority of shrimp (which, of course, we re-distributed!)...and everyone dug in. 

People took turns holding the baby and eating and laughing...what a great time was had....the laughter, the jokes, the sounds of happy eating!  Friends, family, and lots of joy all around the table. Anyone having room for dessert could nibble one of the "Beach Cookies" I made for the trip.

We finished the evening with the poker people (most of the people) playing a fun, albeit quite competitive, game of Texas Hold'em...which was, of course, a win for my sister-in-law Lana.  She's just a little competitive!

A fun time was had by all - good times, good times.

Sister-in-law Lana, big sister Cynthia, and their beautiful
granddaughter Sarah Jewel.


Bon Appetit, Y'all!StumbleUpon

Friday, February 22, 2013

Cinnamon Streusel Pumpkin Loaves

A travel breakfast...hmmmm.  I dug through my folder of recipes I had intended to try over the holidays before chaos erupted in my life.  I wanted something easy that would travel well...something to snack on or to have with coffee as we sat listening to waves rushing in and gulls calling.

As soon as my hand touched a print out for Cinnamon Streusel Pumpkin Bread from Michelle Day at Michelle's Tasty Creations blog, I just "knew" this would be perfect.  We have pleasant temperatures this week-end, but there is a call for being overcast and a light rain.  What is better than the warm taste of pumpkin and cinnamon and all of those warm spices on a lightly drizzly day?  Not much.

I made a few minor tweaks - but nothing major.  My addition is a vanilla bean cream cheese drizzle for a bit of extra topping (like streusel isn't enough) .  Everything is baking while I type... I'm departing in a few short hours.  My house is smelling really awesome about now!  I should probably sample it before taking it with me, right?

Here's the recipe:

CINNAMON STREUSEL PUMPKIN LOAVES
Lightly modified from the Michelle Day recipe


Ingredients:

1 1/2 cup unbleached all-purpose flour
3/4 cup granulated white sugar
1 1/2 tsp. baking powder
1/2 tsp. baking soda
1/4 tsp. salt
1 tsp. cinnamon
1/2 tsp. fresh grated nutmeg
1/4 tsp. ground ginger
1/4 tsp. ground cloves
1/4 cup vegetable oil
1 cup pumpkin puree
2 large eggs
1 1/2 tsp. pure vanilla extract

Streusel Topping:

1/2 cup unbleached AP flour
1/2 cup turbinado sugar
1 tsp. cinnamon
1/4 cup butter, cold and cut into 1/2 inch pieces

Vanilla Bean Cream Cheese Drizzle:

4 ounces cream cheese, room temperature
4 ounces butter, room temperature
1 tsp. vanilla bean paste
1-2 tsp. milk - more if needed

Method:

Preheat oven to 350 degrees.
Spray three mini loaf pans with cooking spray and set aside.

In a large 4 cup measuring cup, add 1 1/2 cups flour, baking powder, baking soda, salt, cinnamon, nutmeg, ginger, and cloves.  Whisk together until well blended.  Set aside.

In bowl of a stand mixer, beat the eggs, 3/4 cup sugar, oil, pumpkin, and vanilla extract until smooth.  Pour the flour mixture into the bowl and beat until smooth (on low) then evenly distribute the batter between the three pans.


For the Streusel Topping:
Mix the flour, sugar, and cinnamon with a fork in a medium bowl.  Add the butter and using a fork, pastry blender, or your fingers, crumble the butter into the sugar mixture until you have a crumble mixture.


Divide evenly over the three pans of pumpkin bread dough.


Bake for 40-45 minutes (or until a toothpick inserted into the center comes out clean).  Allow to cool in pans for a few minutes then remove to a cooling rack.

Vanilla Bean Cream Cheese Drizzle

In small bowl of food processor, pulse 1/4 cup softened butter, 4 ounces of softened cream cheese, and 1 tsp. vanilla bean paste until smooth. 

Add enough powdered sugar to make the consistency of a thick icing. Add milk, 1/2 tsp. at a time, pulsing after each addition until it's just the consistency you desire for drizzling.  I like mine a little thick.


When pumpkin bread is completely cooled, drizzle VBCC Drizzle over each loaf.  If you are eating it warm, drizzle over each slice after plating.

I sampled a slice with a glass of milk because I'd finished all the coffee for the morning....boy howdy, that is so yummy!  I love the crunch of the streusel hidden under the creamy tartness of the drizzle...all on top of the wonderfully aromatic pumpkin loaf.  Two thumbs up...and it was an easy preparation, so even better!

Bon Appetit, Y'all!!!StumbleUpon

Thursday, February 21, 2013

Beach Cookies

The Beach Cookie created following
tutorial from Marlyn of Montreal Confections
I know it is February and many folks North of the equator are having a nippy week...but where I live, it's pretty nice weather!  I live on the Gulf Coast ...right on the water... and this week-end, I'm driving up the coast a few hours to spend time...at the coast.  Yep, weirdly enough, it's true.  My flip flops are happy to be in the sand, wherever the sand may be.

So, cookies were requested by the traveling companions ...apple butter cookies specifically.  Ask and ye shall receive!  I made 30 cookies and got them all decorated in one day via carefully scheduled fan drying of layers and starting early in the day.  I used a different method for making royal icing this time...from the wonderful Jaci at Ali's Sweet Tooth.  We both live in a land of great humidity.  Her method worked beautifully.  Not a bit of separation all day long...and a good thick base to work from with my handy dandy spray bottle. Yay!

My favorite cookies were a "beach" with waves I meticulously created using the YouTube tutorial from Marlyn at Montreal Confections.  I am slightly addicted to her tutorials...she is such a good teacher.  I saw it earlier last year and knew I would eventually get around to trying it out.  Today was the day!  Mine doesn't look as sharp as hers... but I'm pleased with the result for a first effort.  I didn't make fondant sea shells, I used some white and milk chocolate instead in a Wilton silicon mold I bought from Amazon.  I'm not fond of fondant...but I surely do love chocolate.  They came out sort of cute, so I'm glad I took that turn.
I didn't have the cool sanding sugar Marlyn used.
I used turbinado sugar instead.

I also used, for the first time, my air brush.  I carefully covered my table and used a 3-part science poster board to protect over spray as recommended by the talented Melissa at The Baked Equation .  I was so joyful to spray the shades of blue and then pearl the waves.  I am laughing myself silly now, though.  Guess what I didn't protect?  The inside of my nose!  I blew blue icky stuff this evening (OK - blue boogers - I'll just say it).  Good grief!  I'm thinking a mask may be in order next time.  Now that I see how cool the airbrush is, I know I'm going to try to find ways to add more depth to future cookies.

Since I didn't take photos during the process (and you can see Marlyn's online tutorial here) I'll just post these photos of the finished products.  Dolphins, sand dollars, star fish, and some scallop shells add to the beach theme.  The teen informed me "uh, those shells look a little different", in reference to the colors of the scallops.  Heck, I needed to use up some of the blue and peach icing from other cookies...so we have "different" scallop shells.  Leave it to the teen to point out the obvious!
Happy dolphins, funky scallops...it's all good when it gets in the belly!

The sand dollars are much better than my last attempt!  Still
a few issues to work out.  Still, better!


Slowly but surely, I'm trying to get back to enthusiasm for baking.  I have some more stencils I want to use as well as quite a few new cookie cutters.  I need to start sketching out some ideas.  I'll keep you posted!

Bon Appetit, Y'all!!!
I airbrushed pearl on the center starfish and used sugar pearls to accent.
The rest of the starfish were just piped dots and no pearl.
I think I like the pearl best...and I like the dots better than the sugar pearls.
Next time :-)

SHARED WITH:
StumbleUpon

Wednesday, February 6, 2013

"Love" Cookies

The beginning of the 2013 Valentine Cookie Season
I don't know that I'm saying "I'm back"... but I have scraped myself up and "put on my big girl panties" and BAKED.  Finally!  Rough family stuff (too much to share here) resulted in a nearly two-month hiatus from doing most anything creative.  My brain just wasn't on that page.  Hopefully, I can keep myself motivated now that I got started!

While cleaning out my freezer I found a double batch of Apple Butter Cookie Dough all nicely wrapped and ready.  I had completely forgotten that I'd made that before everything crashed around me.  Score!  While that was thawing, I felt motivated to make a batch of LilaLoa's "The Vanilla Variation"" of her Sugar Cookie Dough and between the two, that got me baking!  I ended up with 16 large hearts, 40 medium size "shapes" and 60 minis.  I still have some vanilla sugar cookie dough in the fridge.

My first efforts were just some circles, squares, and rectangles in hopes of getting my piping skills going.  I'm one of those "don't use it you lose it" people.  I felt vaguely cursed because NONE of my icing turned out the way I wanted.  Again, when you do it regularly, you do it right.  This time, well...not so much.  My piping icing was too thin to hold some of the shapes, my flood too thick to lay down straight, I got craters, my little heart transfers didn't "heal" properly, and I learned I can't make my nail flower go in a complete circle without having to reposition my fingers.  (oh, so clumsy) Add to that, my icing didn't hold it's shape for the ribbon roses either.  It was supposed to be the thick stuff! Man, I was screwed.  I kept telling myself the Dory-the-fish line "Just keep swimming.  Just keep swimming".

I decided I would indeed just keep going and finish the cookies I had... I was trying out new tools I got for Christmas and as part of my retail therapy shoppingin January.  I got a heat gun from my son and I bought myself some stencils and new cookie cutters and better tasting Red Tulip AmeriColor gel from Karen's Cookies (man, I love opening boxes from Karen and Mike!).  I read a post from Sweet Sugarbelle about why this red food color isn't as icky as some of the other reds we've all used.  I ordered a big bottle!  Between Valentine and Christmas and Patriotic cookies - red is a popular color!  I also broke out my new airbrush and practiced with water...that will be the next thing I attempt "for real"!

Anyway, I got to it and this is just a post with a few photos (with the good, the bad, and the not-so-ugly).  Why I would share some of these?  I don't know.  I think I just have to start somewhere.  This will help me move along so I prove to myself I can do better.  I won't point out all the booboos, but the cookiers will be able to see everything I'm talking about.  No need for anyone to point out the obvious (like when I was wiping my tip and accidentally sucked up a drop of water from my too damp cloth and then aimed right down at my cookie...oh mercy).
I am dot crazy apparently.  I just felt like
everything was looking better with dots!

I love having the virtual friendships that have allowed me to continue to talk about cookies and tips of the trades on Facebook.  I think I now officially converse with cookiers more than my "regular" friends (oh wait, none of my friends are regular...they are all unique).  I'm not sure that is a good thing...but for now, it's what I need.  Cookie Convo!  I am also completely dedicated to finding my way to Cookie Con 2014.  Fingers are crossed.
I'm no van Gogh...but this is MY blue period!

So, here they are.  They are packaged up and ready to give to people who don't care that I'm not perfect and know what I've been going through.  Now that I think about it, I'm really surrounded by lots of good souls.  I feel happier than I have in a good bit.  Hope it's a trend!

Bon Appetit, Y'all!!!

SHARED WITH:
">
StumbleUpon