The South Padre Island Flip Flop Foodie Brownsville restaurants

Search The South Padre Island Flip Flop Foodie Blog!

Sunday, October 30, 2011

Apple Strudel with Phyllo

I had phyllo left in the fridge that needed to get used up - and I had some apples.  I'd made enough apple sauce for a while...but I thought a turnover or "packet" of some kind would be nice.  This is what I ended up with!

Apple Strudel with Phyllo

Ingredients:

1 large Granny Smith Apple
1/2 cup brown sugar (NOT packed - loose measure)
1 teaspoon ground cinnamon
1/4 teaspoon freshly ground nutmeg
1/2 tablespoon AP flour
1 teaspoon pure vanilla extract
pinch of kosher salt

6 pieces of Phyllo Dough - thawed in refrigerator
1/4 cup melted butter

Cinnamon Sugar for sprinkling

Method:

Preheat oven to 350 degrees Fahrenheit.
Peel and core the apple, quarter, and slice very thinly.
In a medium bowl, stir together brown sugar, cinnamon, nutmeg, salt, flour, and vanilla extract.
Gently toss apple slices in sugar mixture and set aside while preparing phyllo.

Lay one slice of the paper-thin dough on work surface and brush sides with melted butter then brush butter over the inside portion of the dough.  Lay another piece on top of the buttered piece, and repeat process for a total of 6 pieces.  Ensure you keep the waiting pieces covered with a lightly damp towel or in plastic wrap.  It dries out quickly.

With the rectangle laying with the long edge facing you, lay the apple slices out in two layers about 1 1/2 inches from the bottom and end edges. 

Once apples are on dough, carefully pull the short ends up and over the apples. 

Then take the long edge and pull it carefully up over the edge of the apples.  Pull the far edge up and over (all sides covered now) and flip the packet over and over again until completely encapsulated. 

Use the bit of butter left to brush the entire outside of the packet and carefully place it on a baking sheet covered with parchment or a Sil-pat.
Sprinkle top with cinnamon sugar.


Bake at 350 degrees for about 20 minutes.

Allow to cool before slicing and serving.

I served it with a little bit of vanilla ice cream...it was delicious!  Crunchy on the outside, tender on the inside.  Really quite simple!


Bon Appetit, Y'all!!!

SHARED WITH:


KB and WHITESNAKE's Simply Delish Saturday


Creations by Kara


StumbleUpon

Tuesday, October 25, 2011

Halloween Candy Cookies

I often make double batches of cookie dough, then portion leftovers, vacuum seal, and freeze.  It's handy to have a dozen or so bits of cookie dough ready to bake "on command"!

This summer I made sugar cookies for my granddaughters when they visited me at the beach.  I had one dozen scoops of dough still in the freezer and decided I would add some sugar cookies to the soon-to-be-sent package of treats from Grandma.

When the oldest granddaughter was tall enough to stand on a stool at my kitchen counter, I would buy pre-portioned ready-made sugar cookie dough and let her roll them in various sprinkles that I spread out on paper plates or in ramekins.  She still talks about it and asks to do that when she visits.  We've done the big mess of frosting and decorating sugar cookies, but I have found balls of dough, rolled in sprinkles, and baked with the sprinkles already on them, works wonderfully for small hands.  So that the cookies would evoke memories for the girlies, that is how I prepared them today.

I started by thawing the balls of dough overnight in the refrigerator. 
I set up a couple of ramekins with different sprinkles.


I rolled the cookie dough in sprinkles and gently pressed them into the dough, placing on a Sil-pat covered baking sheet.  I baked them off for 10 minutes at 350 degrees

As soon as they came out of the oven, I pressed in candy corn and Fall colored M&Ms to make Halloween Candy Cookies. The candy in warm cookies gives a nice full 3-D effect!

I could hear the M&M shells cracking as they settled into the hot cookies.  They are very bright and Halloweenish looking!


My husband stood looking at them longingly so I told him it was, of course, best that someone sampled them "to make sure they weren't poison", so he could help himself to a cookie.  "Thanks Hon", he said, sarcastically, after thinking a moment and cutting his eyes at me.  Poor man, I took pity on him and gave him the last 4 chocolate chip pecan cookies I had in the freezer.  He was happy.

The recipe for World's Best Sugar Cookies are at this link.  It's the only recipe I use.  The dough doesn't rise much and is awesome for rolling and cutting.  My husband and kids are huge sugar cookie fans.  (I like them...but I LOVE chocolate chip cookies or lemon cookies best of all.)  This was fun because I got to use some of the candy corn that I have sitting around...need to get that stuff out of the house pretty darn soon!

I wrapped up Orange Rice Krispie Treats, the decorated Sugar Cookies, and a bag of orange pumpkin marshmallows for my Lola, who loves marshmallows.  Grandpa Cranky will deliver them to my son tomorrow so they are available for after school snacking.  I love my sugary sweet grandbabies!

Bon Appetit, Y'all!

SHARED WITH:


Photobucket


Nap Time Creations Tasty Tuesday

Creations by Kara
 
StumbleUpon

Monday, October 24, 2011

Halloween Rice Krispie Treats

I bought this big ol' bag of ginormous orange marshmallow pumpkins as soon as they showed up in the stores...I planned to dip some in chocolate and send them to my grandbabies for Halloween...but it's been really too hot for shipping chocolate anything.  Soooo, I decided I would use them to make orange rice krispie treats!  It was fast and easy...so I'm hoping they don't all get eaten before I get them sent off to the grandkids!  If they do (which is a real possibility), then I have plenty to make another batch!


HALLOWEEN RICE KRISPIE TREATS

Ingredients:
3 tablespoons stick margarine (this is a time I do use margarine over butter - and don't use the tub margarine - it has water in it)
10 ounces (weighed) orange pumpkin marshmallows
6 cups crisped rice cereal
Halloween Sprinkles

Method:
Prepare a 9x13 pan with vegetable oil spray or margarine - coat bottom and sides.
Melt the margarine in a large pan (I used my non-stick Dutch Oven) over medium low heat.

Add marshmallows and stir with spatula until completely smooth and melted.

Add cereal and stir until completely coated.

Dump coated cereal into prepared pan.
Press coated cereal into the pan until flat and even (be careful not to over-crush the cereal).
(This is a sticky process and, for years, I have used the method of wadding up a piece of waxed paper, rubbing it with margarine and using that to press the cereal into the pan.  It works better than anything else I've tried.)

Decorate with Halloween Sprinkles while still "sticky" so they will adhere - if you use large pieces - press them into the treats.

Cut into squares and serve!

We love Rice Krispie treats at our house!

Bon Appetit, Y'all!!!


SHARED WITH:

Photobucket


Creations by Kara

StumbleUpon

Wednesday, October 19, 2011

Meatball Subs and Caprese Salad


You might recall the night I made meatballs in the attempt to clean out my fridge of "things that needed to get used up".  I saved about 10 cooked meatballs, put them in a vacuum sealed bag, and popped them in the freezer.  When the teen and I were planning this week's menus he saw them and asked what I was going to do with them.  I suggested that we have Meatball Subs one day this week.  He had never had one - so I explained the ease of making them once the meatballs were already "fixed".  He gave it a thumbs up.  He also asked if he could try "one of those salads with tomato, basil, and cheese".  I showed him a photo of a Caprese Salad and asked if that was what he was talking about...yes, he said.  I stood there in surprise because, like me, he has always refused to eat fresh tomatoes!  However, when a kid wants to try something new, I try not to ever say no!


Part of his "I'm a mean mom and require learning about living independently" lessons each week is to help prepare a menu, see what we have, and what we need, make a shopping list, and go to the grocery store and shop.  So, this week he selected some whole wheat sub rolls, some fresh mozzarella, a vine ripe tomato, and jarred pasta sauce.  We have basil growing in pots on the deck so he was good there - olive oil, salt, pepper - all available.  He wanted to make sure we had plenty of grated cheese for topping the subs...check!  He is doing really, really good at learning these things (although he's none too wild about the shopping part, he's being a trooper - I also make him stick to a budget - the least favorite part).

Well, tonight was the night and I was happy that he loved the Meatball Sub Sandwich and unsurprised that he took two bites of the Caprese Salad and made a bad face, saying "I guess I just like cooked tomatoes Mom"!  Yep, that's what I thought...can't say that I blame you dude.

We both enjoyed our dinner and watched the most recent DVR'd episode of Modern Family while we chowed down.  Sometimes, when it's just the two of us, we find more to talk about when there is a humorous show going and everyone is relaxed and casual.  My older kids would be shocked to know that we often eat together in front of the television.  I have always been a hard core "we will eat at the table and no television at dinner" kind-of-mom.  Really, though, do I think he's going to NOT eat in front of a television as soon as he leaves home?  Nope - and at least he talks to me about what we see on the shows!  Sometimes I take what I can get :-)

Toast the sub rolls, warm the cooked meatballs in jarred
pasta sauce, spoon into the sub rolls, sprinkle with grated
asiago and dollops of fresh mozzarella - melt under broiler and serve!
Bon Appetit, Y'all!!!

SHARED WITH:

Everyday Sisters Sharing Sundays #20

StumbleUpon

Monday, October 17, 2011

An Unexpected and Much Appreciated Award!


The Liebster Blog Award was given to me by Jade at Effie's Recipe Box. It was really a big surprise and little unexpected treats like this nearly make my heart stutter!  She said the name of the award comes from the German verb "to love" and that the purpose of this award is to bring a little love to blogs with less than 200 followers. Wowsie!

Now, I get to pick five of my favorite blogs to wave my wand...
or wiggle my flip flops... and grant this award to them!

The rules that go with receiving this award are:

1. Thank your giver, of course!  (check!)
2. Copy and paste the "Liebster" award to your blog (check!)
3. Pay it forward to 5 blogs who you feel deserve this either by email or post to their blog. (check)

The 5 blogs that I love to read,
and think they totally deserve
The Liebster Award are NOT all
food related (I tend to be eclectic in my reading).
Ta Da...may I present:
(She is one of the best people I know- even if the "knowing" is only online...
but feel like I've known her for years
and if given the chance we could talk about numerous subjects for hours on end)
(I think I would like to be her neighbor)
(She is just so "real")
(because she makes me laugh until I pee)
(because her photos move me - her "eye" is exquisite!)
THANK YOU, THANK YOU TO ALL WHO ENTERTAIN AND INSPIRE ME -
YOU BLOGGERS ROCK!
Bon Appetit, Y'all
StumbleUpon

Friday, October 14, 2011

SPICE GOOEY BUTTER COOKIES


For me, the taste of Fall may be found in apples, citrus, pumpkin, squash, sweet potatoes, cinnamon, nutmeg, allspice, cloves....all of those lovely and rich fragrances and flavors.  In my son's eyes (and tongue) - nothing is better than a spice cake or spice cookies.

I'd been working on new recipes for weeks and finally decided I needed to just make something quick and easy for him.  He's not too keen on the "creations" most of the time - he likes the familiar and beloved.

Last Fall I made a Paula Deen cake-mix-in-a-box cookie recipe that he enjoyed so I decided to make a spice version of it for this week's "thank you for putting up with my kitchen experiments" offering.  I think he will be very happy!

I've been making Ooey Gooey Butter Cakes for YEARS before any of us ever heard of Paula Deen...but we didn't call them that.  They were, however, the same recipe!  My grown children and my husband always expected them on the Christmas goodie trays!  They were always bar cookies and I got the recipe, originally, from a woman I worked with in the 70's.  I really liked those chocolate cookies though - so here's my spice version.

Spice Gooey Butter Cookies
Adapted from Recipe at FoodNetwork.com courtesy of Paula Deen

Ingredients:
1 8-ounce brick cream cheese, room temperature
1 stick butter, room temperature
1 egg, room temperature
1 teaspoon pure vanilla extract
1 18-ounce box moist spice cake mix
Sifted confectioners' sugar, for rolling and dusting

Directions:
In a large bowl of a stand mixer, cream the butter until smooth. 
Add the cream cheese and beat until smooth and incorporated. 
Beat in the egg and the vanilla extract.
Beat in the cake mix, scraping down the sides and the bottom, center of the bowl to insure all ingredients are well-mixed. 
Cover with plastic wrap and refrigerate for 2 hours to firm up so that you can roll the batter into balls.
Preheat oven to 350 degrees F.
Roll the chilled batter into tablespoon sized balls and then roll them in confectioner's sugar.  
It's easiest to do these in batches - roll 12 and drop them into the confectioner's sugar, then clean your hands and then roll the cookie dough balls around to coat in the sugar. 
Place on an ungreased cookie sheet 2 inches apart (I used a baking mat).
Gently press with the palm of your hand to make them less ball shaped and more cookie shaped.

Bake 12 minutes. The cookies will remain soft and "gooey". Cool completely and sift more confectioner's sugar over the top after cooled.
Out of the oven - cooling on rack

Makes about 3 dozen cookies when using a 1 Tbsp volume cookie scoop (that's my small one).

Cooled and re-sugared - delicious!

A simple, but delicious, moist cake-like cookie, much adored in our home.  The spice flavor was indeed a hit!

Bon Appetit, Y'all!

SHARED WITH:


StumbleUpon

Thursday, October 13, 2011

Chunky Drunk Apple Bites


I woke up this morning thinking about applesauce...and my random thoughts segued over to pie...and then over to phyllo and puff pastry.  That's just how my brain works in the morning as I'm sipping my first cup of coffee in the peaceful quiet; kind of a drifting bit of fluff landing and moving on, wherever the breeze takes it.

So, here's my morning fog recipe - it turned out really good!


CHUNKY DRUNK APPLE BITES

Phyllo Cups:

Defrost one packet of frozen phyllo dough in the refrigerator. (I used Athens brand)
Melt 1/4 cup of butter in a small bowl in the microwave.
Prepare a small bowl of cinnamon sugar (white sugar and ground cinnamon)
Lay out one piece of phyllo on your board or counter.  Keep the rest covered with a damp kitchen towel.
Working from the edges inward, brush butter all over the piece of phyllo.
Sprinkle lightly with cinnamon and sugar blend.
Cut into 15 pieces (3x5)
Stack 3 pieces on top of each other catty wumpuss (that's a technical term :-).
Gently place the little packet into a lightly sprayed non-stick mini muffin tin.
Press down gently with your fingertips or a dowel shaped tool (I used the back end of my citrus reamer) - tuck under any pieces that flop over.
Continue until you have filled all of the muffin tin (or as many as you want).
Place in preheated  350 degree Fahrenheit oven for 6-10 minutes (until lightly browned).
Remove and allow to cool on rack - remove very carefully from pan (these crack easily!)
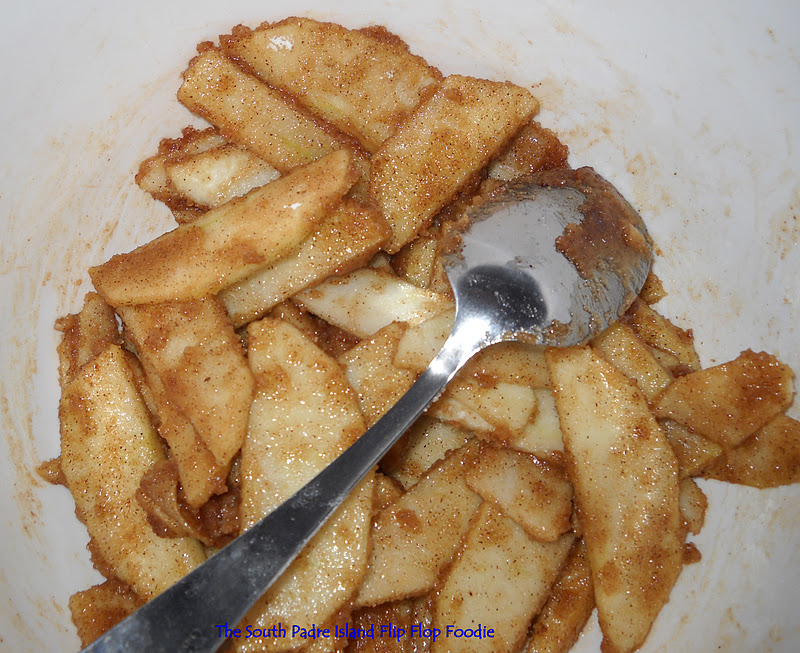

Chunky Drunk Apples

3 apples (I used 2 Empire and 1 Granny Smith)
1/4 cup turbinado sugar
1/4 teaspoon kosher salt
1 teaspoon corn starch
1/2 cup Moscato or other sweet white wine (I used flipflop Moscato)
1 teaspoon ground cinnamon
1/8 teaspoon freshly grated nutmeg
1/8 teaspoon ground allspice
1/2 teaspoon vanilla bean paste

Peel and core apples, cutting all but one half of one apple into bite sized chunks.
Take the remaining piece of apple and small dice.
Toss apple pieces with corn starch and place all of the apple pieces, sugar, and salt into a non-stick saucepan and allow to cook over medium-high heat for 4-5 minutes. (if it gets too dry, go on the low end of time)
Add the wine, cinnamon, nutmeg, and allspice.  Reduce heat to medium and allow to cook for another 5-7 minutes.  Mixture should be thickened and not runny at all.
Remove from heat and add 1/2 teaspoon vanilla bean paste.  Stir well.
Allow to cool - should be syrupy thick.


Spoon into prepared phyllo cups.  Serve immediately.


I must say, this is possibly the best damn apple filling I've ever eaten!  I barely had enough to fill the phyllo cups I made because I started in on it with a spoon...there is a special taste the wine gives the mixture - but it doesn't taste boozy or strong.  I don't know that anyone would have been able to identify what the "special flavor" was!  I think that is largely due to the flipflop Moscato - when a good tasting wine reduces - you taste the true essence...and this wine has a lovely LOVELY essence.

If you can get your hands on a bottle - grab it - it is not only good for sipping, it is a wonderful addition to sweet recipes!  My husband notifies me whenever he sees it in a store....it's a flipflop alert.  It isn't sold in my area so we have to get it from other locations.  At $7 a bottle, I keep it stocked these days!

I didn't make these little Chunky Drunk Apple Bites for any particular reason - but I know when I have my next coffee get-together, these will be served.  They are fairly easy (you can even buy the Athens pre-made mini shells from your freezer section if you want to make it really easy) and I know the first crunchy bite will bring an eye-rolling yummmmm from my friends.  It's the perfect size to just eat 1 or 2 (...or 6).  You should definitely consider testing this for your upcoming holiday gatherings...it would be a welcome addition to anyone wanting some pass-around treats or for a dessert buffet. 

Bon Appetit, Y'all!!!

SHARED WITH:


StumbleUpon