The South Padre Island Flip Flop Foodie Brownsville restaurants

Search The South Padre Island Flip Flop Foodie Blog!

Saturday, March 31, 2012

Homemade Pastel White Chocolate Chips

Happy Easter Colors!!!
(See updates at end of this original post)

I have searched and searched and don't find a source for pastel white chocolate chips!  Why doesn't someone make these?  Do I just not know where to look?  I Googled it a variety of ways, looked online at my usual sources for specialty baking products...no success.  I didn't want pastel M&Ms (although I did eat an entire bag of Easter M&Ms while I thought about this for the last two weeks).  I want pastel colored white chocolate morsels (not candy coating discs either...chips please!) to make "Easter" Chocolate Chip Cookies!

OK...FINE!  I'll just try to make my own!  Rollying eyes smiley  (tongue out)

So, it's a Saturday afternoon and our previous plans for the day got cancelled at the last minute...seemed like it was time to give it a whirl.  I had previously bought both Nestle's Toll House Premier White Chocolate Morsels as well as Ghirardelli White Chocolate Baking Bars...our store didn't have any Ghirardelli White Chocolate Morsels, although I feel certain I've seen them before...and used them, unless I'm delusional...which is an absolute possibility! Tee hee :-)

My main concern with using coloring was fear that it was going to cause the melted white chocolate to seize...but I had hoped that whatever they put in the morsels as a stabilizer might help with that problem, so I went for the Toll House morsels, figuring they might be easiest to bring back to a "chip" shape since that's the way they started.

I set up my baking sheets with silicone baking liners, got out my food colors and piping bags and various tips with collars, bowls, spoons...all the things I thought I'd need.

I measured out 3 ounces of white chocolate morsels *(see note at end of post) into heat proof bowls and started on the first one.  (I'm doing 4 colors and I need 12 ounces for the recipe)

I have, in my not so illustrious past, burnt the crap out of white chocolate when melting it.  So, I started with 30 seconds and 50% power in the microwave.  I stopped and stirred them around, but really, no significant melting yet.  Added 15 seconds, 50% and stirred again...there we go - starting to melt so I stirred well - still bumps in the mix...added 15 seconds, still 50%, but stopped it at 10 seconds...stirred...perfecto!
Melted white chocolate with one drop of blue gel color


For the first batch I added just one drop of AmeriColor's Sky Blue (#103) soft gel paste food color.  Stirred thoroughly and it was a beautiful, perfect pastel blue.  Awesome! (**see note at end of post regarding alternate recommendation for food color)

I had already set up my disposable pastry bags (I'm lazy, it's all I can do to clean my tips, not doing bags too) with a collar and a Wilton #5 tip.  In the same way I add anything to a pastry bag, I had it sitting in a tall glass with the bag rolled over the edge of the glass to form a collar.  I scooped it in, tightened it down, sealed it with a rubber band (and later with twist ties - they worked better for me), and left it sitting tip down in the glass. 

I wanted it to cool a bit before I started piping so I prepped the next color (AmeriColor Deep Pink #114) and followed the same procedure.  No seizing - worked like a charm.  I left it to cool in the piping bag while I worked on piping out all the blue chocolate chips.

The #5 tip worked great.  I had a few different sizes out and I think the one I started with is indeed the best.  Beginners luck.  However, getting a neat chocolate chip took a little effort...that and I realize I can't go in a straight line :-)  Oh well, it is what it is.  Please don't judge me.  There is a definite rhythm to the process.  I pictured a machine.  Squeeze, release, pause, move, squeeze, release, pause, move.  If I forgot to release completely, there was a line of chocolate that followed to the next one.  If I didn't move my hand down the bag to keep an even flow, wocky chips happened.  I'd get going in a great rhythm with awesome little morsels...and then get out of sync, or my hand would feel tired and I'd loose it for a few chips.  Oh well, I guess in a cookie, no one will really notice.

I can tell you already, I'll be too tired after I finish the next two colors to bake cookies today. (I'm taking a pause between the blue/pink set before beginning the green/peach set)  I'll probably make the dough and freeze it tomorrow (I'll bake off a few to show you when I get to that point) - but I want to take them to my boys and grandchildren for part of the Easter goodies next week-end.  I'll want to bake them off fresh when it's closer to the time!

OK, I finished the green and the peach...the peach actually looks, to me, more like a light pink.  I used Mint Green #112 and Peach #117 for the last two batches. 


I must say, that's a fine looking bunch of chocolate morsels. I must also say I will need some ibuprofen any minute now. My hands are aching!

Still, it was a fun project.  I hope my progeny all appreciate the hard work for those special Easter  Chocolate Chip Cookies that their momma/grandma is baking for them!!!  I'll let you know.


*Follow-up Note Added 4/1/2012:
Duh, genius I am not.  Need 12 ounces of chips for recipe.  This made 9 ounces...because, of course, I left some in the bowl and some in the piping bags and collar area...unavoidable to use every bit I weighed into the bowls.  Should have done 4 ounces in each bowl!!! (banging head)

**Follow-up Note Added 3/10/2015
After several more years of working with cookies, chocolates, and cakes.... I'll tell you this will work much better if you do NOT USE WATER BASED GEL COLORS.  I frequently have the chocolate seize or get more thick than I want (thus the difficulty in the piping and pain in my hands).  It works MUCH BETTER with oil based food colors (like Chef Master has).  ALSO - I have given up on microwave melting of chocolate.  The ability to control temperature is so much better in a double boiler on the stove top or the newer Wilton chocolate melter.

A wonderful tutorial for melting chocolate may be found on Julia Usher's Youtube Channel.

Bon Appetit, Y'all!!!

Shared With:


Addicted to Recipes Button, Page button


Our DelightfulHome
Tuesdays at Our Delightful Home
StumbleUpon

Sunday, March 25, 2012

Whole Wheat Oatmeal Chocolate Chippers

I first made these cookies about a year ago...and maybe once since then.  Mr. Flip Flop is the lover of oatmeal cookies... where I have been obsessed with decorating sugar cookies.  The last few episodes of cookie baking have all been sugar cookies and decorative icing.  So as he was on the road home, I decided I wanted the house to smell like warm oatmeal cookies when he arrived.  What else is more welcoming???

Here's the link to the recipe, and the photos are from this batch.  The first thing he did was sit in his comfy chair and inhale 1/2 dozen of these cookies!  Yes, it's true - six cookies down the hatch.  He had seemed all grumpy when he got home (it's a 6 hour drive and he didn't stop for lunch...uh oh) but by the time my cookies had worked their magic and he had a brief nap, he came into the kitchen for kisses and hugs.  I should rename these Magical Happy Cookies.

While I wouldn't term them "healthy" cookies - they are made with whole wheat flour and oatmeal.  I deem them "healthier" than the standard cookie...but, still, you know there is butter and sugar in the blend!  Chocolate is medicinal, so, "healthier" cookies!  This batch has both semi-sweet chocolate chunks as well as milk chocolate chips.  They really are delicious.


After a nice (early) steak dinner with sides of baked sweet potatoes, steamed broccoli, crescent rolls, and fresh pineapple chunks for dessert, all was well in his world again.  He sighed in contentment and we curled up on the couch together to watch Criminal Minds.  What?  Doesn't sound romantic?  Serial murderers and other horrible stuff?  You're right, it isn't, but we both like the show and it's too scary for me to watch while he's out of town.  So, we had two DVR'd and it made for a good Saturday night of viewing.  It's always good when Mr. Flip Flop is home.  He told me the ladies at work think he's like a burnt marshmallow - all crusty on the outside and soft and gooey on the inside.  That is such the absolute truth! 

Glad to have my gooey guy home :-)

Bon Appetit, Yall!!!

SHARED WITH:

StumbleUpon

Thursday, March 15, 2012

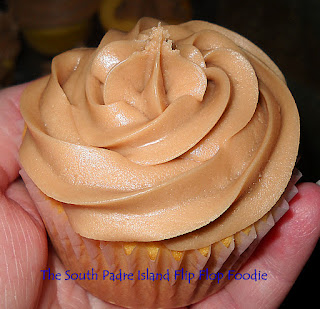
Milky Way Frosting

We are stuck at home in the land of Spring Breakers...traffic is horrendous and going out is highly undesirable!  The teen was looking longingly at the few snacks we had left and walked away dejectedly without making a choice.  I've been loading him up on fruits and healthy choices this week and I could tell....he was hankering for a sweet.

I made some box mix yellow cupcakes and thought we'd just eat them plain...until he said "where's the frosting?"  I said, all I have is a can of cream cheese frosting that I bought to make cake pops...you can open that if you want frosting.  He did and we both slathered a cupcake and bit into it...yuck!  I haven't had canned frosting in a lonnnnggg time.  It was awful!  I threw mine in the trash.  He opted for the bare ones and headed to the man cave.  He better enjoy it, tomorrow is house cleaning day and the man cave is getting aired out!

I looked into my baking cabinet to see if anything stirred me.  I saw two Milky Way bars that I'd bought a couple of weeks ago and forgotten.  That brought to mind an old frosting recipe that I've made for a Milky Way Cake...and I remembered it set up really well, and wondered if it would maybe be pipeable (is that a word?).

I had everything I needed, so got to work to find out if it would hold up to piping!

Milky Way Frosting

Ingredients:

2 Milky Way bars (regular size)
1 stick of butter (1/2 cup)
12 ounces powdered sugar
1 teaspoon pure vanilla extract
1-2 tablespoons heavy whipping cream

Method:

Cut up butter and Milky Way bars into tablespoon sized slices and put in a small saucepan over medium heat. 

Stir frequently and vigorously with a heat-resistant spatula, pressing the Milky Way pieces to hurry the melting process - they never get all the way melted I've found....but that's okay.


In the bowl of a stand mixer, with beater attachment, pour in the powdered sugar and give it a few whirls to make sure all the lumps are out...I've never sifted this recipe and didn't today.

Add the melted chocolate and butter mixture and blend until you have a heavily crumbly mess.  Add the vanilla extract and the whipping cream, 1 teaspoon at a time.  Beating on high medium after each addition.  Today it took about 3 or 4 teaspoons of cream.  I pull the beater up and when the shape holds, I know I'm "there".

Prepare a piping bag with a large coupler and large tip and stand it in a tall glass.  Fold the cuff down and fill the bag with the frosting.  I played with a couple of tips - a Wilton 1M and Wilton 4B.  I will say, I'm not the best at piping...but I don't have a lot of opportunity to practice.  We like cupcakes way too much...I'm going to have to visit the neighbors with cupcake gifts again as it is.  If I don't, our butts won't fit out the door come Monday.

This piped really well, but didn't "finish" well - the stars at the end didn't break gracefully, I nearly had to pinch them off. 

So, this might not be the best piping material...but it is quite tasty, albeit very sweet.  I might try a sprinkle of cinnamon in the mix next time. to give it a little warmth...and I am not sure what to do about the refusal to release...maybe have some snippers handy :-)


Whatever the outcome, it was fun to try my hand at topping cupcakes again.  I'll keep trying until I get it eventually!

Bon Appetit, Y'all!!!

SHARED WITH:

StumbleUpon

Tuesday, March 13, 2012

Scarlet Snapper for Two!


The teen has been begging for some snapper so we ducked into Quik Stop in Port Isabel and picked up a lovely piece of Scarlet Snapper that I thought was just right to feed two people...two normal people. 

I cooked it up with some orzo for dinner tonight...I took 1/3, gave him 2/3...and still he asks "is there more snapper?"

O.M.G.

A nice piece of fish, delicious orzo, a salad, garlic toast, fresh blackberries and whipped cream for dessert...I was beyond full.  Oh yeah, the teen won't eat salad ...oh well...what's a mom to do?  I just shrugged and offered him my fish skin...he loves it, me not so much.  He smiled.

Scarlet Snapper with Orzo

Ingredients:

1-2 quarts water
1 cup chicken broth
1 cup whole wheat orzo pasta
2 tablespoons diced onion
Kosher Salt
2 tablespoons butter (or olive oil if prefer)

2 tbsp butter
1/4 cup EVOO
1/2 white onion, diced
2-3 tablespoons chiffonade of fresh basil
1-2 green onions, split and thinly sliced
4 cloves garlic - through a garlic press
1 filet of Scarlet Snapper - skin on
Lemon Pepper to Taste
1/2 lemon thinly sliced
1/2 lemon reserved

Method:

Bring water and chicken broth to boil in a 3 qt saucepan.  Add salt, chopped onion, and orzo pasta.  Bring back to boil, reduce heat to medium and boil for 8 minutes.  Drain, add 2 tablespoons of butter, and stir.

While orzo is cooking, add butter and EVOO to large skillet over medium high heat.  Add diced onion, 1/2 of the basil, 1/2 of the green onion and garlic to pan, cook for 2-3 minutes.   Push veg to the side and add the Scarlet Snapper filet to the pan, skin side down.  Place lemon slices on top of fish.  Cover pan with lid.  Cook until lower half of fish is turning white.  Move lemon slices off to the side and flip fish, scooting it to the side of the pan. 

Add orzo to pan and stir in the the rest of the onion and basil.  Lemon pepper the fish and return the lemon slices to the top of the skin side of the fish, return the lid to the pan and cook until fish is done (the entire fish cooking time took about 10-12 minutes for a .80 pound piece of fish).

Plate the orzo and place the fish on top of the orzo.  Squeeze fresh lemon juice over the fish and serve.

Awesomely delicious!

Bon Appetit, Y'all!

SHARED WITH:

StumbleUpon

Sunday, March 11, 2012

Roasted Shrimp with Farro Pilaf

I had never heard of the grain "farro" until a year or so ago.  Giada DeLaurentiis made a cold salad with farro and said it was a favorite.  I tucked it into the back of my mind...never seeing it on the shelves here, nor in Austin.  Then, I asked Mr. Flip Flop to stop in at Central Market bulk section and see if they had it there...if so, would he bring me a pound?  He arrived with that, and the rest of my wish list, in hand.  As I unpacked I nearly had a heart attack!  $11.99 per pound...I was guessing in the $4 to $5 per pound range...as I had learned it was an "old grain" and was a type of wheat.  The price on the small ziplock bag was over $13.00 so I turned and said "OMG, I had no idea this cost so much...call me next time if it seems out of line!"  He said he was certainly shocked, but I'd asked and he'd delivered.  (good man that he is!)  I am now pondering how to use this bit of Italian gold.

I searched recipes - found lots of soups, a few cold salads...spaghetti made out of farro...aka spelt.  Ahhh, okay, now that is a more familiar word!  I've seen spelt flour in the specialty flour section at the grocery store and it felt like a more common term...although it really isn't a "common" grain in wide use here in the United States...at least not in my part of the U.S.!  Farro is apparently the Italian word for spelt or emmer.  I decided to investigate a bit further...and found this on the USDA's website.

"Emmer wheat (Triticum dicoccon),
also known as farro especially in Italy, is a low yielding,
awned wheat. It was one of the first crops domesticated
in the Near East. It was widely cultivated in the ancient
world, but is now a relict crop in mountainous regions
of Europe and Asia."
(Source)
Most searches for recipes had a fairly standard method of cooking...somewhere in the 1:3 or 3.5 ratio of farro to liquid...and most suggested 20-30 minutes of cooking time, yielding a firm to the teeth cooked grain.   Some sources recommended soaking it overnight and others recommended toasting it in oil prior to adding the liquid and boiling, much in the manner of rice...bring to boil, reduce heat, put a lid on it and leave it alone.

I decided I wanted to treat it in a pilaf sort of method, hoping the teen might eat it.  He hates rice (do you know how hard it is to cook with no rice products???) but loves orzo...so I've got my fingers crossed.

I am hoping by serving it with one his favorites, shrimp, he might be inclined to give it a go. 

Here's what I came up with:

ROASTED SHRIMP WITH FARRO PILAF
by Debbi Hook
(with a nod to Ina Garten 
for showing us how good it is to roast shrimp!)

Ingredients:


½ pound Farro (spelt)

1 tablespoon EVOO

Chicken or Vegetable broth sufficient to use a 3:1 ratio for cooking Farro

1 teaspoon salt

*********

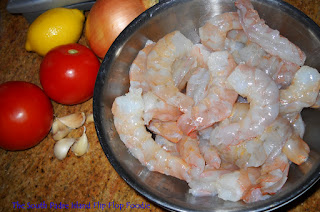
1 ½ pound jumbo shrimp (21/25 per pound), peeled and deveined

Two vine ripe tomatoes, cored, halved, de-seeded, and sliced in 8 pieces from each half.

4 cloves garlic, peeled and thinly sliced (I used the Martha Stewart Garlic Press/Slicer)

EVOO for drizzling

1/2 teaspoon kosher salt

1 teaspoon freshly ground black pepper

**********

¼ cup EVOO

¼ cup butter

1 small yellow onion, chopped

1/2 teaspoon kosher salt

1 teaspoon lemon pepper

1 clove garlic, peeled and finely diced (I used a press)

¼ cup basil, chiffonade

Fine zest from ½ lemon (use a microplane)

3 green onions, cleaned and thinly sliced (2 of these will be cooked, 1 will be garnish)

Juice of 1/2 lemon

Method:

In the bottom of a 3 quart or larger sauce pan, heat 1 tablespoon of olive oil over a medium high heat and add ½ pound of dried Farro, stirring to coat with oil.  Continue toasting the Farro for 3-4 minutes, stirring constantly, then add chicken or vegetable broth with 1 teaspoon of salt, using 3 parts liquid to 1 part Farro.  (my 1/2 pound was slightly above 1 cup…but not quite 1 ¼ cups.  I used 3 ½ cups of low sodium chicken broth for the liquid.

Bring to boil while stirring, lower heat to medium low, cover and and cook for about 30 minutes – try a grain and see how it feels to your tooth.  (I actually cooked mine another 5 minutes because the teen taste-tester said it was still too hard.)  Drain and set aside, keeping warm with a lid on the pan – doesn’t have to stay hot, just warm as it won’t be heated again before service.

While Farro is cooking, prepare your shrimp and tomatoes and garlic. 

Preheat oven to 400 degrees. 

Peel and devein shrimp, including removal of tails. 

Cover a rimmed baking sheet with aluminum foil for easy clean-up. 

Lay cleaned shrimp (I ended up with 30 shrimp) and tomato portions in single layer on the cookie sheet, drizzle with EVOO, sprinkle the salt and pepper and garlic slices over everything.  Toss to coat everything with oil. 

Place in oven for 9-10 minutes.  Shrimp will be pink and curled in on itself.  If using smaller shrimp, cook less time.  Don’t over-cook shrimp, it gets rubbery.
Perfecto!

*************

While the shrimp are roasting, work on the rest of the flavors for the Farro.  In a small frying pan, heat butter and olive oil, add chopped onion and sauté for a few minutes.  Add  diced garlic clove, salt, lemon pepper, basil, lemon zest, and about 2/3 of the sliced green onions (reserve last third  in its raw condition to the side).  Sauté for just one or 2 minutes more – then pour contents of the pan over the warm, drained Farro and mix well. 

Remove the shrimp from the roasting pan onto a plate. Add everything  else from the roasting pan, including any juices or oil, to the Farro and onion mixture.  Toss well to combine.  Place Farro mixture into a serving vessel, add the shrimp on top, and garnish with last bit of green onion, and a little more fresh basil if desired. Squeeze 1/2 of a lemon over the shrimp or serve lemon wedges on the side if preferred. Serve immediately.

IT WAS DELICIOUS!  The teen ate THREE servings. (Mr. Flip Flop is convinced if we tell him it's from Italy, and supply a history lesson, he'll eat anything!) There were enough leftovers for maybe one person the next day.  Dad and the boy gave it a thumbs up!  I ate one helping.  It was very filling.  I'm happy with my first utilization of Farro...it will definitely be used again - I'm thinking soup next time.

Bon Appetit, Y'all!

SHARED WITH:


StumbleUpon

Friday, March 9, 2012

Seahorsies and Starfish Cookies

I received an order from Karen's Cookies this week and could barely wait to tear into the package....felt like a little kid at Christmas.  I sliced open the box and carefully took out each item, admiring it and thinking of how and when I would use the different products.  I had most of these items in my online basket for over a month...I just kept thinking and changing my mind - adding stuff - tossing it out.  These are luxury items - Momma's toys.  I wanted to make sure I spent my money wisely.  I'm much more impulsive in a walk-in retailer.  When it's online, I'm a bit more careful.  Returns require too much work, so I want to make sure it's just right!  I scored - it was perfect.

I got some new cookie cutters, some sugar pearls in colors I can't find locally, disco dust of various colors, some booboo sticks (those are wonderful), some pixie dust shakers (another marvelous invention),  and some small 2 oz. squeeze bottles with tip couplers for detail work.

For my first play time with the new toys, I went for the starfish and seahorse cookie cutters.  I had cookie dough left from my last round with tropical themed cookies so that saved time.  I always try to make extra and keep in the fridge or freezer.  Baked off a couple of dozen - ended up with two different seahorses - so I tried them both.

Next day, it was time to start the decoration process.  I wanted to try Karen's Meringue Powder Buttercream Frosting recipe.  She said she's used it for a lot of years and likes the texture and flavor for decorating.  I watched her tutorials something like three times to make sure I got it right.  It seems counter intuitive to add fat to a meringue but I forged ahead, following her steps with precision.  It turned out beautifully!  It tastes delicious with a bit of almond extract and vanilla extract.  The taste is vastly superior to regular royal icing.  It takes a LOT longer to dry...and it doesn't dry as hard as royal icing so I did mark a few, even after they crusted.  You have to handle them a lot more carefully...a LOT more carefully!  However, this morning, after drying under a fan overnight and part of yesterday, they are safe to handle and package with no oopsies.  I've yet to see how the packaging and stacking goes.

I also learned my lesson last week - you really can't outline and flood in assembly line fashion.  The outline will dry and you can't nudge the flood into the edge - you will always see an outline.  I really noticed it on my dolphin cookies last week so this week, one cookie at a time.

I've linked Karen's frosting recipe above - she has several video tutorials on her web site.  I also like the tutorials for icing consistency from Ali Bee.  I LOVE video tutorials - I'm definitely a person who likes to see how to do things in action!  I found her method of thinning with a spray bottle of water to be so much more controlled and better and getting a good consistency than any other way I've done it.  I didn't use the squirt bottle of water for the batch of frosting for the starfish...and I got it a bit too runny - overflows!  I learned my lesson and got the squirt bottle for everything else.  Soooo much easier to control.  I also find working in small bowls in small batches to be the best way to get good icing consistency. I never think I'm going to have enough...and I almost always have too much! The small squeeze bottles were superb for decorating the details. 

I'm on a roll here - and I have more new cutters I haven't used.  You'll likely see more and more cookies from me.  I hope my friends and neighbors are hungry!  I am loyal to the sugar cookie recipe obtained from the Central Market Cooking School class with Laurie Mather.  It is just so easy to make and to work with.
First I baked
Then I piped and filled
Then they dried for 10 hours
Then I decorated
Then they dried...for about 12 hours

I so enjoyed this little project and trying out my new tools and products.  I finished the seahorses with a baby yellow disco dust for a bit of sparkle.  When using disco dust be sure to put some wax paper under the cookie or cookie rack.  It is very expensive and you can add the dust that falls onto the wax paper back into the tiny jar very easily.  I love, love, LOVE the pixie dust shakers.  They are the tiniest little shaker and they distribute just the right amount.  I've never found anything that works as efficiently.

So, as you can see, I'm a huge fan of Karen's Cookies web site.  A great online store, wonderful recipes, and awesome tutorials.  Now I'll be looking at more cookie cutters and I wonder how long it will take to complete the purchase this time?

Spring Break starts today for the teen - I sent some of these cookies to his teacher and his note-taker.  Hope they enjoy the treats as much as I enjoyed making them :-)


Bon Appetit, Y'all!

SHARED WITH:


StumbleUpon

Saturday, March 3, 2012

Tropical Sugar Cookies - Warmth in Winter!


I started these cookies on the last day of February...it was 85 degrees outside and gorgeously sunny.  The joys of living at the tip of Texas in the Winter.  I felt compelled to make some sugar cookies in tropical shapes so I got busy baking.  I knew this would be a multi-day task...baking one day, base coats the next day, and details on the final day.  I finished up late Friday night amidst a most hectic Thursday and Friday with errands, school meetings lasting until 7:00 at night, an unexpected trip into "town" - 30 miles away - which took most of the day.  All-in-all, it was not what I planned, but still they turned out okay.  I used up all of my royal icing before I got some additional colors for further details I had planned...and some of it wasn't the right consistency...and a couple were sacrificed to the teen-ager (he gets the ones I mess up).  Then, I wake up Saturday morning and a windy "cold front" has blown in...it's 67 now instead of a lovely mid-70s.  However, I feel certain my Northern friends will not give me any sympathy as they are being coated in snow.  News of horrific tornadoes throughout the South and Midwest states also bring a pall to the days.  Still...for us, we are entering the period of time that brings a ton of visitors to the area...SPRING BREAK!  Some of the far Northerners began arriving Friday.  It was noticeable on the road and at the grocery store.  As Winter Texans began their trek home, college students begin their treks South, seeking warmth, sun, and the fun to be had on South Padre Island.  They will come in waves...small wave this week, a monster wave next week, dwindling waves the following two weeks and then it's over.

To celebrate the onset of Spring, despite the blustery winds, I have tropical cookies!  Using my favorite sugar cookie recipe and royal icing recipe, I'll share the progress in pictures below!  Enjoy :-)

Cookies are baked and decorating station ready to rock and roll.  I have said it before and I'll say it again.  Mis en place is important, even when decorating cookies!
Maybe ESPECIALLY when decorating cookies!
The dolphins were outlined, floated, and then happy smiles and eyes drawn with edible marker
The flowers were going to be much more detailed...but I got tired and ran out of icing...
so tired, I didn't have energy to make more.  Still, happy flowers.

Palm trees will be my next task to "make better".  The detail piping on the trumk was done with icing not thick enough to stand alone...and I had some running.  The palm leaf top layer was going to be much different than it ended up with.
My hands were cramping...these were the very last thing I did.  I'd just done all I could!
The turtles take the most steps.  I start with the green base for
the shell, then do the heads and flippers after the shell
is well-firmed up.  About 6 to 8 hours later, I do the shell detail.
The next day after all is very dried and can be handled
easily, I do the eyes and flipper detail with an edible marker.
I do love my sea turtles!

So, there we have it.  I was sad that the sea horse and star fish and lighthouse cookie cutters had not arrived in time for this batch...but I'll be attempting those when I next get the hankerin' to bake and decorate sugar cookies.  This seems to be the season...It starts with Christmas, segues into Valentine's Day (which I skipped this year in the cookie department) and then we have Spring Break and Easter.  After that, I probably won't do any for a while.  Maybe until 4th of July...and then, of course, I have a lot of humidity to deal with so...we'll see!


Thanks for reading along!  Hmmmm. wonder who I will share these cookies with today???  Maybe my friends at Island Wheelies and The Salty Seagull!  If you are Spring Breaking on the island, please stop by their venue in the Palmetto Shopping Center just north of the bridge by a few blocks!

Bon Appetit, Y'all!


SHARED WITH:

The Bearfoot Baker


StumbleUpon