The South Padre Island Flip Flop Foodie Brownsville restaurants

Search The South Padre Island Flip Flop Foodie Blog!

Showing posts with label tropical designs. Show all posts

Monday, July 23, 2012

Sea Shell Cookies


This week-end I decided to pull the sugar cookie dough out of the freezer and bake some of the shapes from new cookie cutters... some of which I won in a "Giveaway" from Sweet Art Factory!  I elected to work with a conch shell cutter, a sand dollar cutter, as well as a scallop shell I already had on hand.

I used some of the vanilla and almond sugar cookie dough recipe I found on Lila Loa's blog and had stored for future use in the freezer.  I took out two slabs of pre-made, well-wrapped, and frozen dough and put it in the fridge.  Saturday evening I rolled and baked (after allowing them to sit out for 15 minutes before starting).  I have only used the World's Best Sugar Cookie Dough from the class I took at Central Market in Austin...so I was leery.  However, the chocolate recipe was so good, I went ahead and made the vanilla too.  So glad I did.  I really enjoyed how easy it was to roll and cut and it didn't seem to crack as much as my generally favored dough does. 

So, onward I went the next morning, prepping my royal icing... I kept it simple - lots of white, a little bottle of warm brown (was more like tan) and a little bottle of mauve (more like a light pink).  I used AmeriColor squeeze gel paste.

I started with the conch shells.


I am not much of an artist but it really helps me plan my icing and the project if I draw it out.  To do that, I just trace the cookie cutter and write out my idea.  I find I can make more consistent cookies if I do that.  Sometimes, like when I make Easter egg cookies, I don't want consistent cookies...they are all happily different.  No drawings required for those projects!


Step 1 - set up your decorating area.  I like to decorate on a rack over a baking sheet.
Step 2 - I outlined the parts that needed a white outline, with piping icing.
Step 3 - I filled the bottom portion of the shell with flood icing.
Step 4 - I gently nudged the icing to the edges and gave the cookie a shake.  Since I knew I was going to feather, I didn't worry overly about getting it perfectly flat or ridding myself of bubbles.

Step 5 - I piped horizontal lines of light brown icing while the white icing was still wet.  Feathering requires a "wet on wet" procedure.
Step 6 - Using a round toothpick (or you can use a boo boo stick from Karen's Cookies), draw the toothpick down through the line - I start slightly above the line, end before the beginning of the next line, raise the toothpick, wipe it on the palm of my left hand (OK - it's messy - but efficient) and move on down the line.  I keep a damp cloth handy as well as a bowl of water for wiping my hands and cleaning my fingertips.

Step 7:  Pipe the mauve that looks like pink icing on the inner lip of the shell.
Step 8:  Again, using wet on wet, pipe a stripe of the brown next to the white, but on top of the pink.
Step 9:  Using the toothpick again, drag the brown into the pink, and, as I was going for a shaded effect I didn't clean the toothpick between every swipe.  These were fast light pulls through the icing, all the way to the bottom of the brown line.  That method sort of shoved the pink icing higher on the edge, which gave it some dimension.
Step 10: Using some of the thicker piping icing, I filled the dome outlines which gave them a puffy effect.  Use a clean toothpick to drag it to the edge if it doesn't get there by itself.  Take care not to go over the "dam" you created or you will lose the puffy effect.
Step 11:  After the pink and brown edge has dried for about 5-10 minutes or so, lightly sprinkle with some pink disco dust (also available at Karen's Cookies) just on the pink portion.  My original intention was to let it dry completely and then paint on some wet pink lustre dust (mixed with clear extract or alcohol).  I decided I didn't want to wait :-)

Always challenging to see the sparkly disco dust in a photo
and I don't have a light box so I got reflection on the white.
Oh well - I'll try to do better.


I worked on the other cookies as well...but will write a post on those tomorrow.  I've got to get up and get going on something other than decorating cookies today!!!  Here's what will be coming tomorrow. (And, yes, I know...my sand dollars are not all that great.  I piped the centers today before coffee...major mistake.  AND, my holes didn't stay open correctly.) (BIG SIGH)


Bon Appetit, Y'all!!!

Shared With:

 
Chef In Training


Creations by Kara


Our Delightful Home
StumbleUpon

Friday, March 9, 2012

Seahorsies and Starfish Cookies

I received an order from Karen's Cookies this week and could barely wait to tear into the package....felt like a little kid at Christmas.  I sliced open the box and carefully took out each item, admiring it and thinking of how and when I would use the different products.  I had most of these items in my online basket for over a month...I just kept thinking and changing my mind - adding stuff - tossing it out.  These are luxury items - Momma's toys.  I wanted to make sure I spent my money wisely.  I'm much more impulsive in a walk-in retailer.  When it's online, I'm a bit more careful.  Returns require too much work, so I want to make sure it's just right!  I scored - it was perfect.

I got some new cookie cutters, some sugar pearls in colors I can't find locally, disco dust of various colors, some booboo sticks (those are wonderful), some pixie dust shakers (another marvelous invention),  and some small 2 oz. squeeze bottles with tip couplers for detail work.

For my first play time with the new toys, I went for the starfish and seahorse cookie cutters.  I had cookie dough left from my last round with tropical themed cookies so that saved time.  I always try to make extra and keep in the fridge or freezer.  Baked off a couple of dozen - ended up with two different seahorses - so I tried them both.

Next day, it was time to start the decoration process.  I wanted to try Karen's Meringue Powder Buttercream Frosting recipe.  She said she's used it for a lot of years and likes the texture and flavor for decorating.  I watched her tutorials something like three times to make sure I got it right.  It seems counter intuitive to add fat to a meringue but I forged ahead, following her steps with precision.  It turned out beautifully!  It tastes delicious with a bit of almond extract and vanilla extract.  The taste is vastly superior to regular royal icing.  It takes a LOT longer to dry...and it doesn't dry as hard as royal icing so I did mark a few, even after they crusted.  You have to handle them a lot more carefully...a LOT more carefully!  However, this morning, after drying under a fan overnight and part of yesterday, they are safe to handle and package with no oopsies.  I've yet to see how the packaging and stacking goes.

I also learned my lesson last week - you really can't outline and flood in assembly line fashion.  The outline will dry and you can't nudge the flood into the edge - you will always see an outline.  I really noticed it on my dolphin cookies last week so this week, one cookie at a time.

I've linked Karen's frosting recipe above - she has several video tutorials on her web site.  I also like the tutorials for icing consistency from Ali Bee.  I LOVE video tutorials - I'm definitely a person who likes to see how to do things in action!  I found her method of thinning with a spray bottle of water to be so much more controlled and better and getting a good consistency than any other way I've done it.  I didn't use the squirt bottle of water for the batch of frosting for the starfish...and I got it a bit too runny - overflows!  I learned my lesson and got the squirt bottle for everything else.  Soooo much easier to control.  I also find working in small bowls in small batches to be the best way to get good icing consistency. I never think I'm going to have enough...and I almost always have too much! The small squeeze bottles were superb for decorating the details. 

I'm on a roll here - and I have more new cutters I haven't used.  You'll likely see more and more cookies from me.  I hope my friends and neighbors are hungry!  I am loyal to the sugar cookie recipe obtained from the Central Market Cooking School class with Laurie Mather.  It is just so easy to make and to work with.
First I baked
Then I piped and filled
Then they dried for 10 hours
Then I decorated
Then they dried...for about 12 hours

I so enjoyed this little project and trying out my new tools and products.  I finished the seahorses with a baby yellow disco dust for a bit of sparkle.  When using disco dust be sure to put some wax paper under the cookie or cookie rack.  It is very expensive and you can add the dust that falls onto the wax paper back into the tiny jar very easily.  I love, love, LOVE the pixie dust shakers.  They are the tiniest little shaker and they distribute just the right amount.  I've never found anything that works as efficiently.

So, as you can see, I'm a huge fan of Karen's Cookies web site.  A great online store, wonderful recipes, and awesome tutorials.  Now I'll be looking at more cookie cutters and I wonder how long it will take to complete the purchase this time?

Spring Break starts today for the teen - I sent some of these cookies to his teacher and his note-taker.  Hope they enjoy the treats as much as I enjoyed making them :-)


Bon Appetit, Y'all!

SHARED WITH:


StumbleUpon

Friday, March 4, 2011

Rising Above


My tropical cookies!
 Some days baking can be a salvation for me.  I've had a hard week or two (or ten) and I posted a "poor me" status on Facebook this morning (Thursday).  My friend in Italy commented "Bake and Breathe"...another friend, on the island, said "Come by and see me at ArtSpace today"....and that is just what I did :-)  I feel like a different person this afternoon - thanks to my link to sanity - Facebook and some good friends.  I baked cookies yesterday (as posted) and this morning I took a "breather" on the deck overlooking the beautiful Laguna Madre and drank a nice cup of White Chocolate Mocha coffee - watched birds flying and diving and calling.  Sun was shining - gentle cool breeze.  I felt better...  I got out my mp3 player and set it on shuffle.  First up "Rise Above" by The Trishas.  They played at the 2010 South Padre Island Seafood and Music Festival and I downloaded everything they had available for download at that point.  They are regulars on my mp3 player...so I guess my mystical mp3 knew I needed to hear "Rise Above" right about then.  I squared my shoulders and got on with the day. (I figured if I whined much more someone would surely offer some cheese to go with it...so onward!)


I went and mixed up a batch of royal icing and filled 6 squeeze bottles with various colors I used for today's cookie decorating endeavors.  If you want to refer back to the squeeze bottle story click here and if you want the royal icing recipe click here.   Anyway, I cleaned up the mess (after yesterday's end-of-day debacle in the kitchen, I was not going to leave it) and sat down to finish off my coffee. (Making all that frosting in 6 different colors was "industrious" work and I was in need of another break)


All set up and started on the dolphins

I worked on cookie decorating from about 9:00 to 12:30 and left everything drying. 

First layer of the turtles need to dry - shells are done

First layer of dolphins and palms drying...and my "oops" caused
by shaking the cookie by the trunk of the palm tree...that smooths
out the icing...I guess the trunk didn't like it!
I headed over to the island and spent a very enjoyable hour and a half watching Ann work on her art and bent her ear (all the way to the ground) with tales of my woes.  Cleansing.  She's a good listener and non-judgmental.  I'm glad to have her as a friend.  I'm slowly building a circle of friends.  I moved here not knowing a single soul...so it's been weird for me not to have the full social circle I had in Austin...but it's gettin' there!

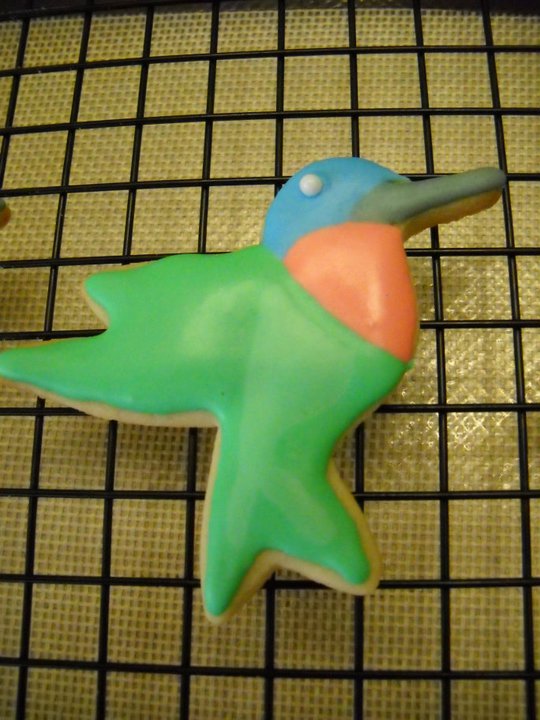
I got back home around 3:00 and started back to decorating.  I have to say, I'm fairly pleased with what I accomplished today.  I particularly like my sea turtles.  Nothing is anatomically correct - heck, they are just cookies!  But the cookies are cute and pretty much what I had hoped for.  I still have work to do on the hummingbirds but the turtles, palm trees, sea shells, and dolphins are done.  I have another cookie project lined up, but that will be a post for another day.


Happy dolphins

Hummers need a bit more work...I'm deciding if I'm up to it!

Today, I'll share where "I'm at" as of Thursday afternoon and will post, as usual, the next morning.  I like to sleep on what I wrote and give myself time to change anything that I really wish I hadn't said in a public forum ;-p


I like my shells - they look kind of groovy :-)

Needed a piping bag with finer tip for these details...live and learn!

I kind of love my turtles.  I think the grandbabies would like them too!
I'm thinking I might use a food marker and draw feathers...
but I'm not sure my art skills are up to that.
If I try it...I'll post an updated photo.
Don't hold your breath.

BON APPETIT, Y'ALL!!!StumbleUpon