The South Padre Island Flip Flop Foodie Brownsville restaurants

Search The South Padre Island Flip Flop Foodie Blog!

Showing posts with label white chocolate. Show all posts

Monday, April 2, 2012

Easter (or Spring) Chocolate Chip Cookies

Easter or Spring - the Pastel White Chocolate Chips make a pretty cookie!
If you follow my blog, you know that I spent Saturday insanely piping dots of various colors of white chocolate so that I could have Pastel White Chocolate Chips.  Couldn't find 'em....wanted 'em real bad... so I durn well made 'em myself! 

I made the cookie dough Sunday and baked off a few to let the teen sample (and me too of course).  I also wanted the opportunity to take photos of the finished product so you could see how cute they turned out.  I have almost gotten to hate the term "super cute"...but in this instance, I gotta say... they really are super cute!


I basically use a Toll House dough, but make a few changes like a little bitsy bit of cinnamon.  I love that it gives a slight warmth to the cookie that you really couldn't identify if you didn't see the recipe.  I like to do that when I'm using the white chocolate chips.  It just works.

So, here's the recipe...and a few photos, but not a lot...of the Easter Chocolate Chip Cookies.  I baked ten, and scooped the rest and froze them on a cookie sheet before transferring to a Ziploc bag.  I'll bake them off (from their frozen state) right before I head to see my big boys and grandchildren for Easter.  That way, they will have yummy fresh-baked cookies from Grandma :-)  ooohhh, I can't wait.


EASTER (OR SPRING) CHOCOLATE CHIP COOKIES
By Debbi Hook
Adapted from Nestle's Toll House Cookie Recipe

Ingredients:

2 1/4 cups unbleached all-purpose flour
1 teaspoon baking soda
1/2 teaspoon fine sea salt
1/2 teaspoon ground cinnamon

3/4 cup light brown sugar - packed
3/4 cup white granulated sugar
1 cup (2 sticks) butter - softened to room temperature
2 large eggs - room temperature
1 1/2 teaspoons pure vanilla extract

9 ounces of assorted Spring-colored white chocolate chips
3 ounces rough chopped Ghirardelli Premium White Chocolate Baking Bar
  (comes in a 4 ounce bar...you could use it all - I ate the other ounce ;-)

Method:

Preheat oven to 375 degrees F.

Prepare baking sheets with Silpat or Parchment Paper.

Makes about 3 dozen cookies.

Set up cooling racks.

In medium bowl, whisk together flour, salt, cinnamon, and baking soda - set aside

In bowl of stand mixer, mix butter and both sugars until lightened. Add vanilla extract. Beat until blended.

Add eggs, 1 at a time, mixing to incorporate after each addition.

Lower mixer speed and add the flour mixture by thirds, incorporating after each addition.
This dough is ready for the final step

Remove beater and scrape down bowl one last time, get all the dough off the beater paddle.  Add both pastel chocolate chips and the chopped white chocolate all at once. 
Just dump it all together on top of the dough.  Get rid of your
wimpy spatula and get a heavy duty spoon.

MIX BY HAND.  Use a sturdy spoon and make sure to scrape the bottom of the bowl!  No need to over mix - just get them incorporated.

Using small to medium sized cookie scoop, place 8 cookies - spaced out - on each baking sheet.  I put 10 on one sheet and two of the cookies spread together.  (You can see the photo below - the two in the left bottom corner are too close...and they were touching when they came out.)  I used a medium cookie scoop.  If you use a small scoop, I'm sure the standard dozen will fit on a baking sheet.

Place in oven and bake for 9-11 minutes.  Remove pan to cooling rack and allow to sit for 15 minutes or so, then remove from pan and complete cooling on the rack.

Since I froze the rest of my dough balls, it will likely take the full 11 minutes to bake.  This "test" batch took 10 minutes and had a nice light brown crust around the edge, but still remained soft...like I like them. 

Here's a couple of things I noticed.  After baking, I really can't tell much difference between blue and green until I bite into the cookie...and I surely can't see a difference in pink and peach.  So, you might want to save yourself some effort...I can see the difference after I bite into them though - your call. 

Hmmm, maybe I should have taken a picture of that bitten one so you could see.  Oh dear, I'm forced to bite another cookie for the sake of getting a photo (as she laughs maniacally)!!! 

Well, I'll be...must have been the lighting in the kitchen...I can see the difference in blue and green fairly clearly in better light...but the peach and pink...just go with one or the other, not worth the effort! 

Well, heck, I can clearly see all the colors here...sigh...must be getting
"old eyes"....but my taste buds surely do work.  That's a good cookie!

Another thought...if I have the impetus to try this again, I'd try it with the Ghirardelli white chocolate.  While I've been a life long Nestle's chip user, I could significantly taste the richness of the Ghirardelli White Chocolate.  I'll make a note and when I try this again (which I know I will), I'll try using the way more expensive White Chocolate Baking Bars from Ghirardelli.  I'll let you know how it goes!

Bon Appetit, Y'all... and check back soon for this year's Easter Decorated Sugar Cookies!

SHARED WITH:


Addicted to Recipes Button, Page button


Our DelightfulHome
Tuesdays at Our Delightful Home

StumbleUpon

Saturday, March 31, 2012

Homemade Pastel White Chocolate Chips

Happy Easter Colors!!!
(See updates at end of this original post)

I have searched and searched and don't find a source for pastel white chocolate chips!  Why doesn't someone make these?  Do I just not know where to look?  I Googled it a variety of ways, looked online at my usual sources for specialty baking products...no success.  I didn't want pastel M&Ms (although I did eat an entire bag of Easter M&Ms while I thought about this for the last two weeks).  I want pastel colored white chocolate morsels (not candy coating discs either...chips please!) to make "Easter" Chocolate Chip Cookies!

OK...FINE!  I'll just try to make my own!  Rollying eyes smiley  (tongue out)

So, it's a Saturday afternoon and our previous plans for the day got cancelled at the last minute...seemed like it was time to give it a whirl.  I had previously bought both Nestle's Toll House Premier White Chocolate Morsels as well as Ghirardelli White Chocolate Baking Bars...our store didn't have any Ghirardelli White Chocolate Morsels, although I feel certain I've seen them before...and used them, unless I'm delusional...which is an absolute possibility! Tee hee :-)

My main concern with using coloring was fear that it was going to cause the melted white chocolate to seize...but I had hoped that whatever they put in the morsels as a stabilizer might help with that problem, so I went for the Toll House morsels, figuring they might be easiest to bring back to a "chip" shape since that's the way they started.

I set up my baking sheets with silicone baking liners, got out my food colors and piping bags and various tips with collars, bowls, spoons...all the things I thought I'd need.

I measured out 3 ounces of white chocolate morsels *(see note at end of post) into heat proof bowls and started on the first one.  (I'm doing 4 colors and I need 12 ounces for the recipe)

I have, in my not so illustrious past, burnt the crap out of white chocolate when melting it.  So, I started with 30 seconds and 50% power in the microwave.  I stopped and stirred them around, but really, no significant melting yet.  Added 15 seconds, 50% and stirred again...there we go - starting to melt so I stirred well - still bumps in the mix...added 15 seconds, still 50%, but stopped it at 10 seconds...stirred...perfecto!
Melted white chocolate with one drop of blue gel color


For the first batch I added just one drop of AmeriColor's Sky Blue (#103) soft gel paste food color.  Stirred thoroughly and it was a beautiful, perfect pastel blue.  Awesome! (**see note at end of post regarding alternate recommendation for food color)

I had already set up my disposable pastry bags (I'm lazy, it's all I can do to clean my tips, not doing bags too) with a collar and a Wilton #5 tip.  In the same way I add anything to a pastry bag, I had it sitting in a tall glass with the bag rolled over the edge of the glass to form a collar.  I scooped it in, tightened it down, sealed it with a rubber band (and later with twist ties - they worked better for me), and left it sitting tip down in the glass. 

I wanted it to cool a bit before I started piping so I prepped the next color (AmeriColor Deep Pink #114) and followed the same procedure.  No seizing - worked like a charm.  I left it to cool in the piping bag while I worked on piping out all the blue chocolate chips.

The #5 tip worked great.  I had a few different sizes out and I think the one I started with is indeed the best.  Beginners luck.  However, getting a neat chocolate chip took a little effort...that and I realize I can't go in a straight line :-)  Oh well, it is what it is.  Please don't judge me.  There is a definite rhythm to the process.  I pictured a machine.  Squeeze, release, pause, move, squeeze, release, pause, move.  If I forgot to release completely, there was a line of chocolate that followed to the next one.  If I didn't move my hand down the bag to keep an even flow, wocky chips happened.  I'd get going in a great rhythm with awesome little morsels...and then get out of sync, or my hand would feel tired and I'd loose it for a few chips.  Oh well, I guess in a cookie, no one will really notice.

I can tell you already, I'll be too tired after I finish the next two colors to bake cookies today. (I'm taking a pause between the blue/pink set before beginning the green/peach set)  I'll probably make the dough and freeze it tomorrow (I'll bake off a few to show you when I get to that point) - but I want to take them to my boys and grandchildren for part of the Easter goodies next week-end.  I'll want to bake them off fresh when it's closer to the time!

OK, I finished the green and the peach...the peach actually looks, to me, more like a light pink.  I used Mint Green #112 and Peach #117 for the last two batches. 


I must say, that's a fine looking bunch of chocolate morsels. I must also say I will need some ibuprofen any minute now. My hands are aching!

Still, it was a fun project.  I hope my progeny all appreciate the hard work for those special Easter  Chocolate Chip Cookies that their momma/grandma is baking for them!!!  I'll let you know.


*Follow-up Note Added 4/1/2012:
Duh, genius I am not.  Need 12 ounces of chips for recipe.  This made 9 ounces...because, of course, I left some in the bowl and some in the piping bags and collar area...unavoidable to use every bit I weighed into the bowls.  Should have done 4 ounces in each bowl!!! (banging head)

**Follow-up Note Added 3/10/2015
After several more years of working with cookies, chocolates, and cakes.... I'll tell you this will work much better if you do NOT USE WATER BASED GEL COLORS.  I frequently have the chocolate seize or get more thick than I want (thus the difficulty in the piping and pain in my hands).  It works MUCH BETTER with oil based food colors (like Chef Master has).  ALSO - I have given up on microwave melting of chocolate.  The ability to control temperature is so much better in a double boiler on the stove top or the newer Wilton chocolate melter.

A wonderful tutorial for melting chocolate may be found on Julia Usher's Youtube Channel.

Bon Appetit, Y'all!!!

Shared With:


Addicted to Recipes Button, Page button


Our DelightfulHome
Tuesdays at Our Delightful Home
StumbleUpon

Sunday, November 20, 2011

Chock-ful-o-Goodness Oatmeal Cookies


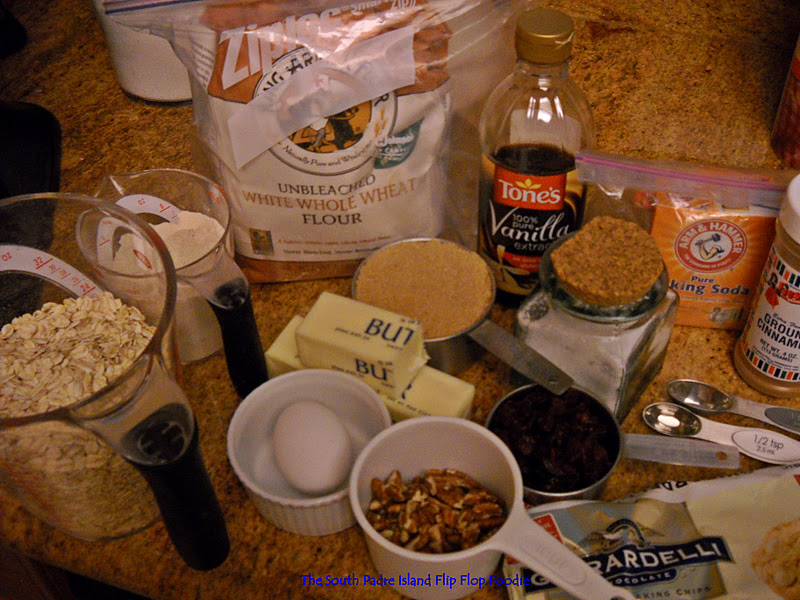
I'm rolling on my holiday baking this week-end.  I have to travel and it's too chaotic to bake in someone else's kitchen while they are trying to do their thing at the same time.  I know my husband loves some good oatmeal cookies and I saw a couple of recipes on FoodBuzz and Pinterest highlighting Cranberries, White Chocolate and Oatmeal as ingredients.  I've made some great oatmeal cookies in the past...and I've added chocolate chips to them too.  I've steered away from raisins - I'm just not a fan of baked raisins.  I am, however, a huge fan of dried sweet cranberries and happened to have some in my pantry.  I also bought some Ghirardelli white chocolate chips this week because there was a coupon!  I love Ghirardelli products.  It was one of the highlights of my trip to San Francisco to see the original factory.  I've been hooked ever since.  These cookies will be good "keepers" so long as I get them into an airtight container.  I've timed all of my baking to make the things that don't last to be done right before hopping into the car!  These nice dense cookies keep well for several days.

I'll give a nod here to Erin at Dinners, Dishes, and Desserts for the base idea and the many people pinning a variety of cranberry and white chocolate cookies on Pinterest this week!  I did pin a recipe from Risa at Baked Perfection on my Recipe Board.  I didn't use either of their recipes, but they did poke the idea into my brain!  Thanks ladies :-) 

CHOCK-FUL-O-GOODNESS
CRANBERRY, WHITE CHOCOLATE,
PECAN, AND OATMEAL COOKIES
Adapted from Stephanie Jaworski's recipe at joy of baking Oatmeal Cookies
further credited to Jane Rodmell's 'Best Summer Weekends Cookbook'


Ingredients:

3/4 cup salted butter, softened at room temperature
1 cup light brown sugar, firmly packed
1 large egg, at room temperature
1 teaspoon pure vanilla extract
3/4 cup of flour - measured thus:
1/3 cup of all purpose unbleached flour spooned into a graduated measuring cup
and the balance of the measure (just 3/4 total) filled with White Whole Wheat flour.
1/2 teaspoon baking soda
1/2 teaspoon salt
1 teaspoon ground cinnamon
3 cups old-fashioned rolled oats (not instant)
1 heaping cup Ghirardelli White Chocolate Chips
1/2 cup dried cranberries
1/2 cup roughly chopped pecans (make sure they are fresh)


Method:

Preheat oven to 350 degrees. Prepare cookie sheets with parchment paper or Silpat.

In the bowl of your stand mixer, beat the butter and sugar until creamy and smooth (about 2-3 minutes).
Add the egg and vanilla extract and beat to combine.
Scrape down sides of bowl.
In a separate bowl, whisk together the flours, baking soda, salt, and ground cinnamon.
Add the flour mixture to the creamed mixture and beat until incorporated. Scrape the bowl, getting down into the center at the bottom, not just the sides.
Stir in the oats.  I mixed them just a few times around with the stand mixer then mixed the rest by hand.
Add in the chips, cranberries, and pecans.  Again, let the mixer do a couple of laps around the bowl to get the basic incorporation going and then finish by hand with a sturdy wooden spoon or spoonula.

For large cookies, use about 1/4 cup of batter (I used a 1 1/2 liquid ounce scoop which equals 3 tablespoons - I ended up with 19 cookies).

Space the cookies about 2 inches apart on the baking sheet. I actually hand-rolled the scooped cookies into a ball because some pieces were falling apart. I then flattened the cookies to about 1/2 to 3/4 inch thick with my hands.

Bake the cookies for about 12-15 minutes (mine were perfect at 13-14 minutes) or until barely light golden brown around the edges but still soft in the centers.  They don't acquire a lot of color and if you want them chewy, don't over-bake.

Remove from oven and let the cookies cool a few minutes on the baking sheet before transferring to a wire rack to cool.

These are some awesome cookies.  I can't wait for my hubby to try them...I think he's gonna like 'em!!!

Musical Baking today compliments of the album Nick of Time by Bonnie Raitt.  Loved listening to it 21+  years ago when I fell in love with my honey...and love it still today. (of course it was on cassette back then - now it's on the mp3 player!)

Enjoy the cookies - they are definitely going to be on my annual Thanksgiving cookie list from here on out!

Bon Appetit, Y'all!!!

SHARED WITH:


StumbleUpon

Friday, November 19, 2010

Cake Pops - I'm exhausted!

This is going to be brief...because I'm exhausted...and I have about 2 dozen more cake pops to dip.  I forgot how labor intensive this is.  Bakerella makes it look so easy :-)

So, if you read my review of her fabulous book, and look at my photos...you will see that I am in the infant stages of cake poppery!  The teen has already snatched one and he had a big smile when he bit into the pop...so I guess they taste good anyway!  My granddaughters like Tinkerbell, so I bought some Tink sprinks...purple and green jimmies, purple sugar, and some candy butterflies.  I bet they will be a hit when I arrive in Austin in a few days!  Those cute girlies are never critical of Grandma's goodies...they are happy to dig in.

These cake pops are spice cake and cream cheese frosting with white chocolate coating.
Don't laugh at my cake pops ...I'll keep trying!!!

The teen ate the two unsprinkled pops before I could type this blog post!
StumbleUpon