The South Padre Island Flip Flop Foodie Brownsville restaurants

Search The South Padre Island Flip Flop Foodie Blog!

Sunday, October 27, 2013

Birthday Cookies for Lola

A 6 1/2 inch by 6 1/2 inch plaque cookie using:
*Stencil from Michael's on the base royal icing flood
*sprayed with Wilton pearl sheen edible spray,
*royal icing transfer roses I made
after watching a SweetAmbs tutorial (sample of tutorial here). 
I'm still working on that skill but each attempt is slightly better,
*bead work and shell borders, and
*another stencil on  top of the base stencil...lots of work! 

My oldest granddaughter turns ten years old today (do I feel old???).  Her mom and my son are not together but they do a great job of co-parenting, taking turns with parties, and helping each other whenever needed.  Together, they have been rearing a bright, polite, and amazing young girl.

Mr. Flip Flop and I enjoyed visiting the old neighborhood for a fun at-home birthday party.  Last year's fun was at a Lazer Tag and gaming facility, which the younglings adored.  However, I really enjoyed seeing some more old-fashioned fun going on via games on the patio, a piñata, cake and cookies and ice-cream, and presents opened and appreciated in a more quiet environment.

Perhaps I sound old school, but the kids had fun and conversation was actually possible.  Turn-taking, courtesy, and enjoyment was evident.  Can't imagine a better memory to carry forward.
Crowns for Princess Lola
These royal icing roses were
accented with pink lustre dust.

As usual...I made cookies.  I made a special set for Lola and we shared a cookie with each child from the Halloween batch.  The birthday cookies were Vanilla Bean Sugar Cookies with the addition of 1/2 teaspoon of LorAnn's Princess Cake and Cookie Bakery Emulsion.  I love this new form of extract!  It is suspended in water instead of alcohol.  Don't know how they do that, but it sure makes for a nummy cookie!  The Halloween cookies were without that new addition.  I could taste the difference...not much, but the emulsion gave it a depth of sugary goodness that makes me think I will be adding it to many of my cookie batches!

My son deciding which cookies to hold back for his girls!

I think they were enjoyed, lots of questions about the cookies, and one comment from a young man "did you make this icing?" to which I replied "yes".  He said "you should make it softer - it's too hard", to which I tried to reply convincingly "it has to be hard to hold the shapes".  His dubious response?  "well, it would taste better if it was softer".  I laughed and have to admit he is right.  Softer is tastier to the tongue...but royal icing décor has to be quite firm.  Maybe he'll appreciate that aspect as he gets older...or maybe not!  It did make me laugh though.

This "cake cookie" was also stenciled with Wilton
spray - a silver spray this time. The stencil was a
quatrefoil stencil from SalsaStencils.
Unfortunately, I managed to move the stencil when spraying...
not my best work.  I didn't have a back-up cookie either.  Yikes! 
Thankfully, Lola didn't seem to notice!
So, Happy Birthday my sweet girl.  You seemed to have a great time, and after ditching you pretty fairy wings, you were fully into sweating off your fairy make-up.  Hope the rest of your day was just as awesome.  You are very loved!!!


Bon Appetit, Y'all!!!StumbleUpon

Saturday, October 26, 2013

Dump-in Beef Vegetable Soup

We were so hungry we didn't take photos...although my husband deemed this soup worthy of a wait for photographs.  Unfortunately, I didn't feel like setting it all up.  When I make it again, I'll add some photos.  It was absolutely delicious.  Give it a try!


Ingredients:

2 tbsp. olive oil
1 pound quality stew meat chunks or chunks of thick sirloin steak
1/2 large yellow onion, diced
1 15oz can crushed tomatoes
3 tbsp. tomato paste
3 stalks celery, diced
3 carrots, halved and sliced
1 tsp dried basil
3 cloves of garlic, pressed
1 tsp of garlic powder
1/3 head of green cabbage, large dice
1 cup sugar snap peas, cut into bite-sized pieces
1 can cut green beans
1 can black-eyed peas
1 quart low-sodium beef broth
2 cups chicken stock
4 cups water
kosher salt - to taste
fresh ground pepper - to taste

Method:

Heat olive oil in a Dutch Oven.  Season beef with salt and pepper and add to pan, tossing to brown.  Add onions and garlic with a pinch of salt, stir around for about a minute.  Add tomato paste and stir in and cook for a minute or two.  Add the celery and carrots, stir for a minute or so.  Add can of crushed tomatoes and all of the other ingredients except the canned green beans and black-eyed peas.  Stir well and bring to a boil then reduce to simmer.  Leave on a good simmer (not too high, not too low) until meat is tender, stirring every so often to ensure nothing sticks to the bottom of the pan.  In last 30 minutes before serving, add green beans and black-eyed peas (do not drain) and re-season to taste. 

I let mine simmer for several hours.

A hearty and delicious vegetable beef soup - perfect on a chilly night!

Bon Appetit, Y'all!!!StumbleUpon

Friday, October 25, 2013

Halloween Cookies


This year's cookies were a bit of trial and error in trying to do something "different".  I've seen so many cute candy corn cookies floating around the cookie world that I knew I wanted to do something with that cutter (I've had for a while and never used).  I ended up trying to stencil on them with some cute little round stencils from Designer Stencils.  The error part was trying to stencil on a cookie that was not perfectly flat.  The three color layers resulted in a "bump" and that caused some bleed under the stencil.  One of the things I've learned over the past couple of months is that a set of artist palette knives/spatulas are my favorite tool for spreading the royal icing over stencils when working on small cookies/small stencils.  They are just perfect!  I got mine at Michael's in the artist supply section.  They were reasonable in price and really a great addition to my cookie tool kit!

Even with the under-bleed, the cookies turned out very cute IMHO!  I added a dot of green for a witch eye, marbled in some yellow and orange on the cauldron flames and added some yellow dots as "bubbles".  Gave the cookies some character.

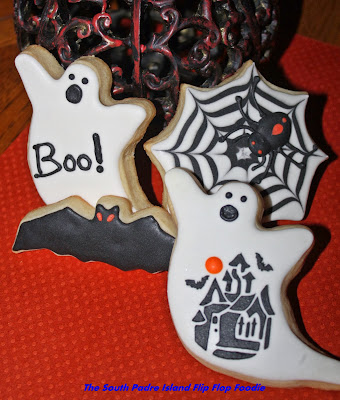
The set I made with ghosts, bats, and spider webs turned out quite well.  The stencil on one ghost was also from the set described above accented with an orange moon.  I made spider bodies as RI transfers and then piped on the legs when I applied them.  If you don't know how to make a royal icing transfer, here is a link to Haniela's YouTube video where she shows one way to make these spiders (mine were a bit different - but she shows you very easily how to make some for yourself!)Easy to do and gave the cookies a little bit of 3-D pop.  Bats this year were kept simple.  Last year's bats were a bit too much black RI for my taste.  These are smaller and just have spooky orange eyes.  I think the grandkids are going to love them!


The final set of cookies were edible wafer papers on rectangle-shaped Vanilla Bean Sugar Cookies.  The cutter was not perfectly "plumb" so some of the rectangles were a little wonky...but they still worked out fairly well.  I bought these cute Vintage Halloween Wafer Papers from an Etsy seller, The Cookie Pixie.  She does great work and has blog posts to help you learn how to apply wafer papers.  I did a blog post on my first experience with this back in July.  I admit I'm not wild about the wafer paper texture...they do melt on contact with water and dissolve in the mouth somewhat quickly.  Still, just not wild about it personally.  It is, however, one of the few ways of applying that level of detail on a cookie without being an artist of the highest caliber!  So, it suits me just fine.  Again, the grandkids are not bothered by the wafer papers and I bet they like these cookies a lot!


I hope you step outside the box this year and try some variations on your usual theme with your 2013 Halloween cookies.  I sure enjoyed doing some different designs and bet you will too!

Bon Appetit, Y'all!!!

StumbleUpon

Sunday, October 6, 2013

SPI Sandcastle Days 2013


I don't always talk about food.  While it is a favorite topic, I also like to share the great activities that go on in my little part of the world.

This week-end was the 26th anniversary of the South Padre Island Sandcastle Days.  I was feeling icky for the first few days of the event, but Sunday turned out to be a cool (and somewhat blustery) day and I felt up to an excursion.  Mr. Flip Flop and I headed over to the island before noon and spent a couple of hours enjoying the cool weather, some frothy wave action, and some gorgeous sand sculptures.

Professionals, like our own Sandy Feet and Amazin' Walter, joined with amazing sculptors from around the world to create both fantastical and gorgeous works of art.  I am a huge fan of both purist sand castles like you will see from Amazin' Walter...as well as the more abstract works.  My hubby always has to drag me away.  I circle each one repeatedly seeking and finding new details at every angle.  I may have to go back tomorrow (if the tide doesn't wipe them out...it's been a bit higher than normal)... I love to go back when the beach is emptier of crowds and just sit and stare at the truly awesome feats of sand sculpture.

I put together a little YouTube slide show of my pics from today.  Just click on the link below to view.  Hope you enjoy!

South Padre Island Sand Castle Days 2013

See ya soon with more fun and good food!

DebbiStumbleUpon