This year's cookies were a bit of trial and error in trying to do something "different". I've seen so many cute candy corn cookies floating around the cookie world that I knew I wanted to do something with that cutter (I've had for a while and never used). I ended up trying to stencil on them with some cute little round stencils from Designer Stencils. The error part was trying to stencil on a cookie that was not perfectly flat. The three color layers resulted in a "bump" and that caused some bleed under the stencil. One of the things I've learned over the past couple of months is that a set of artist palette knives/spatulas are my favorite tool for spreading the royal icing over stencils when working on small cookies/small stencils. They are just perfect! I got mine at Michael's in the artist supply section. They were reasonable in price and really a great addition to my cookie tool kit!
Even with the under-bleed, the cookies turned out very cute IMHO! I added a dot of green for a witch eye, marbled in some yellow and orange on the cauldron flames and added some yellow dots as "bubbles". Gave the cookies some character.
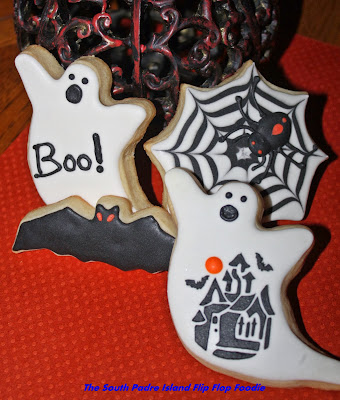
The set I made with ghosts, bats, and spider webs turned out quite well. The stencil on one ghost was also from the set described above accented with an orange moon. I made spider bodies as RI transfers and then piped on the legs when I applied them. If you don't know how to make a royal icing transfer, here is a link to Haniela's YouTube video where she shows one way to make these spiders (mine were a bit different - but she shows you very easily how to make some for yourself!)Easy to do and gave the cookies a little bit of 3-D pop. Bats this year were kept simple. Last year's bats were a bit too much black RI for my taste. These are smaller and just have spooky orange eyes. I think the grandkids are going to love them!
The final set of cookies were edible wafer papers on rectangle-shaped Vanilla Bean Sugar Cookies. The cutter was not perfectly "plumb" so some of the rectangles were a little wonky...but they still worked out fairly well. I bought these cute Vintage Halloween Wafer Papers from an Etsy seller, The Cookie Pixie. She does great work and has blog posts to help you learn how to apply wafer papers. I did a blog post on my first experience with this back in July. I admit I'm not wild about the wafer paper texture...they do melt on contact with water and dissolve in the mouth somewhat quickly. Still, just not wild about it personally. It is, however, one of the few ways of applying that level of detail on a cookie without being an artist of the highest caliber! So, it suits me just fine. Again, the grandkids are not bothered by the wafer papers and I bet they like these cookies a lot!
I hope you step outside the box this year and try some variations on your usual theme with your 2013 Halloween cookies. I sure enjoyed doing some different designs and bet you will too!
Bon Appetit, Y'all!!!


No comments:
Post a Comment
Comments are moderated - you should see it within a few hours if approved! Spam or marketing comments are immediately deleted. Thank you!!!