The South Padre Island Flip Flop Foodie Brownsville restaurants

Search The South Padre Island Flip Flop Foodie Blog!

Wednesday, November 27, 2013

Fresh Pumpkin Pie ... a First for Me!


Several weeks ago we received a package from my husband's sister in Indiana.  In it was the jackpot... a 4 cup jar of freshly canned pumpkin puree!  I was so thrilled I could barely stand it.

Today, I began "the baking of the pie".  Fortunately, since I've never made a fresh pumpkin pie (only from packed canned pumpkin) my sister-in-law included a recipe.  I know my mother-in-law and she put up pumpkin together but I don't really know whose recipe this is.  I'll have to find that out!  Thank you to Ruth Hook Wiles and Kate Hook for sharing the fruits of your labor.  I pray I do it justice.

I do know, when I spoke to Kate last week, she said it was mandatory to use powdered milk in the recipe.  OK, I said, no problem - I keep that on hand in the event of hurricanes!  Here's the recipe that was included. 

Fresh Pumpkin Pie
Recipe from Ruth Hook Wiles and/or Kate Hook
(I'll update when I know the answer)

4 cups fresh pumpkin puree (you'll have to figure out that part yourself)
1 cup powdered milk
1 1/2 cups granulated sugar
4 eggs
1 tsp salt
2 tsp cinnamon (I used Watkins Saigon Cinnamon - my fave!)

1 tsp ground ginger
1/2 tsp cloves
1/2 tsp freshly grated nutmeg (my addition - I love nutmeg in pumpkin pie)

Mix all together. (How simple is that?)
Getting the sealed lid off the jar was the hardest part
of this recipe!

All ingredients poured in and mixer turned on...easy recipe!


I love "dump it in a bowl and mix" recipes!  This came together
just beautifully!!!

Make your own pie crust or buy the Pillsbury brand that you unroll.  Form the crust in the bottom of a DEEP dish pie pan (it's a lot of pumpkin).  Pour pumpkin mixture in the crust.  Bake at 425 degrees for 15 minutes.  Reduce heat to 350 degrees for 50 minutes. 

I went the Pillsbury method...because I suck at pie crust.

I got some cute little Paula Deen pie crust cutters in preparation for the holidays...and I used the pumpkin cutter to make pieces from the extra roll of pie crust.  It made just enough to overlap and circle the pie. 

I filled the pie crust after getting all those pieces on, then gave it an egg wash.  After the first 15 minutes, it really needed a pie crust shield.  I made one out of aluminum foil.  Worked pretty good!  Unfortunately, the cut-out pumpkins didn't fare as well as last year's leaves did.  They hung over the edge too much.  You really can't even tell they are pumpkins once they are baked. Back to the leaves next year.  (I don't think Paula Deen really tried these out before she put her name on them...or maybe I missed some instructions somewhere)  Ever the optimist though, maybe I could still use them next year for the baked pumpkin cutouts as toppers for the whipped cream - those turned out okay! (baked on a baking sheet topped with silicone baking mat - egg wash, sprinkled with sanding sugar)
Little pie crust toppers for the whipped cream on the pie


I'm not a freak about raw eggs (I always sample my raw cookie dough before rolling and baking) so I sampled a bite of the filling.  Picture my eyes rolling back in my head.  I don't know how to identify what tastes specifically different...but it's sure better than any pumpkin pie I've ever made before!  Depth of flavor is the best way to describe it I guess.  In other words...fresh pumpkin matters! (Did you know Libby's canned pumpkin is actually a squash from the butternut family? A pumpkin is a squash, right?  I don't know why I brought it up.  Here's a link to a blog where it is explained in much better terms than I could provide.  I will say, I probably won't ever make my own fresh pumpkin pie again unless someone sends me their fresh pumpkin...so whatever Libby's does, it works for me!

Okay - what do you do with your scraps of pie dough?  I did the cut-outs sprinkled with sugar, and then I had a little more left.  I noticed there was still some pie filling all over the sides of my mixing bowl because I didn't scrape... because I had filled my pan to where I felt comfortable (to avoid rising over the edge).  So, in the interest of waste-not-want-not,  I grabbed a mini muffin tin, pushed in enough dough to thinly line six muffin tin spaces...and I was able to scrape out enough filling to fill them to right below the edge of the dough...popped it in on the oven rack right under the pie for the final 15-20 minutes of baking...voila...tasty testers for me and the boys!

Hmmm...think I'll have one of those right now!  First there were six and now there are five!


I was going to save this post for Thanksgiving since I already posted one today...but what the heck.  Someone might NEED to read this post...or not.  By this time Thursday, I hope to have already had a big ol' slice of this pie topped with freshly whipped cream. The tester I had still warm from the oven was heavenly, so I have no doubt the big old pie is even better!  Happy Thanksgiving everyone...hope it's a wonderful day for you and your loved ones.

Bon Appetit, Y'all!!!

Update 11/28/2013 - post Thanksgiving dinner...
Quite possibly the best pumpkin pie I have ever eaten...absolutely delicious!


StumbleUpon

Lemon Ricotta Acorn Cakelets

I'm in love with Nordic Ware pans.  I've posted about my seashell teacake pan (which I prefer to call cakelet pans) but I haven't shared my newest acquisition...the Acorn pan!  I saw it on Amazon and searched every local retailer possible to no avail so I finally broke down and ordered it online.  When you live in the boonies and you want something specific, Amazon can be a real life saver.  I am still a firm believer in shopping in local independent shops whenever possible...but sometimes...you gotta go with the big box in the sky.  This was one of those times.

It's been on my wish list for over a year.  I kept hoping the price would go down.  It didn't.  I also opted to buy a second seashell cakelet pan.  It gets really old to try to make batches of these and wait for cooling in between.  Nigh impossible for my patience level!  So, now, I have 4 Nordic Ware "teacake pans".  One, the first, is not my favorite, but I use it anyway.  I'm sure I just need to find the correct density batter/dough to make that first one work well.  I usually end up with a lot of holes and that's not always pretty!

Anyway, here's a picture of my new pan.  So cute!
Nordic Ware Acorn Cakelet Pan

I had every intention of creating or finding a pumpkin recipe for the acorn cakelets...but I ended up having 6 expensive Meyer lemons that were staring at me from my counter, and I needed to use them before they became over-ripe on me.  I search for them so I really don't want THAT to happen!  Therefore, I grabbed my absolute favorite lemon cookie recipe (which is quite cakey) and decided we would have lemon acorns...and lemon seashells too, because, I do live at the coast!

I whipped them all up and having 3 pans made life so much easier.  The recipe made exactly 2 pans worth of each cakelet (4 pans total).  Since I started the acorn first, it was great to have it cool and easily washed for the 4th round.  I did up the glaze recipe a bit because I tend to run out when I use the original recipe instructions.  Here's the link to the original recipe from Giada De Laurentis.  I don't change anything in the dough. However, I do give a quick spritz of Pam or other cooking spray to the pan before filling.  I use a 1 Tbsp. scoop to fill (and actually liked the second batch of acorn cakelets where I used a heaping Tbsp scoop instead of it leveled off).  For a more ample amount of glaze, I make it thusly:

Lemon Drop Glaze

2 cups powdered sugar
4 Tbsp fresh-squeezed lemon juice
1 lemon finely zested (a Microplane is perfect for this task)

Combine ingredients with a small whisk.  Cover and let sit for 15 minutes or so to ensure any sugar lumps dissolve.  Re-stir before using.

Place the cakelets on a rack over a baking sheet.  Ensure they are completely cool.  Dip the cakelet upside down into the glaze, allow to drip a second or two over the bowl, then turn right side up and place back on rack for glaze to harden.
The glaze is hardened and the cakelets are now
easy to handle.  If you look close you can see
the zest in the glaze.  OMG - so good!

I call it Lemon Drop Glaze because my family says these cookies/cakelets taste like lemon drops.  They are deliciously sweet and tart and my eyes roll when I bite into one!

I have no idea how long these cookies or cakelets last.  They don't stay around in my house long enough to find out!  Keep covered and enjoy (I love a cup of coffee or hot tea with 2 or 3 of these babies).

See you on the other side of Thanksgiving my friends!

Bon Appetit, Y'all!!!
StumbleUpon

Friday, November 22, 2013

Thanksgiving Cookies 2013


I've been studiously working on cookies all week.  We are staying home this year because Mr. Flip Flop has to work Friday... so family Thanksgiving will be celebrated over the week-end (probably with Mexican Food because we'll all be stuffed with turkey already).

I wanted to get some cookies in the mail today for some of those family members we won't be able to see.  I hope they make it there intact and on time for them to enjoy...I've happily played with this first set...and will be working on more to take with us for our little celebration when it finally happens.  It's not the day you celebrate thankfulness and family that matters, it's the people you're with!

I used Vanilla Bean Sugar Cookie dough and you can find the link to a printable recipe here.  Scroll to the bottom of the recipe and it says "print page" below the comments box.  I roll all of my cookies 3/8" thick and this dough does a great job of not spreading when well-chilled. For best results, chill overnight in the fridge.  Give it a try!  I like to use Nielsen-Massey Vanilla Bean Paste...it's the best I've ever tried.  If you can't find it locally, you can order it on Amazon in the U.S.  If you can't find paste or order it...you can scrape whole vanilla bean pods of their seeds and add it to the dough instead.  I would suggest 2 or 3 beans...you really want to see the little specks in this cookie and have a fragrant vanilla aroma when it bakes.  The Lor-Ann's emulsion is also available on Amazon if you can't find it locally.  I have gotten it at Hobby Lobby and at Michael's down here in The Valley.  It makes a delicious difference to the taste.  Shake both the paste and emulsion before using for best results.

So - here's a sharing of photos...with some commentary.  I'm still struggling with the stencils, but I assume, as my husband says, "it's a cookie...they will eat it".    I guess that is the absolute truth, but I really like them to be the best that they can be!

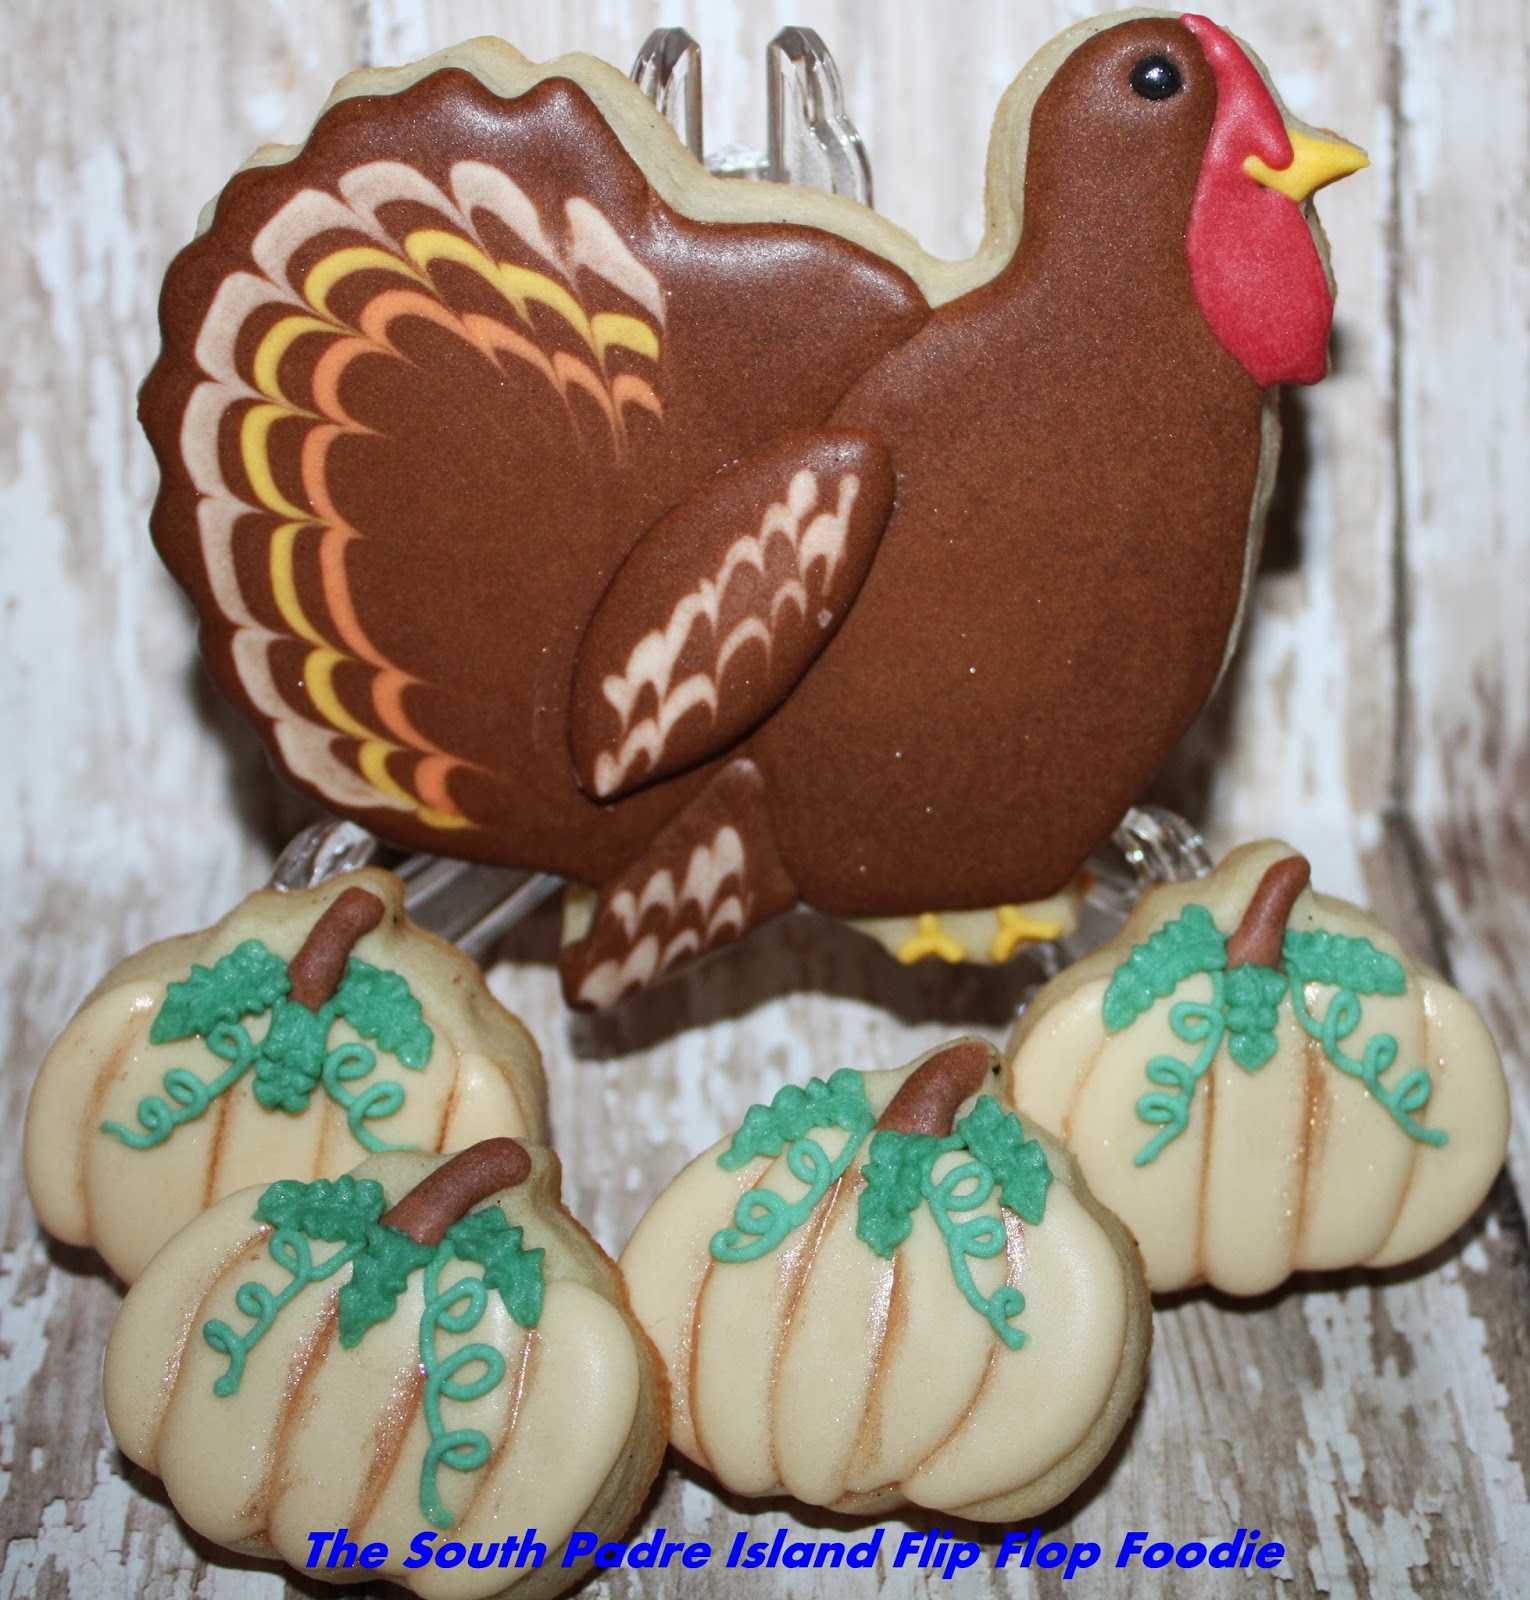
Large Turkey and Mini Pumpkins
I wrote a Turkey Tutorial last year and I mentioned that I felt like it needed a wing.  I finished my big turkeys this year and thought the same thing, but I had not remembered my comment that I would address that issue in 2013.  So, I thought, "how about a royal icing transfer?"  I'd finished everything last night and had some brown and ivory royal icing left over so I grabbed a piece of flat parchment paper and piped a brown "shape" and two lines of ivory...ran a needle tool down them for feathering and left it to dry last night.  I glued them on with some more brown icing, used a dry paint brush to neaten up where some squished out after I applied the transfers, and voila!  It was just the trick! 

I see so many cookie artists' work that I worry I am using somebody's idea without giving credit.  I try to go back and see if I can find pictures where I got the idea.  These little pumpkins are one of those ideas I know I got "somewhere" and I can't remember where.  I know I got the idea for the ivory pumpkin from LilaLoa's blog.  What I don't remember, is who I saw use lustre dust in the crevices to accent the pumpkin curves.  It wasn't a white pumpkin, but an orange one.  If I find it, I'll be sure to add in credit.  I waited until the pumpkin sections were dried and then I dipped a dry paint brush in some bronze edible lustre dust, tapped off the excess and just ran it down the seams.  I really like the effect! (Update 11/28/2013 - I was looking at some YouTube tutorials today and saw Haniela had done orange pumpkins painted with lustre dust...I think that may have been where I got the idea.  Here's the link to her tutorial if you are interested.  She does great work!)

Two different leaf techniques.  I usually suck at leaves.
I love these front two!
Okay - I had to stop in the midst of my blog post writing and try like crazy to find my inspiration for the front two cookies.  I know it was a "chalkboard" style of cookie - dark background and light leaf veins.  Checked Cookie Connection clips, my Facebook feed, Google images...nada zip!  Again, I'll apologize in advance.  I think it was someone sharing someone else's cookies on Facebook.  Any whoo.... I am not really very good at Fall Leaves as a subject matter.  I think it is from living in Texas my entire life and we don't really get the colored leaves so I haven't any real-life experience to draw from.  I coated everything with a different orange that I mixed up with orange, brown, and some other color I can't remember...it looked "Fallish" to me and less like Halloween.  I based coated the leaves and let them dry.  I remembered seeing a YouTube video from Ali Bee's Bake Shop which demonstrated speckling leaves with lustre dust.  So, I watched it again and did that on the back cookie.  Then I watched a YouTube video from SweetAmbsCookies that inspired me to paint the piped veins with lustre dust...so I did that! I was down to the last two leaves last night (I put aside stuff I'm not good at) and decided I was going to use an edible food marker (brown) and just draw veins.  I was tired and I didn't really want to pipe anything any more.  I let them dry but didn't like the way they looked so I got a brush and dipped dry bronze lustre dust and started dry painting the entire cookie.  The lustre dust changed the brown to a kind of silvery bronze color and I perked right up.  I loved it!  Then, I used some of the wet to paint a border around the two leaves.  They ended up being one of my favorites in the bunch!  AND SO EASY!  I don't use my markers enough.

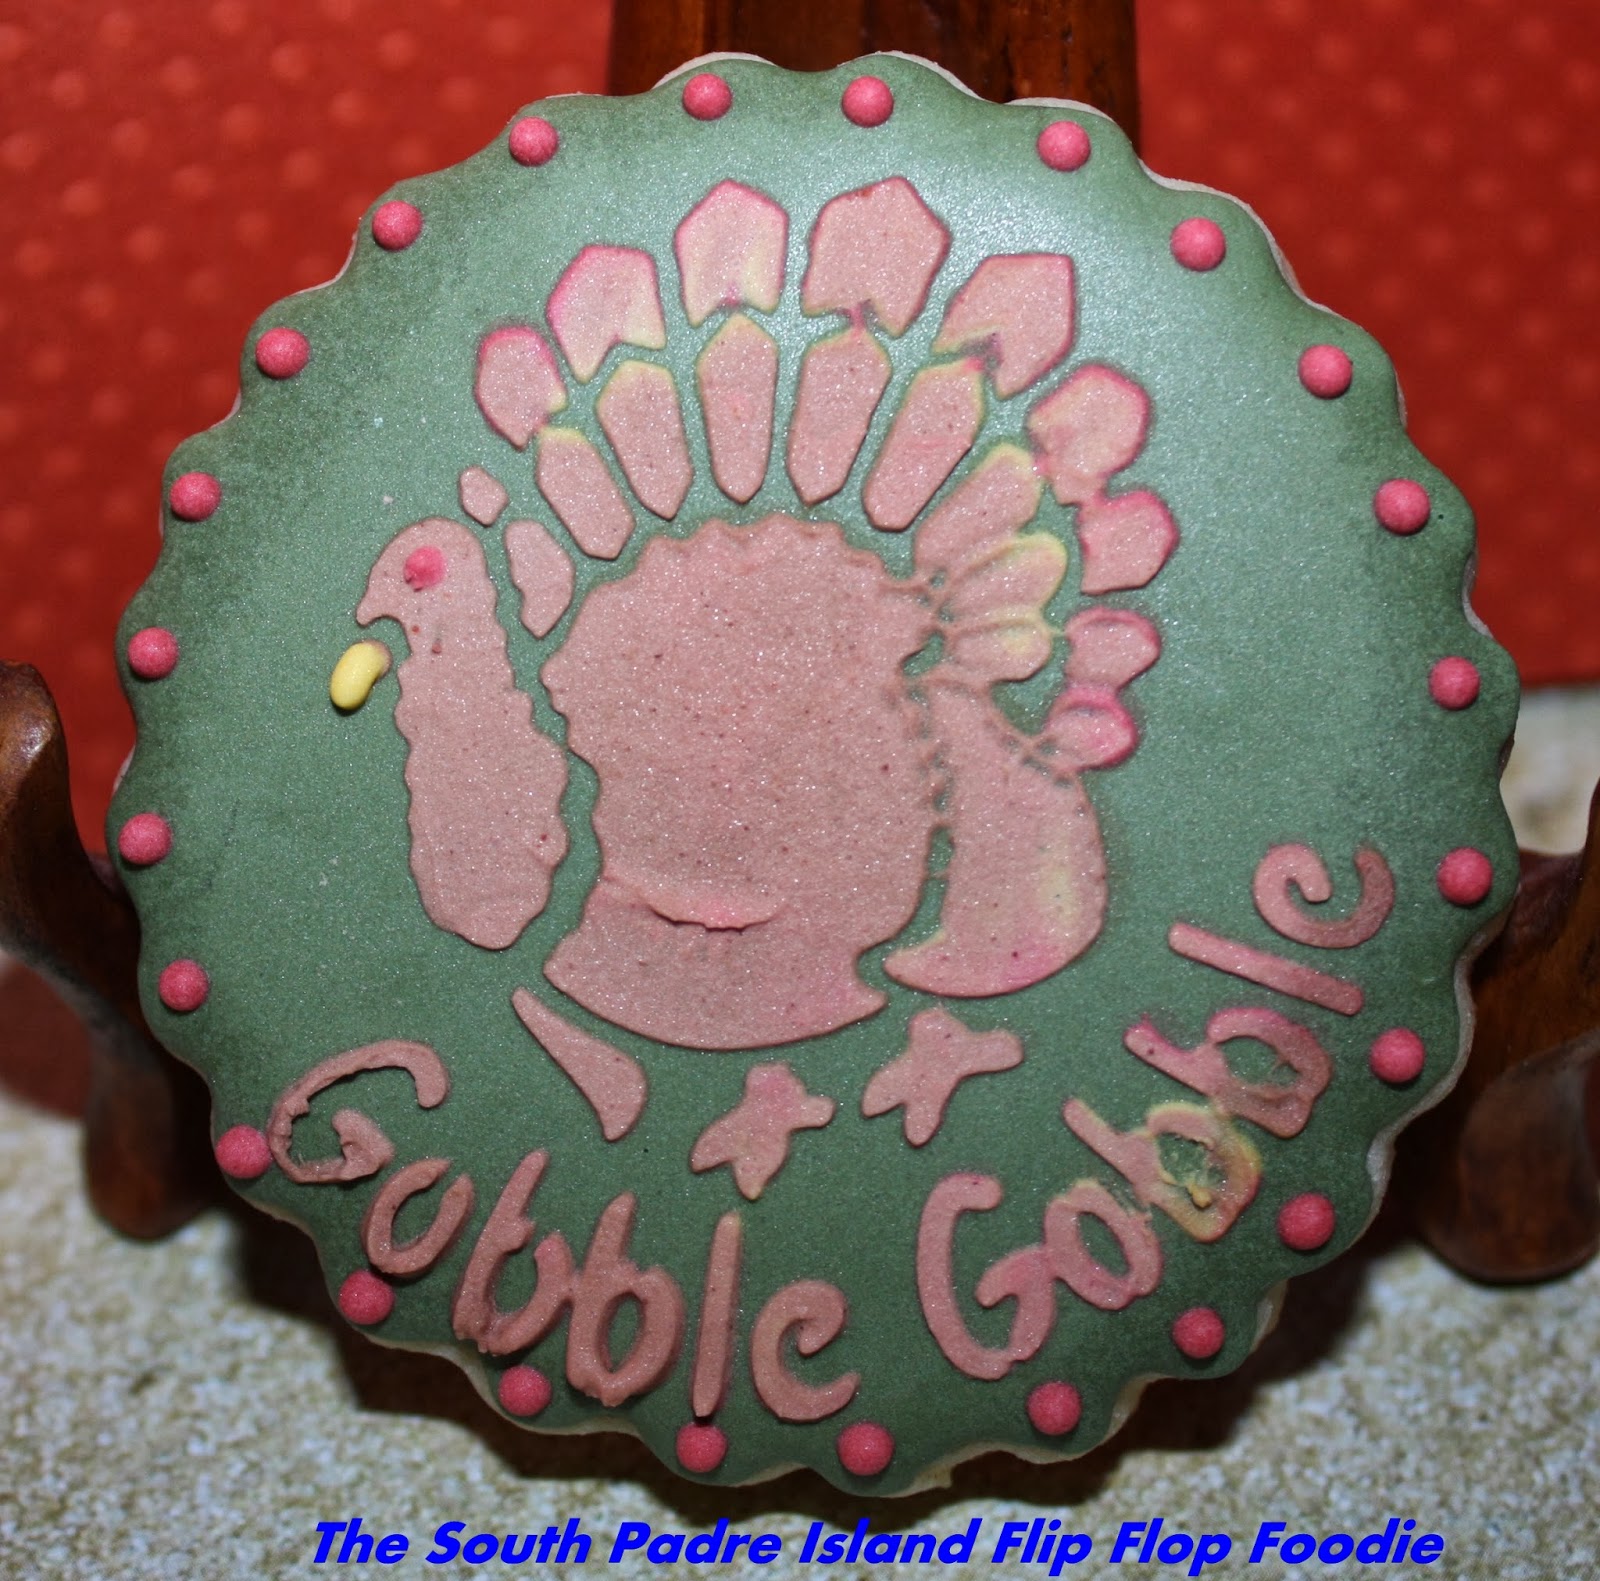
Turkey stencil from Designer Stencils.
I made 6 larger rounds in hopes of having an easier time stenciling.  Some luck...some not.  I waited too long into the decorating process and my hands were tired and shaky...and my icing wasn't "just right" and I got some "under flow" with the stencil...not crisp and clean.  Oh well - I'll keep trying.  The pumpkins, acorns, and turkeys were much easier this year due to practice!  The acorn was a larger cutter I found in a set at Michael's.  I find I really like my mid-sized acorn better - it isn't so "round" and the caps look better when they are a bit smaller.  Again...it's a cookie...they will eat it!

More efforts at stenciling....
The lower left cookie ... well, I moved it before I finished stenciling the words at the bottom...and once you do that - there's no going back.  So, I used a food marker to write the words.  Necessity is the mother of invention (not that invented anything, it just sounded like the thing to say).  I am posting this picture mostly to show the cookie on the lower right side.  The stencil skills were sucky on the leaves...but the words were crisp.  Good grief!  However, I liked the border I made.  I used a tiny little leaf tip from PME... #ST50... to go with a scallop and dot border.  I liked the way it looked, so I'm sharing.

Another DesignerStencils.com product.
This cookie was another experiment with borders.  I like multiple borders and I had a tip I'd never used because I couldn't figure it out.  It is a "spiked leaf" from PME and is #54.  I had it in with my star tips and when I sorted tips the other day I found it and looked it up.  I thought it was squished or something and then realized it was a leaf tip.  Huh, who knew?  Obviously not me!  I tried it out on this cookie as a border and while it was bigger than I expected, it was kind of cool.

Tired of looking at cookie pictures yet?  Yeah, me too...I have other things I should be doing...like packing these up to go out in the mail TODAY!

Here's the last one...

A stencil job I'm happy with!
This stencil turned out just the way I imagined it in my mind.  A little bit of maroon, some yellow, brown, and green leaf.  It came out fairly well I thought and I liked the shell and dot borders too.  Whew! (#13 Wilton star tip for the border).  All of my dots are using a PME 1.5 tip and a looser consistency of RI than I used to use.  I find if I space correctly, pipe straight up and down, and follow the Julia Usher school of "you should never have to push down a point if you have the right consistency of icing" (that's not a direct quote, but the general idea)...I get nicely rounded dots.

So, I have more cookies to make and I'll share those likely next week.  I won't have time for more blogging as we are ramping up for the big Gobble Gobble day.  Hope you have a wonderful Thanksgiving if you don't hear from me before then!

Bon Appetit, Y'all!!!


StumbleUpon

Wednesday, November 6, 2013

Fall Decorated Sugar Cookies

A friend of a friend was in need of cookies to be used as favors at her November luncheon.  She had tried my cookies at a beach birthday party and asked me if I would do a few for her party.  I don't really sell cookies so I was hesitant...but as we visited, I liked her and decided I would do it.

Of course, nothing ever comes together exactly as expected.  She had said it would be mid-November and I told her I needed at least two weeks advance notice.  She, unexpectedly, had to reschedule her luncheon to November 6th...a time frame that really wasn't optimal for me.  However, always trying to help where I can, I planned out my various work really fast and thought "I can probably do this"...and then I ended up having to take two trips to Austin (two 700-mile round trips - one planned, one not planned) within the span of the week I needed to start work on the cookies!  Yikes!!!

She had requested 30 minis and wanted Fall-themes...acorns, pumpkins, that sort of thing.  I knew I could whip those out fairly easily, quoted a reasonable price, and went on down the road thinking thirty mini cookies would be easy-peasy.  NOT! 

I could not find my mini acorn cookie cutter (which I was sure I had), but I did have a medium-sized acorn.  I did not have a smallish-medium-sized pumpkin...only largish-medium, large, and mini (and the mini looked too small next to the acorns)...but I had an appropriate-sized apple...which I could make look like a pumpkin with no one being the wiser. I also had one-step-up in size from a mini Turkey.  I finally settled on those three.  I think they turned out quite cute.  I gave her 31 cookies - the extra in case one broke or she needed a stress snack. (Who doesn't need a stress snack when putting on a luncheon for 25 or so folks???)

The party favors for the very popular South Padre Island KOA water aerobics class! 
I hear instructor, Mary L., is really awesome.  They have a heated pool too. 
I might have to go some time!

While I was making those, I went ahead and made one  of the slightly larger pumpkins and 3 round scallops because I wanted to try out some stencils before I started my personal Thanksgiving cookies.  Glad I did.  I'm always learning something!  The cookies were barely large enough, but there was an unseen slope at the edge of the base-coated rounds and the stencils did not lay flat on the rounds, causing some smearing at the lower edges.  I also didn't have adequate space for the border I wanted and had to improvise.  Again, one of those things most people might not notice...but we cookiers would see it!


So, I now know I will use a slightly larger cookie for the round Thanksgiving stencils I bought from Designer Stencils.  I also will try decorating the flat bottom of the cookie instead of the top.  I learned that trick from another cookier.  She said she always decorates that way so the surface is level.  I probably won't do it always...but when I need a flat stencil surface, that may be the answer! 

The leaves on the cookie above the this one were
much more forgiving of the rounded edge than the
Gobble Gobble lettering was.  It was very challenging
and I had to work steadily with my needle tool
to get the letters to look like the word Gobble!

I also tried a multi-colored Fall leaf (one of 4 in another stencil set, also Designer Stencil product).  I was really pleased with it!  I'll be making more of those, using all of the 4 leaf shapes and working on my multi-color stencil technique.  I don't have it down "pat" just yet.  I tried to make the turkey feathers above be reddish at the top and yellowish in the middle...but they got muddled with brown.  I was more careful with the leaf below and I really like the look I got with the leaf.


I used the Vanilla Bean Sugar Cookie recipe for all of the cookies in this batch, as requested by Mary, the friend of a friend...and added a bit of the Princess Cake/Cookie Emulsion I discussed in my last blog post.  Makes a really tasty cookie! I'd considered making a Meringue Powder Butter Cream icing (the mouth feel is so much nicer than royal icing) but remembering how long it took to dry last time I did that...I knew I'd have to stick to RI this time.  I was lucky to get everything done in the short amount of time I had...didn't want to stack the cards against myself!

The order was delivered Tuesday for the Wednesday party and Mary seemed happy.  Woo Hoo!  One of the reasons I don't sell cookies in general is the stress I feel over worrying if the customer would like my cookies or not.  I'm my worst critic!  However, she said they were beautiful, I felt a warm glow, and I know she got a good deal getting bigger-than-mini cookies for a mini price.  I really think her guests will be pleased. Still, I cleared enough financially to get myself a nice manicure...so I consider it work well-done!

The cookie on the left is a pumpkin cutter and the cookie on the right
is an apple cutter.  I think it worked out well and was more in-tune with
the size of the other cookies in the set.
I will share more cookies as I progress through my Autumnal baking endeavors.  By the way - I found a cute little set of graduated leaves and acorns at Michael's yesterday....so I'm good to go on all-sized acorns!  LOL!

I'm already starting to think about Christmas baking...are you?  I was slightly irritated when shopping yesterday...I could barely find any Thanksgiving stuff because Target, Michael's, Wal-Mart, and Kohl's had shoved over anything to do with Thanksgiving and were busily stocking Christmas stuff.  Christmas music was blaring in the stores.  It made me sad (but I still bought some Christmas baking morsels and a few other Christmas baking items because they'll likely be sold out if I don't get them now).

Bon Appetit, Y'all!!!


StumbleUpon

Sunday, October 27, 2013

Birthday Cookies for Lola

A 6 1/2 inch by 6 1/2 inch plaque cookie using:
*Stencil from Michael's on the base royal icing flood
*sprayed with Wilton pearl sheen edible spray,
*royal icing transfer roses I made
after watching a SweetAmbs tutorial (sample of tutorial here). 
I'm still working on that skill but each attempt is slightly better,
*bead work and shell borders, and
*another stencil on  top of the base stencil...lots of work! 

My oldest granddaughter turns ten years old today (do I feel old???).  Her mom and my son are not together but they do a great job of co-parenting, taking turns with parties, and helping each other whenever needed.  Together, they have been rearing a bright, polite, and amazing young girl.

Mr. Flip Flop and I enjoyed visiting the old neighborhood for a fun at-home birthday party.  Last year's fun was at a Lazer Tag and gaming facility, which the younglings adored.  However, I really enjoyed seeing some more old-fashioned fun going on via games on the patio, a piñata, cake and cookies and ice-cream, and presents opened and appreciated in a more quiet environment.

Perhaps I sound old school, but the kids had fun and conversation was actually possible.  Turn-taking, courtesy, and enjoyment was evident.  Can't imagine a better memory to carry forward.
Crowns for Princess Lola
These royal icing roses were
accented with pink lustre dust.

As usual...I made cookies.  I made a special set for Lola and we shared a cookie with each child from the Halloween batch.  The birthday cookies were Vanilla Bean Sugar Cookies with the addition of 1/2 teaspoon of LorAnn's Princess Cake and Cookie Bakery Emulsion.  I love this new form of extract!  It is suspended in water instead of alcohol.  Don't know how they do that, but it sure makes for a nummy cookie!  The Halloween cookies were without that new addition.  I could taste the difference...not much, but the emulsion gave it a depth of sugary goodness that makes me think I will be adding it to many of my cookie batches!

My son deciding which cookies to hold back for his girls!

I think they were enjoyed, lots of questions about the cookies, and one comment from a young man "did you make this icing?" to which I replied "yes".  He said "you should make it softer - it's too hard", to which I tried to reply convincingly "it has to be hard to hold the shapes".  His dubious response?  "well, it would taste better if it was softer".  I laughed and have to admit he is right.  Softer is tastier to the tongue...but royal icing décor has to be quite firm.  Maybe he'll appreciate that aspect as he gets older...or maybe not!  It did make me laugh though.

This "cake cookie" was also stenciled with Wilton
spray - a silver spray this time. The stencil was a
quatrefoil stencil from SalsaStencils.
Unfortunately, I managed to move the stencil when spraying...
not my best work.  I didn't have a back-up cookie either.  Yikes! 
Thankfully, Lola didn't seem to notice!
So, Happy Birthday my sweet girl.  You seemed to have a great time, and after ditching you pretty fairy wings, you were fully into sweating off your fairy make-up.  Hope the rest of your day was just as awesome.  You are very loved!!!


Bon Appetit, Y'all!!!StumbleUpon

Saturday, October 26, 2013

Dump-in Beef Vegetable Soup

We were so hungry we didn't take photos...although my husband deemed this soup worthy of a wait for photographs.  Unfortunately, I didn't feel like setting it all up.  When I make it again, I'll add some photos.  It was absolutely delicious.  Give it a try!


Ingredients:

2 tbsp. olive oil
1 pound quality stew meat chunks or chunks of thick sirloin steak
1/2 large yellow onion, diced
1 15oz can crushed tomatoes
3 tbsp. tomato paste
3 stalks celery, diced
3 carrots, halved and sliced
1 tsp dried basil
3 cloves of garlic, pressed
1 tsp of garlic powder
1/3 head of green cabbage, large dice
1 cup sugar snap peas, cut into bite-sized pieces
1 can cut green beans
1 can black-eyed peas
1 quart low-sodium beef broth
2 cups chicken stock
4 cups water
kosher salt - to taste
fresh ground pepper - to taste

Method:

Heat olive oil in a Dutch Oven.  Season beef with salt and pepper and add to pan, tossing to brown.  Add onions and garlic with a pinch of salt, stir around for about a minute.  Add tomato paste and stir in and cook for a minute or two.  Add the celery and carrots, stir for a minute or so.  Add can of crushed tomatoes and all of the other ingredients except the canned green beans and black-eyed peas.  Stir well and bring to a boil then reduce to simmer.  Leave on a good simmer (not too high, not too low) until meat is tender, stirring every so often to ensure nothing sticks to the bottom of the pan.  In last 30 minutes before serving, add green beans and black-eyed peas (do not drain) and re-season to taste. 

I let mine simmer for several hours.

A hearty and delicious vegetable beef soup - perfect on a chilly night!

Bon Appetit, Y'all!!!StumbleUpon

Friday, October 25, 2013

Halloween Cookies


This year's cookies were a bit of trial and error in trying to do something "different".  I've seen so many cute candy corn cookies floating around the cookie world that I knew I wanted to do something with that cutter (I've had for a while and never used).  I ended up trying to stencil on them with some cute little round stencils from Designer Stencils.  The error part was trying to stencil on a cookie that was not perfectly flat.  The three color layers resulted in a "bump" and that caused some bleed under the stencil.  One of the things I've learned over the past couple of months is that a set of artist palette knives/spatulas are my favorite tool for spreading the royal icing over stencils when working on small cookies/small stencils.  They are just perfect!  I got mine at Michael's in the artist supply section.  They were reasonable in price and really a great addition to my cookie tool kit!

Even with the under-bleed, the cookies turned out very cute IMHO!  I added a dot of green for a witch eye, marbled in some yellow and orange on the cauldron flames and added some yellow dots as "bubbles".  Gave the cookies some character.

The set I made with ghosts, bats, and spider webs turned out quite well.  The stencil on one ghost was also from the set described above accented with an orange moon.  I made spider bodies as RI transfers and then piped on the legs when I applied them.  If you don't know how to make a royal icing transfer, here is a link to Haniela's YouTube video where she shows one way to make these spiders (mine were a bit different - but she shows you very easily how to make some for yourself!)Easy to do and gave the cookies a little bit of 3-D pop.  Bats this year were kept simple.  Last year's bats were a bit too much black RI for my taste.  These are smaller and just have spooky orange eyes.  I think the grandkids are going to love them!


The final set of cookies were edible wafer papers on rectangle-shaped Vanilla Bean Sugar Cookies.  The cutter was not perfectly "plumb" so some of the rectangles were a little wonky...but they still worked out fairly well.  I bought these cute Vintage Halloween Wafer Papers from an Etsy seller, The Cookie Pixie.  She does great work and has blog posts to help you learn how to apply wafer papers.  I did a blog post on my first experience with this back in July.  I admit I'm not wild about the wafer paper texture...they do melt on contact with water and dissolve in the mouth somewhat quickly.  Still, just not wild about it personally.  It is, however, one of the few ways of applying that level of detail on a cookie without being an artist of the highest caliber!  So, it suits me just fine.  Again, the grandkids are not bothered by the wafer papers and I bet they like these cookies a lot!


I hope you step outside the box this year and try some variations on your usual theme with your 2013 Halloween cookies.  I sure enjoyed doing some different designs and bet you will too!

Bon Appetit, Y'all!!!

StumbleUpon

Sunday, October 6, 2013

SPI Sandcastle Days 2013


I don't always talk about food.  While it is a favorite topic, I also like to share the great activities that go on in my little part of the world.

This week-end was the 26th anniversary of the South Padre Island Sandcastle Days.  I was feeling icky for the first few days of the event, but Sunday turned out to be a cool (and somewhat blustery) day and I felt up to an excursion.  Mr. Flip Flop and I headed over to the island before noon and spent a couple of hours enjoying the cool weather, some frothy wave action, and some gorgeous sand sculptures.

Professionals, like our own Sandy Feet and Amazin' Walter, joined with amazing sculptors from around the world to create both fantastical and gorgeous works of art.  I am a huge fan of both purist sand castles like you will see from Amazin' Walter...as well as the more abstract works.  My hubby always has to drag me away.  I circle each one repeatedly seeking and finding new details at every angle.  I may have to go back tomorrow (if the tide doesn't wipe them out...it's been a bit higher than normal)... I love to go back when the beach is emptier of crowds and just sit and stare at the truly awesome feats of sand sculpture.

I put together a little YouTube slide show of my pics from today.  Just click on the link below to view.  Hope you enjoy!

South Padre Island Sand Castle Days 2013

See ya soon with more fun and good food!

DebbiStumbleUpon

Friday, September 27, 2013

King Bob's Birthday 2013


I was so happy to be invited to the 2nd Annual King Bob's Birthday party on the beach!  Bob's wife, Sally, puts on a great party...which included beach-front umbrellas and lounge chairs in front of Wanna-Wanna, ice chests filled with icy libations, yummy snack trays. Sand Castle Queen of the Island, Sandy Feet, her very entertaining "sand slaves", and a bunch of interesting people to talk to!  I really enjoy meeting new friends.  I also love talking to people who have moved to the area and find out where they come from.  There's always a story...I just love hearing the tales!
I enjoyed using some of my stencils on the minis!  These
came from Designer Stencils

My offering was a set of cookies made for King Bob (Bob's 71st birthday and his 1st anniversary of retirement makes him King of the Day!).  The cookie set included a large layered cake-shaped cookie, some crowns for the king, and a few minis to fill in the set.  He was kind enough to share the cookies and it seems the Acorn Squash Sugar Cookies were a success.  Even my trial with a new royal icing recipe seemed to work out okay (I didn't have time to taste a dry cookie before leaving for the beach so I wasn't sure how taste and texture would be after drying...risky on my part but...whew...it apparently worked).  Nothing makes me more happy than people enjoying my treats!
These were drying to the very last minute!
Photo by Sally Scaman
I was having a big hair humidity day...the
curls were blowing wildly as Sally snapped
a photo of me and Bob and the box of cookies

While a lot of the United States is enjoying Fall weather, folks on South Padre Island are enjoying one of our favorite times of year.  The beautiful days of September and October are PERFECT beach weather.  So, it being a perfect day on the beach, I'll just end the post with a slew of photos featuring Sandy Feet, Dennis,and Ken working hard (did you know, it's important to place your beer higher than the sandcastle...else you fill your can with sand???) Enjoy!

This stuff is hard work!
Things are shaping up as the creative genius kicks in!

Hot work when you are working on the side where there is no wind!

Sandy Feet carving the King's Sculpture
Dennis (L) and Ken (R) carving supporting castles on each side
of the King Bob sculpture 
(yep, they are a lot more than just sand slaves - 
they are talented sculptors themselves).  
This is the status when I had to leave.


Following Photos from Sally Scaman
The King and his Pampered Princess
The Sand Sculptors (behind)
Bob and Sally...beach royalty.  Great party and Fabulous Sand Sculpture!

Bon Appetit, Y'all...and May Your Day be Filled with Sunshine!!!StumbleUpon

Thursday, September 26, 2013

Squash Sugar Cookies, Take Two!


Undecorated allows you to see how nicely they
are rolled and cut as well as the bits of squash and
spices in this wonderful Fall-ish cookie!
In early August, Ian asked for a spice cheesecake for his birthday.  I didn't recall having a recipe for a spice cheesecake but we looked back at the blog because he remembered I had made one before.  We found a 2010 recipe for Squash Chocolate Cheesecake.  He said "yes, that's the one"!  I was so surprised!  Squash? I asked of the "vegetable-hater"... Yes, he confirmed...that's the one.  Fortunately, I've got a couple of cups of roasted and peeled acorn squash in the freezer - it's a wonderful staple to have on hand for sweets (I use it often in lieu of pumpkin) and as a wonderful addition to soups.  The recipe only called for a cup of the squash, so I decided to re-make the Squash Sugar Cookie recipe, I had also done in 2010, with the remaining squash.

I noticed, when reviewing that recipe, that it didn't include any egg.  Huh?  Was that a mistake?  I tried to find the source recipe and it is no longer posted on the B&B Recipe web site.  Hmmmm.  I set out some butter and followed the recipe and I have to say "this MUST be a mistake"...the dough was way too crumbly.

After 2 1/2 more years of baking experience since I developed that recipe, I knew of a couple of tweaks that would make a much nicer cookie...still keeping the sweet flavor of the squash silently in the background.  So, here's the recipe I ended up with.  The texture is now perfect for rolling and I can only apologize if anyone tried to make the one I posted in 2010!!!  I try to be very careful...but sometimes mistakes happen...and I think that may have been one of those times.

Printable Recipe

Squash Sugar Cookies, Take Two!

Ingredients:

1 cup butter, softened
1 cup granulated white sugar
1/2 cup drained, dry, roasted acorn squash (I squeezed the squash in a cotton kitchen towel, twisting until quite dry - then I pulsed it in the food processor...I remember the previous cookies having some long strands of squash - the food processor didn't truly puree the squash, but it did cut the long strands)
1 large egg
1/2 tablespoon vanilla bean paste
1 teaspoon ground cinnamon
1/4 to 1/2 teaspoon freshly ground nutmeg
1/2 teaspoon ground allspice
3 cups unbleached all-purpose flour
1 teaspoon baking powder
1/2 teaspoon fine sea salt

Method:

In the bowl of a stand mixer, cream butter and sugar until combined.  Add squash and mix until combined.  Add egg and vanilla bean paste and mix until well incorporated.

In a 4-cup measuring cup, mix all of the dry ingredients with a whisk and add to the wet mixture in the mixer bowl.  Mix just until blended.

Divide dough in two parts.  Form a disk and wrap each half in plastic wrap and refrigerate for at least 1 hour - preferably 2 or 3 hours for a nice rolled cookie.

Preheat oven to 375 degrees Fahrenheit.
Remove dough 5 minutes prior to being ready to roll the dough.  Roll either on a lightly floured surface or between two sheets of parchment paper.
Use your favorite cookie cutter to cut various shapes.  Place on a parchment lined cookie sheet or on a baking mat lined cookie sheet.  Bake for 8-10 minutes, depending on thickness (some thick cookies that were cut with a large cutter took 13-14 minutes to bake...light brown along the bottom edge is the indicator).  Allow to cool on rack before decorating with a glaze or buttercream frosting....or royal icing if you want to decorate nicely!


These are a great Fall flavored spice cookie with an unusual cookie ingredient.  However, they are great any time of the year.  They are an awesome cookie!  The photos I took were of the naked cookies...the next post will include some of these that I baked recently and decorated for an on-the-beach birthday party.  Keep an eye out for that!

Bon Appetit, Y'all!!!


StumbleUpon

Wednesday, September 11, 2013

Vanilla Bean Cheese Cake

The saga of Mr. Flip Flop requesting cheesecake for his birthday continues.  This year, he requested a simple vanilla cheesecake.  Drat...I so like experimenting.  HOWEVER, since I am on a vanilla bean paste kick (still) I decided to modify our family's favorite basic recipe and eliminate the chocolate and supplement the vanilla extract with some vanilla bean paste.  So, with these few tweaks...here's the "new" recipe!

Happy Birthday dearest husband...you bring tremendous joy and love into my life... I look forward to growing old together (which, obviously, is drawing closer and closer LOL!!!)  Hope you enjoy your cake!


VANILLA BEAN CHEESECAKE
Adapted from Marble Cheesecake Recipe 
Austin American-Statesman, 1974

1 1/2 cups graham cracker crumbs
1/4 cup granulated sugar
6 tablespoons salted butter, melted

3 8-ounce packages cream cheese, softened
1 1/4 cup granulated sugar
1 teaspoon pure vanilla extract
2 teaspoons quality vanilla bean paste
4 eggs
1 cup heavy cream

Preheat oven to 325 degrees Fahrenheit.

Combine graham cracker crumbs and 1/4 cup sugar with hand whisk in a mixing bowl.  Break up any lumps.  Add melted butter and mix until all crumbs moistened.  Press in bottom and 1 3/4 inches up the side of a 9-inch spring form pan (I usually wrap the spring form pan in foil on the outside before making the crust...just to ensure there is no butter leakage).  I prefer to press the crust using a flat-bottomed metal 1-cup measure.  Works beautifully!  After crust prepared and in pan, set aside and begin filling.

In bowl of a stand mixer with paddle attachment, beat the cream cheese, 1 1/4 cup sugar, vanilla extract, and vanilla bean paste on medium speed until smooth and fluffy.  Add eggs, one at a time, with mixer on low just until blended.  Add cream and continue beating on low speed just until blended.  You don't want to put a lot of air in it at this point.

Pour mixture into prepared crust and allow to sit a minute or two.  I run a sharp knife through to pop any bubbles, taking care not to touch the bottom of the crust.

Place on rack in middle of oven and bake for 60 to 75 minutes or until the center appears nearly set when gently shaken.  Remove from oven and let sit on a cooling rack for 15 minutes.  After 15 minutes, very gently run a sharp knife around the edges and then release the spring to loosen the sides of the pan. 
Yay...sides released and nothing stuck!

Cool 30 more minutes on rack, then oh so carefully, remove the sides of the pan to avoid getting crumbs on the cheesecake. 

 
I leave mine on the base...I have NEVER successfully removed a cheesecake from the bottom of the spring pan....I don't care how many YouTube videos I watch!  Chill cake several hours.  Makes 16 servings (well, not in this house...more like 10 LOL!!!)


There is a note on the original recipe that the top of this cheesecake typically cracks during cooling.  I kept my fingers crossed that this wouldn't happen...and it didn't!  I have a 75% crack rate (I don't really measure...but that sounds about right) for cheesecakes.  I noticed this one does have some bubbles that surfaced in the middle though...and my crust went a little higher than usual (I don't measure that either).  Like I always say...it is what it is!


Bon Appetit, Y'all!!!StumbleUpon

Wednesday, September 4, 2013

Crescent Roll Explosion Apple Tartlets


What do you do when you've had a sort-of crappy day, get home with loads of groceries and find a can of crescent rolls exploded in the grocery bag?  (The end of the can blew off...really...just exploded!)

If you are me, you gently rescue the dough, make 4 squares out of the 8 triangles (pinching/pressing the seams together), spoon in some canned apple pie filling (I used Lucky Leaf), pull the dough over the filling to make a "purse"...pinch all seams thoroughly... bake for 20 minutes at 350 degrees until golden brown.  Allow to cool.  (These crescent rolls were H.E.B. store brand reduced fat...worked perfectly)
Two were round, two were elongated...the dough was not consistent...
but, considering it had exploded, no surprises there!

While cooling, mix up an icing/glaze consisting of about 2-3 Tbsp heavy cream, 1/2 tablespoon vanilla bean paste, a dash of cinnamon, and 1/2 to 3/4 cup confectioner's sugar until thick and smooth.  Load into a zipper sandwich bag and snip the end...drizzle all over the dumpling-like dessert.  It was so freaking delicious!  E-Z P-Z!!!

I was so irritated in the beginning and all smiles at the end of it all!  My husband nearly licked his plate and smacked his lips!  That's a good sign.

Inside the "explosion tartlets"...yummy!


Bon Appetit, Y'all!!!StumbleUpon