The South Padre Island Flip Flop Foodie Brownsville restaurants

Search The South Padre Island Flip Flop Foodie Blog!

Wednesday, February 27, 2013

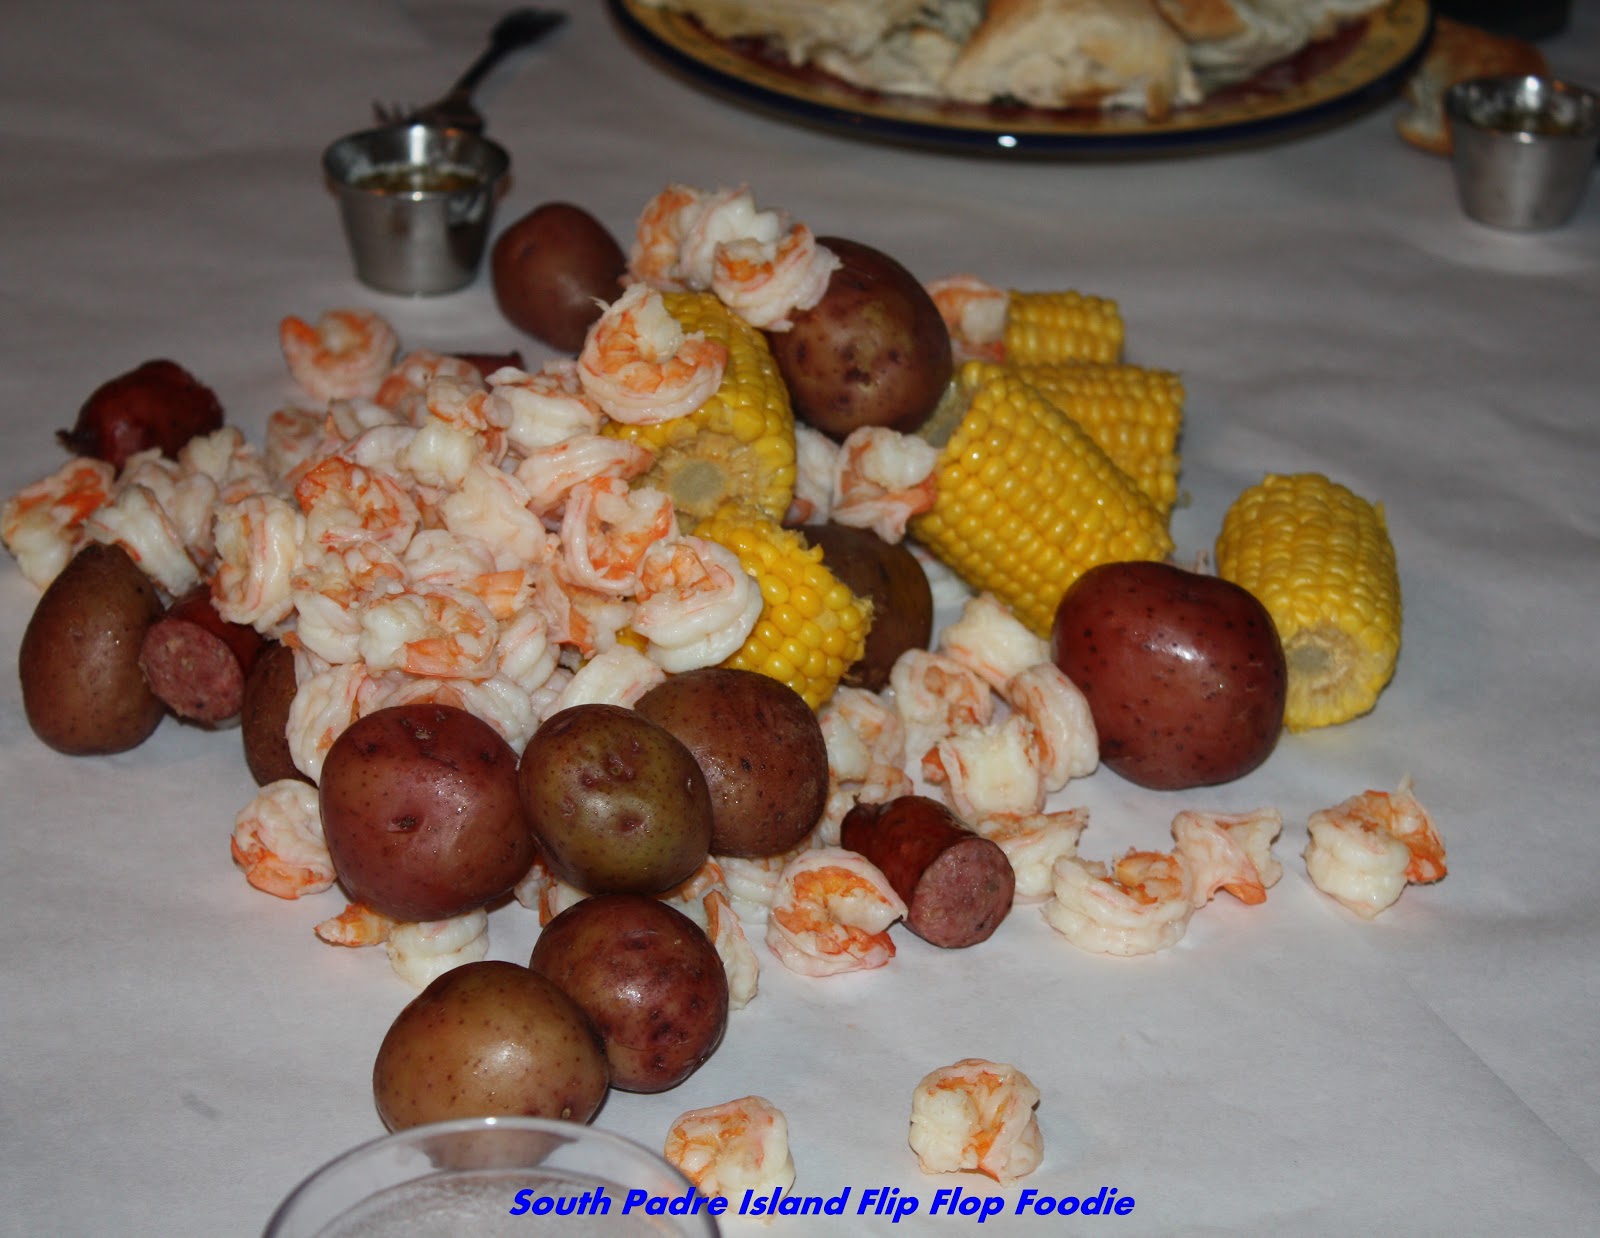
Shrimp Boil

I've had a lot of shrimp boils in my day...but this may have been one of the best ones and easy to throw together!

Twelve people, a six-month old who had had enough fun for the day, an ocean-front condo with seating for 5...hmmmm.  No biggie - we could make it work!  We dragged in the balcony table and chairs, covered both tables with wax-backed butcher paper (double layer) and threw all of the food on the table.  Literally!

We used a big "turkey fryer" pot filled 2/3 with water and two packages of Zatarain's Crab and Shrimp Boil.  Started it to boil and first put in a bag of clean new potatoes and let it go for 15 minutes or so...next went the frozen corn (24 pieces) and then, 5 minutes later, three pounds of sausage chunks.  I prepped the 4 pounds of fresh shrimp purchased near the docks at Port Aransas by peeling, butterflying, and deveining (because my sister doesn't like to peel them and see the vein...so, like a good sister, I cleaned them for her).  Once the shrimp were added, they were finished cooking in 3 minutes or less and everything smelled so incredibly delicious!

We melted 3 sticks of butter and placed in little ramekins around the table; my sister-in-law, Lana, mixed up 2 bowls of cocktail sauce and toasted two loaves of French bread.  We put out a container of my homemade pasta salad and dinner was ready!

We carefully transported the extremely heavy boiling pot to the floor on top of towels, lifted the strainer basket up over the sink and let it drain.  With a towel underneath, my oldest son transported it to the table and we tossed it down the middle of the two tables.  One table got more potatoes and corn and the other table got the majority of shrimp (which, of course, we re-distributed!)...and everyone dug in. 

People took turns holding the baby and eating and laughing...what a great time was had....the laughter, the jokes, the sounds of happy eating!  Friends, family, and lots of joy all around the table. Anyone having room for dessert could nibble one of the "Beach Cookies" I made for the trip.

We finished the evening with the poker people (most of the people) playing a fun, albeit quite competitive, game of Texas Hold'em...which was, of course, a win for my sister-in-law Lana.  She's just a little competitive!

A fun time was had by all - good times, good times.

Sister-in-law Lana, big sister Cynthia, and their beautiful
granddaughter Sarah Jewel.


Bon Appetit, Y'all!StumbleUpon

Friday, February 22, 2013

Cinnamon Streusel Pumpkin Loaves

A travel breakfast...hmmmm.  I dug through my folder of recipes I had intended to try over the holidays before chaos erupted in my life.  I wanted something easy that would travel well...something to snack on or to have with coffee as we sat listening to waves rushing in and gulls calling.

As soon as my hand touched a print out for Cinnamon Streusel Pumpkin Bread from Michelle Day at Michelle's Tasty Creations blog, I just "knew" this would be perfect.  We have pleasant temperatures this week-end, but there is a call for being overcast and a light rain.  What is better than the warm taste of pumpkin and cinnamon and all of those warm spices on a lightly drizzly day?  Not much.

I made a few minor tweaks - but nothing major.  My addition is a vanilla bean cream cheese drizzle for a bit of extra topping (like streusel isn't enough) .  Everything is baking while I type... I'm departing in a few short hours.  My house is smelling really awesome about now!  I should probably sample it before taking it with me, right?

Here's the recipe:

CINNAMON STREUSEL PUMPKIN LOAVES
Lightly modified from the Michelle Day recipe


Ingredients:

1 1/2 cup unbleached all-purpose flour
3/4 cup granulated white sugar
1 1/2 tsp. baking powder
1/2 tsp. baking soda
1/4 tsp. salt
1 tsp. cinnamon
1/2 tsp. fresh grated nutmeg
1/4 tsp. ground ginger
1/4 tsp. ground cloves
1/4 cup vegetable oil
1 cup pumpkin puree
2 large eggs
1 1/2 tsp. pure vanilla extract

Streusel Topping:

1/2 cup unbleached AP flour
1/2 cup turbinado sugar
1 tsp. cinnamon
1/4 cup butter, cold and cut into 1/2 inch pieces

Vanilla Bean Cream Cheese Drizzle:

4 ounces cream cheese, room temperature
4 ounces butter, room temperature
1 tsp. vanilla bean paste
1-2 tsp. milk - more if needed

Method:

Preheat oven to 350 degrees.
Spray three mini loaf pans with cooking spray and set aside.

In a large 4 cup measuring cup, add 1 1/2 cups flour, baking powder, baking soda, salt, cinnamon, nutmeg, ginger, and cloves.  Whisk together until well blended.  Set aside.

In bowl of a stand mixer, beat the eggs, 3/4 cup sugar, oil, pumpkin, and vanilla extract until smooth.  Pour the flour mixture into the bowl and beat until smooth (on low) then evenly distribute the batter between the three pans.


For the Streusel Topping:
Mix the flour, sugar, and cinnamon with a fork in a medium bowl.  Add the butter and using a fork, pastry blender, or your fingers, crumble the butter into the sugar mixture until you have a crumble mixture.


Divide evenly over the three pans of pumpkin bread dough.


Bake for 40-45 minutes (or until a toothpick inserted into the center comes out clean).  Allow to cool in pans for a few minutes then remove to a cooling rack.

Vanilla Bean Cream Cheese Drizzle

In small bowl of food processor, pulse 1/4 cup softened butter, 4 ounces of softened cream cheese, and 1 tsp. vanilla bean paste until smooth. 

Add enough powdered sugar to make the consistency of a thick icing. Add milk, 1/2 tsp. at a time, pulsing after each addition until it's just the consistency you desire for drizzling.  I like mine a little thick.


When pumpkin bread is completely cooled, drizzle VBCC Drizzle over each loaf.  If you are eating it warm, drizzle over each slice after plating.

I sampled a slice with a glass of milk because I'd finished all the coffee for the morning....boy howdy, that is so yummy!  I love the crunch of the streusel hidden under the creamy tartness of the drizzle...all on top of the wonderfully aromatic pumpkin loaf.  Two thumbs up...and it was an easy preparation, so even better!

Bon Appetit, Y'all!!!StumbleUpon

Thursday, February 21, 2013

Beach Cookies

The Beach Cookie created following
tutorial from Marlyn of Montreal Confections
I know it is February and many folks North of the equator are having a nippy week...but where I live, it's pretty nice weather!  I live on the Gulf Coast ...right on the water... and this week-end, I'm driving up the coast a few hours to spend time...at the coast.  Yep, weirdly enough, it's true.  My flip flops are happy to be in the sand, wherever the sand may be.

So, cookies were requested by the traveling companions ...apple butter cookies specifically.  Ask and ye shall receive!  I made 30 cookies and got them all decorated in one day via carefully scheduled fan drying of layers and starting early in the day.  I used a different method for making royal icing this time...from the wonderful Jaci at Ali's Sweet Tooth.  We both live in a land of great humidity.  Her method worked beautifully.  Not a bit of separation all day long...and a good thick base to work from with my handy dandy spray bottle. Yay!

My favorite cookies were a "beach" with waves I meticulously created using the YouTube tutorial from Marlyn at Montreal Confections.  I am slightly addicted to her tutorials...she is such a good teacher.  I saw it earlier last year and knew I would eventually get around to trying it out.  Today was the day!  Mine doesn't look as sharp as hers... but I'm pleased with the result for a first effort.  I didn't make fondant sea shells, I used some white and milk chocolate instead in a Wilton silicon mold I bought from Amazon.  I'm not fond of fondant...but I surely do love chocolate.  They came out sort of cute, so I'm glad I took that turn.
I didn't have the cool sanding sugar Marlyn used.
I used turbinado sugar instead.

I also used, for the first time, my air brush.  I carefully covered my table and used a 3-part science poster board to protect over spray as recommended by the talented Melissa at The Baked Equation .  I was so joyful to spray the shades of blue and then pearl the waves.  I am laughing myself silly now, though.  Guess what I didn't protect?  The inside of my nose!  I blew blue icky stuff this evening (OK - blue boogers - I'll just say it).  Good grief!  I'm thinking a mask may be in order next time.  Now that I see how cool the airbrush is, I know I'm going to try to find ways to add more depth to future cookies.

Since I didn't take photos during the process (and you can see Marlyn's online tutorial here) I'll just post these photos of the finished products.  Dolphins, sand dollars, star fish, and some scallop shells add to the beach theme.  The teen informed me "uh, those shells look a little different", in reference to the colors of the scallops.  Heck, I needed to use up some of the blue and peach icing from other cookies...so we have "different" scallop shells.  Leave it to the teen to point out the obvious!
Happy dolphins, funky scallops...it's all good when it gets in the belly!

The sand dollars are much better than my last attempt!  Still
a few issues to work out.  Still, better!


Slowly but surely, I'm trying to get back to enthusiasm for baking.  I have some more stencils I want to use as well as quite a few new cookie cutters.  I need to start sketching out some ideas.  I'll keep you posted!

Bon Appetit, Y'all!!!
I airbrushed pearl on the center starfish and used sugar pearls to accent.
The rest of the starfish were just piped dots and no pearl.
I think I like the pearl best...and I like the dots better than the sugar pearls.
Next time :-)

SHARED WITH:
StumbleUpon

Wednesday, February 6, 2013

"Love" Cookies

The beginning of the 2013 Valentine Cookie Season
I don't know that I'm saying "I'm back"... but I have scraped myself up and "put on my big girl panties" and BAKED.  Finally!  Rough family stuff (too much to share here) resulted in a nearly two-month hiatus from doing most anything creative.  My brain just wasn't on that page.  Hopefully, I can keep myself motivated now that I got started!

While cleaning out my freezer I found a double batch of Apple Butter Cookie Dough all nicely wrapped and ready.  I had completely forgotten that I'd made that before everything crashed around me.  Score!  While that was thawing, I felt motivated to make a batch of LilaLoa's "The Vanilla Variation"" of her Sugar Cookie Dough and between the two, that got me baking!  I ended up with 16 large hearts, 40 medium size "shapes" and 60 minis.  I still have some vanilla sugar cookie dough in the fridge.

My first efforts were just some circles, squares, and rectangles in hopes of getting my piping skills going.  I'm one of those "don't use it you lose it" people.  I felt vaguely cursed because NONE of my icing turned out the way I wanted.  Again, when you do it regularly, you do it right.  This time, well...not so much.  My piping icing was too thin to hold some of the shapes, my flood too thick to lay down straight, I got craters, my little heart transfers didn't "heal" properly, and I learned I can't make my nail flower go in a complete circle without having to reposition my fingers.  (oh, so clumsy) Add to that, my icing didn't hold it's shape for the ribbon roses either.  It was supposed to be the thick stuff! Man, I was screwed.  I kept telling myself the Dory-the-fish line "Just keep swimming.  Just keep swimming".

I decided I would indeed just keep going and finish the cookies I had... I was trying out new tools I got for Christmas and as part of my retail therapy shoppingin January.  I got a heat gun from my son and I bought myself some stencils and new cookie cutters and better tasting Red Tulip AmeriColor gel from Karen's Cookies (man, I love opening boxes from Karen and Mike!).  I read a post from Sweet Sugarbelle about why this red food color isn't as icky as some of the other reds we've all used.  I ordered a big bottle!  Between Valentine and Christmas and Patriotic cookies - red is a popular color!  I also broke out my new airbrush and practiced with water...that will be the next thing I attempt "for real"!

Anyway, I got to it and this is just a post with a few photos (with the good, the bad, and the not-so-ugly).  Why I would share some of these?  I don't know.  I think I just have to start somewhere.  This will help me move along so I prove to myself I can do better.  I won't point out all the booboos, but the cookiers will be able to see everything I'm talking about.  No need for anyone to point out the obvious (like when I was wiping my tip and accidentally sucked up a drop of water from my too damp cloth and then aimed right down at my cookie...oh mercy).
I am dot crazy apparently.  I just felt like
everything was looking better with dots!

I love having the virtual friendships that have allowed me to continue to talk about cookies and tips of the trades on Facebook.  I think I now officially converse with cookiers more than my "regular" friends (oh wait, none of my friends are regular...they are all unique).  I'm not sure that is a good thing...but for now, it's what I need.  Cookie Convo!  I am also completely dedicated to finding my way to Cookie Con 2014.  Fingers are crossed.
I'm no van Gogh...but this is MY blue period!

So, here they are.  They are packaged up and ready to give to people who don't care that I'm not perfect and know what I've been going through.  Now that I think about it, I'm really surrounded by lots of good souls.  I feel happier than I have in a good bit.  Hope it's a trend!

Bon Appetit, Y'all!!!

SHARED WITH:
">
StumbleUpon

Tuesday, January 15, 2013

THE MUTT HUTT - Restaurant Review


5/28/2013 UPDATE
Reported to be closed and out-of-business.  

I've been off the blogging trail for a while now.  I'm having a really hard time getting moving...I got very sick the week my Mom passed away - it took two weeks to get over that nasty cold and I'm still coughing a bit.  Add to that, our sunny coastal weather is....well...NOT sunny coastal weather.  The wind is whistling, the bay has a chop, it's 48 degrees and GLOOMY outside...for days now!  I think I have S.A.D. on top of the expected moroseness of a post-holiday-constantly-grieving-post-illness January!!!  Whew - that's a lot of stuff to get over, right?

So, anyway, the teen had an appointment at Venus on the island today for a haircut; so we decided to eat lunch out while we were there.  Obviously every other person in the near, and maybe far, vicinity had the same idea.  We stopped in at one of our favorite restaurants and no parking available...FULL!  I had mentioned as we rolled past The Mutt Hutt, that it was a new restaurant and I wanted to try it out some day.  Therefore, the oh-so-intelligent teen said "let's try that new place".  So we did!

My boy is a huge fan of Chicago-style hot dogs...and he mourned the closing of Windy City Hot Dogs in Port Isabel.  When I told him I had heard they had Chicago dawgs at The Mutt Hutt, I figured that would lure him in.  I find it amazing that a child (ok, young man) who will not eat a raw tomato, will not eat relish, and is not overly fond of poppy seeds, absolutely GROOVES on all of those things when they are piled up together.  Go figure!

I digress. (I know you are not surprised)
It was Tuesday, so I don't know if there was a special...
or not. No notice of a Tuesday special that I could see!

In we roll to The Mutt Hutt and it is "seat yourself" we assumed as we were not really greeted and I couldn't really see a clear place to place an order at the bar...so, we seated ourselves and waited.  They were either short staffed or are still struggling with being a new place.  After a bit, a very nice woman, maybe an owner (?), came and gave us menus and silverware.  She also set up another table and then took our drink orders.  She said she wasn't a very good waitress :-) but she did fine, really.  I feel certain this is a family-owned and operated restaurant.  Sometimes that is a bit more challenging to get rolling.

The teen and I perused the menu and looked around at the decor.  I pointed out a Beatles wall that had some Apple Record 45's, some photos of those Liverpool boys my boy is so fond of...and a really old framed Beatles album cover.  I knew I was going to like the people who liked the music we like!  Finally, about 10 minutes in, we got our orders taken.

Obviously, one of us got a Chicago Dog, which comes with fries (appeared to be hand-cut) and coleslaw.  He won't eat coleslaw and I try not to eat fries (or at least not a whole order).  So, I ordered the Shepherd Dog, which was was with sauerkraut and spicy mustard...and I told our waiter to give him all the fries and me all the coleslaw.  That worked out perfectly.

It seemed to take a while, considering it was just hot dogs...and the place was NOT packed.  While we were there, only 3 other tables were seated.  We arrived at 1:05 and our food arrived at 1:33.  I, unfortunately, was watching the clock because we had a 2:00 hair appointment!

I will say, it was worth waiting for!  The Shepherd Dog was a high quality wiener with just the right amount of mustard and a dry sauerkraut (perfect - no soggy bun) on a delicious fresh-tasting bun.  The coleslaw was some of the best I've ever eaten in my life.  An unusual hint of onion gave it a different taste which was right up my alley.  Mayo dressing - not thick though.  As Goldilocks would say, it was JUST rigggghhht.  Yum.

The teen's Chicago Dog was inhaled.  He said it was very good.  His generous mound of fries were, well... "enough for two people"... duh!  I counted out, and ate, six of his fries.  They were delicious.  It's not easy to get hand-cut fries crispy.  These weren't overly crisp but they, too, were just right!  Yum!
Ian elected not to try the coleslaw - his loss!

We ate everything, paid the bill, and were out the door in less than 20 minutes.  I'm sure that new vibrating fork would have been working overtime if we had one.  We were hungry and running late.  However, it was extremely satisfying and filled our hungry bellies.

As with any new business, I imagine it is hard to get the service issues smoothed out.  I think if they can iron it all out and hang in there until summer, the quality of their food will make for a very successful addition to island cuisine.  I love seafood - but having some alternatives is always a plus!  Their Facebook page says they have breakfast... and I saw alcohol behind the bar, so they obviously have that up and running.  I will need to check them out for breakfast.  I didn't see it mentioned on the menu (but I can't say I was looking for that so could have missed it).  Mr. Flip Flop and I are always on the look-out for a breakfast place that serves after 10:00... it's worthless to us if they stop serving at 10...he doesn't get up until 10!

Good luck to the Mutt Hutt...and we will definitely be back!


SPI FLIP FLOP FOODIE RATING:

4 – Lip smackin’ - good quality – flip flops will definitely be parked under their table again!

The Mutt Hutt on UrbanspoonStumbleUpon

Sunday, December 23, 2012

With a Sad Heart...

I'm sorry for disappearing at one of my favorite baking times of the year.  My mother was very ill and passed away this last week.  I was privileged to be by her side as she crossed over and it was peaceful and loving experience.  After getting through the holidays and getting some rest...I'll be back.  I'll be ready to honor her "cooking legacy" with lots of goodies in 2013.

I snapped these photos right before packaging them up and taking them with me.  They had just dried when I got the call.  She loved seeing my cookies and I always felt warm and fuzzy when she admired them.  She enjoyed reading my blog before she lost the ability to use the computer.  I miss her sorely.  She was a great lady.

I enjoyed using "accents" for the sleigh and snowman hats
I made weeks ago from leftover royal icing.  Waste not, want not!


Hope everyone has a wonderful holiday season, blessed with good food, family, and love.  Give your loved ones an extra hug...and write down your Mom's and your Grandma's special family recipes while they are still with you.  Having done so with my Mom will remain one of my greatest treasures!  I wrote about it in 2010 and am so thankful to have that memory.

Now, get back to baking and preparing to enjoy a blessed holiday.  I'm going to bake off some of those cookies I froze (aren't I glad I did THAT now!) and take them with me when I return back to Austin for Christmas with my children and grand-children.

Hugs,
Debbi Hook
The South Padre Island Flip Flop FoodieStumbleUpon

Thursday, December 6, 2012

Christmas Cookies... I've gone to the Dark Side!

Pearlized Snowflake Chocolate Espresso Chocolate Chip Cookies


I started prepping dough for holiday baking a few weeks ago, tucking it safely and well-wrapped in my freezer.  This week, I thawed, baked, and decorated my first batch of Christmas cookies using the new  chocolate sugar cookie recipe I found on AnnClark.com.  After rolling, cutting, and baking... I gave one a try and they were rich and dark and marvelous.

The only down side is that, even with sharp metal cookie cutters, the mini chocolate chips wreaked havoc with smooth edges.  They were also "not smooth" straight out of the oven - no problem there.  I was able to use my fondant smoother and "iron out" the dips.  Nothing to be done about the edges though.  You can see from the photos that some of the edges show the problem.  However, the flavor is so exceptionally good for a roll-and-cut cookie dough, that I think I'm not going to care.  They are "rustic"...yeah, that's the ticket.

Here's the recipe with a small tweak or two that I made...plus I renamed it.  The Espresso Powder gives it the depth of flavor...I wanted that to be in the title.
Christmas Lights
accented with Wilton Silver Color Mist Shimmering
Food Color Spray over white piped icing for the bulb's base

Chocolate Espresso Chocolate Chip Cookies
Adapted from Ann Clark

Click Here for Printable Recipe

 
Ingredients:

1 cup butter, softened
1/2 cup brown sugar
1/2 cup granulated white sugar
1 large egg (room temperature)
1 teaspoon instant espresso powder
1 1/2 teaspoon pure vanilla extract

2 1/2 cups unbleached all purpose flour
1/2 cup cocoa
1/2 teaspoon salt
1/4 teaspoon baking powder

3/4 cup mini chocolate chips (I used Nestle's -
must use mini chips - you can't roll it with regular
size chips)

Method:

In the bowl of a stand mixer, beat butter and both sugars until creamy.  Add egg, espresso powder and vanilla extract.  Beat until incorporated.

In a separate bowl (or large measuring cup), whisk together flour, cocoa, salt, and baking powder.

Add dry ingredients to wet ingredients and mix just until completely incorporated.  I did this 1/2 at a time to reduce the "fly up" of dry goods.

Hand mix the mini chocolate chips into the dough.

Wrap the dough, in four portions, in plastic wrap and chill until firm (I froze them and then brought them down to the refrigerator for a day before using).  I wrap in small sections to make it easier to roll.  If you have too much, it is more prone to being uneven, cracking, and getting too warm before everything is cut out and moved over.

Preheat the oven to 350 degrees Fahrenheit   Roll the well-chilled dough out on a lightly floured surface.  Ensure your rolling pin is well-floured as well.  This dough can be sticky if not well-chilled.  Using metal cookie cutters (you need the sharpness to cut through the chips) cut the dough and transfer cookies onto baking sheets lined with parchment or a Silpat.  If they stick to the counter at all, use an offset spatula dipped in flour, sliding underneath the cutout, to help you make the transfer.  Because I have a warm kitchen, I almost always pop the trays into the freezer after the cut-outs are ready, for 5 to 15 minutes, to re-chill the butter (helps prevent spreading).

Bake cookies for 8 to 10 minutes (mine took about 9 minutes, except the large snowflakes, which took the full 10 minutes). The surface of the cookies look dry and set when they are ready.  Remove from oven and place baking trays on cooling racks for 10 minutes or so, then transfer cookies to a wire rack to cool completely.

I did re-roll my scraps - and they seemed to work just fine.  I actually used the last bit of dough left to form a free-style cookie as a tasting cookie.  Since it was a new recipe, I wanted to make sure they tasted good before I spent hours decorating them!  Delicious they were!!! (Did I just sound like Yoda?)
Christmas Reindeer
Oops I forgot to pipe their black hooves!
I'll do that before I package them.

I iced all of these cookies using my regular royal icing.  I have become a huge fan of the AmeriColor Meringue Powder.  It seems to taste better than the Wilton brand...but Wilton is absolutely fine too, I have both in my cabinet.  I flavored this batch with a mix of almond extract and pure vanilla extract.  I wasn't worrying about a pure white color so I didn't use the clear vanilla (actually, I rarely do - I like the real deal).
Mittens
The little lines for the cuff were
harder to pipe than I thought...and already
a couple of lines crumbled a bit.
Live and learn...I learn something from every project!

I did break one snowflake when piping and flooding.  In retrospect, I probably should have used a medium sized cutter for all cookies with this dough.  It is not as "hard" as regular sugar cookies.  These are not cookies I would feel free to bang on the table to help them smooth themselves out.  These are hold-and-shake cookies....of course, that's how I broke the snowflake, so I'll leave it to you to figure out how to smooth things along.
Snowflakes
I outlined and flooded these with a slate blue icing.
Then I pearlized them by spraying with Wilton's Pearl Color Mist.
Piped on the detail with white 20 second+ icing and
accented with blue sugar pearls.  I am quite happy with them!

This recipe will now be a stock recipe for cookie decorating.  I feel it is so important that pretty cookies really taste good.  Otherwise, what's the point???

OK - now that I've photographed the cookies, time to package them up and put them in the freezer.  What?  You didn't know you could freeze decorated sugar cookies?  Oh yes you can...and they taste just as good as the day I put them in (I don't leave them more than a few weeks).  It would be impossible to bake and decorate without stress if I didn't have a freezing option!  I follow the instructions found at Bake at 350's blog.  Believe me, it was a game changer for me!  The only problem is that I need a bigger freezer now!  Oh well, details...just details!
Christmas Ornaments
My hands were really tired, as evidenced by
some shaky lines and slanting sections
that were intended to be straight!


Bon Appetit, Y'all!!!

Shared With:

Creations by Kara


Inside BruCrew Life

Chef In Training
Our Delightful Home

Carole's Chatter:  Food on Friday Christmas Favourites

StumbleUpon

Friday, November 30, 2012

Peanut Butter Blossoms... or as we call them, PB Kisses

My boys love Peanut Butter Blossoms...or even just plain Peanut Butter Cookies.  They often search them out before any other cookie on the platter.  We have always called them Peanut Butter Kisses in our house...had never even heard them called PB Blossoms until I started following a multitude of blogs and cooking/baking sites.

As I wrote last year, and the year before, they are a really easy last minute cookie to bake using store-bought refrigerated peanut butter cookie dough in a roll.  It's what I usually do!  This year, though, I decided to mix up some homemade dough and freeze it for later baking.  Short cuts are all good and well, but homemade is what I really like during the holidays.  This year, I'm getting in front of the insanity!

I have frozen the store-bought dough, but have never frozen the homemade dough.  I froze, and then baked off a dozen cookies so we could have a look at how they do!  They taste mahvelous dahling!


Peanut Butter Blossoms
Adapted from Joy of Baking.com
(Basically I just doubled her recipe because it looked closest to what I used to make years ago when I made these from scratch on a more regular basis)

Ingredients:

1 cup butter, softened to room temperature
1 1/2 cups creamy peanut butter
2/3 cup brown sugar
2/3 cup granulated white sugar
2 large eggs - room temperature
2 teaspoons pure vanilla extract
1/4 cup milk

3 cups unbleached all-purpose flour
2 teaspoons baking soda
1/2 teaspoon fine sea salt

96 Unwrapped Hershey Kisses

Method:

In the bowl of a stand mixer, beat the butter until light and creamy.  Add the peanut butter and both sugars and mix on medium until color has lightened and it is smooth and fluffy.  Scrape the bowl and beater to ensure all the peanut butter is incorporated.

Add eggs, one at a time, beating after each addition.  Add vanilla extract and mix.  Add milk and mix.  Your batter will be light and creamy at this point.

In a large measuring cup, combine the flour, baking soda, and salt.  Whisk by hand until combined.  Add half of the dry goods to the wet mixture in the mixer bowl.  On very low, begin to mix, bring the speed up once you know there won't be a cloud of flour and then add the second half of the dry good...again slow to start, then raise the speed and beat until totally incorporated - scrape down the bowl ALL THE WAY TO THE BOTTOM (voice of experience) to insure all the ingredients are together and smooth.

Cover the bowl and place in refrigerator for 1 or 2 hours.  This will allow the butter to firm back up and make rolling the balls easier.

I used a small cookie scoop to ensure a uniform size to the cookies.  Scoop out your dough on one cookie sheet (covered with a baking mat for easy removal) and pop back into the fridge while you scoop the next tray.  Keeping this dough cold is pretty important.

Alternate out the trays and roll the first tray in balls and place that tray in the freezer until frozen.  Then remove the second tray from the fridge and roll them and place that tray in freezer.  Once all are frozen, place the frozen balls in gallon Ziploc bags and get out as much air as possible before zipping closed and placing in freezer.  Freeze until ready to use.

When ready to bake, preheat the oven to 375 degrees Fahrenheit. Take out however many balls you are going to bake and place on parchment lined or Silpat lined cookie sheet.  Allow to soften slightly at room temperature to the point where you can use a fork to score the cookie dough (took mine about 20 minutes).  I like to dip them in red and green sugars for Christmas.  You can do that by either dipping the top half of the ball of cookie in the sugar or dipping a fork in the sugar and make criss-cross marks on the cookie.  Don't press too far down if you want a puffy cookie.  (I know a lot of people don't score the blossoms - just the plain PB cookies - but I like that instant recognition that comes with the scores..."hey, PB Cookies!")  If needed, wipe the fork between every 3 or 4 cookies... sometimes it gets gummed up with dough and doesn't make clear marks.

Bake the cookies for 8-10 minutes - just lightly browned so they will be soft and chewy.  As soon as they come out of the oven, place tray on a cooling rack and place an unwrapped Hershey Kiss in the center of the cookie, gently pushing down.

Or, of course, if you don't want the chocolate in the middle, just leave them as Peanut Butter Cookies!
After the cookies are cool enough to handle, use a spatula to move from cookie sheet to cooling rack to continue cooling all the way.  The chocolate will be soft, so don't squish them!  I like to eat them while the chocolate is still soft...and the cookie is warm.  My kids don't care - they'll take 'em however they can get them!

I'm happy to be checking off another item on my "to bake" list... I'm liking that I am getting ahead of the game this year.  Of course, I haven't decorated even a single surface of my home...but the baking prep is getting done! 
The tasting dozen!

Bon Appetit, Y'all!!!

Shared With:

StumbleUpon

Wednesday, November 28, 2012

Holiday Chocolate Chip Cookies

In October I first laid eyes on the Nestle's Toll House Limited Edition Holiday Chocolate Morsels...and I instantly grabbed two bags.  Like so many other products, the size was now 10 ounces instead of 12 ounces.  I've been thinking about what I wanted to do with these ever since.  My family does love the Toll House cookies....but we like LOTS of chips in those cookies...and they have to be chewy, not crisp.  So, I elected to stick close to the original Toll House recipe but to  make it 1 1/2 times the amount listed on the bag and use both bags of chips.  They are red, green, and semi-sweet chocolate.

You might remember my insanity last Spring in searching for pastel colored morsels...finally ending up making my own.  Whew, that was labor intensive.  My heart jumped when I saw these this year.  They certainly were not in the Wal-mart last year (at least that I saw), so I'm thinking they must have read my blog (ROFL!!!) wherein I wondered why the heck no one was marketing colored baking chips?   I've seen the swirled chips before, and the mint chips - but never this particular package.

Here's the recipe I came up with (including my frequent addition of cinnamon to things with chocolate).

Holiday Chocolate Chip Cookies
Adapted from Nestle's Toll House Cookie Recipe
(click here for printable recipe)

Ingredients:

3 1/2 cups unbleached AP flour
1 1/2 tsp. baking soda
1 tsp fine sea salt (I have found Kosher salt is not as good in these cookies - I end up with salty bites here and there)
1 tsp. ground cinnamon

3 sticks (1 1/2 cups) butter - softened
1 cup granulated white sugar
1 1/4 cup packed light brown sugar
2 tsp. pure vanilla extract
3 large eggs (room temperature)

2 ten-ounce packages Nestle's Holiday Morsels

Method:

In separate mixing bowl (or 5 cup measuring cup) combine the dry ingredients (flour, soda, salt, and cinnamon) - whisk to incorporate - set aside.

In bowl of a stand mixer, whip softened butter and both sugars until fluffy.  Add eggs, one at a time, mixing after each addition, and finally the vanilla extract.  Mix until combined thoroughly.  Scrape bowl.

Add the dry ingredients, mixer on low, about 1/3 of the amount per addition.  Scrape bowl between additions if needed.  Definitely scrape all the way to the bottom at the completion of this step.

Add the first package of morsels and mix a couple of rounds on low.  Remove the beater and hand mix the second package of morsels so they don't get broken up.  Use a very sturdy spoon to do this - I broke a large spatula with a plastic handle trying to mix this amount of dough.  Moved to an industrial size metal mixing spoon!  Now is the time to add pecans or walnuts if you like nuts in your cookies... we prefer nut-free except for my husband.  (I make him special ones from time to time)

I have scooped them all up with a medium-sized cookie scoop and have them freezing on a couple of trays.  I scooped out 63 cookie dough balls with this recipe.  Once they are frozen firmly, I will store them in Ziploc bags in the freezer for baking as Christmas time draws near.

I like to get ahead of the game, and when I do this, not a soul knows that I wasn't in the kitchen mixing up a batch of cookies that morning (well, except for you guys).  It really cuts down on the overwhelm that occurs that last week before December 25th!

When it is time to bake, preheat your oven to 350 degrees Fahrenheit, place cookies, directly from freezer bag, at least two inches apart on a parchment or Silpat covered baking sheet.  (no need for them to thaw - just pop them right in the oven)  Bake for 11 to 14 minutes and allow to cool on a rack before moving to serving tray. 

Obviously I had to bake off a few to ensure they were not poison.  I think they taste and look quite delicious!  This will be a colorful and tasty addition to your holiday platters of cookies!

I baked six and tasted one...yummy...and you-know-who will
be happy to be a taste tester as well... "ohhhh Ian...guess
what I have for youuuuu!"


Bon Appetit, Y'all!!!

Shared With:StumbleUpon