
This year I have spent a long stretch of time creating the 2014 version of a Christmas Snow Globe. The original tutorial for this lovely cookie was created by SweetAmbs and can be found on youtube. Last year I made a few, but this year I made a dozen. I was much more organized than last year. I made my royal icing transfers a week before and it took 3 days to complete them. I tried acetate for the first time instead of my normal parchment paper. Wow! Talk about sliding right off and zero breakage! That is indeed the way to go if you have a lot to make! I made a variety of snowmen and trees and the detail work was so time consuming.... I may make them in the Summer this next year. I'm so far behind on my regular baking, I know this year is not going to be up to my expectations.
| Royal icing, piped on either acetate sheets, parchment paper, or wax paper and allowed to dry until hard, are called Royal Icing Transfers. They keep forever in a sealed container. A step above the "candy flowers on a sheet" you buy at the grocery store. I adored eating those as a child. These are miles above the factory-made decorations! |
| After drying, store in a container with a good seal. For delicate decorations like these, I temporarily used a cupcake and deviled egg carrier. Long term storage would be a plastic container with bubble wrap between the layers for the snowmen and the trees are sturdy enough to just be in a container sans bubble wrap. |
However, I like the snow globes a lot, so the effort has given me a sense of satisfaction, despite the physical aches and pains! Once they get baked and cooled and the various icing colors and consistencies all mixed up/bagged and have the proper sprinkles on hand (white nonpareils were not to be found this year - I had to order online and pay for express shipping...then low and behold, they appeared on the HEB shelf the next day - ayi!), anyway, once all that is done, the actual decorating took three days. I made one dozen. They are large cookies so it took 1 1/2 batches of my Vanilla Bean Sugar Cookie Dough (that's a lot for one dozen cookies). I hope the lucky recipients enjoy the effort that went into these.
I hope you will watch Amber's video and then see how you can use an available cookie cutter, different sprinkles, and different design details to make it your own, like I did. It doesn't have to be perfect (mine sure aren't) and each of mine are different. Here's a photo journal of making this fun cookie. Enjoy!
 |
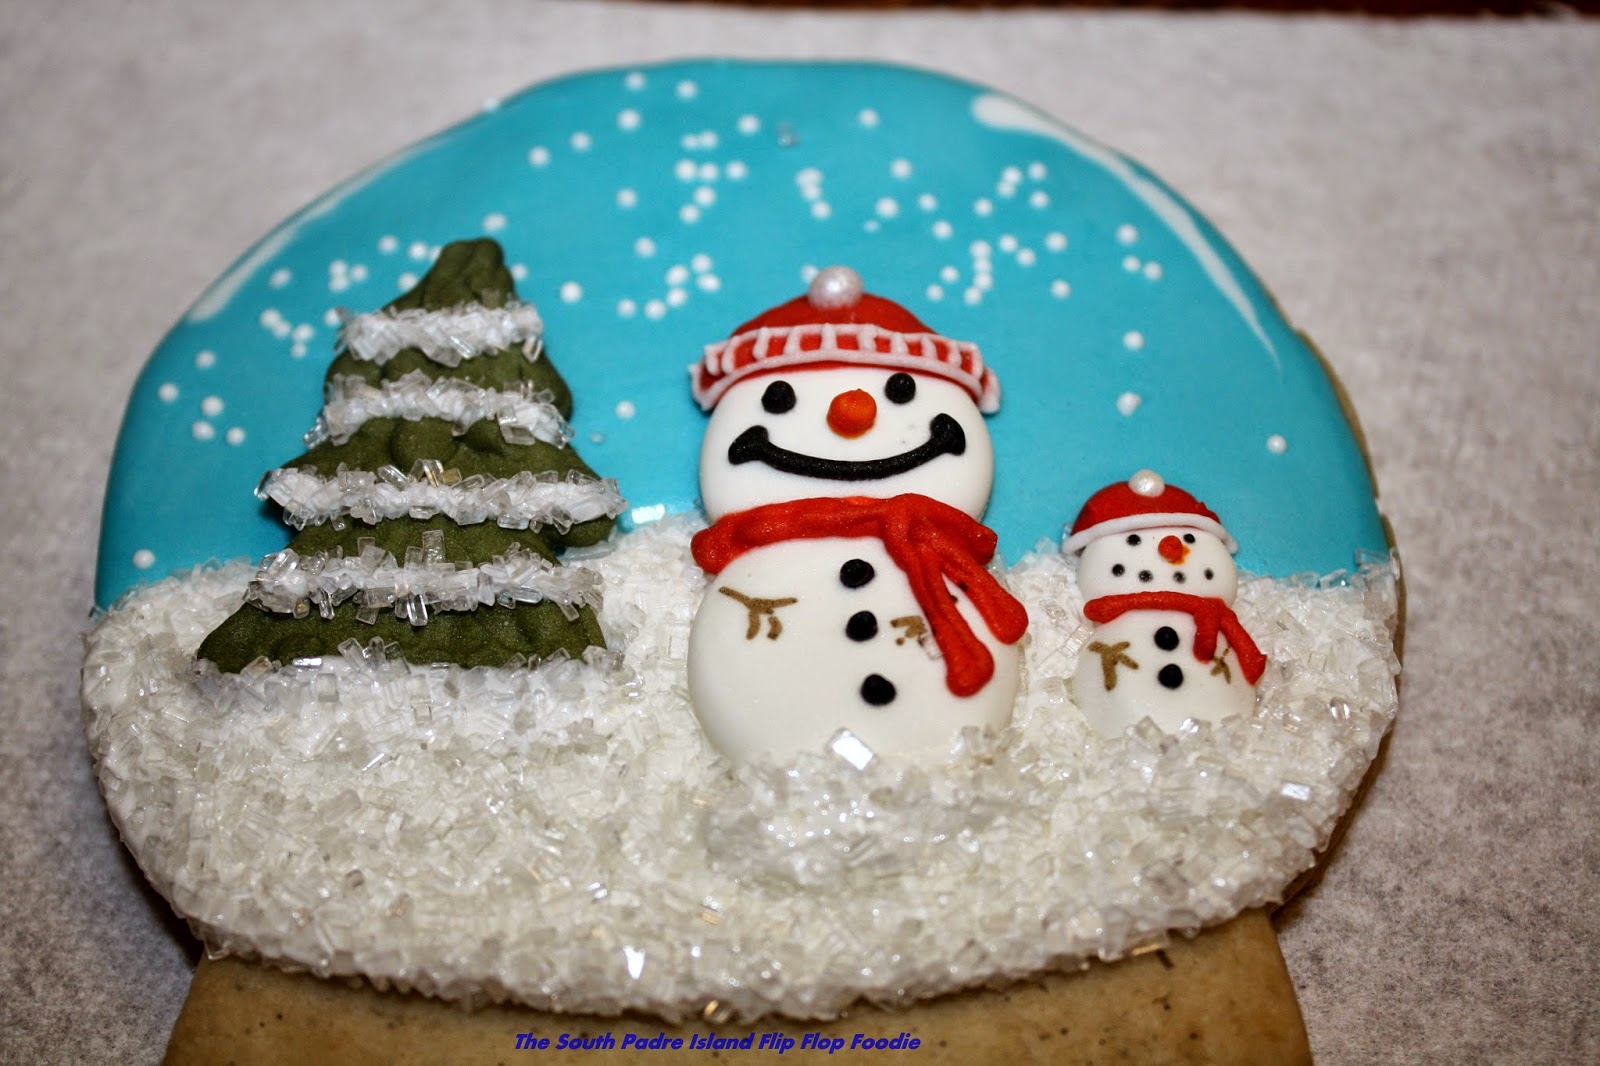
| After baking and allowing to cool, I piped on sky blue royal icing, then while wet, sprinkled on some white nonpareils. Then I piped a white royal icing "reflection" on the upper edges. This technique is demonstrated in the video tutorial from SweetAmbs. These must dry completely (over night) before you can continue. |
 |
| I am using some "tipless" piping bags. I ordered them on E-bay and they are very popular in the cookie artist community. They are very thin, you can cut the tip, thus the nickname "tipless bags". (if you don't need any fancy tips) They are so cheap you can throw them away without feeling like you should clean and reuse. A sharp pair of embroidery scissors helps you get the tiniest opening...or a slightly larger opening for the flood consistency I was using here. Cool new tool! |
 |
| Base for the "snow" is ready for some sparkle to be added while still wet. |
 |
| I use a bead tray for sprinkles. It's easy to pour the leftovers back into the jar using the little tubes at the end of the tray. I chose to use sparkling sugar crystals for the snow on the ground. I like the glistening appearance. |
| Once the sparkling sugar is on and you have neatened up the edges of the snow globe with something like the yellow boo-boo stick on the right, it is time to apply the royal icing transfers by applying some of the same white RI to the back and carefully placing it on the cookie. |
| You can see that after you press the RI transfers, the icing is displaced and moved towards the edge. You'll need to neaten the edges again. |
| Now I want to add some depth and further dimension. I pipe some royal icing on the tree and at the base of the tree and snow people. |
 |
| This time I lay the cookie in the tray face up and manually sprinkle sparkling sugar over the wet icing and then carefully move the cookie up so that the excess falls off. I clean it up with a dry paint brush in case sugar is where I don't want it....and once more fix the edges of the snow to be even with the blue sky while it is still wet. |
 |
| Allow to dry overnight or with a fan blowing on it for several hours. |
 |
| The base is a simple flood. Use a needle tool or tooth pick to pop any bubbles or smooth any bumps. Allow to dry. Then pipe a red line on top of the outline of the base. Allow to dry. Top outline again to get height and dimension. And, again allow to dry. A simple zigzag and dot pattern in green outline consistency icing with a very small opening cut in the tipless bag (on top of the dry red) gives it a Christmasy look! |
 |
| The last step is piping some white snowflakes in the blue sky in any blank spaces. I usually add 3 or 4 of these. Allow everything to dry at least 12 hours before bagging (I always dry under a fan for 24 hours because of our humidity and then bag) |

Bon Appetit, Y'all!!!
No comments:
Post a Comment
Comments are moderated - you should see it within a few hours if approved! Spam or marketing comments are immediately deleted. Thank you!!!