The South Padre Island Flip Flop Foodie Brownsville restaurants

Search The South Padre Island Flip Flop Foodie Blog!

Showing posts with label sweet. Show all posts

Friday, May 17, 2013

Three-Kinda-Chocolate Chip Cookies


Yesterday afternoon my son walks into the kitchen and notices a pound of butter out and softening, some vanilla bean paste out, and a few eggs laying on the counter coming to room temperature.  His eyes lit up and he said "what are you making Mom?".  When I said "cookies" - he smiled and asked what kind.  I knew that smile would dim when I said I was decorating cookies...so I decided, instead, on the spot, to make some cookies that the men of the household would pounce on.  They tend to hold off from pouncing on the decorated sugar cookies.  Neither are overly fond of royal icing at this point.

I slid over to my stash of chips and found a bag of chocolate chunks, a 3/4 bag of milk chocolate morsels, and a bag with about 1/3 of it filled with white chocolate morsels.  I grabbed them all and decided to just make a "dump in what I have" cookie!

I've said before, and I'll say again, I like the base mixture of a Toll House Cookie - really, it's hard to beat!  So, you'll notice the basics of this cookie are just that...with a few tweaks that really, IMHO, make it special.

Here it is:

THREE-KINDA-CHOCOLATE CHIP COOKIES
Adapted from Toll House Chocolate Chip Cookie Recipe


Printable Recipe Here

Ingredients:

2 1/4 cups Unbleached All Purpose Flour (I am a King Arthur flour fan)
1 teaspoon ground cinnamon (brings a wonderful warmth to the cookie)
1 teaspoon baking powder (Toll House recipe uses baking soda - but I went from memory and didn't check and already had the baking powder out for my sugar cookies...it seemed to work okay!)
3/4 tsp. fine sea salt (I don't use kosher salt in these cookies)
1 cup (2 sticks) butter, softened (I use salted butter - usually do, because that's what I grew up with)
3/4 cup packed brown sugar
3/4 cup granulated white sugar
1/2 tsp. vanilla extract
2 Tbsp vanilla bean paste (needed a stand-up-to-the-chocolate flavor)
2 large eggs - room temperature
12 ounces Semi-Sweet Chocolate Chunks - Nestle Toll House brand
8 ounces Milk Chocolate Morsels - Nestle Toll House brand
4 to 6 ounces White Chocolate Morsels - Ghirardelli brand (I didn't measure and would have been happier with 8 ounces - to equal the Milk Chocolate volume)

Method:

Preheat oven to 375 degrees Fahrenheit.  Prepare baking sheets with parchment paper or silicone mats.  I prefer the mats.

Whisk dry ingredients in large measuring cup and set aside.

In bowl of a stand mixer, beat butter and both sugars until fluffy.  Add eggs one at a time, while beating, and then add the vanilla bean paste and the vanilla extract.

With mixer on low, add the whisked dry ingredients about 1/3 at a time, mixing between each addition. Stop mixer to add chips and chunks.

Add the chunks and, on low, mix just until barely combined.  Stop and add the other two morsels and pulse a couple of times to mix gently.  Remove the beater, scrape all the way to the bottom of the bowl and gently mix a couple of times with a sturdy spoon.

This batch made 2 dozen that I baked...and I froze twenty balls of cookie dough for later use.  I used a medium size cookie scoop to get that number of cookies.

Bake 12 at a time on the baking sheet and bake 10-12 minutes for a chewy cookie.  For the frozen ones, I will generally bake at 350 for 11 to 13 minutes from a frozen state.  I don't thaw or put in fridge first.  They turn out beautifully straight from the freezer.
Frozen bag of cookie dough balls are great to keep in the freezer.
I allow to freeze on a smaller cookie sheet in the freezer,
then remove them to a freezer zipper bag.
Remove as much air as possible before freezing.
Double bagging won't go amiss! 

The men in the house were very pleased and I notice there are less than a dozen left...that's a good thing!

Dark, Milk, White...a great combination of chocolate with
the underlying cinnamon and vanilla flavors.
Made a really tasty cookie!


StumbleUpon

Sunday, October 7, 2012

BLUEBERRY CREAM CHEESE BREAD

I have been away for quite a while - my Mom is in the hospital, and has been since mid-September.  Baking and doing fun things has really been placed on the back-burner.  This has been one of the first cooking/baking endeavors in weeks.  It is a worthy project for a return to blogging!

I found this recipe online several months ago and pinned it on my Pinterest Board of recipes I'd like to try.  It just looked so yummy and I finally got around to making it.  Despite it taking a boatload of mixing bowls, spatulas, measuring cups, and measuring spoons - I'm definitely happy with the outcome.  Being a first try, I didn't change the recipe.  I did have to bake it longer.  It simply was not done at the recommended time.  So, the recipe I've typed below includes that note...and a few other of my thoughts and additional instructions (in italics usually).

I found the recipe at Tasty Kitchen and encourage you to link back to the site and scope out their many yummy recipes.  This one was posted by Savannah in the Breads section.  In my opinion, it is more like a cake - and was eaten with a fork by my family.  We also liked it after it was at room temperature...everything firmed up nicely and it was easier to slice.  The recipe said prep time was 20 minutes...well, she's a better cook than me.  It took me over 50 minutes to pull this together and get it in the oven.  Of course, I had to stop for many photos...maybe that was the problem.

So, here it is...lots of effort, but worth it for a special breakfast or brunch.


Blueberry Cream Cheese Bread
by Savannah at Tasty Kitchen: A Happy Recipe Community

INGREDIENTS:

For the Bread Batter:

1/2 cup butter (I used salted)
1/2 cup granulated sugar
1/4 teaspoon salt
1 teaspoon vanilla extract
2 egg yolks
1 1/2 cups all-purpose flour
1 teaspoon baking powder
1/2 cup milk
1 1/2 cups Blueberries (up to 2 cups she said - I used a pint)
1 tablespoon all-purpose flour
2 egg whites
1/4 cup white granulated sugar

For the Filling:

8 ounces, weight, Cream Cheese (softened)
1/2 cup sugar
1 tablespoon flour
1 whole egg
1 tablespoon Orange zest

For the Glaze:

2 tablespoons granulated sugar
1/2 teaspoon vanilla
1 teaspoon water

METHOD:

Preheat oven to 350 degrees F.

Filling:
In a medium bowl, combine cream cheese, sugar, 1 tablespoon flour, whole egg, and orange zest; beat until smooth.  Set aside.

Glaze:
Stir together the glaze ingredients (2 Tbsp sugar, 1/2 tsp vanilla, 1 tsp water) and set aside.

Bread:
Cream butter and 1/2 cup sugar until fluffy.  Add salt and vanilla.  Add egg yolks (be sure to save the egg whites for later) to the sugar mixture; beat until creamy.  Set aside.
In another bowl, combine 1 1/2 cups flour and 1 tsp baking powder.  Add this to the butter and sugar mixture, alternating with milk (1/3 four, 1/2 milk, 1/3 flour, 1/2 milk, last third of flour.  Very stiff batter.)
In another bowl, coat blueberries with 1 tablespoon flour and add them to the batter. (Note - when I do this again, I'm changing this to the last addition - I squished many berries by adding them to such a dense batter - which is lightened in the next step with egg whites...it makes sense to me to add them at the end.  However, I followed recipe and added them at this point).
In a separate bowl, beat egg whites until soft peaks form.  Add 1/4 cup sugar, 1 tablespoon at a time, and beat until stiff peaks form.  Fold egg whites into batter.

Putting it into pan:
Pour 1/2 of the blueberry batter (or a little less) into a floured and greased pan.  Smooth it with a spatula.
Layer the filling over the batter - smooth it with a spatula.
Finish with the remainder of batter - carefully smoothing to the edge of the pan.  This will create a layer of "cheesecake" between the blueberry bread layers.
Pour glaze over top of UNBAKED loaf and place in preheated 350 degree oven for 55-60 minutes.
(As stated above, mine took longer to bake - a total of 1 hour 15 minutes and it was perfect)

I allowed the bread to cool 20 minutes in the pan on a rack.  I turned it out onto a tray and allowed it to firm up for another 15-20 minutes or so...then we couldn't wait any longer to try it. 

It was still crumbly (and firmed up much more within a few hours).  Very, very delicious!  We had large slabs with our coffee.  Not overly sweet but, a bit more cake-like than bread-like to me.  I just had another piece with coffee while I wrote this post.  Excellent the next day as well!!!

Bon Appetit, Y'all!!!

SHARED WITH:

Addicted to Recipes Button, Page button
StumbleUpon

Tuesday, September 11, 2012

Biscoff Crust Marble Cheesecake


It's 9/11 and that special day is Mr. Flip Flop's birthday.  Sometimes difficult to be celebratory on such a solemn day in our country.  We persevere.  I wrote about one of his favorite birthday cakes last year; the Marble Cheesecake recipe found in an old Austin American-Statesman newspaper from the 70's, which I have been making him for over 20 years.  It is still a family favorite and his choice for this year's birthday cake as well.

I asked if he was okay with me tweaking it a bit...he said "sure".  I gave him a Biscoff cookie to eat to ensure he thought the flavor would be a good substitution in the crust.  He told me to go for it, so I did.

I only made two tweaks...the original recipe is posted at this link.  This time around I substituted ground up Biscoff cookies instead of graham cracker crumbs...a whirl in the food processor's small bowl with small blade was quick and efficient.  It took 25 cookies to measure 1 1/2 cups of crumbs.

The second tweak was adding 1/4 teaspoon ground cinnamon to the chocolate mixture.  I normally use semi-sweet chips, but this time I got a Ghirardelli semi-sweet chocolate baking bar (4 oz size, used half, or 4 squares).  I thought the higher quality chocolate with a hint of spice would nicely complement the cinnamon flavor in the Biscoff cookie crust.

I'm really glad I completely wrapped the outside of my pan in foil...butter inside the foil when I took it off.  I've never had any spring form pan that didn't leak butter!  I also place the wrapped pan on a cookie sheet...another good thing because lo and behold...butter on the cookie sheet.  Jeez Louise!

Here's the slightly revised recipe:

BISCOFF CRUST
MARBLE CHEESECAKE

INGREDIENTS:

1 1/2 cups Biscoff cookie crumbs (about 25 cookies)
1 1/2 cups white granulated sugar, divided
6 tablespoons butter, melted
3 8-ounce packages cream cheese, softened to room temperature
1 1/2 teaspoons vanilla
4 eggs
1 cup cream
2 ounces Ghirardelli semi-sweet chocolate, melted and cooled
1/4 teaspoon ground cinnamon

METHOD:

Preheat oven to 325 degrees Fahrenheit
Combine Biscoff crumbs, 1/4 cup of the sugar, and the melted butter in a bowl.


Press mixture in bottom and up the sides of a 9-inch springform pan; set aside.  I use the bottom of a measuring cup to press the crust evenly across the pan and slightly up the sides.

In the bowl of a stand mixer beat cream cheese, 1 1/4 cups sugar, and vanilla on medium speed until fluffy.  Add eggs (one at a time), beating on low speed just until blended.  Add cream; beat on low speed until blended.


While the batter is blending, work on the chocolate.  It needs to be fairly cooled off before mixing into a portion of the batter.  I melted the chocolate in a small microwave proof bowl - it took only 50 seconds total. (30 seconds, then 10, then 10)

Stir 1 1/2 cups batter and 1/4 tsp cinnamon into the melted cooled chocolate, stirring briskly until smooth.


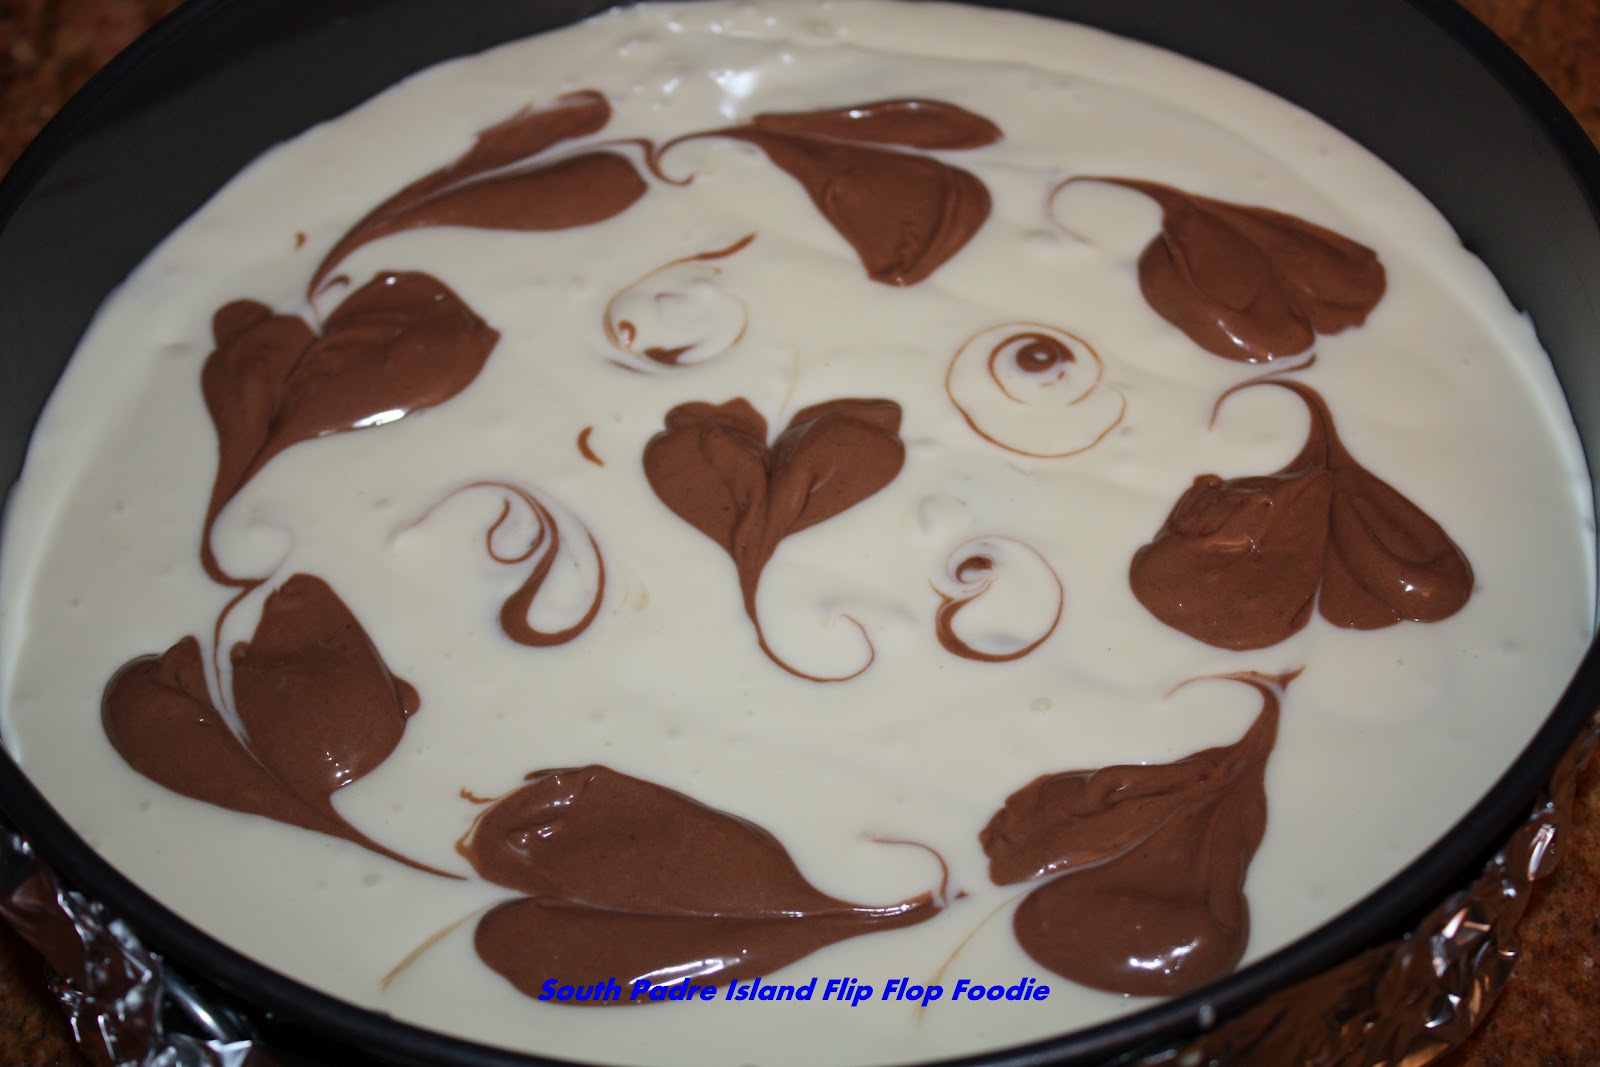
Pour slightly more than half of the plain mixture into the crust.  Gradually spoon in slightly more than half of the chocolate mixture next, using a zigzag motion.


Pour or gently spoon the rest of the plain mixture over the chocolate mixture.  Gently guide to edge to completely cover the chocolate.  Carefully, with a sharp knife or the tip of a chop stick, swirl the mixture (not bringing the chocolate to the surface and not disturbing the crust below) in a pattern that you will see after cutting the cheesecake.

I dolloped spoonfuls of the remaining chocolate mixture around the cake and in the center.  I ran the tip of the chop stick around in a circle, pulling the chocolate into loosely heart-shaped swirls.  I dropped a few little droplets and swirled them about as well.  Just get creative :-)


Bake at 325 for 60 to 70 minutes or until the center appears nearly set when shaken. Cool in pan for 15 minutes on a wire rack; carefully loosen sides of pan after removing foil.  Cool another 30 minutes before removing sides of pan.  Refrigerate once completely cool.

Despite giving the pan a few sharp whacks on the counter, I still ended up with bubbles.  I also have a few cracks.  My family is not bothered by either.  They only care about the taste.


My hubby was particularly impressed with the hearts... he has mentioned them more than once... which made me feel all squishy inside.  I do love that man of mine!  We went into "town" for a movie, picking up the teen from campus after his classes.  We went to see The Words.  When we walked out, Ian said "wow, that was deep".  I was so pleased that this complex movie, which was deep, was something he could wrap his mind around.  Next, we are out to eat on the island since we ended up at an early movie and didn't want to hang out in town for dinner time.

All-in-all, a lovely day despite the sad reminders of flags at half-mast... and news filled with a reminder of the utter sadness of a day no longer just a day to wake up and think "oh, fun, happy birthday"... and while we must never forget...we must also not forget to celebrate the joys of another year of life!

Bon Appetit, Y'all!!!


SHARED WITH:


Creations by Kara


StumbleUpon

Sunday, May 6, 2012

Fresh Fruit with Greek Yogurt


I asked Mr. Flip Flop if he would prefer fruit and yogurt for breakfast or some breakfast tacos?  He perked up immediately to fruit and yogurt.  The strawberries and blackberries are looking so good right now, fortunately I had a good supply in the fridge.  It was an easy fix!

I washed, hulled, and quartered strawberries, gently washed the blackberries, and rinsed some red grapes that I had, slicing those in half.  Left all the fruit draining on some paper towels while I mixed up a yogurt topping.

Greek Yogurt Fruit Topping

1 cup fat free Greek yogurt
1/2 teaspoon pure vanilla bean paste
1/4 teaspoon ground cinnamon
1 tablespoon honey

Whisk ingredients together - simple as could be!

I piled the fruit in a pasta bowl, drizzled the fruit with a bit of extra honey, and poured the yogurt topping over the fruit, using a few reserved pieces on top so he'd know what was underneath.


He was delighted with his healthy breakfast and scraped the bowl clean.

I love simple Sunday mornings!

Bon Appetit, Y'all!

Shared With:

StumbleUpon

Thursday, March 15, 2012

Milky Way Frosting

We are stuck at home in the land of Spring Breakers...traffic is horrendous and going out is highly undesirable!  The teen was looking longingly at the few snacks we had left and walked away dejectedly without making a choice.  I've been loading him up on fruits and healthy choices this week and I could tell....he was hankering for a sweet.

I made some box mix yellow cupcakes and thought we'd just eat them plain...until he said "where's the frosting?"  I said, all I have is a can of cream cheese frosting that I bought to make cake pops...you can open that if you want frosting.  He did and we both slathered a cupcake and bit into it...yuck!  I haven't had canned frosting in a lonnnnggg time.  It was awful!  I threw mine in the trash.  He opted for the bare ones and headed to the man cave.  He better enjoy it, tomorrow is house cleaning day and the man cave is getting aired out!

I looked into my baking cabinet to see if anything stirred me.  I saw two Milky Way bars that I'd bought a couple of weeks ago and forgotten.  That brought to mind an old frosting recipe that I've made for a Milky Way Cake...and I remembered it set up really well, and wondered if it would maybe be pipeable (is that a word?).

I had everything I needed, so got to work to find out if it would hold up to piping!

Milky Way Frosting

Ingredients:

2 Milky Way bars (regular size)
1 stick of butter (1/2 cup)
12 ounces powdered sugar
1 teaspoon pure vanilla extract
1-2 tablespoons heavy whipping cream

Method:

Cut up butter and Milky Way bars into tablespoon sized slices and put in a small saucepan over medium heat. 

Stir frequently and vigorously with a heat-resistant spatula, pressing the Milky Way pieces to hurry the melting process - they never get all the way melted I've found....but that's okay.


In the bowl of a stand mixer, with beater attachment, pour in the powdered sugar and give it a few whirls to make sure all the lumps are out...I've never sifted this recipe and didn't today.

Add the melted chocolate and butter mixture and blend until you have a heavily crumbly mess.  Add the vanilla extract and the whipping cream, 1 teaspoon at a time.  Beating on high medium after each addition.  Today it took about 3 or 4 teaspoons of cream.  I pull the beater up and when the shape holds, I know I'm "there".

Prepare a piping bag with a large coupler and large tip and stand it in a tall glass.  Fold the cuff down and fill the bag with the frosting.  I played with a couple of tips - a Wilton 1M and Wilton 4B.  I will say, I'm not the best at piping...but I don't have a lot of opportunity to practice.  We like cupcakes way too much...I'm going to have to visit the neighbors with cupcake gifts again as it is.  If I don't, our butts won't fit out the door come Monday.

This piped really well, but didn't "finish" well - the stars at the end didn't break gracefully, I nearly had to pinch them off. 

So, this might not be the best piping material...but it is quite tasty, albeit very sweet.  I might try a sprinkle of cinnamon in the mix next time. to give it a little warmth...and I am not sure what to do about the refusal to release...maybe have some snippers handy :-)


Whatever the outcome, it was fun to try my hand at topping cupcakes again.  I'll keep trying until I get it eventually!

Bon Appetit, Y'all!!!

SHARED WITH:

StumbleUpon

Tuesday, February 14, 2012

Valentine Brownie Cake

This is not really a cake...yet, it is more than just a brownie.  It is so decadently sweet it just screams Valentine's Day.  I served it Sunday evening after a very filling meal...and it was almost a struggle for each piece to be totally consumed.  We needed a cup of coffee or a glass of milk.  It was rich!

I did use a boxed brownie mix - I really only planned to make some brownies for the week-end, then I got this idea to make it in a  round glazed pottery dish my Mom had given me for Christmas...and then, I got the idea to bring cream cheese frosting into play...and then I got the bright idea to cut the brownie to make it two layers (that was not the best decision I will say - it was hard to accomplish).

All-in-all, it is a holiday-worthy dessert.  I am no cake decorator that is for sure, but a very large star tip made everything either very easy or challenging, depending on which part I was working on.  The family thought it looked good and tasted good.  The teen forwent second servings of dinner to make sure he had room for dessert.  It was a satisfying result but quite the challenging endeavor.

Here's how I did it.

I prepared a box of Betty Crocker Fudge Brownie 13x9 Family Size, per package directions.  I wish I'd used 3 eggs instead of 2 to make it more cake-like.  I used a 10 inch round pan and I sprayed the bottom of that pan with vegetable oil spray, laid a round of parchment paper in the bottom, and then sprayed it too.  In went the batter and it baked for 36-37 minutes.

I allowed the brownie to cool overnight, on a rack, loosely covered with plastic wrap after it was cool to the touch...you don't want condensation under the plastic wrap.  The next morning I used a sharp knife to run around the edges to loosen the brownie from the pan.  I flipped it onto a "cake turner".

I then had to decide how best to cut the brownie into two layers.  My Wilton cake leveler was too tall and not sharp enough anyway.  I ended up with the cake on the cake stand on top of a cake decorating lazy susan.  I realized a serrated knife was going to be my best bet...even then, I had a slightly fudgy center which caused all sorts of problems.  I was able to cut it, then take the same cake lifter and lay it on top of the cake and lifted the cake plate and began a slow tilting motion.  I realized what I hoped for was indeed happening!  The bottom of the brownie was sticky enough to stay on the cake plate allowing the top layer to plop onto the cake lifter upside down.  Whew.

I had prepared some light pink Vanilla Bean Cream Cheese Frosting (recipe below) and placed it in a 16 inch piping bag with a large coupler.  I piped a filling of frosting on the bottom layer using a Wilton 1M Star Tip, leaving a border so the filling doesn't squish out. 

Next, I flipped the top of the brownie back onto the filled bottom.  A minor amount of cracking occurred but I was able to sort of squeeze it back into position since the brownie was really closer to fudgy than cakey.  I did have one spot where the filling seeped out to the edge.  I covered that with some piping on the sides. 

I did a few stars and swirls on top (again, I am not good with cake decorating so don't judge my inconsistent piping :-) and finally piped a heart in the middle. Standing back, it wasn't too bad. I could see all the booboos...but I knew the family probably wouldn't!


It was outstanding - but the slices should have been half the size I cut.  We will enjoy nibbling on it a bit more...and I'll need to share a slice or two with a neighbor to get it out of the house.  Eating it all would be a bad, bad thing!


Vanilla Bean Cream Cheese Frosting

Ingredients:

1/2 cup butter softened to room temperature (1 stick)
8 ounces cream cheese softened to room temperature
1 teaspoon pure vanilla bean paste
1 pound sifted powdered sugar (confectioners sugar)
1 teaspoon heavy cream - more if needed to get to spreading consistency
4 drops liquid red food coloring

Method:

Beat butter and cream cheese until light and fluffy.  Add vanilla bean paste until incorporated.
Add powdered sugar, beat on low until powder no longer flies, then increase beating speed and add cream and red food coloring to desired color and consistency.


Happy Valentine's Day to everyone.

Bon Appetit, Y'all!!!StumbleUpon

Tuesday, December 13, 2011

Toffee Chocolate Chip Cookies


One of our family's favorite cookies from the Central Market Bakery in Austin is their ...uh, uh...oops, I'm not sure of their real name!  I just see them and grab the package.  They used to not sell them in the summer time because they said it was too hard to keep the ingredients from melting.  It is rife with chocolate chips and pieces of toffee and reminds me of a Heath Bar doing an impersonation of a cookie.

I've made this recipe a few times, adding chunked up Heath candy bars to my traditional chocolate chip cookie recipe - my favored Toll House recipe.

This time, however, I found some Heath Milk Chocolate Toffee Bits right on the baking aisle.  They may have had them for years - I just have never seen them - I've seen just the toffee bits, but not the ones with chocolate...actually chopped up candy bars!  I have always just determinedly chopped up Heath Bars and tried to keep them corralled on my cutting board.  I sense this will be soooo much easier - all the work is done.

Seems like several new ingredients are on the shelves this year...or again, maybe I haven't been very observant!  I'm digging this bit of ease though!  I hope they are as good - they are quite a bit smaller than I chop the candy bars when I do it by hand.

I'm making a lot of dough today and tomorrow and I'll bake a few...for quality control of course...and the rest will be portioned and frozen for baking right before Christmas Eve and Christmas Day.  My boys will be pleased :-)  This cookie is buttery and laden with chocolates and hidden bits of toffee....ummm, pretty darn delicious!  (Is it bad of me to say, now that I taste it, I like my hand-chopped candy bars more?  These bits are too bitty...but still very good.)
If you look closely, you might see
the bits of toffee melted between all that chocolate!

TOFFEE CHOCOLATE CHIP COOKIES

Ingredients:

2 1/4 cups unbleached all-purpose flour
1 teaspoon baking soda
1 teaspoon kosher salt

3/4 cup light brown sugar
3/4 cup white granulated sugar
1 cup (2 sticks) unsalted butter - softened to room temperature
2 large eggs
1 1/2 teaspoons pure vanilla extract

3/4 cup Milk Chocolate chunks (I used El Rey discs)
3/4 cup Milk Chocolate morsels (I used Ghirardelli)
1 cup semi-sweet chocolate morsels (I used Ghirardelli)
1 1/3 cups Heath Milk Chocolate Toffee Bits (the 8 ounce pkg)

Method:

Preheat oven to 375 degrees F.

Prepare baking sheets with Silpat or Parchment Paper.

Set up cooling racks.

In medium bowl, whisk together flour, salt, and baking soda - set aside

In bowl of stand mixer, cream butter and both sugars until lightened. Add vanilla extract. Beat until blended.
Add eggs, 1 at a time, mixing to incorporate after each addition.

Lower mixer speed and add the flour mixture by thirds, incorporating after each addition.

Remove beater and hand mix in chocolates and toffee bits. Use a sturdy spoon...I kid you not!  I have broken more than one spatula doing this.
That's a very stiff dough!

Using small to medium sized cookie scoop, place 1 dozen cookies on each baking sheet. Place in oven for 9 to 11 minutes.

The sample batch was rich and buttery and awesome!

40 scoops of dough in the freezer for fresh Christmas cookies


Today, I used a medium scoop and I had enough cookie dough for 52 cookies.  I baked off a dozen and put the other 40 scoops of dough on a baking sheet into the freezer.  Once they are solid, I will move them to a gallon Ziploc and return them to the freezer.  When I get near the 24th and bake off the rest of the batch, I'll take it as part of my cookie trays for the family Christmas.


Happy Holiday Baking my foodie friends....it's beginning to feel a lot like Christmas... despite the fact that I've only bought a couple of gifts and my house isn't decorated.  I'm feeling a little Grinchy this year for some reason.  However, I think I'm starting to feel the spirit.  I've been really tired lately and it's hard to push myself to bake, cook, blog about it, and keep up with everything else I have going on....and stay on the teen to study, study, study for semester finals.  Senior year is a bitch challenging time.  Senior boys in my family are like horses eyeing some really good green grass on the other side of the fence and I swear this one is ready to bolt!   Focus is not primary in his life...and despite it being decades ago, I remember exactly what it was like myself.  I've made it through two other teen boys ...I know I can make it through this one.  I think I can, I think I can, I know I can, I know I can!
The front of my Christmas cards...if I ever get around to getting them sent!
Got them at The Rusty Pelican in Port Isabel - just love them.


Keep the South Padre Island Flip Flop Foodie in your thoughts, prayers, or any other good juju...I'ma needin' it this year!


Bon Appetit, Y'all!!!

SHARED WITH:
StumbleUpon