The South Padre Island Flip Flop Foodie Brownsville restaurants

Search The South Padre Island Flip Flop Foodie Blog!

Showing posts with label Ghirardelli chocolate. Show all posts

Tuesday, September 11, 2012

Biscoff Crust Marble Cheesecake


It's 9/11 and that special day is Mr. Flip Flop's birthday.  Sometimes difficult to be celebratory on such a solemn day in our country.  We persevere.  I wrote about one of his favorite birthday cakes last year; the Marble Cheesecake recipe found in an old Austin American-Statesman newspaper from the 70's, which I have been making him for over 20 years.  It is still a family favorite and his choice for this year's birthday cake as well.

I asked if he was okay with me tweaking it a bit...he said "sure".  I gave him a Biscoff cookie to eat to ensure he thought the flavor would be a good substitution in the crust.  He told me to go for it, so I did.

I only made two tweaks...the original recipe is posted at this link.  This time around I substituted ground up Biscoff cookies instead of graham cracker crumbs...a whirl in the food processor's small bowl with small blade was quick and efficient.  It took 25 cookies to measure 1 1/2 cups of crumbs.

The second tweak was adding 1/4 teaspoon ground cinnamon to the chocolate mixture.  I normally use semi-sweet chips, but this time I got a Ghirardelli semi-sweet chocolate baking bar (4 oz size, used half, or 4 squares).  I thought the higher quality chocolate with a hint of spice would nicely complement the cinnamon flavor in the Biscoff cookie crust.

I'm really glad I completely wrapped the outside of my pan in foil...butter inside the foil when I took it off.  I've never had any spring form pan that didn't leak butter!  I also place the wrapped pan on a cookie sheet...another good thing because lo and behold...butter on the cookie sheet.  Jeez Louise!

Here's the slightly revised recipe:

BISCOFF CRUST
MARBLE CHEESECAKE

INGREDIENTS:

1 1/2 cups Biscoff cookie crumbs (about 25 cookies)
1 1/2 cups white granulated sugar, divided
6 tablespoons butter, melted
3 8-ounce packages cream cheese, softened to room temperature
1 1/2 teaspoons vanilla
4 eggs
1 cup cream
2 ounces Ghirardelli semi-sweet chocolate, melted and cooled
1/4 teaspoon ground cinnamon

METHOD:

Preheat oven to 325 degrees Fahrenheit
Combine Biscoff crumbs, 1/4 cup of the sugar, and the melted butter in a bowl.


Press mixture in bottom and up the sides of a 9-inch springform pan; set aside.  I use the bottom of a measuring cup to press the crust evenly across the pan and slightly up the sides.

In the bowl of a stand mixer beat cream cheese, 1 1/4 cups sugar, and vanilla on medium speed until fluffy.  Add eggs (one at a time), beating on low speed just until blended.  Add cream; beat on low speed until blended.


While the batter is blending, work on the chocolate.  It needs to be fairly cooled off before mixing into a portion of the batter.  I melted the chocolate in a small microwave proof bowl - it took only 50 seconds total. (30 seconds, then 10, then 10)

Stir 1 1/2 cups batter and 1/4 tsp cinnamon into the melted cooled chocolate, stirring briskly until smooth.


Pour slightly more than half of the plain mixture into the crust.  Gradually spoon in slightly more than half of the chocolate mixture next, using a zigzag motion.


Pour or gently spoon the rest of the plain mixture over the chocolate mixture.  Gently guide to edge to completely cover the chocolate.  Carefully, with a sharp knife or the tip of a chop stick, swirl the mixture (not bringing the chocolate to the surface and not disturbing the crust below) in a pattern that you will see after cutting the cheesecake.

I dolloped spoonfuls of the remaining chocolate mixture around the cake and in the center.  I ran the tip of the chop stick around in a circle, pulling the chocolate into loosely heart-shaped swirls.  I dropped a few little droplets and swirled them about as well.  Just get creative :-)
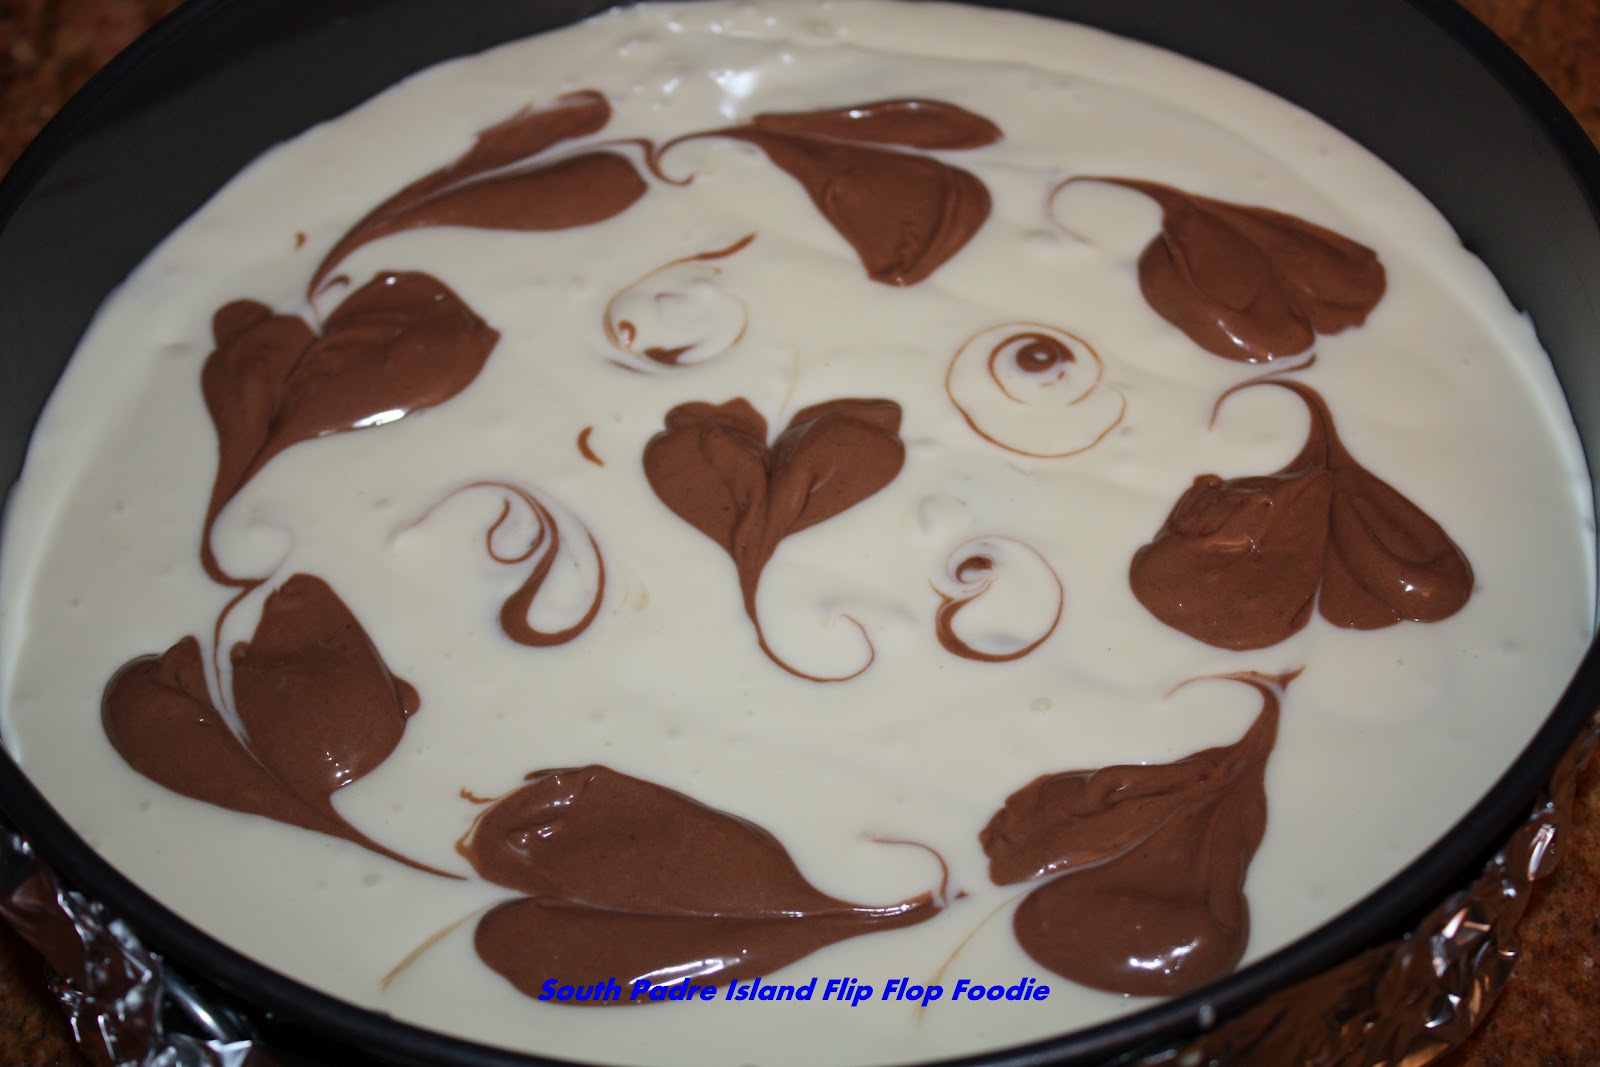

Bake at 325 for 60 to 70 minutes or until the center appears nearly set when shaken. Cool in pan for 15 minutes on a wire rack; carefully loosen sides of pan after removing foil.  Cool another 30 minutes before removing sides of pan.  Refrigerate once completely cool.

Despite giving the pan a few sharp whacks on the counter, I still ended up with bubbles.  I also have a few cracks.  My family is not bothered by either.  They only care about the taste.


My hubby was particularly impressed with the hearts... he has mentioned them more than once... which made me feel all squishy inside.  I do love that man of mine!  We went into "town" for a movie, picking up the teen from campus after his classes.  We went to see The Words.  When we walked out, Ian said "wow, that was deep".  I was so pleased that this complex movie, which was deep, was something he could wrap his mind around.  Next, we are out to eat on the island since we ended up at an early movie and didn't want to hang out in town for dinner time.

All-in-all, a lovely day despite the sad reminders of flags at half-mast... and news filled with a reminder of the utter sadness of a day no longer just a day to wake up and think "oh, fun, happy birthday"... and while we must never forget...we must also not forget to celebrate the joys of another year of life!

Bon Appetit, Y'all!!!


SHARED WITH:


Creations by Kara


StumbleUpon

Tuesday, December 13, 2011

Toffee Chocolate Chip Cookies


One of our family's favorite cookies from the Central Market Bakery in Austin is their ...uh, uh...oops, I'm not sure of their real name!  I just see them and grab the package.  They used to not sell them in the summer time because they said it was too hard to keep the ingredients from melting.  It is rife with chocolate chips and pieces of toffee and reminds me of a Heath Bar doing an impersonation of a cookie.

I've made this recipe a few times, adding chunked up Heath candy bars to my traditional chocolate chip cookie recipe - my favored Toll House recipe.

This time, however, I found some Heath Milk Chocolate Toffee Bits right on the baking aisle.  They may have had them for years - I just have never seen them - I've seen just the toffee bits, but not the ones with chocolate...actually chopped up candy bars!  I have always just determinedly chopped up Heath Bars and tried to keep them corralled on my cutting board.  I sense this will be soooo much easier - all the work is done.

Seems like several new ingredients are on the shelves this year...or again, maybe I haven't been very observant!  I'm digging this bit of ease though!  I hope they are as good - they are quite a bit smaller than I chop the candy bars when I do it by hand.

I'm making a lot of dough today and tomorrow and I'll bake a few...for quality control of course...and the rest will be portioned and frozen for baking right before Christmas Eve and Christmas Day.  My boys will be pleased :-)  This cookie is buttery and laden with chocolates and hidden bits of toffee....ummm, pretty darn delicious!  (Is it bad of me to say, now that I taste it, I like my hand-chopped candy bars more?  These bits are too bitty...but still very good.)
If you look closely, you might see
the bits of toffee melted between all that chocolate!

TOFFEE CHOCOLATE CHIP COOKIES

Ingredients:

2 1/4 cups unbleached all-purpose flour
1 teaspoon baking soda
1 teaspoon kosher salt

3/4 cup light brown sugar
3/4 cup white granulated sugar
1 cup (2 sticks) unsalted butter - softened to room temperature
2 large eggs
1 1/2 teaspoons pure vanilla extract

3/4 cup Milk Chocolate chunks (I used El Rey discs)
3/4 cup Milk Chocolate morsels (I used Ghirardelli)
1 cup semi-sweet chocolate morsels (I used Ghirardelli)
1 1/3 cups Heath Milk Chocolate Toffee Bits (the 8 ounce pkg)

Method:

Preheat oven to 375 degrees F.

Prepare baking sheets with Silpat or Parchment Paper.

Set up cooling racks.

In medium bowl, whisk together flour, salt, and baking soda - set aside

In bowl of stand mixer, cream butter and both sugars until lightened. Add vanilla extract. Beat until blended.
Add eggs, 1 at a time, mixing to incorporate after each addition.

Lower mixer speed and add the flour mixture by thirds, incorporating after each addition.

Remove beater and hand mix in chocolates and toffee bits. Use a sturdy spoon...I kid you not!  I have broken more than one spatula doing this.
That's a very stiff dough!

Using small to medium sized cookie scoop, place 1 dozen cookies on each baking sheet. Place in oven for 9 to 11 minutes.

The sample batch was rich and buttery and awesome!

40 scoops of dough in the freezer for fresh Christmas cookies


Today, I used a medium scoop and I had enough cookie dough for 52 cookies.  I baked off a dozen and put the other 40 scoops of dough on a baking sheet into the freezer.  Once they are solid, I will move them to a gallon Ziploc and return them to the freezer.  When I get near the 24th and bake off the rest of the batch, I'll take it as part of my cookie trays for the family Christmas.


Happy Holiday Baking my foodie friends....it's beginning to feel a lot like Christmas... despite the fact that I've only bought a couple of gifts and my house isn't decorated.  I'm feeling a little Grinchy this year for some reason.  However, I think I'm starting to feel the spirit.  I've been really tired lately and it's hard to push myself to bake, cook, blog about it, and keep up with everything else I have going on....and stay on the teen to study, study, study for semester finals.  Senior year is a bitch challenging time.  Senior boys in my family are like horses eyeing some really good green grass on the other side of the fence and I swear this one is ready to bolt!   Focus is not primary in his life...and despite it being decades ago, I remember exactly what it was like myself.  I've made it through two other teen boys ...I know I can make it through this one.  I think I can, I think I can, I know I can, I know I can!
The front of my Christmas cards...if I ever get around to getting them sent!
Got them at The Rusty Pelican in Port Isabel - just love them.


Keep the South Padre Island Flip Flop Foodie in your thoughts, prayers, or any other good juju...I'ma needin' it this year!


Bon Appetit, Y'all!!!

SHARED WITH:
StumbleUpon

Friday, November 11, 2011

Chewy Chocolate Meringues

It is 11-11-11, it's a gorgeous day, and I needed to bake something to take over for coffee with a friend this afternoon.  I had about 1 1/2 hours available and I took a peak at my "list of things I want to bake" and the item on the top was a recipe I'd saved from Bakerella's website some weeks ago.  I am a meringue lover - I'll eat it raw I love it so much.  So the Chewy Chocolate Meringues were what I decided upon.  They looked wonderful, and blessedly fast.  They are supposed to be cracked and crispy on the outside and soft and chewy on the inside.  Yummmmm.

I was intrigued because I usually have to leave meringues in my oven to cure - but these appeared to be fast bakers and I thought I could whip them up and out before having to get dressed and hit the road for Zumba.

First, I'll share the things that I did different and a few things that went wrong. 

I didn't take my laptop in the kitchen, nor print off the recipe.  I ran back and forth like an idiot, peeking at the recipe to make sure I was on point.  Uh, not advisable.

I didn't have chocolate nibs - so I decided to double the chocolate - and I decided I didn't have time to chop block chocolate, so I used Ghirardelli Milk Chocolate Chips.  I almost always prefer milk chocolate to dark anyway.  I prayed that would not mess things up.

I re-read the recipe 3 times...and still missed the part that said "rotate and bake another 8-9 minutes".

It was a cold morning, no rain, so I didn't check the humidity here on the Texas Gulf Coast until AFTER I baked the cookies.  Whew...only 62%.  That'll do.  I don't usually make that mistake with meringues...I have ruined some lovely piped meringues on a 90% humidity day!  They literally wept that day.

I had to scramble upon realization that I had screwed up the baking time and needed to re-insert the tray I'd just removed, despite now having two trays already in the oven - I had to scurry and create another level with a cooling rack to get all 3 trays in my oven that only fits two trays.  Holy crap people.  I was red in the face, praying, and cursing all at the same time.

The scariest thing I did, however, was using a carton of pasteurized egg whites instead of fresh egg whites.  I was in a hurry, I'd read a recent blog that said they worked just fine, and I just decided I'd take the risk - it is, after all, 11/11/11, a supposedly good day!

All said, they still turned out okay!  Better than okay.  They look and taste exactly as I had hoped.  Chewy, yet fluffy on the inside, crisp on the outside, and full of chocolaty deliciosity!  They looked like the pictures from Bakerella and the book, Home Baked Comfort...so I felt good about the whole thing!

 
Chewy Chocolate Meringues
(adapted from Salty Tart via Home Baked Comfort via Bakerella)
1 cup pasteurized egg whites (I used a local store brand - H.E.B.) or 1 cup of fresh egg whites if you prefer
2 cups granulated sugar
5 tbsp natural unsweetened cocoa powder (I used Hershey's)
8 oz Ghirardelli Milk Chocolate chips (orig recipe called for 4 oz. chopped semi-sweet chocolate and 4 oz. of chocolate nibs - I started with 4 oz. of chips then added another 4 oz.)
Method:
  • Preheat oven to 350 degrees.
  • Line baking sheets with parchment paper or a very clean silicon baking sheet (Silpat).

  • Measure out all of your ingredients.

  • In the metal bowl of your stand mixer, whisk together egg whites and sugar by hand. Set over, but not touching, simmering water in a saucepan.

  • Whisk constantly until the sugar is completely dissolved and remove from heat. (I rubbed some between my fingers to make sure I didn’t feel any sugar granules.)

  • Put the bowl onto your stand mixer with whisk attachment.  Beat the eggs on high until stiff and glossy.

  • Sift cocoa over the meringue. (I forgot to sift - I just sprinkled it on - worked out okay because I had nice fresh cocoa with next to no lumps...whew!)  Fold into meringue with a spatula.

  • Sprinkle chocolate chips on top. Fold together with spatula until combined.  Fold, don't mix.


  • Use a scoop to drop even amounts of batter onto prepared baking sheets about two inches apart.

  • Bake for about 8-9 minutes. Rotate the pans and bake for another 8-9 minutes until the cookies are fluffy and full of cracks.

  • Transfer the cookies, leaving them on the parchment paper or silpat, to wire racks to cool.

Meringues you don't have to worry about cracking...because they are supposed to be cracked...who wouldn't love that?  The insides are kind of gooey - and they taste delicious. 

My batch made 48 cookies.  The ones that I kept at 12 to a sheet seemed to be the best.  The trays that I had a bit more crowded were slower in getting "done".  Next time, I'm going to take the time to chop semi-sweet chocolate...the milk chocolate and the large amount of sugar together was a bit too sweet (I know, you can't believe I'm saying such a thing!).  I'm happy to add these to my meringue repertoire!


Bon Appetit, Y'all!!!

SHARED WITH:



StumbleUpon

Saturday, March 26, 2011

KICKIN' OFF THE WEEK-END WITH CREAM CHEEESE BROWNIES

I was craving a bit of chocolate...wanted to bake something... but not something that would leave me with an excess amount of sweets to eat over the week-end!  I was going to make a chocolate cake and then decided a two-layer frosted cake was just too much for the two of us ... and pieces of layer cake aren't as easy to give away as cookies...or brownies.

Brownies sounded good when it hit my brain but I sure didn't want the favored ultra rich brownies that are immense in size and weight.  So, when I happened upon my go-to website and saw Cream Cheese Brownies...I knew that would be the ticket!

As regular readers know, I'm a huge fan of Stephanie Jaworski's JoyofBaking.com and that's where I got the basis for these brownies.  I had to tweak it a bit, but I'll put the link for her recipe here...so you can see what hers calls for.  Basically, I used a different pan, a different chocolate, and a different lining for the pan.  Hers calls for a 9 inch square pan...I just have an 8 inch.  Hers calls for foil lining the bottom and hanging over two edges to lift with...after attempting this with two pieces of foil and poking my fingers through it...I gave up and moved to parchment paper.  I use Reynold's Recycled Foil...and it's thin.  I need to just buy some regular foil and give up on trying to be green in the foil department.  Lastly, her recipe called for unsweetened chocolate - of which I had none - so I used Ghirardelli's semi-sweet chocolate morsels.  That will likely result in some really sweet brownies...but you do with what you have!

Here's the recipe the way I baked it...

CREAM CHEESE BROWNIES
Based on the recipe from JoyofBaking.com

INGREDIENTS:


BROWNIE LAYER:

1/2 cup unsalted butter - cut into small pieces
4 ounces semi-sweet chocolate chips (I used Ghirardelli)
1 1/4 cups granulated sugar
1 teaspoon pure vanilla extract
2 large eggs (room temperature)
1/2 cup all purpose flour
1/4 teaspoon sea salt

CREAM CHEESE LAYER:

8 ounce block cream cheese - softened to room temperature
1/3 cup granulated sugar
1 teaspoon pure vanilla extract
1 large egg (room temperature)

METHOD:

Preheat oven to 325 degrees Fahrenheit.  Place rack in center position of the oven.
Line 8" square pan with parchment paper across the bottom and up and over the two opposite sides (to give you handles for removal).  I sprayed some baking spray in the bottom of the pan to adhere the parchment paper and folded the excess down over the outside of the pan. Make a crisp edge so they don't flop back in on the batter.

Prepare a saucepan of simmering water and place a metal or heatproof glass bowl over the pan.  Add the butter and chocolate to the bowl and allow to melt. 


Remove from heat and place the bowl on a dishtowel to keep from slipping and stir in sugar and vanilla with a wooden spoon until smooth.  This will serve to cool the chocolate too.  Add eggs, one at a time, stirring after each addition.  Add flour and salt and stir until smooth and glossy - about 1 minute.  The batter will be thick and starts to come away from the edge a bit.


Remove 1/2 cup of chocolate batter and set aside.


Add the rest of the chocolate batter to the prepared pan and spread evenly.  Set aside.


In food processor bowl, process cream cheese until smooth.  Add sugar, egg, and vanilla and pulse.  Scrape down bowl, including bottom of bowl, and pulse just until mixture is smooth and creamy. 


Pour mixture on top of chocolate mixture in baking pan.  Smooth mixture with spatula to cover the chocolate mixture, careful not to mix the two.  You now have a layer of chocolate mixture and a layer of cream cheese mixture in the baking pan.

Take the 1/2 cup of reserved chocolate batter and drop by spoonful evenly all across the top of the cream cheese batter.

Take a butter knife or a skewer and swirl through the two batters (not digging down into the bottom batter) to make a swirly pattern - but not "mixing" the two together. 


Place pan in pre-heated oven and bake for 25-35 minutes (mine took 33 minutes).  The cream cheese batter should be lightly brown on the edges...and like a cheese cake, it should still be wiggly in the middle.  Allow to cool completely on a rack.


Place in refrigerator and allow to completely set up (at least 2 hours).  After brownies are chilled, run a knife around the un-papered edges to ensure they are released and lift cream cheese brownies from pan with the two paper handles and place on cutting board (have the cutting board right next to the pan).  Cut into sixteen 2 inch x 2 inch pieces, wiping knife after each cut.  It wouldn't hurt to have a glass of hot water and a dish towel, or better yet, paper towels handy for cleaning the knife between slices.

Here's what I ran in to...the middle brownies, bottom layer, were not baked sufficiently.  I had a smaller pan so I cooked them longer and went with the slight jiggle deal I usually do with cheese cake stuff.  Maybe that was a bad choice...this isn't cheesecake after all!  It was just the middle 4...but all the bottom brownies were "fudgy".  That's fine with me...but the 4 in the middle...well, they needed baking a bit longer...or the right pan!  The other thing might have been that I used semi-sweet chocolate...the chemistry might have gotten out of kilter.  I'm no scientist so I can't hypothesize that particular element!


So, the final word is...I've eaten one... and these are kick-ass brownies.  They are all fudgy with the tang of cream cheese...delicious.  I've put the four "underbaked" ones on a separate plate and I'm going to see if they set up over night.  Otherwise, the outer ones are just the way I like 'em!!!  Next time I'll need to get a 9 inch square pan.  In baking, size really does matter!

Bon Appetit, Y'all!!!

Follow-up Note:
I ate one of these this morning straight from the fridge - it's more like a piece of fudgy cheesecake than a traditional cake brownie.  Intense and flavorful...

The other note is be careful not to overbeat the base brownie mixture.  I notice I had lots of air bubbles in mine...probably overbeat it...even though I did it by hand.

The teen is going to LOVE these!StumbleUpon