The South Padre Island Flip Flop Foodie Brownsville restaurants

Search The South Padre Island Flip Flop Foodie Blog!

Showing posts with label cream cheese. Show all posts

Sunday, October 7, 2012

BLUEBERRY CREAM CHEESE BREAD

I have been away for quite a while - my Mom is in the hospital, and has been since mid-September.  Baking and doing fun things has really been placed on the back-burner.  This has been one of the first cooking/baking endeavors in weeks.  It is a worthy project for a return to blogging!

I found this recipe online several months ago and pinned it on my Pinterest Board of recipes I'd like to try.  It just looked so yummy and I finally got around to making it.  Despite it taking a boatload of mixing bowls, spatulas, measuring cups, and measuring spoons - I'm definitely happy with the outcome.  Being a first try, I didn't change the recipe.  I did have to bake it longer.  It simply was not done at the recommended time.  So, the recipe I've typed below includes that note...and a few other of my thoughts and additional instructions (in italics usually).

I found the recipe at Tasty Kitchen and encourage you to link back to the site and scope out their many yummy recipes.  This one was posted by Savannah in the Breads section.  In my opinion, it is more like a cake - and was eaten with a fork by my family.  We also liked it after it was at room temperature...everything firmed up nicely and it was easier to slice.  The recipe said prep time was 20 minutes...well, she's a better cook than me.  It took me over 50 minutes to pull this together and get it in the oven.  Of course, I had to stop for many photos...maybe that was the problem.

So, here it is...lots of effort, but worth it for a special breakfast or brunch.


Blueberry Cream Cheese Bread
by Savannah at Tasty Kitchen: A Happy Recipe Community

INGREDIENTS:

For the Bread Batter:

1/2 cup butter (I used salted)
1/2 cup granulated sugar
1/4 teaspoon salt
1 teaspoon vanilla extract
2 egg yolks
1 1/2 cups all-purpose flour
1 teaspoon baking powder
1/2 cup milk
1 1/2 cups Blueberries (up to 2 cups she said - I used a pint)
1 tablespoon all-purpose flour
2 egg whites
1/4 cup white granulated sugar

For the Filling:

8 ounces, weight, Cream Cheese (softened)
1/2 cup sugar
1 tablespoon flour
1 whole egg
1 tablespoon Orange zest

For the Glaze:

2 tablespoons granulated sugar
1/2 teaspoon vanilla
1 teaspoon water

METHOD:

Preheat oven to 350 degrees F.

Filling:
In a medium bowl, combine cream cheese, sugar, 1 tablespoon flour, whole egg, and orange zest; beat until smooth.  Set aside.

Glaze:
Stir together the glaze ingredients (2 Tbsp sugar, 1/2 tsp vanilla, 1 tsp water) and set aside.

Bread:
Cream butter and 1/2 cup sugar until fluffy.  Add salt and vanilla.  Add egg yolks (be sure to save the egg whites for later) to the sugar mixture; beat until creamy.  Set aside.
In another bowl, combine 1 1/2 cups flour and 1 tsp baking powder.  Add this to the butter and sugar mixture, alternating with milk (1/3 four, 1/2 milk, 1/3 flour, 1/2 milk, last third of flour.  Very stiff batter.)
In another bowl, coat blueberries with 1 tablespoon flour and add them to the batter. (Note - when I do this again, I'm changing this to the last addition - I squished many berries by adding them to such a dense batter - which is lightened in the next step with egg whites...it makes sense to me to add them at the end.  However, I followed recipe and added them at this point).
In a separate bowl, beat egg whites until soft peaks form.  Add 1/4 cup sugar, 1 tablespoon at a time, and beat until stiff peaks form.  Fold egg whites into batter.

Putting it into pan:
Pour 1/2 of the blueberry batter (or a little less) into a floured and greased pan.  Smooth it with a spatula.
Layer the filling over the batter - smooth it with a spatula.
Finish with the remainder of batter - carefully smoothing to the edge of the pan.  This will create a layer of "cheesecake" between the blueberry bread layers.
Pour glaze over top of UNBAKED loaf and place in preheated 350 degree oven for 55-60 minutes.
(As stated above, mine took longer to bake - a total of 1 hour 15 minutes and it was perfect)

I allowed the bread to cool 20 minutes in the pan on a rack.  I turned it out onto a tray and allowed it to firm up for another 15-20 minutes or so...then we couldn't wait any longer to try it. 

It was still crumbly (and firmed up much more within a few hours).  Very, very delicious!  We had large slabs with our coffee.  Not overly sweet but, a bit more cake-like than bread-like to me.  I just had another piece with coffee while I wrote this post.  Excellent the next day as well!!!

Bon Appetit, Y'all!!!

SHARED WITH:

Addicted to Recipes Button, Page button
StumbleUpon

Tuesday, September 11, 2012

Biscoff Crust Marble Cheesecake


It's 9/11 and that special day is Mr. Flip Flop's birthday.  Sometimes difficult to be celebratory on such a solemn day in our country.  We persevere.  I wrote about one of his favorite birthday cakes last year; the Marble Cheesecake recipe found in an old Austin American-Statesman newspaper from the 70's, which I have been making him for over 20 years.  It is still a family favorite and his choice for this year's birthday cake as well.

I asked if he was okay with me tweaking it a bit...he said "sure".  I gave him a Biscoff cookie to eat to ensure he thought the flavor would be a good substitution in the crust.  He told me to go for it, so I did.

I only made two tweaks...the original recipe is posted at this link.  This time around I substituted ground up Biscoff cookies instead of graham cracker crumbs...a whirl in the food processor's small bowl with small blade was quick and efficient.  It took 25 cookies to measure 1 1/2 cups of crumbs.

The second tweak was adding 1/4 teaspoon ground cinnamon to the chocolate mixture.  I normally use semi-sweet chips, but this time I got a Ghirardelli semi-sweet chocolate baking bar (4 oz size, used half, or 4 squares).  I thought the higher quality chocolate with a hint of spice would nicely complement the cinnamon flavor in the Biscoff cookie crust.

I'm really glad I completely wrapped the outside of my pan in foil...butter inside the foil when I took it off.  I've never had any spring form pan that didn't leak butter!  I also place the wrapped pan on a cookie sheet...another good thing because lo and behold...butter on the cookie sheet.  Jeez Louise!

Here's the slightly revised recipe:

BISCOFF CRUST
MARBLE CHEESECAKE

INGREDIENTS:

1 1/2 cups Biscoff cookie crumbs (about 25 cookies)
1 1/2 cups white granulated sugar, divided
6 tablespoons butter, melted
3 8-ounce packages cream cheese, softened to room temperature
1 1/2 teaspoons vanilla
4 eggs
1 cup cream
2 ounces Ghirardelli semi-sweet chocolate, melted and cooled
1/4 teaspoon ground cinnamon

METHOD:

Preheat oven to 325 degrees Fahrenheit
Combine Biscoff crumbs, 1/4 cup of the sugar, and the melted butter in a bowl.


Press mixture in bottom and up the sides of a 9-inch springform pan; set aside.  I use the bottom of a measuring cup to press the crust evenly across the pan and slightly up the sides.

In the bowl of a stand mixer beat cream cheese, 1 1/4 cups sugar, and vanilla on medium speed until fluffy.  Add eggs (one at a time), beating on low speed just until blended.  Add cream; beat on low speed until blended.


While the batter is blending, work on the chocolate.  It needs to be fairly cooled off before mixing into a portion of the batter.  I melted the chocolate in a small microwave proof bowl - it took only 50 seconds total. (30 seconds, then 10, then 10)

Stir 1 1/2 cups batter and 1/4 tsp cinnamon into the melted cooled chocolate, stirring briskly until smooth.


Pour slightly more than half of the plain mixture into the crust.  Gradually spoon in slightly more than half of the chocolate mixture next, using a zigzag motion.


Pour or gently spoon the rest of the plain mixture over the chocolate mixture.  Gently guide to edge to completely cover the chocolate.  Carefully, with a sharp knife or the tip of a chop stick, swirl the mixture (not bringing the chocolate to the surface and not disturbing the crust below) in a pattern that you will see after cutting the cheesecake.

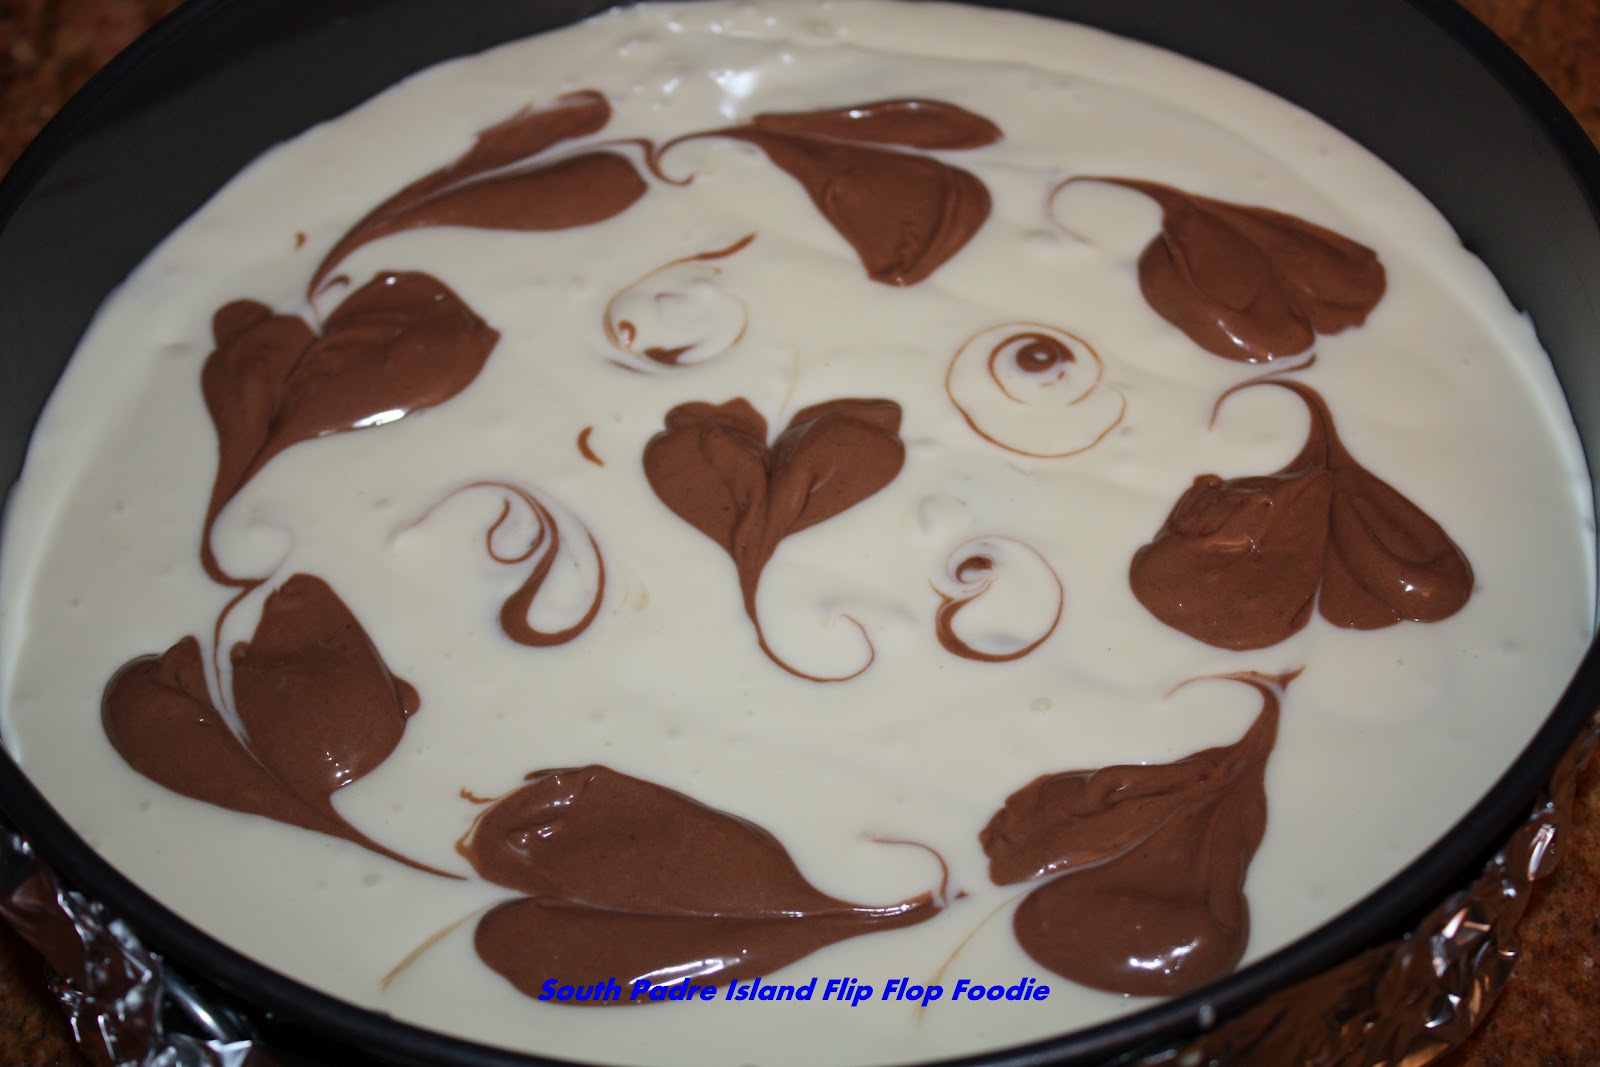
I dolloped spoonfuls of the remaining chocolate mixture around the cake and in the center.  I ran the tip of the chop stick around in a circle, pulling the chocolate into loosely heart-shaped swirls.  I dropped a few little droplets and swirled them about as well.  Just get creative :-)


Bake at 325 for 60 to 70 minutes or until the center appears nearly set when shaken. Cool in pan for 15 minutes on a wire rack; carefully loosen sides of pan after removing foil.  Cool another 30 minutes before removing sides of pan.  Refrigerate once completely cool.

Despite giving the pan a few sharp whacks on the counter, I still ended up with bubbles.  I also have a few cracks.  My family is not bothered by either.  They only care about the taste.


My hubby was particularly impressed with the hearts... he has mentioned them more than once... which made me feel all squishy inside.  I do love that man of mine!  We went into "town" for a movie, picking up the teen from campus after his classes.  We went to see The Words.  When we walked out, Ian said "wow, that was deep".  I was so pleased that this complex movie, which was deep, was something he could wrap his mind around.  Next, we are out to eat on the island since we ended up at an early movie and didn't want to hang out in town for dinner time.

All-in-all, a lovely day despite the sad reminders of flags at half-mast... and news filled with a reminder of the utter sadness of a day no longer just a day to wake up and think "oh, fun, happy birthday"... and while we must never forget...we must also not forget to celebrate the joys of another year of life!

Bon Appetit, Y'all!!!


SHARED WITH:


Creations by Kara


StumbleUpon

Saturday, March 26, 2011

KICKIN' OFF THE WEEK-END WITH CREAM CHEEESE BROWNIES

I was craving a bit of chocolate...wanted to bake something... but not something that would leave me with an excess amount of sweets to eat over the week-end!  I was going to make a chocolate cake and then decided a two-layer frosted cake was just too much for the two of us ... and pieces of layer cake aren't as easy to give away as cookies...or brownies.

Brownies sounded good when it hit my brain but I sure didn't want the favored ultra rich brownies that are immense in size and weight.  So, when I happened upon my go-to website and saw Cream Cheese Brownies...I knew that would be the ticket!

As regular readers know, I'm a huge fan of Stephanie Jaworski's JoyofBaking.com and that's where I got the basis for these brownies.  I had to tweak it a bit, but I'll put the link for her recipe here...so you can see what hers calls for.  Basically, I used a different pan, a different chocolate, and a different lining for the pan.  Hers calls for a 9 inch square pan...I just have an 8 inch.  Hers calls for foil lining the bottom and hanging over two edges to lift with...after attempting this with two pieces of foil and poking my fingers through it...I gave up and moved to parchment paper.  I use Reynold's Recycled Foil...and it's thin.  I need to just buy some regular foil and give up on trying to be green in the foil department.  Lastly, her recipe called for unsweetened chocolate - of which I had none - so I used Ghirardelli's semi-sweet chocolate morsels.  That will likely result in some really sweet brownies...but you do with what you have!

Here's the recipe the way I baked it...

CREAM CHEESE BROWNIES
Based on the recipe from JoyofBaking.com

INGREDIENTS:


BROWNIE LAYER:

1/2 cup unsalted butter - cut into small pieces
4 ounces semi-sweet chocolate chips (I used Ghirardelli)
1 1/4 cups granulated sugar
1 teaspoon pure vanilla extract
2 large eggs (room temperature)
1/2 cup all purpose flour
1/4 teaspoon sea salt

CREAM CHEESE LAYER:

8 ounce block cream cheese - softened to room temperature
1/3 cup granulated sugar
1 teaspoon pure vanilla extract
1 large egg (room temperature)

METHOD:

Preheat oven to 325 degrees Fahrenheit.  Place rack in center position of the oven.
Line 8" square pan with parchment paper across the bottom and up and over the two opposite sides (to give you handles for removal).  I sprayed some baking spray in the bottom of the pan to adhere the parchment paper and folded the excess down over the outside of the pan. Make a crisp edge so they don't flop back in on the batter.

Prepare a saucepan of simmering water and place a metal or heatproof glass bowl over the pan.  Add the butter and chocolate to the bowl and allow to melt. 


Remove from heat and place the bowl on a dishtowel to keep from slipping and stir in sugar and vanilla with a wooden spoon until smooth.  This will serve to cool the chocolate too.  Add eggs, one at a time, stirring after each addition.  Add flour and salt and stir until smooth and glossy - about 1 minute.  The batter will be thick and starts to come away from the edge a bit.


Remove 1/2 cup of chocolate batter and set aside.


Add the rest of the chocolate batter to the prepared pan and spread evenly.  Set aside.


In food processor bowl, process cream cheese until smooth.  Add sugar, egg, and vanilla and pulse.  Scrape down bowl, including bottom of bowl, and pulse just until mixture is smooth and creamy. 


Pour mixture on top of chocolate mixture in baking pan.  Smooth mixture with spatula to cover the chocolate mixture, careful not to mix the two.  You now have a layer of chocolate mixture and a layer of cream cheese mixture in the baking pan.

Take the 1/2 cup of reserved chocolate batter and drop by spoonful evenly all across the top of the cream cheese batter.

Take a butter knife or a skewer and swirl through the two batters (not digging down into the bottom batter) to make a swirly pattern - but not "mixing" the two together. 


Place pan in pre-heated oven and bake for 25-35 minutes (mine took 33 minutes).  The cream cheese batter should be lightly brown on the edges...and like a cheese cake, it should still be wiggly in the middle.  Allow to cool completely on a rack.


Place in refrigerator and allow to completely set up (at least 2 hours).  After brownies are chilled, run a knife around the un-papered edges to ensure they are released and lift cream cheese brownies from pan with the two paper handles and place on cutting board (have the cutting board right next to the pan).  Cut into sixteen 2 inch x 2 inch pieces, wiping knife after each cut.  It wouldn't hurt to have a glass of hot water and a dish towel, or better yet, paper towels handy for cleaning the knife between slices.

Here's what I ran in to...the middle brownies, bottom layer, were not baked sufficiently.  I had a smaller pan so I cooked them longer and went with the slight jiggle deal I usually do with cheese cake stuff.  Maybe that was a bad choice...this isn't cheesecake after all!  It was just the middle 4...but all the bottom brownies were "fudgy".  That's fine with me...but the 4 in the middle...well, they needed baking a bit longer...or the right pan!  The other thing might have been that I used semi-sweet chocolate...the chemistry might have gotten out of kilter.  I'm no scientist so I can't hypothesize that particular element!


So, the final word is...I've eaten one... and these are kick-ass brownies.  They are all fudgy with the tang of cream cheese...delicious.  I've put the four "underbaked" ones on a separate plate and I'm going to see if they set up over night.  Otherwise, the outer ones are just the way I like 'em!!!  Next time I'll need to get a 9 inch square pan.  In baking, size really does matter!

Bon Appetit, Y'all!!!

Follow-up Note:
I ate one of these this morning straight from the fridge - it's more like a piece of fudgy cheesecake than a traditional cake brownie.  Intense and flavorful...

The other note is be careful not to overbeat the base brownie mixture.  I notice I had lots of air bubbles in mine...probably overbeat it...even though I did it by hand.

The teen is going to LOVE these!StumbleUpon

Monday, December 27, 2010

Salmon Spread

I found this Xerox copied recipe folded up and squished down in my recipe box.  I'm so happy to be finding some of my lost recipes!  This is obviously cut from a newspaper or magazine...and considering the age of the paper, I'm betting it is from the 80's.  This is probably the last dip recipe I'll post prior to New Year's Day.  I have another appetizer, a salad, and black-eyed peas to share as well!

This recipe is just titled Salmon Spread.  My husband really likes salmon and so does the teen.  I'm not a huge fan.  I do like salmon croquettes (oh yeah, fry something up and I'm bound to like it!).  I remember liking this dip though - I wish I could remember who shared it with me!  It uses a canned salmon and can be made ahead...two pluses during the holiday season!  So, here's the recipe:


Photo Source:  Google Images

Salmon Spread

Ingredients:

15 ounce can red salmon
8 ounce package cream cheese, softened
1 tablespoon fresh lemon juice
1 tablespoon grated onion
1 teaspoon celery seed
1 teaspoon prepared horseradish
1/4 teaspoon sea salt
Coarsely ground black pepper to taste
Tabasco sauce to taste
3/4 cup finely chopped pecans

Method:

Drain salmon, removing bones and skin; flake with a fork.
Combine next eight ingredients and mix well.
Stir in salmon.
For a smoother consistency, especially if molding, blend in a food processor.

Spoon mixture into a well-oiled 2 cup or 3-cup mold and chill overnight.  Unmold on to serving platter and gently pat pecans onto surface.  Garnish with some sprigs of parsley, curls of lemon rind, and/or green onion curls.  If you don't want to mold it, simply sprinkle the pecans on the surface of your dip in a low, wide-mouthed serving bowl. 

If you are looking to make some tasty individual appetizers - cut some 1/2" thick rounds of cucumber and put a dollop of salmon spread on top of each slice and top with a sprinkle of chopped pecans.  Also, you might try a more adult version of "ants on a log"...pipe a line of salmon spread in a 3" piece of celery and sprinkle with chopped pecans. 

Serve with assorted crackers....or carrot and celery sticks.  This is a very flexible dip!

Green Onion Curls:
Place green onion on cutting board
With a very sharp paring knife, remove root end of onion and most of green end...leaving half white and half green...about 3 to 4 inches in length.
Make lengthwise cut up center of onion to about the halfway point
Repeat to slice green end into thin slivers
Place onion in cold (not ice) water until ends curl slightly
Remove from water and drain well.


A blurry photo from my cell phone - sorry

Ta Da!  Easy Peasy!

Bon Appetit Y'all!!!StumbleUpon

Tuesday, November 23, 2010

Dirt Cake

My friend, Sandy, made this back in the late 80's and early 90's, and it is so delicious that I've decided to make it in a clear trifle dish for one of our upcoming parties.  Normally, Sandy served it in a lined flower pot because the topping of crushed Oreos looks like dirt (hence the name).  Sandy used to put a silk flower in the middle.  It was always a hit when she brought it to a pot luck or for someone's birthday at work.

It's not really a cake at all - it's more like a creamy rich pie with oreo layers instead of crust.  I think it will be a pretty presentation in a trifle bowl with the "dirt" layers visible instead of hidden in the flower pot.  I don't have a picture, because I haven't made it yet...the party's a few weeks out.  However, I'll post it as soon as I do.  It's a delicious concoction and so easy to make, you'll love it! 

I just wanted to share it now - in case you need an EXTRA Thanksgiving dessert - you might want to give this great no-cook treat a try!

DIRT CAKE

INGREDIENTS:
2 small packages Oreos (I'm not sure they come in large and small any longer - so I'm going to buy 2 of the only package I see on the shelf these days - I can save left-over crumbs for another recipe)
2 8-ounce packages Cream Cheese - softened
3/4 cup sugar
1/2 stick butter (4 Tbsp) - softened
1 small package Instant Chocolate pudding
1 small package Instant French Vanilla pudding
2 3/4 cup milk
1 tsp. vanilla extract
12 ounces Cool Whip

METHOD:
Crush cookies - set aside. (Use food processor OR a Ziploc gallon-size bag and crush with your wooden rolling pin)
In small bowl, cream the butter, cream cheese, and sugar.
In large bowl, mix puddings, vanilla extract, and milk.
Add creamed mixture and mix thoroughly.
Add Cool Whip and mix thoroughly.

Layer cookie crumbs and pudding mixture - ending with cookies.

(Line flower pot and decorate with silk flowers for serving alternative - makes it look like dirt)

Bon Appetit Y'all !!!StumbleUpon