The South Padre Island Flip Flop Foodie Brownsville restaurants

Search The South Padre Island Flip Flop Foodie Blog!

Showing posts with label dessert. Show all posts

Wednesday, September 4, 2013

Crescent Roll Explosion Apple Tartlets


What do you do when you've had a sort-of crappy day, get home with loads of groceries and find a can of crescent rolls exploded in the grocery bag?  (The end of the can blew off...really...just exploded!)

If you are me, you gently rescue the dough, make 4 squares out of the 8 triangles (pinching/pressing the seams together), spoon in some canned apple pie filling (I used Lucky Leaf), pull the dough over the filling to make a "purse"...pinch all seams thoroughly... bake for 20 minutes at 350 degrees until golden brown.  Allow to cool.  (These crescent rolls were H.E.B. store brand reduced fat...worked perfectly)
Two were round, two were elongated...the dough was not consistent...
but, considering it had exploded, no surprises there!

While cooling, mix up an icing/glaze consisting of about 2-3 Tbsp heavy cream, 1/2 tablespoon vanilla bean paste, a dash of cinnamon, and 1/2 to 3/4 cup confectioner's sugar until thick and smooth.  Load into a zipper sandwich bag and snip the end...drizzle all over the dumpling-like dessert.  It was so freaking delicious!  E-Z P-Z!!!

I was so irritated in the beginning and all smiles at the end of it all!  My husband nearly licked his plate and smacked his lips!  That's a good sign.

Inside the "explosion tartlets"...yummy!


Bon Appetit, Y'all!!!StumbleUpon

Sunday, October 7, 2012

BLUEBERRY CREAM CHEESE BREAD

I have been away for quite a while - my Mom is in the hospital, and has been since mid-September.  Baking and doing fun things has really been placed on the back-burner.  This has been one of the first cooking/baking endeavors in weeks.  It is a worthy project for a return to blogging!

I found this recipe online several months ago and pinned it on my Pinterest Board of recipes I'd like to try.  It just looked so yummy and I finally got around to making it.  Despite it taking a boatload of mixing bowls, spatulas, measuring cups, and measuring spoons - I'm definitely happy with the outcome.  Being a first try, I didn't change the recipe.  I did have to bake it longer.  It simply was not done at the recommended time.  So, the recipe I've typed below includes that note...and a few other of my thoughts and additional instructions (in italics usually).

I found the recipe at Tasty Kitchen and encourage you to link back to the site and scope out their many yummy recipes.  This one was posted by Savannah in the Breads section.  In my opinion, it is more like a cake - and was eaten with a fork by my family.  We also liked it after it was at room temperature...everything firmed up nicely and it was easier to slice.  The recipe said prep time was 20 minutes...well, she's a better cook than me.  It took me over 50 minutes to pull this together and get it in the oven.  Of course, I had to stop for many photos...maybe that was the problem.

So, here it is...lots of effort, but worth it for a special breakfast or brunch.


Blueberry Cream Cheese Bread
by Savannah at Tasty Kitchen: A Happy Recipe Community

INGREDIENTS:

For the Bread Batter:

1/2 cup butter (I used salted)
1/2 cup granulated sugar
1/4 teaspoon salt
1 teaspoon vanilla extract
2 egg yolks
1 1/2 cups all-purpose flour
1 teaspoon baking powder
1/2 cup milk
1 1/2 cups Blueberries (up to 2 cups she said - I used a pint)
1 tablespoon all-purpose flour
2 egg whites
1/4 cup white granulated sugar

For the Filling:

8 ounces, weight, Cream Cheese (softened)
1/2 cup sugar
1 tablespoon flour
1 whole egg
1 tablespoon Orange zest

For the Glaze:

2 tablespoons granulated sugar
1/2 teaspoon vanilla
1 teaspoon water

METHOD:

Preheat oven to 350 degrees F.

Filling:
In a medium bowl, combine cream cheese, sugar, 1 tablespoon flour, whole egg, and orange zest; beat until smooth.  Set aside.

Glaze:
Stir together the glaze ingredients (2 Tbsp sugar, 1/2 tsp vanilla, 1 tsp water) and set aside.

Bread:
Cream butter and 1/2 cup sugar until fluffy.  Add salt and vanilla.  Add egg yolks (be sure to save the egg whites for later) to the sugar mixture; beat until creamy.  Set aside.
In another bowl, combine 1 1/2 cups flour and 1 tsp baking powder.  Add this to the butter and sugar mixture, alternating with milk (1/3 four, 1/2 milk, 1/3 flour, 1/2 milk, last third of flour.  Very stiff batter.)
In another bowl, coat blueberries with 1 tablespoon flour and add them to the batter. (Note - when I do this again, I'm changing this to the last addition - I squished many berries by adding them to such a dense batter - which is lightened in the next step with egg whites...it makes sense to me to add them at the end.  However, I followed recipe and added them at this point).
In a separate bowl, beat egg whites until soft peaks form.  Add 1/4 cup sugar, 1 tablespoon at a time, and beat until stiff peaks form.  Fold egg whites into batter.

Putting it into pan:
Pour 1/2 of the blueberry batter (or a little less) into a floured and greased pan.  Smooth it with a spatula.
Layer the filling over the batter - smooth it with a spatula.
Finish with the remainder of batter - carefully smoothing to the edge of the pan.  This will create a layer of "cheesecake" between the blueberry bread layers.
Pour glaze over top of UNBAKED loaf and place in preheated 350 degree oven for 55-60 minutes.
(As stated above, mine took longer to bake - a total of 1 hour 15 minutes and it was perfect)

I allowed the bread to cool 20 minutes in the pan on a rack.  I turned it out onto a tray and allowed it to firm up for another 15-20 minutes or so...then we couldn't wait any longer to try it. 

It was still crumbly (and firmed up much more within a few hours).  Very, very delicious!  We had large slabs with our coffee.  Not overly sweet but, a bit more cake-like than bread-like to me.  I just had another piece with coffee while I wrote this post.  Excellent the next day as well!!!

Bon Appetit, Y'all!!!

SHARED WITH:

Addicted to Recipes Button, Page button
StumbleUpon

Sunday, May 6, 2012

Fresh Fruit with Greek Yogurt


I asked Mr. Flip Flop if he would prefer fruit and yogurt for breakfast or some breakfast tacos?  He perked up immediately to fruit and yogurt.  The strawberries and blackberries are looking so good right now, fortunately I had a good supply in the fridge.  It was an easy fix!

I washed, hulled, and quartered strawberries, gently washed the blackberries, and rinsed some red grapes that I had, slicing those in half.  Left all the fruit draining on some paper towels while I mixed up a yogurt topping.

Greek Yogurt Fruit Topping

1 cup fat free Greek yogurt
1/2 teaspoon pure vanilla bean paste
1/4 teaspoon ground cinnamon
1 tablespoon honey

Whisk ingredients together - simple as could be!

I piled the fruit in a pasta bowl, drizzled the fruit with a bit of extra honey, and poured the yogurt topping over the fruit, using a few reserved pieces on top so he'd know what was underneath.


He was delighted with his healthy breakfast and scraped the bowl clean.

I love simple Sunday mornings!

Bon Appetit, Y'all!

Shared With:

StumbleUpon

Saturday, December 18, 2010

Cream Puffs

Unfilled puffs cooling (small in back tray - medium in front)
A few days ago I posted the recipe for the basic sweet Pate a Choux - for pastry puffs. Today is baking day!  I'll only be filling a few - the rest will go into the freezer to take with us to Austin (where I'll re-warm, fill, and glaze).  Today, though, the teen is very interested in having some filled with "cherry curd" instead of lemon curd.  I can't say I'm interested in making any from scratch...and I've never seen any on the grocery shelf locally, but what I believe he is looking for is something similar to the jelly in the middle of a jelly donut.  I'll be heading momentarily to the grocery store to pick up a can of Cherry Pie Filling - I think if I run it through the food processor, it will have a similar taste, even with some cherry bits.  Actually, sounds delicious.  Maybe a chocolate ganache topping?  Similar to chocolate covered cherries in nature?  We'll see how it goes.

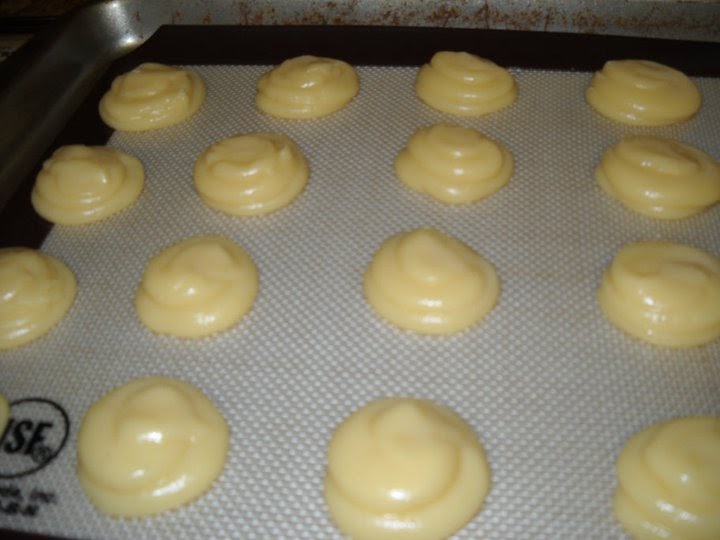
Small puffs piped and ready to bake

I've made the dough and piped a set of very small puffs - and a set of medium puffs.

Medium Puffs Piped and Ready to Bake

I'll go ahead and put the recipe here again so it is easy to have in one blog post - and I will make it very specific to the way I did everything today...so you'll see small differences.


MINIATURE CREAM PUFFS (Pate a Choux)Prepare your pans - line shallow baking sheet with parchment paper - or use a baking mat (I did) if you don't need to draw out your circle sizes.  If you want to ensure you have uniform puffs - use a template to draw circles with a pencil on the parchment paper (leave at least 2 inches between circles) and then turn it over - you can see through the paper to pipe the dough!  I piped free hand today - small ones and medium ones!

Preheat oven to 425 degrees F.

Ingredients:
1 cup water
1/2 cup unsalted butter (one stick - I used salted butter today - that's all I had)
1 tsp sugar
1 cup unbleached all-purpose flour
4 large eggs (should equal 1 cup of eggs - if your eggs don't equal one cup of eggs - add an egg white or another egg to get it to the right volume - I had to add some egg white to get an exact cup today)

Method:
In a saucepan, bring water, butter, and sugar to a boil over high heat.  Immediately remove from heat.
Add flour and stir with a wooden spoon until mixture pulls away from the side of the pan. (takes just a couple of minutes). 
After flour added - it pulls away from sides of pan

Let cool for a couple of minutes to the point you don't curdle the eggs when you add them next (just about 5 minutes) OR you can move everything to the bowl of a stand mixer at this point which hastens the cooling process (me, I don't want another dirty bowl to wash - and I cooled my pan in a bowl of iced water which worked perfectly).

Add eggs, one at a time, mixing thoroughly after each addition with the wooden spoon until smooth.  It gets gummy looking and then smooths out...that's when you add the next egg.  And, believe me...you have to stir industriously...but, it's meaningful that way :-)  Be careful not to slop it out - those eggs are slick!
After egg added you work it, work it, work it

After eggs all worked in


Transfer batter/dough to a large pastry bag with a 1/2 inch round tip (if you are doing the miniatures - larger tip if larger puff) OR you can use a Ziploc bag (I prefer the freezer bags as they are sturdy and less likely to pop on you).  If you use that method, move the dough to one corner and twist down the excess bag so the dough doesn't move backwards when you pipe.  Snip the corner of the bag about 1/4 inch up, and start piping.
Prepared dough/batter in the bag - ready to pipe
Pipe batter into mounds - keeping at least 2 inches apart.  If you are using parchment paper, and your paper slips around, anchor it by putting a dab of batter in each corner between the bottom of the parchment paper and the cookie sheet.  It will hold it in place.  After all your piping is finished, smooth the tips of each batter mound with a lightly wet finger (put a little water in a ramekin and dab your finger to keep it moist while smoothing the tops of the batter mounds).
 
Bake at 425 for 10 minutes - reduce oven temperature to 350 and bake until puffs are golden brown - another 20 to 30 minutes. (the small ones took 10 minutes at 350 and the medium ones took 15 minutes at 350...so I imagine the original recipe is really pushing it for 30 minutes unless you are making some pretty big puffs).  They should feel light and hollow if you lift one off the parchment.  Mine turned out perfect...these are so easy folks :-)

Allow to cool on baking sheets placed on wire racks.

How to Fill:
Use a toothpick to make a small hole in the bottom of the baked puff.  Wiggle it around to make about 1/4" hole.  Fill piping bag (or Ziploc bag) with whatever you want to fill the puff with.  Pastry cream, homemade or store bought lemon curd, flavored whip creams, instant or cooked and cooled pudding, or as I'll be doing, a whipped jelly.  Snip the corner of the Ziploc in the same way you did when piping puffs - hold puff upside down in one hand and insert piping tip in puff hole you made - and squeeze to fill the puff with goodness.  Place hole side down on the same baking tray.  If you are using a cold filling, place tray in fridge while you make your glaze.

How to Glaze:
Vanilla Glaze:  1 cup sifted powdered sugar (confectioner's sugar), 1/2 tsp good vanilla extract, 1 1/2 to 2 tbsp milk or cream.  Whisk or stir until smooth.  Start with less liquid and add to get the consistency you want.  A thin glaze will dry to a light crust where a thicker glaze will dry in more of a dollop.  Spoon a small amount over the puff - or dip it in upside down...either way works.  Let glaze harden.

Lemon Glaze: 1 cup sifted powdered sugar (confectioner's sugar), 1/2 lemon, zested before juicing, 2 Tbsp. fresh lemon juice,   Whisk or stir until smooth.  Spoon a small amount over the puff - or dip it in upside down...either way works.  Let glaze harden.

Chocolate Glaze:  In a medium heat-proof bowl, place 4 oz. rough chopped semi-sweet or dark chocolate (make sure it's of good quality).  If you want a really shiny glaze, add 1 tablespoon light corn syrup to the bowl.  In a small saucepan, bring 1/2 cup heavy cream just to a boil and immediately remove from heat.  Pour cream over chocolate and allow to sit for a couple of minutes.  Stir until mixture is smooth.  When it is a dipping consistency, spoon a small amount over the puff - or dip it in upside down.  Refrigerate to harden the chocolate.

Serve same day as filled for best results.  All cream-based fillings must be refrigerated until served.  Unfilled baked puffs may be kept in airtight container in fridge for one or two days - and frozen for up to 6 weeks.  Bring to room temperature on rack before filling after thawing.  Can be recrisped at 350 for 5 minutes, cooled and filled for best flavor after freezing.

Bon Appetit Y'all!!!
StumbleUpon