The South Padre Island Flip Flop Foodie Brownsville restaurants

Search The South Padre Island Flip Flop Foodie Blog!

Showing posts with label cheese cake. Show all posts

Wednesday, September 11, 2013

Vanilla Bean Cheese Cake

The saga of Mr. Flip Flop requesting cheesecake for his birthday continues.  This year, he requested a simple vanilla cheesecake.  Drat...I so like experimenting.  HOWEVER, since I am on a vanilla bean paste kick (still) I decided to modify our family's favorite basic recipe and eliminate the chocolate and supplement the vanilla extract with some vanilla bean paste.  So, with these few tweaks...here's the "new" recipe!

Happy Birthday dearest husband...you bring tremendous joy and love into my life... I look forward to growing old together (which, obviously, is drawing closer and closer LOL!!!)  Hope you enjoy your cake!


VANILLA BEAN CHEESECAKE
Adapted from Marble Cheesecake Recipe 
Austin American-Statesman, 1974

1 1/2 cups graham cracker crumbs
1/4 cup granulated sugar
6 tablespoons salted butter, melted

3 8-ounce packages cream cheese, softened
1 1/4 cup granulated sugar
1 teaspoon pure vanilla extract
2 teaspoons quality vanilla bean paste
4 eggs
1 cup heavy cream

Preheat oven to 325 degrees Fahrenheit.

Combine graham cracker crumbs and 1/4 cup sugar with hand whisk in a mixing bowl.  Break up any lumps.  Add melted butter and mix until all crumbs moistened.  Press in bottom and 1 3/4 inches up the side of a 9-inch spring form pan (I usually wrap the spring form pan in foil on the outside before making the crust...just to ensure there is no butter leakage).  I prefer to press the crust using a flat-bottomed metal 1-cup measure.  Works beautifully!  After crust prepared and in pan, set aside and begin filling.

In bowl of a stand mixer with paddle attachment, beat the cream cheese, 1 1/4 cup sugar, vanilla extract, and vanilla bean paste on medium speed until smooth and fluffy.  Add eggs, one at a time, with mixer on low just until blended.  Add cream and continue beating on low speed just until blended.  You don't want to put a lot of air in it at this point.

Pour mixture into prepared crust and allow to sit a minute or two.  I run a sharp knife through to pop any bubbles, taking care not to touch the bottom of the crust.

Place on rack in middle of oven and bake for 60 to 75 minutes or until the center appears nearly set when gently shaken.  Remove from oven and let sit on a cooling rack for 15 minutes.  After 15 minutes, very gently run a sharp knife around the edges and then release the spring to loosen the sides of the pan. 
Yay...sides released and nothing stuck!

Cool 30 more minutes on rack, then oh so carefully, remove the sides of the pan to avoid getting crumbs on the cheesecake. 

 
I leave mine on the base...I have NEVER successfully removed a cheesecake from the bottom of the spring pan....I don't care how many YouTube videos I watch!  Chill cake several hours.  Makes 16 servings (well, not in this house...more like 10 LOL!!!)


There is a note on the original recipe that the top of this cheesecake typically cracks during cooling.  I kept my fingers crossed that this wouldn't happen...and it didn't!  I have a 75% crack rate (I don't really measure...but that sounds about right) for cheesecakes.  I noticed this one does have some bubbles that surfaced in the middle though...and my crust went a little higher than usual (I don't measure that either).  Like I always say...it is what it is!


Bon Appetit, Y'all!!!StumbleUpon

Tuesday, September 11, 2012

Biscoff Crust Marble Cheesecake


It's 9/11 and that special day is Mr. Flip Flop's birthday.  Sometimes difficult to be celebratory on such a solemn day in our country.  We persevere.  I wrote about one of his favorite birthday cakes last year; the Marble Cheesecake recipe found in an old Austin American-Statesman newspaper from the 70's, which I have been making him for over 20 years.  It is still a family favorite and his choice for this year's birthday cake as well.

I asked if he was okay with me tweaking it a bit...he said "sure".  I gave him a Biscoff cookie to eat to ensure he thought the flavor would be a good substitution in the crust.  He told me to go for it, so I did.

I only made two tweaks...the original recipe is posted at this link.  This time around I substituted ground up Biscoff cookies instead of graham cracker crumbs...a whirl in the food processor's small bowl with small blade was quick and efficient.  It took 25 cookies to measure 1 1/2 cups of crumbs.

The second tweak was adding 1/4 teaspoon ground cinnamon to the chocolate mixture.  I normally use semi-sweet chips, but this time I got a Ghirardelli semi-sweet chocolate baking bar (4 oz size, used half, or 4 squares).  I thought the higher quality chocolate with a hint of spice would nicely complement the cinnamon flavor in the Biscoff cookie crust.

I'm really glad I completely wrapped the outside of my pan in foil...butter inside the foil when I took it off.  I've never had any spring form pan that didn't leak butter!  I also place the wrapped pan on a cookie sheet...another good thing because lo and behold...butter on the cookie sheet.  Jeez Louise!

Here's the slightly revised recipe:

BISCOFF CRUST
MARBLE CHEESECAKE

INGREDIENTS:

1 1/2 cups Biscoff cookie crumbs (about 25 cookies)
1 1/2 cups white granulated sugar, divided
6 tablespoons butter, melted
3 8-ounce packages cream cheese, softened to room temperature
1 1/2 teaspoons vanilla
4 eggs
1 cup cream
2 ounces Ghirardelli semi-sweet chocolate, melted and cooled
1/4 teaspoon ground cinnamon

METHOD:

Preheat oven to 325 degrees Fahrenheit
Combine Biscoff crumbs, 1/4 cup of the sugar, and the melted butter in a bowl.


Press mixture in bottom and up the sides of a 9-inch springform pan; set aside.  I use the bottom of a measuring cup to press the crust evenly across the pan and slightly up the sides.

In the bowl of a stand mixer beat cream cheese, 1 1/4 cups sugar, and vanilla on medium speed until fluffy.  Add eggs (one at a time), beating on low speed just until blended.  Add cream; beat on low speed until blended.


While the batter is blending, work on the chocolate.  It needs to be fairly cooled off before mixing into a portion of the batter.  I melted the chocolate in a small microwave proof bowl - it took only 50 seconds total. (30 seconds, then 10, then 10)

Stir 1 1/2 cups batter and 1/4 tsp cinnamon into the melted cooled chocolate, stirring briskly until smooth.


Pour slightly more than half of the plain mixture into the crust.  Gradually spoon in slightly more than half of the chocolate mixture next, using a zigzag motion.


Pour or gently spoon the rest of the plain mixture over the chocolate mixture.  Gently guide to edge to completely cover the chocolate.  Carefully, with a sharp knife or the tip of a chop stick, swirl the mixture (not bringing the chocolate to the surface and not disturbing the crust below) in a pattern that you will see after cutting the cheesecake.

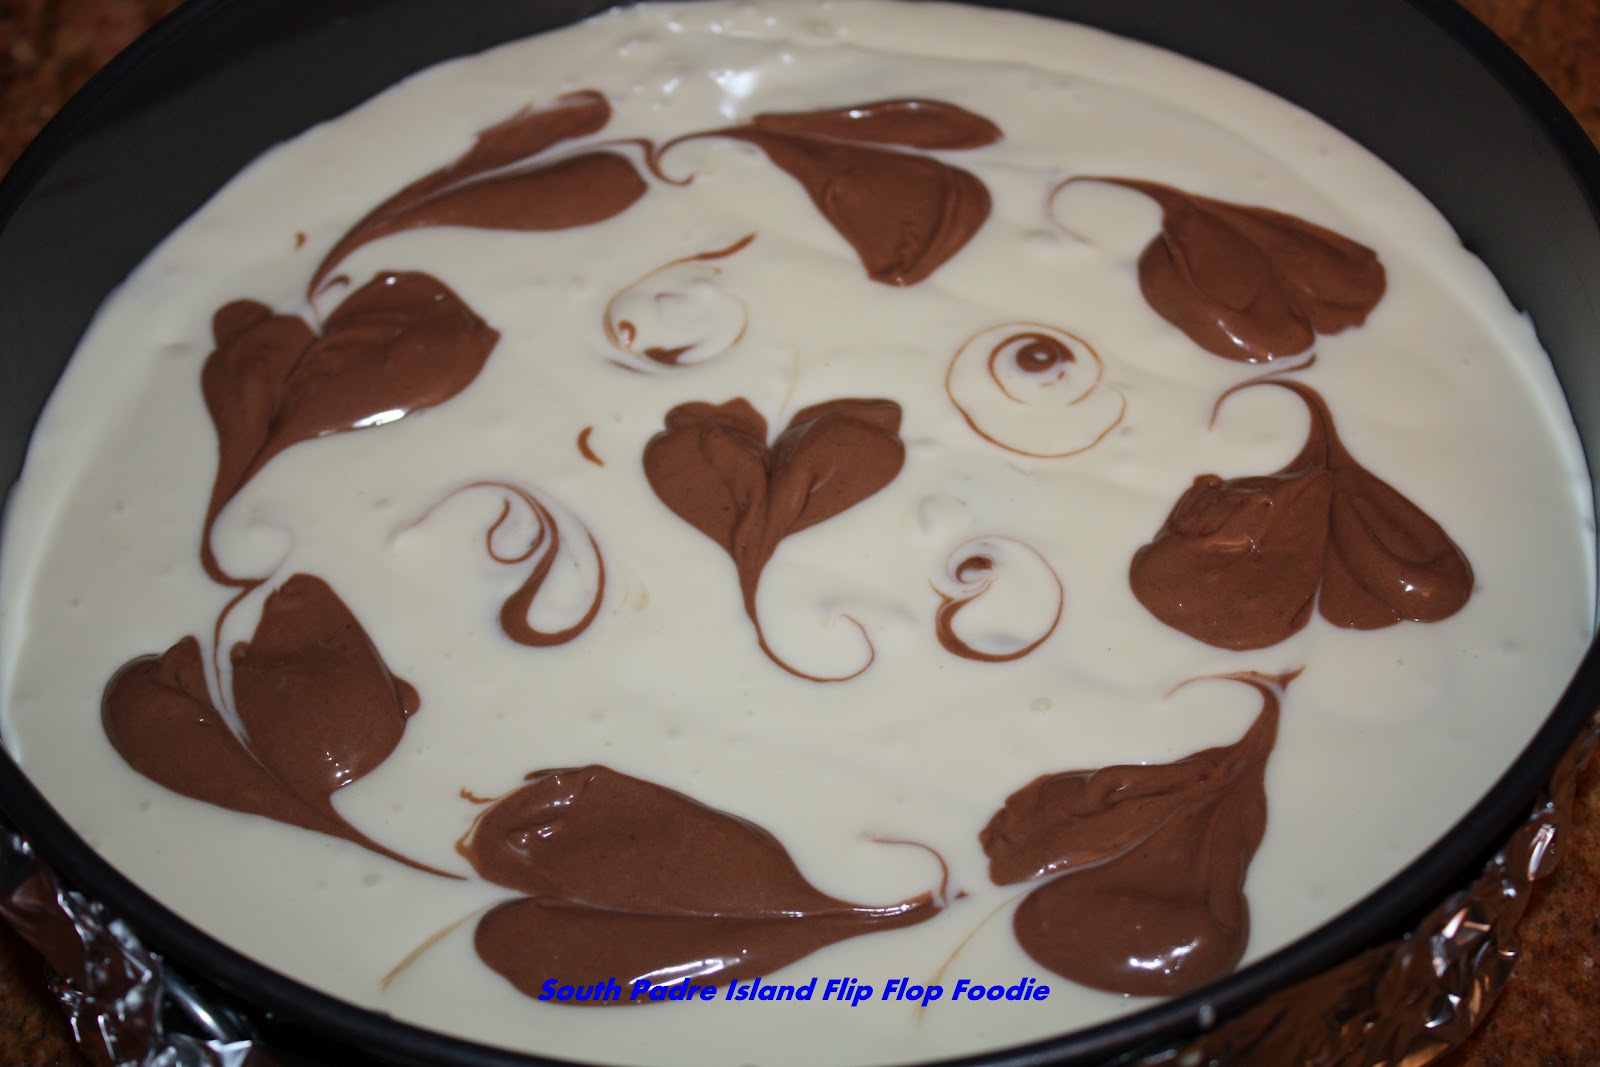
I dolloped spoonfuls of the remaining chocolate mixture around the cake and in the center.  I ran the tip of the chop stick around in a circle, pulling the chocolate into loosely heart-shaped swirls.  I dropped a few little droplets and swirled them about as well.  Just get creative :-)


Bake at 325 for 60 to 70 minutes or until the center appears nearly set when shaken. Cool in pan for 15 minutes on a wire rack; carefully loosen sides of pan after removing foil.  Cool another 30 minutes before removing sides of pan.  Refrigerate once completely cool.

Despite giving the pan a few sharp whacks on the counter, I still ended up with bubbles.  I also have a few cracks.  My family is not bothered by either.  They only care about the taste.


My hubby was particularly impressed with the hearts... he has mentioned them more than once... which made me feel all squishy inside.  I do love that man of mine!  We went into "town" for a movie, picking up the teen from campus after his classes.  We went to see The Words.  When we walked out, Ian said "wow, that was deep".  I was so pleased that this complex movie, which was deep, was something he could wrap his mind around.  Next, we are out to eat on the island since we ended up at an early movie and didn't want to hang out in town for dinner time.

All-in-all, a lovely day despite the sad reminders of flags at half-mast... and news filled with a reminder of the utter sadness of a day no longer just a day to wake up and think "oh, fun, happy birthday"... and while we must never forget...we must also not forget to celebrate the joys of another year of life!

Bon Appetit, Y'all!!!


SHARED WITH:


Creations by Kara


StumbleUpon

Friday, October 22, 2010

Squash Chocolate Cheese Cake - oh yes indeed!

Another chapter in the "using the acorn squash gift" saga.

Slice and Bake Squash Cookies
Today I was sitting around making some homemade Chex Mix for my hubby and baking off the last few cookies from the squash sugar cookie dough I made last week-end.  I saved the pieces I didn't want to re-roll and formed a log - froze them - and today did slice and bake.  They are still yummy!  Anyway - on to the cheese cake...

For the past 20 years, my husband has requested a cheese cake baked from scratch for his birthday cake.  It's what he loves.  He wasn't home on his birthday this year so I wanted to bake a cheese cake for him for this week-end's "make up for missing it" birthday dinner.  I laughingly told him the other night that I might make him an acorn squash cheese cake.  "Ha ha", I said, "I was just joking".  He said, "well, I like pumpkin cheese cake...go for it".  So I thought and thought and decided, okay, let's see what I can do!

I saw a recipe for some pumpkin bars earlier this week but didn't have, nor could I find, all the ingredients, so I mish-mashed a couple of recipes together and I think it will work.  I just threw it together and it is in the oven now.  It surely does smell good!  I'll let you know after the birthday dinner Saturday night.  (I tasted the batter - so I have no doubt it will taste as good as it smells)

Into the oven it goes!

So, here's the recipe I came up with....

ACORN SQUASH CHOCOLATE CHEESE CAKE

Crust:
14 Oreo Cookies
Filling:
2 – 8 ounce packages cream cheese
1 cup white granulated sugar
1 cup roasted acorn squash, squished (that's a technical term) and dried*
3 Tbsp. unbleached flour
1 tsp cinnamon
1/4 tsp. ground ginger
1/4 tsp. freshly ground nutmeg
1/8 tsp. ground allspice
½ tsp. sea salt (fine grind)
1 tsp good vanilla extract
3 large eggs
1 cup Milk Chocolate morsels
DIRECTIONS:
Set out eggs and cream cheese to reach room temperature
Squeeze (or mash) roasted acorn squash until pureed consistency and drain until as dry as possible using strainer and paper towels – or a clean cotton cloth.
Preheat oven to 350 degrees
Prepare bottom and lower sides of a 9 inch spring form pan with cooking spray.
Set aside
In a food processor, pulse Oreo cookies until finely ground.
Transfer crumb mixture to the prepared pan and press gently into bottom – use a measuring cup bottom to firm the crust to ensure it bakes firmly together.
Bake crust for no more than 10 minutes.
Remove from oven and set aside to cool.
Place cream cheese in clean food processor bowl (wipe out the cookie crumbs) and pulse until smooth.  Add sugar, acorn squash puree, flour, spices, vanilla, and salt.  Pulse until thoroughly smooth.  Scrape down sides of processor as needed (I had to scrape down 3 times until everything was fully incorporated).
Add eggs one at a time (break into measuring cup and pour through shoot while processor is on – blending each egg before adding the next).
Set aside.
In a 1 quart microwave safe bowl, place chocolate in microwave and microwave in 30-second increments, stirring between each until melted smooth - let cool for a few minutes but not to the point it is firming back up.  Add 1 cup of cream cheese mixture from food processor to chocolate and mix thoroughly.  This is what you will use to swirl into the cheese cake.
Use a paper towel to wipe down the sides of the cooled spring form pan to remove any crumbs.  Spray sides of pan with cooking spray (two times around for thorough coverage).
Pour remaining cheese cake mixture from processor bowl into prepared pan on top of baked crust.
Drop dollops of chocolate cheese cake mixture on top of squash cheese cake mixture.  Swirl with a butter knife or the handle of a spoon – taking care not to hit the crust on the bottom.  Don’t over-mix – just make swirly patterns.
Bake until cheese cake is set but jiggles a little bit when gently shaken.  Should take 45 to 50 minutes. (I just checked mine at 45 minutes and I'm going to let it go 3-4 more minutes)
After removed from oven allow to cool on counter until it can be safely placed in fridge.  Chill for at least 4 hours in pan (in refrigerator) but overnight is even better.  Run a warm sharp knife around edge of pan* and carefully release spring form.  Carefully remove side of pan.  It is quite challenging to remove the cheese cake from the bottom of the spring form pan.  I generally cut slices and serve on individual plates straight from the spring form bottom.  However, if you need to present the entire cheesecake – VERY carefully, use the same hot water and thin knife technique (see below) to release the cake from the bottom of the pan…very slowly.  Once totally released, you can nudge it onto a serving round.  I’ve never successfully done this without losing a hunk of crust because a spring form pan has a little lip on it.  There are special cheesecake pans – but I don’t have one.  I think I may order one from Amazon.
*Hot water and thin knife procedure for removing cheese cake from spring form pan...
Prepare a tall vessel of hot water and put your thinnest knife (a filet knife is great) into the water  – wipe it with a cloth and run it around the sides of the pan to release the cake (make sure the knife side is touching the pan so you don’t gouge the cake).  You may need to dip and dry it 2 or 3 times as you release the cake.

Oh, I hear the timer - gotta go - Bon Appetit Y'all!

(UPDATE - See comments for a slight tweak to improve the recipe)

2013 UPDATE:
Ian selected this cheese cake for his 20th birthday (he's no longer a teen!)  Here are a couple of photos of the finished product.


SHARED WITH:

StumbleUpon