The South Padre Island Flip Flop Foodie Brownsville restaurants

Search The South Padre Island Flip Flop Foodie Blog!

Showing posts with label chocolate. Show all posts

Monday, April 29, 2013

Coastal Theme Tea Cakes

I really enjoy baking with Nordic Ware pans - I'm getting quite a little collection going!  You may have seen my rose cakelets, my mini bundts, my Christmas tea cakes, etc.

My newest acquisition is their Sea Shell Tea Cake pan.  It has been on my Amazon Wish List for over 18 months...and I finally just DID IT.

The outside of the pan shows what your
finished product should look like

The inside shows you what tiny little bits of batter
will fit in the tea cake pan...1 Tbsp each.
 I have had issues in the past with overfilling these tiny little sections and I was thinking hard about what would not rise too much and would be moist and dense enough for one bite to be "just about enough".  I decided I would test the pan with a box of Milk Chocolate Brownie Mix I had bought a few weeks ago.    As you can see below, they turned out pretty good!  A few of them have "edges" but all were easy to see, nicely outlined, sea life tea cakes!  I had enough batter to make another pan, using my mini tea cake pan I used in the Christmas endeavors of 2011.  What was nice about using the dark batter was the ability to see more clear outlines.  I didn't take pictures of those using the other pan  because I was in a big hurry.  However, I sent all of these and some of the tea cakes from the other pan over to Joni at Paragraphs on Padre Blvd for treats at the Rio Grande Valley International Poetry Festival readings.  I heard a little feedback that they were enjoyed so, even though I used a box mix, it was the "just right" density to work in these little sea shell shaped treatlets!

If anyone has a suggestion for a homemade recipe I can use for tea cakes, please send me a link... I'd love to find that "just right" recipe for using these adorable little pans!!!

The final unadorned tea cakes - very tasty and quite cute!
Bon Appetit, Y'all!!!StumbleUpon

Friday, November 30, 2012

Peanut Butter Blossoms... or as we call them, PB Kisses

My boys love Peanut Butter Blossoms...or even just plain Peanut Butter Cookies.  They often search them out before any other cookie on the platter.  We have always called them Peanut Butter Kisses in our house...had never even heard them called PB Blossoms until I started following a multitude of blogs and cooking/baking sites.

As I wrote last year, and the year before, they are a really easy last minute cookie to bake using store-bought refrigerated peanut butter cookie dough in a roll.  It's what I usually do!  This year, though, I decided to mix up some homemade dough and freeze it for later baking.  Short cuts are all good and well, but homemade is what I really like during the holidays.  This year, I'm getting in front of the insanity!

I have frozen the store-bought dough, but have never frozen the homemade dough.  I froze, and then baked off a dozen cookies so we could have a look at how they do!  They taste mahvelous dahling!


Peanut Butter Blossoms
Adapted from Joy of Baking.com
(Basically I just doubled her recipe because it looked closest to what I used to make years ago when I made these from scratch on a more regular basis)

Ingredients:

1 cup butter, softened to room temperature
1 1/2 cups creamy peanut butter
2/3 cup brown sugar
2/3 cup granulated white sugar
2 large eggs - room temperature
2 teaspoons pure vanilla extract
1/4 cup milk

3 cups unbleached all-purpose flour
2 teaspoons baking soda
1/2 teaspoon fine sea salt

96 Unwrapped Hershey Kisses

Method:

In the bowl of a stand mixer, beat the butter until light and creamy.  Add the peanut butter and both sugars and mix on medium until color has lightened and it is smooth and fluffy.  Scrape the bowl and beater to ensure all the peanut butter is incorporated.

Add eggs, one at a time, beating after each addition.  Add vanilla extract and mix.  Add milk and mix.  Your batter will be light and creamy at this point.

In a large measuring cup, combine the flour, baking soda, and salt.  Whisk by hand until combined.  Add half of the dry goods to the wet mixture in the mixer bowl.  On very low, begin to mix, bring the speed up once you know there won't be a cloud of flour and then add the second half of the dry good...again slow to start, then raise the speed and beat until totally incorporated - scrape down the bowl ALL THE WAY TO THE BOTTOM (voice of experience) to insure all the ingredients are together and smooth.

Cover the bowl and place in refrigerator for 1 or 2 hours.  This will allow the butter to firm back up and make rolling the balls easier.

I used a small cookie scoop to ensure a uniform size to the cookies.  Scoop out your dough on one cookie sheet (covered with a baking mat for easy removal) and pop back into the fridge while you scoop the next tray.  Keeping this dough cold is pretty important.

Alternate out the trays and roll the first tray in balls and place that tray in the freezer until frozen.  Then remove the second tray from the fridge and roll them and place that tray in freezer.  Once all are frozen, place the frozen balls in gallon Ziploc bags and get out as much air as possible before zipping closed and placing in freezer.  Freeze until ready to use.

When ready to bake, preheat the oven to 375 degrees Fahrenheit. Take out however many balls you are going to bake and place on parchment lined or Silpat lined cookie sheet.  Allow to soften slightly at room temperature to the point where you can use a fork to score the cookie dough (took mine about 20 minutes).  I like to dip them in red and green sugars for Christmas.  You can do that by either dipping the top half of the ball of cookie in the sugar or dipping a fork in the sugar and make criss-cross marks on the cookie.  Don't press too far down if you want a puffy cookie.  (I know a lot of people don't score the blossoms - just the plain PB cookies - but I like that instant recognition that comes with the scores..."hey, PB Cookies!")  If needed, wipe the fork between every 3 or 4 cookies... sometimes it gets gummed up with dough and doesn't make clear marks.

Bake the cookies for 8-10 minutes - just lightly browned so they will be soft and chewy.  As soon as they come out of the oven, place tray on a cooling rack and place an unwrapped Hershey Kiss in the center of the cookie, gently pushing down.

Or, of course, if you don't want the chocolate in the middle, just leave them as Peanut Butter Cookies!
After the cookies are cool enough to handle, use a spatula to move from cookie sheet to cooling rack to continue cooling all the way.  The chocolate will be soft, so don't squish them!  I like to eat them while the chocolate is still soft...and the cookie is warm.  My kids don't care - they'll take 'em however they can get them!

I'm happy to be checking off another item on my "to bake" list... I'm liking that I am getting ahead of the game this year.  Of course, I haven't decorated even a single surface of my home...but the baking prep is getting done! 
The tasting dozen!

Bon Appetit, Y'all!!!

Shared With:

StumbleUpon

Friday, September 14, 2012

"GRAND" TREATS


My children know I have a secret addiction to Nestle's 100 Grand candy bars.  I can plow through those candy bars, eyes rolling, and quickly pick up another.  BUT, I shouldn't, so I don't even bring them home any more.

Then, I stumbled upon Inside BruCrew Life's blog with a post called 100 Grand Rice Krispie Treats.  I moved on, thinking I should probably not learn to love those...and if I made them, I knew I would likely love them.

Then, I was strolling down the candy aisle looking for candy corn to lay in for Halloween baking and I saw caramels...usually out of my line of site on the bottom shelf...moved front and center to lure me.  I love caramels.  I grabbed two bags.  I searched for the blog post I had seen, thinking "oh, this would make a great Halloween or Fall treat!"  I FOUND IT!

Oh my, it is quite exciting.  I finished them this morning and am taking them over to my sister's condo on the island for dessert following our lobster dinner!  A grand dinner and kicked up Rice Krispie Treats for dessert...that's how we roll.

I'll ask you to click through to Inside BruCrew Life for the recipe...since I didn't really alter much of anything.  I did use a full 11.5 ounce bag of Ghirardelli Milk Chocolate Chips and only 1/2 tablespoon of Crisco for the topping (and no sprinkles).  Otherwise, it is exactly as described.

Here are some photos of the process:

The butter and caramel mixture beginning to melt
Marshmallows added to completely melted caramel mixture
Keep stirring...it will eventually come together

Yes!  The caramel, butter, and marshmallow mixture
Pressed into a buttered pan (using buttered hands)
The melted chocolate (I could eat it with a spoon!)

Smooth the chocolate with a spatula all over the treats and
allow to cool before cutting.  I use a bench scraper
to cut the treats...easier than a knife in my opinion.


I am going to call these Grand Treats - they are indeed yummy!  HOWEVER, I'm going to make them again and up the caramel "oomph" in some form or fashion. They didn't taste caramelly enough to me. They didn't taste enough like the Hundred Grand Bar I love so much.  I have an idea...so keep an eye out for "take two" on these treats!  I'm not saying they aren't good though... they are indeed excellent treats just the way they are...I've already sampled two while I wrote this!   :-)  Give them a try, they are a wonderful tweak to the regular Rice Krispie Treats!


Bon Appetit, Y'all!!!

Shared With:

 
StumbleUpon

Tuesday, September 11, 2012

Biscoff Crust Marble Cheesecake


It's 9/11 and that special day is Mr. Flip Flop's birthday.  Sometimes difficult to be celebratory on such a solemn day in our country.  We persevere.  I wrote about one of his favorite birthday cakes last year; the Marble Cheesecake recipe found in an old Austin American-Statesman newspaper from the 70's, which I have been making him for over 20 years.  It is still a family favorite and his choice for this year's birthday cake as well.

I asked if he was okay with me tweaking it a bit...he said "sure".  I gave him a Biscoff cookie to eat to ensure he thought the flavor would be a good substitution in the crust.  He told me to go for it, so I did.

I only made two tweaks...the original recipe is posted at this link.  This time around I substituted ground up Biscoff cookies instead of graham cracker crumbs...a whirl in the food processor's small bowl with small blade was quick and efficient.  It took 25 cookies to measure 1 1/2 cups of crumbs.

The second tweak was adding 1/4 teaspoon ground cinnamon to the chocolate mixture.  I normally use semi-sweet chips, but this time I got a Ghirardelli semi-sweet chocolate baking bar (4 oz size, used half, or 4 squares).  I thought the higher quality chocolate with a hint of spice would nicely complement the cinnamon flavor in the Biscoff cookie crust.

I'm really glad I completely wrapped the outside of my pan in foil...butter inside the foil when I took it off.  I've never had any spring form pan that didn't leak butter!  I also place the wrapped pan on a cookie sheet...another good thing because lo and behold...butter on the cookie sheet.  Jeez Louise!

Here's the slightly revised recipe:

BISCOFF CRUST
MARBLE CHEESECAKE

INGREDIENTS:

1 1/2 cups Biscoff cookie crumbs (about 25 cookies)
1 1/2 cups white granulated sugar, divided
6 tablespoons butter, melted
3 8-ounce packages cream cheese, softened to room temperature
1 1/2 teaspoons vanilla
4 eggs
1 cup cream
2 ounces Ghirardelli semi-sweet chocolate, melted and cooled
1/4 teaspoon ground cinnamon

METHOD:

Preheat oven to 325 degrees Fahrenheit
Combine Biscoff crumbs, 1/4 cup of the sugar, and the melted butter in a bowl.


Press mixture in bottom and up the sides of a 9-inch springform pan; set aside.  I use the bottom of a measuring cup to press the crust evenly across the pan and slightly up the sides.

In the bowl of a stand mixer beat cream cheese, 1 1/4 cups sugar, and vanilla on medium speed until fluffy.  Add eggs (one at a time), beating on low speed just until blended.  Add cream; beat on low speed until blended.


While the batter is blending, work on the chocolate.  It needs to be fairly cooled off before mixing into a portion of the batter.  I melted the chocolate in a small microwave proof bowl - it took only 50 seconds total. (30 seconds, then 10, then 10)

Stir 1 1/2 cups batter and 1/4 tsp cinnamon into the melted cooled chocolate, stirring briskly until smooth.


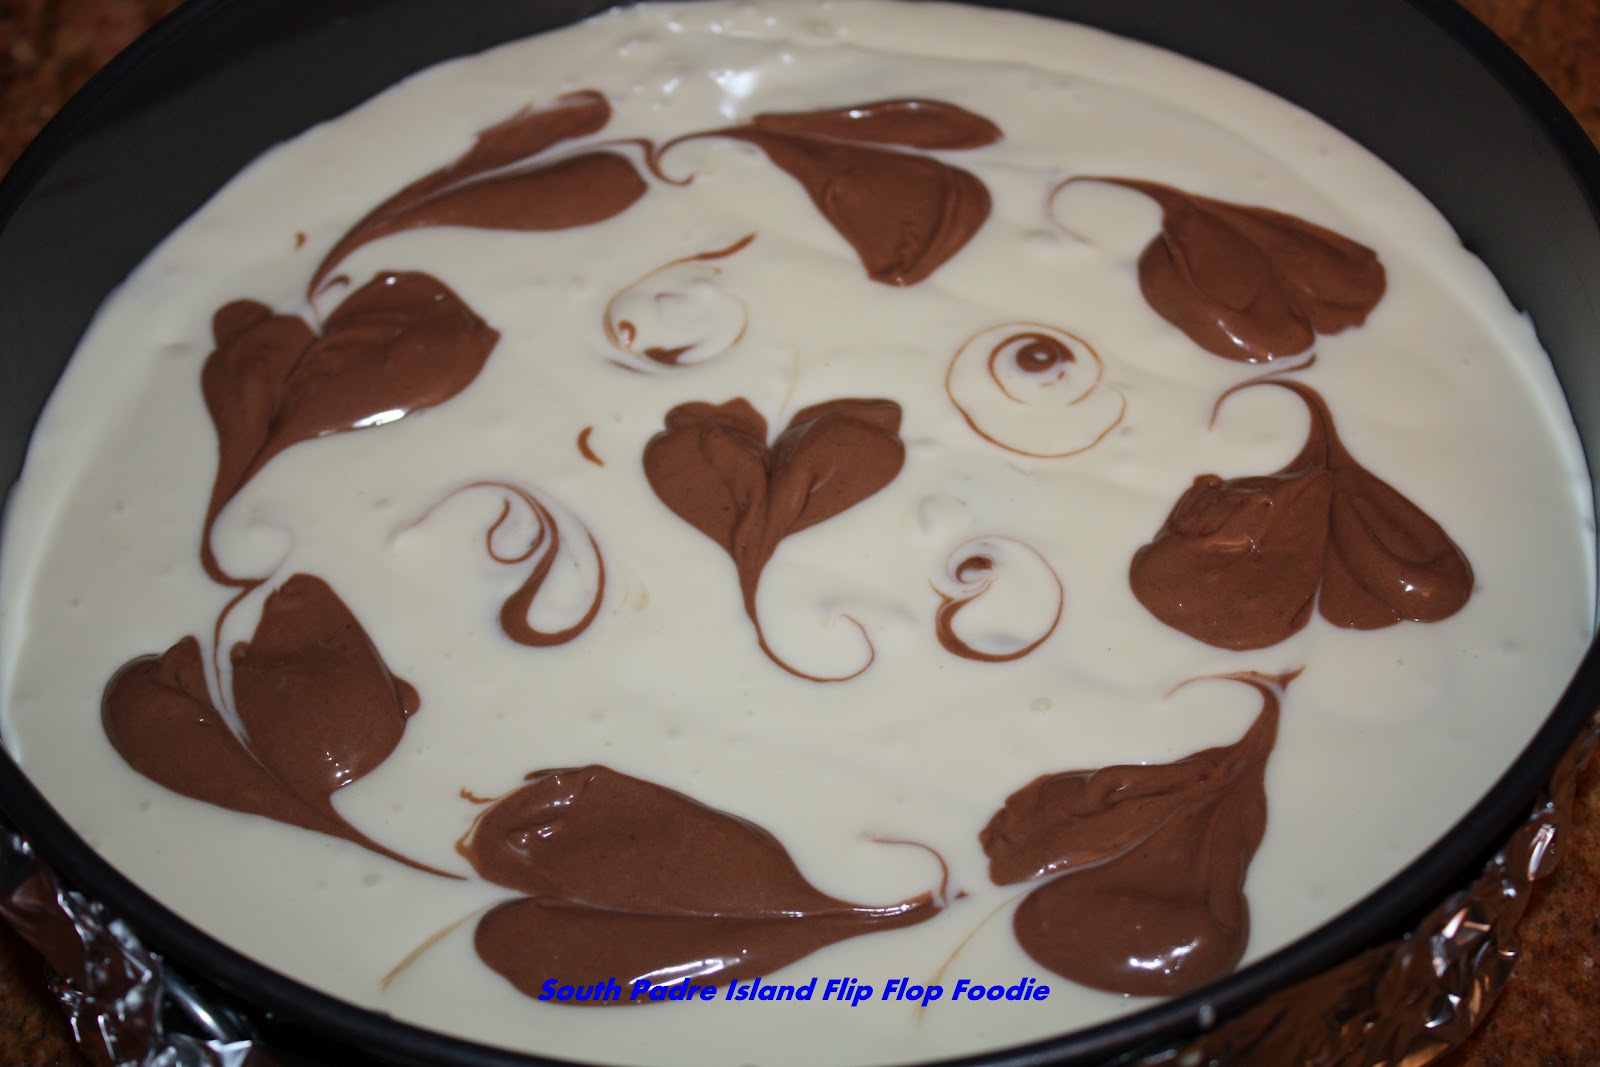
Pour slightly more than half of the plain mixture into the crust.  Gradually spoon in slightly more than half of the chocolate mixture next, using a zigzag motion.


Pour or gently spoon the rest of the plain mixture over the chocolate mixture.  Gently guide to edge to completely cover the chocolate.  Carefully, with a sharp knife or the tip of a chop stick, swirl the mixture (not bringing the chocolate to the surface and not disturbing the crust below) in a pattern that you will see after cutting the cheesecake.

I dolloped spoonfuls of the remaining chocolate mixture around the cake and in the center.  I ran the tip of the chop stick around in a circle, pulling the chocolate into loosely heart-shaped swirls.  I dropped a few little droplets and swirled them about as well.  Just get creative :-)


Bake at 325 for 60 to 70 minutes or until the center appears nearly set when shaken. Cool in pan for 15 minutes on a wire rack; carefully loosen sides of pan after removing foil.  Cool another 30 minutes before removing sides of pan.  Refrigerate once completely cool.

Despite giving the pan a few sharp whacks on the counter, I still ended up with bubbles.  I also have a few cracks.  My family is not bothered by either.  They only care about the taste.


My hubby was particularly impressed with the hearts... he has mentioned them more than once... which made me feel all squishy inside.  I do love that man of mine!  We went into "town" for a movie, picking up the teen from campus after his classes.  We went to see The Words.  When we walked out, Ian said "wow, that was deep".  I was so pleased that this complex movie, which was deep, was something he could wrap his mind around.  Next, we are out to eat on the island since we ended up at an early movie and didn't want to hang out in town for dinner time.

All-in-all, a lovely day despite the sad reminders of flags at half-mast... and news filled with a reminder of the utter sadness of a day no longer just a day to wake up and think "oh, fun, happy birthday"... and while we must never forget...we must also not forget to celebrate the joys of another year of life!

Bon Appetit, Y'all!!!


SHARED WITH:


Creations by Kara


StumbleUpon

Thursday, March 15, 2012

Milky Way Frosting

We are stuck at home in the land of Spring Breakers...traffic is horrendous and going out is highly undesirable!  The teen was looking longingly at the few snacks we had left and walked away dejectedly without making a choice.  I've been loading him up on fruits and healthy choices this week and I could tell....he was hankering for a sweet.

I made some box mix yellow cupcakes and thought we'd just eat them plain...until he said "where's the frosting?"  I said, all I have is a can of cream cheese frosting that I bought to make cake pops...you can open that if you want frosting.  He did and we both slathered a cupcake and bit into it...yuck!  I haven't had canned frosting in a lonnnnggg time.  It was awful!  I threw mine in the trash.  He opted for the bare ones and headed to the man cave.  He better enjoy it, tomorrow is house cleaning day and the man cave is getting aired out!

I looked into my baking cabinet to see if anything stirred me.  I saw two Milky Way bars that I'd bought a couple of weeks ago and forgotten.  That brought to mind an old frosting recipe that I've made for a Milky Way Cake...and I remembered it set up really well, and wondered if it would maybe be pipeable (is that a word?).

I had everything I needed, so got to work to find out if it would hold up to piping!

Milky Way Frosting

Ingredients:

2 Milky Way bars (regular size)
1 stick of butter (1/2 cup)
12 ounces powdered sugar
1 teaspoon pure vanilla extract
1-2 tablespoons heavy whipping cream

Method:

Cut up butter and Milky Way bars into tablespoon sized slices and put in a small saucepan over medium heat. 

Stir frequently and vigorously with a heat-resistant spatula, pressing the Milky Way pieces to hurry the melting process - they never get all the way melted I've found....but that's okay.


In the bowl of a stand mixer, with beater attachment, pour in the powdered sugar and give it a few whirls to make sure all the lumps are out...I've never sifted this recipe and didn't today.

Add the melted chocolate and butter mixture and blend until you have a heavily crumbly mess.  Add the vanilla extract and the whipping cream, 1 teaspoon at a time.  Beating on high medium after each addition.  Today it took about 3 or 4 teaspoons of cream.  I pull the beater up and when the shape holds, I know I'm "there".

Prepare a piping bag with a large coupler and large tip and stand it in a tall glass.  Fold the cuff down and fill the bag with the frosting.  I played with a couple of tips - a Wilton 1M and Wilton 4B.  I will say, I'm not the best at piping...but I don't have a lot of opportunity to practice.  We like cupcakes way too much...I'm going to have to visit the neighbors with cupcake gifts again as it is.  If I don't, our butts won't fit out the door come Monday.

This piped really well, but didn't "finish" well - the stars at the end didn't break gracefully, I nearly had to pinch them off. 

So, this might not be the best piping material...but it is quite tasty, albeit very sweet.  I might try a sprinkle of cinnamon in the mix next time. to give it a little warmth...and I am not sure what to do about the refusal to release...maybe have some snippers handy :-)


Whatever the outcome, it was fun to try my hand at topping cupcakes again.  I'll keep trying until I get it eventually!

Bon Appetit, Y'all!!!

SHARED WITH:

StumbleUpon

Saturday, February 18, 2012

Chocolate Buttercream Frosting

I hadn't made cupcakes in quite awhile... and as I sat on the couch, nibbling on a handful of Ghirardelli Milk Chocolate Chips, I decided it was time to melt some of those chips and experiment with some frosting for cupcakes.  I wanted something stiff enough to pipe, but I didn't want to use shortening to hold it.  I dug into my box of chocolate in my baking cabinet and found a half bag of semi-sweet chips and I grabbed them and headed to the kitchen.

I had baked some basic white cupcakes - just plain old cupcakes.  They were cooled down and now it was the frosting I was after.

I had set out a stick of butter earlier when I was going to make a butter cake - and decided against it.  I set the butter to creaming in the stand mixer bowl.

In a small saucepan, I poured 3/4 cup of heavy cream and put it over medium heat.  I poured 6 ounces of the Ghirardelli semi-sweet chocolate into a metal bowl and when the cream was just coming to a simmer, I poured it over the chocolate and stirred until smooth.  I gave it a little taste.  Nope, needed some milk chocolate added (I'm a milk chocolate freak)...so I grabbed approximately 4 ounces of milk chocolate drops (I admit I didn't measure them, but I'm pretty sure it was about 1/3 of a 12 ounce bag) and dropped them into the cream and chocolate concoction.

While I waited for them to get soft from the heat, I added 10 ounces of powdered sugar to the creaming butter and 1 teaspoon pure vanilla extract and continued the beating.

Back to the chocolate, I mixed it until almost all lumps of chocolate were gone but it was cooling down fairly rapidly by now so I went ahead and mixed the chocolate into the butter and sugar mixture.  Sample taste said it had the right flavor, but not the right amount of texture.  I needed more confectioners sugar and added 6 more ounces bit by bit until I had exactly the texture I was looking for.  Not so stiff that I couldn't easily pipe it, but stiff enough that it would hold the lines of a large star tip when I piped circles onto the cupcakes. 

I loaded up a large piping bag and the frosting volume was exactly enough to pipe frosting onto 24 cupcakes.  (and Goldilocks said "this one is jussst right")

The teen arrived in time to sample one, and his arrival for a second assured me it was as tasty as I'd hoped. 

He likes it when Momma goes into the kitchen to experiment with cupcakes...he thoroughly enjoys the taste testing role...just so long as it's not vegetables.  Good thing he doesn't read my blog and realize how many times I sneak pureed veggies into our sweets.  Tee hee hee!

So, there we go, now I have a shortening-free buttercream that will stand up to piping.  It could have been made even more stiff if I'd wanted to add some more sugar and pipe more detail...but that wasn't the point for this particular exercise.

Mission accomplished!

Bon Appetit, Y'all!

Shared With:

StumbleUpon

Wednesday, November 23, 2011

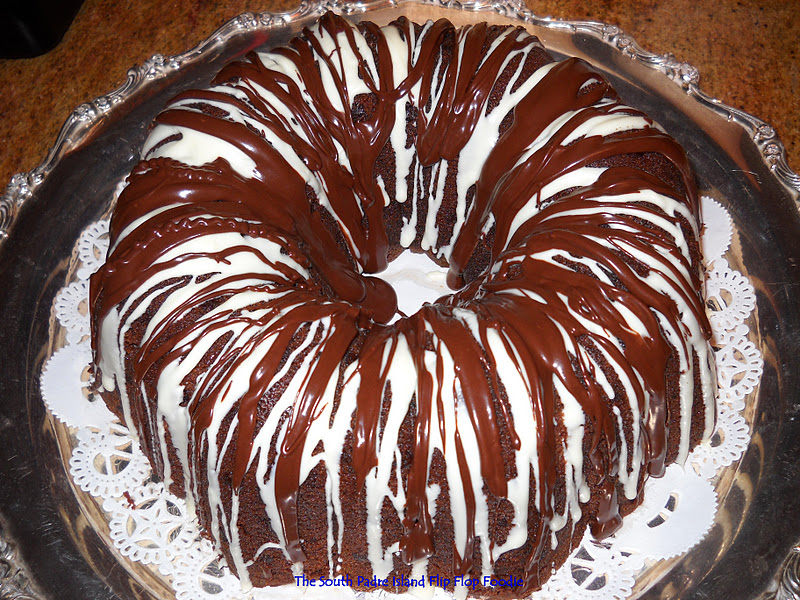
DECADENT FUDGE CAKE

I've had this recipe in my binder for over 20 years...and I've never made it.  I saved it because the photograph of the presentation was so beautiful.  I never felt I was a good enough baker to make the cake successfully...and it had a lot of expensive chocolate in the listing...I never wanted to "take the risk".  This year is different.  My skills have improved.  I feel competent.  I called my sister and told her to bring me a silver platter...I was going to make a cake worthy of a silver platter.  She did...and here it is the Tuesday before Thanksgiving and I have done the deed.  If it makes the trip without crisis, we will see if the recipe lives up to its name and we'll see if I lived up to my belief in myself.

The recipe came from a Southern Living book and is dated 1990.  I only made one tiny adjustment.  I decided to go with the Ina Garten school of thought...espresso powder makes chocolate taste even more chocolatey!  I added a teaspoon of espresso powder - and I must say when I licked the spatula (yes, I don't care if I eat raw eggs) it was FABULOUS tasting.  Hope the baked cake is as good as the batter indicates it will be.

The only potential for failure is that I was listening to music and dancing while I baked...with an occasional Facebook break.  Might have gotten distracted.  However, I have checked and re-checked myself so I hope all is well!  Here's the recipe as I made it.

DECADENT FUDGE CAKE
Adapted from Southern Living Five Star Recipe Collection, 1990


Cake Ingredients:

1 cup butter, softened (I used salted as no other salt was included and that's what I like anyway)
1 1/2 cups granulated white sugar
4 eggs, room temperature
1/2 teaspoon baking soda
1 cup buttermilk
2 1/2 cups all-purpose flour (I used King Arthur's Unbleached AP)
1 cup semisweet chocolate mini-morsels, divided (I used Toll House mini chips)
2 (4-ounce) bars sweet baking chocolate, melted and cooled (I used Baker's German Sweet)
1 teaspoon instant espresso powder
1/3 cup chocolate syrup
2 teaspoons pure vanilla extract

Glaze Ingredients:

4 ounces quality white chocolate, chopped (I used Ghirardelli)
2 tablespoons shortening (I used Crisco)

1/2 cup semisweet chocolate mini-morsels
2 teaspoons shortening

Cake Method:

Preheat oven to 300 degrees Fahrenheit.  Prepare a 10-inch Bundt pan with Baker's Joy or a similar product (or grease and flour if desired...but get all the nooks and crannies if you do).  Spray all the way to the very top of the pan - this cake will rise to the edge of the pan - make sure to do the tube part all the way to the top too.

1.  Chop and melt sweet chocolate in double boiler (I used a metal bowl over a pan of simmering water).  Add espresso powder to melted chocolate, stir to incorporate, set aside to cool to room temperature.

2.  Cream butter in the bowl of a stand mixer.  Gradually add sugar, beating well at medium speed. (2-3 minutes until fluffy).

3.  Add eggs, one at a time, beating after each addition.

4.  Dissolve soda in buttermilk, stirring well.  Be ready for next step immediately - the soda begins reacting with the buttermilk immediately and it starts "growing" (make sure you measure your buttermilk in a container that allows growth... like a 2-cup measure).

5.  Add buttermilk mixture to creamed butter mixture alternating with flour, beginning and ending with flour. (1/3 flour, half the buttermilk, 2nd 3rd of flour, rest of buttermilk, and last of flour - keeping the stand mixer on low while you work).


6.  Add 1 cup mini-morsels, the melted and cooled sweet chocolate/espresso mixture, chocolate syrup, and vanilla.  Stir just until blended, do not over beat.  Really get down and scrape to the bottom of the bowl so that you don't have white streaks in your cake from unmixed batter.  I did a pulse motion just a few times with the stand mixer and finished by hand with a strong spatula.

7.  Spoon batter into prepared Bundt pan.  Smooth cake surface with offset spatula or back of a spoonula.

8.  Bake at 300 degrees for 1 hour and 25 to 35 minutes or until cake springs back when touched. (Mine took 1 hour 27 minutes)  Remove from oven and invert cake immediately onto a serving plate.  Allow to cool completely before drizzling.

Drizzle Method:

1.  Combine 4 ounces chopped white chocolate and 2 tablespoons shortening in top of a double boiler; bring water to a simmer.  Reduce heat to low; cook until mixture is melted and smooth.  Remove from heat.  Drizzle melted white chocolate mixture over cooled cake. (I recommend putting some wax paper or parchment pieces under the edge of the cake so you keep your serving plate somewhat clean)

2.  Melt remaining 1/2 cup mini-morsels and 2 teaspoons shortening in a small sauce-pan over low heat, stirring until smooth (or do it with double boiler method).  Remove from heat and let cool; drizzle on top of and in between white chocolate drizzle.  Allow to set up and remove protective paper.


If desired, garnish with chocolate and white chocolate leaves.  I had every intention of doing that - but the day just got away from me.  It simply isn't going to happen.  Sometimes you have to follow in Porky Pig's steps and say "that's all folks!"


Musical baking all day long...mp3 player on shuffle...included, but not limited to:
The Judds - Rockin With the Rythm of the Rain
Garth Brooks - Friends in Low Places
The Trishas - So Blue
Rachel Solomon - Rain on Me
Madonna - Material Girl
The Doors - Twentieth Century Fox
Bonnie Raitt - Real Man
James Taylor - How Sweet it is to be Loved by You
ACDC - Highway to Hell
Enya - The River Sings
Rolling Stones - Brown Sugar
Beatles - Help!
Mustang Sally - C'mon DJ
Aerosmith - Toys in the Attic
Patsy Cline - So Wrong
Donovan - Mellow Yellow
Hewlett Crist - Cross the Border
Gnarls Barkley - Crazy
Stevie Wonder and Paul McCartney - Ebony and Ivory (just like my cake!)
Simon and Garfunkel - America
and others too numerous to think of!

It's been a great day...hope everyone has a blessed Thanksgiving. 

I'm out of here for now!  See you on the other side of Thursday! 

I'm sure there will be tales to tell :-)

Gobble Gobble!
Photo added 11/26/2011 - the cake was moist and rich.
Personal preference - I would have rather had a cream cheese
frosting on this cake - with the drizzle on top.  It was too
much like a candy bar - not enough like cake :-)


BON APPETIT, Y'ALL


SHARED WITH:


StumbleUpon