The South Padre Island Flip Flop Foodie Brownsville restaurants

Search The South Padre Island Flip Flop Foodie Blog!

Showing posts with label food. Show all posts

Friday, October 22, 2010

Squash Chocolate Cheese Cake - oh yes indeed!

Another chapter in the "using the acorn squash gift" saga.

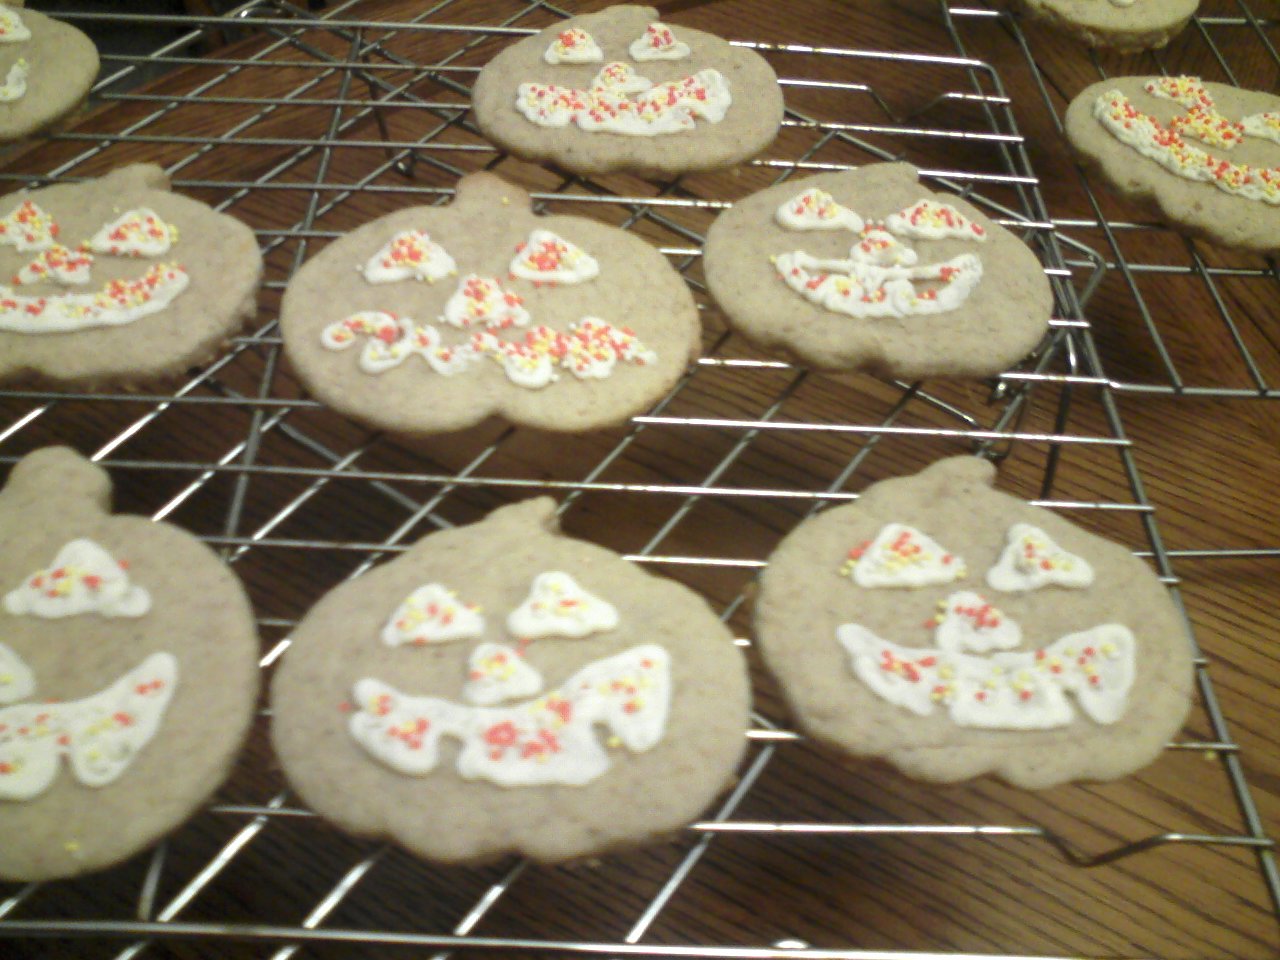
Slice and Bake Squash Cookies
Today I was sitting around making some homemade Chex Mix for my hubby and baking off the last few cookies from the squash sugar cookie dough I made last week-end.  I saved the pieces I didn't want to re-roll and formed a log - froze them - and today did slice and bake.  They are still yummy!  Anyway - on to the cheese cake...

For the past 20 years, my husband has requested a cheese cake baked from scratch for his birthday cake.  It's what he loves.  He wasn't home on his birthday this year so I wanted to bake a cheese cake for him for this week-end's "make up for missing it" birthday dinner.  I laughingly told him the other night that I might make him an acorn squash cheese cake.  "Ha ha", I said, "I was just joking".  He said, "well, I like pumpkin cheese cake...go for it".  So I thought and thought and decided, okay, let's see what I can do!

I saw a recipe for some pumpkin bars earlier this week but didn't have, nor could I find, all the ingredients, so I mish-mashed a couple of recipes together and I think it will work.  I just threw it together and it is in the oven now.  It surely does smell good!  I'll let you know after the birthday dinner Saturday night.  (I tasted the batter - so I have no doubt it will taste as good as it smells)

Into the oven it goes!

So, here's the recipe I came up with....

ACORN SQUASH CHOCOLATE CHEESE CAKE

Crust:
14 Oreo Cookies
Filling:
2 – 8 ounce packages cream cheese
1 cup white granulated sugar
1 cup roasted acorn squash, squished (that's a technical term) and dried*
3 Tbsp. unbleached flour
1 tsp cinnamon
1/4 tsp. ground ginger
1/4 tsp. freshly ground nutmeg
1/8 tsp. ground allspice
½ tsp. sea salt (fine grind)
1 tsp good vanilla extract
3 large eggs
1 cup Milk Chocolate morsels
DIRECTIONS:
Set out eggs and cream cheese to reach room temperature
Squeeze (or mash) roasted acorn squash until pureed consistency and drain until as dry as possible using strainer and paper towels – or a clean cotton cloth.
Preheat oven to 350 degrees
Prepare bottom and lower sides of a 9 inch spring form pan with cooking spray.
Set aside
In a food processor, pulse Oreo cookies until finely ground.
Transfer crumb mixture to the prepared pan and press gently into bottom – use a measuring cup bottom to firm the crust to ensure it bakes firmly together.
Bake crust for no more than 10 minutes.
Remove from oven and set aside to cool.
Place cream cheese in clean food processor bowl (wipe out the cookie crumbs) and pulse until smooth.  Add sugar, acorn squash puree, flour, spices, vanilla, and salt.  Pulse until thoroughly smooth.  Scrape down sides of processor as needed (I had to scrape down 3 times until everything was fully incorporated).
Add eggs one at a time (break into measuring cup and pour through shoot while processor is on – blending each egg before adding the next).
Set aside.
In a 1 quart microwave safe bowl, place chocolate in microwave and microwave in 30-second increments, stirring between each until melted smooth - let cool for a few minutes but not to the point it is firming back up.  Add 1 cup of cream cheese mixture from food processor to chocolate and mix thoroughly.  This is what you will use to swirl into the cheese cake.
Use a paper towel to wipe down the sides of the cooled spring form pan to remove any crumbs.  Spray sides of pan with cooking spray (two times around for thorough coverage).
Pour remaining cheese cake mixture from processor bowl into prepared pan on top of baked crust.
Drop dollops of chocolate cheese cake mixture on top of squash cheese cake mixture.  Swirl with a butter knife or the handle of a spoon – taking care not to hit the crust on the bottom.  Don’t over-mix – just make swirly patterns.
Bake until cheese cake is set but jiggles a little bit when gently shaken.  Should take 45 to 50 minutes. (I just checked mine at 45 minutes and I'm going to let it go 3-4 more minutes)
After removed from oven allow to cool on counter until it can be safely placed in fridge.  Chill for at least 4 hours in pan (in refrigerator) but overnight is even better.  Run a warm sharp knife around edge of pan* and carefully release spring form.  Carefully remove side of pan.  It is quite challenging to remove the cheese cake from the bottom of the spring form pan.  I generally cut slices and serve on individual plates straight from the spring form bottom.  However, if you need to present the entire cheesecake – VERY carefully, use the same hot water and thin knife technique (see below) to release the cake from the bottom of the pan…very slowly.  Once totally released, you can nudge it onto a serving round.  I’ve never successfully done this without losing a hunk of crust because a spring form pan has a little lip on it.  There are special cheesecake pans – but I don’t have one.  I think I may order one from Amazon.
*Hot water and thin knife procedure for removing cheese cake from spring form pan...
Prepare a tall vessel of hot water and put your thinnest knife (a filet knife is great) into the water  – wipe it with a cloth and run it around the sides of the pan to release the cake (make sure the knife side is touching the pan so you don’t gouge the cake).  You may need to dip and dry it 2 or 3 times as you release the cake.

Oh, I hear the timer - gotta go - Bon Appetit Y'all!

(UPDATE - See comments for a slight tweak to improve the recipe)

2013 UPDATE:
Ian selected this cheese cake for his 20th birthday (he's no longer a teen!)  Here are a couple of photos of the finished product.


SHARED WITH:

StumbleUpon

Sunday, October 17, 2010

Squash Sugar Cookies...Really!

My friend KM brought back some ginormous acorn squash from her Fall wanderings to the hinterland (OK, maybe not hinterland - up in Minnesota or Wisconsin or one of those chilly states)...she described them as Dolly Parton boob-sized squash.  She wasn't joking!  These are no b-cup size squash. 

So, I have never used squash this big - I'm used to little acorn squash...and I knew the teen wouldn't eat any and my hubby won't be back home for a bit - so I decided I would roast them and use my handy dandy Food Saver to package smaller packets of squash for baking and soup and other yummy things.  I washed them and vented them by stabbing them with a sharp knife and roasted them at 350 for 90 minutes...whole, on a cookie sheet with a silpat on it.  My house smelled like Thanksgiving.  That's a really happy smell!  After they cooled down I sliced the top off and cut them lengthwise, scooped the seeds and stringy stuff out, then scooped the good stuff out, mashed it and packaged in 1 and 2 cup sizes.  I got about 8 cups.  Popped it in the freezer - ready for future goodness.

I started Googling some recipes for pumpkin and squash and found lots of ideas - but I found one that sounded particularly perfect because I was in the mood to make some Halloween themed cookies.  The Recipe is Pumpkin Sugar Cookie presented by The Washington School Inn - and I found it on a bed and breakfast online recipe sharing site.  B&B food is generally pretty yummy so I hoped, substituting the squash would work...and yum, it did!

Here's a link to the original recipe and below is my version.

Acorn Squash Sugar Cookies

3/4 cup softened butter (1 1/2 sticks)
1 cup white granulated sugar
1/2 cup roasted acorn squash pulp - squeezed very dry*
1 egg
1/2 teaspoon pure vanilla extract
1 teaspoon cinnamon
1/2 teaspoon freshly grated nutmeg
1/2 teaspoon ground allspice
3 cups unbleached flour
1 teaspoon baking powder
1/2 teaspoon fine salt

Cream butter and sugar in stand mixer until light and fluffy.
Add squeezed-dry squash (*I let mine drain over paper towels in a colander - then replaced the paper towels and squished them until it was as dry as possible) and egg.
Add vanilla, and spices.
Mix flour, baking powder and salt together, then add gradually to mixer bowl to form a stiff dough.
Chill for at least one hour.
Preheat oven to 375 degrees.
Roll out dough with some bench flour mixed with a bit of sifted confectioner's sugar (a great trick for not making your cut sugar cookies taste floury - they taste sweet inside and out) and cut with your favorite shaped cookie cutters (or just do round if you want to make it easy on yourself).
Bake on a silpat covered cookie sheet 7-8 minutes.  Makes approximately 2 dozen cookies.

Unbaked Ghosts
Baked Pumpkins (not much color change)


I decorated with a stiff cream cheese frosting so I could pipe the designs I wanted on the pumpkins and sprinkle some sprinkles on them for the eyes, nose, and mouth (sprinkle quickly - the frosting dried faster than I expected)... and I just wanted to frost the ghosts and make eyes with a couple of those "currants", I brought home from Central Market in Austin, and a little piece of chocolate that I cut out with the bottom of a metal decorating tip and pushed out with a toothpick for a woooooo mouth.  You could easily make a basic powdered sugar and milk frosting (as the original recipe called for).  I would also love to use a nice royal icing if I wanted the icing to harden and hold the design.  Royal icing is challenging down here at the coast - royal icing and humidity are not friends :-)  I found that out the hard way last Christmas!

Frankly, the teen and I tasted a cookie unfrosted after a brief cool down.  They were great with NOTHING on them.  They are a delicious cookie (can they count as a vegetable???) and I would recommend them highly for an addition to your Fall cookie repertoire!


Bon Appetit, Y'all!!!

SHARED WITH:

Everyday Sisters Sharing Sundays #15

PhotobucketStumbleUpon

Thursday, October 14, 2010

MILKY WAY CAKE

Today is October 14th - a couple of reasons I remember this day are:
1.  It is my youngest sisters' birthday
AND
2.  It is National Dessert Day (did you know that was a holiday?)

So, in honor of both of the above, I'm going to share a recipe that is loved in my family.  I got the recipe from an elderly mature co-worker in the Shoal Creek Hospital Business Office in the early 1980s.  She told me she copied it from an old church cookbook.  I love "old" recipes...and I still have the copied paper she gave me about 30 years ago.  It is stained and yellowed with age - a well-used recipe.  You know, I said she was elderly, but now, I'm rapidly approaching the age she was when she gave it to me!!!  Yikes!  I think I need to edit!!!

If you make this cake, you will find it to be the most decadent, sweet cake you may ever wrap your lips around.  It keeps well - I leave mine in the pan, just frosting the top - I think that helps the "keeping" ability - less exposed surfaces.  I have no idea of calories - heck, I really don't want to know.  This is for those special less-formal occasions when you want a really tasty cake - it travels well too.

MILKY WAY CAKE (the recipe contributor is listed as Mabel Ellison - bless you Mabel for sharing!)

I am typing it exactly as worded in the original recipe!

4 Regular Size Milky Way Candy Bars
2 Sticks Margarine
2 Cups White Sugar 
4 Eggs
2 1/2 C. Flour
1/2 tsp. Soda
1 C. Buttermilk
1 C. Chopped Nuts (we don't use - my kids don't like nuts in their sweets)
2 tsp. Vanilla

Icing:
2 Milky Way Bars
1 Stick Margarine
3 T. Cream
1 tsp. Vanilla
Powdered Sugar

Cake Instructions:
Melt 4 bars and one stick margarine in pan.  In another bowl, cream one stick of margarine with sugar.  Add eggs, one at a time.  Combine flour and soda and add to the creamed mixture.  Add the buttermilk, nuts (if desired) and vanilla.  Add Milky Way Mixture.  Bake in a 9x13 inch pan at 300 degrees for one hour.

Icing Instructions:
Melt bars and margarine together over low heat.  Add cream and vanilla.  Add enough powdered sugar for spreading consistency.

Now, I've noticed candy bars have gotten smaller over time, but I've not changed the recipe at all because when I tried it (I added 1/2 bar to each component) I noticed no difference!  So I stick to the original recipe.

Also, I found that it takes a long time for the bars to melt...I tear or cut my Milky Way bars into small pieces (the first time I just dropped full bars into the pan - that took FOREVER to melt).  No matter how long - all of the fluff doesn't melt - I whisk after they get really melty and that works best.  You will see little spots inside the cake where those little bits don't melt - just makes it better.

For the frosting - I find a little less than one box of Powdered Sugar works "just right" and if it needs thinning out - just add more cream.  It will firm up as the chocolate and butter in the mixture cools- so make sure it is not too thick or it will be too dense when firmed up.

It doesn't say, but do let the cake cool completely before frosting.  I have no photos of this cake in my files and if I make it...well, the teen and I would be forced to eat it and that would be a bad thing...you need a group to eat this cake!  When I make it again, I'll add a photo to the post.

So, bon appetit y'all - it is REALLY good eats! 

Happy National Dessert Day...
and Happy Birthday sister Karen,
and Happy Birthday up in Heaven sister Sharon!!!StumbleUpon

Monday, October 11, 2010

Cookies - I Need Cookies

I messed around with my iGoogle page - and added the Martha Stewart gadget.  It has a Cookie of the Day link and boy has that been luring me in to the kitchen!

Today I am preparing to get to see my traveling hubby for the first time in a good while (in person instead of on Skype) and I thought - hey I'll make some cookies :-)  Friday's Martha offering was Apple-Currant Cookies.  The picture was very "Autumnal" with chunky looking cookies with an apple ring on top - just up my sweetie pie's alley.  He always likes stuff with oats and raisins and spices...I don't care for cooked raisin type things - so this was definitely for him!  Now, currants aren't really raisins.  They are a small berry that look like a tiny raisin when dried - and I have not been able to find them down here at HEB or Wal-mart.  What is generally sold in grocery stores - and called currants - are a small Greek grape dried into small raisins - the Zante Raisin.  Huh, who knew?  We apparently couldn't grow currant bushes in the United States until 2003 because of some disease the shrub carried which could cause a problem for our timber.  So, in the early 1900s it became popular to import these little Greek raisins and call them currants.  If you want to know more about currants - here's the link I found when I started wondering "hmmm, what exactly is the problem with finding currants?"   

While I was waiting for my oil change at Wal-mart I picked up the few things I needed for the recipe and noticed dried BLUEBERRIES that actually looked similar to currants.  The teen won't eat cooked raisins (it's genetic I guess) but loves blueberries so I thought this might make everyone happy.

A few thing I learned today ....
1.  the proper tools, as in all things, make life so much easier
and
2. it is important to know how much cookie dough is in a 1oz. scoop. 

The recipe called for plumping the currants with apple cider - no apple cider but lots of apple juice - eh, good enough.  The package of dried blueberries only came out to a little over 1/2 cup - eh, good enough.  I wasn't making homemade Apple Butter - Bama is good enough for me and seemed to be good enough for the recipe.  Plus, I added 1 tsp. of vanilla - because I like vanilla with my spice based baked goods.

So, here's MY rendition of Martha's cookies.  Here's the link for Martha's cookies in case you think you might rather go with the "professional" on this issue!

Apple-Blueberry Cookies

Ingredients (Makes about 3 dozen cookies if you use the proper scoop)

1 cup apple juice
1/2 cup dried blueberries
2 cups all-purpose flour
1 tsp baking soda
1 tsp ground cinnamon
1 tsp ground cloves
1/2 tsp freshly grated nutmeg
1/2 teaspoon salt
1 cup (2 sticks) salted butter (unsalted was called for but I didn't have any) - room temperature
2 cups dark brown sugar - firmly packed
1 cup Bama Apple Butter
1 large egg - room temperature
1 tsp. pure vanilla extract
2 1/2 cups old-fashioned rolled oats (not instant)
3 Granny Smith apples (or any tart and crisp cooking apples)
Super fine granulated sugar for sprinkling (optional - but I used it)

Tools (Martha doesn't tell you this as a separate line item - I think it's important)
Stand Mixer with paddle attachment
Baking Sheet with Silpat (it will go faster if you have 3 or 4 of these)
Small saucepan
Small bowl for berries
Separate bowl for dry goods (one with a pour spout on the rim is a good plan)
Sifter
Measuring spoons
Dry measuring cup
Wet measuring cup
Big Spoon
Strong Spatula
Box Grater
Microplane (for nutmeg)
Apple corer
Mandolin (or very sharp knife for slicing apple very thin)
Paring Knife or Peeler
1 oz cookie scoop (that would be a scoop that scoops 2 TBSP of dough - not 3 TBSP of dough or 1 TBSP of dough - but TWO TBSP of dough - this is important if you want your cookies to look like Martha's)

So - if I'd known all of that - I probably would not have gotten gung ho on these cookies - my mandolin is in my storage unit, I don't have a box grater any longer and my hand held grater seems to be hiding - couldn't find it anywhere.  I usually use the food processor but I recently purchased a bigger, better, badder food processor and I would have had to figure out how to use the grating apparatus and that just seemed like too much trouble...so I used the microplane - big mistake - took FOREVER - and I grated my finger requiring paper towel and rubber band first aid (don't ask about the band-aids - it's another story).  I also have a large and a small cookie dough scoop but not a medium...and the medium is apparently 1 oz as called for in Martha's recipe.  Neither of my scoops are marked with the volume, by the way.  I had to go to Pampered Chef's website and look up the volume of the one I have (they have a large and a medium and I apparently own the large).  Then, I had to Google how many Tbsp were in an ounce.  Blah, blah, blah...I have a 1/2 ounce scoop and a one and a half ounce scoop - but no one ounce scoop.  Holy COW!  It took me FOREVER to make these cookies and it is a good thing they taste delicious because I am so freaking tired I just want to lay down now.  Anyway, back to the instructions.

Directions:
Preheat the oven to 350 degrees
Line a baking sheet with a Silpat nonstick baking mat (I have 4 because it makes cookies go so much faster)

1.  Heat apple juice in a small saucepan to a simmer.  Place blueberries in a bowl and pour warm juice over them.  Let them plump at least 10 minutes.

2.  Sift together the four, baking soda, cinnamon, cloves, nutmeg, and salt and set aside in bowl.

3.  In the stand mixer bowl, with paddle attachment, cream together room temperature butter and brown sugar until fluffy.  Scrape down sides of bowl, lower speed to slow, and add apple butter and beat until well blended.  Add egg and vanilla extract and continue beating until well blended.  The mixture will not be smooth - looks a little curdled - but that's okay.

4.  Add the bowl of dry ingredients, beating until just combined.

5.  Drain the plumped blueberries, discarding the juice.  Mix in berries and oats until just combined. 

6.  Peel one of the apples and using the largest holes on a box grater, shred the apple directly into the dough, rotating to avoid seeds and core.  Stir well to combine.

7.  Using a 1-ounce scoop (2 TBSP volume), scoop out six cookies evenly apart onto the prepared baking sheet. (really - don't put more than six - they really spread out)

8.  Peel and core the other 2 apples and slice thinly on a mandolin (I actually did one at a time so they didn't turn brown on me).  If you don't have a mandolin - very thinly slice with a sharp knife.  Place a thinly sliced apple ring on top of each cookie.  Sprinkle the top of each ring with a pinch of sugar if desired.

Bake in the pre-heated oven until dark brown.  18-20 minutes.  Repeat with remaining batter.

Now, I realized after 18 cookies that these cookies were just too big to handle (they were 2 handed cookies) so I used the rest of the batter and made small cookies with my 1/2 oz. scoop - since they were too small for an apple ring, I diced the remaining apple and sprinkled them on top of the dough.  The first batch of small ones I put 3 little pieces of apple on each and the 2nd and final batch I used a lot of smaller diced apple pieces - I liked them better!

So, folks, just another crazy day trying to act like Martha - and I am SO NOT!!!

NOTE:  I wrote this on Friday and thought it posted - got home Monday night and saw it had not.  Soooo, I am posting but with a footnote - these cookies, made my way, did not travel well.  The cookies I made and sampled on Friday were fabulous.  By Saturday, they had gotten really "moist" and by Saturday night I couldn't even pick them up, they were wet.  I think it was because of my faux pas with the apple grating - made it too juicy.  And, maybe even the blueberries - because when I found Zante Raisin "Currants" in Austin this week-end, they were REALLY tiny!!!  The blueberries plumped up to traditional raisin size and may have had too much moisture for the recipe.  Anyway.  Make them and eat them ... or use Martha's exact recipe - because hers say they last a long time.  Mine, not so much.
<sad face>  STILL, they tasted delicious - I will make them again and do a straight Martha method!
StumbleUpon

Friday, October 1, 2010

Cap'n Roy's

One of our family's "go to" dining spots on the island is Cap'n Roy's at 1313 Padre Blvd. ....everyone has their favorite and it's a frequent choice when we talk about grabbing a bite to eat on the island.  I tend to go for the Mexican food offerings, my husband goes for the seafood, and the teen either goes for a burger or fried shrimp.  No one has ever had any complaint about their food - and I don't think we've ever not 100% cleaned our plates!  Last time, I had the enchilada plate - beef enchiladas specifically.  I ordered chips and salsa for the side - and they are big freshly fried 1/2 tortilla sized chips and a cooked style salsa.  Only complaint is the bowl isn't big enough :-)  I always need more.  I have also had, on a cold dreary day, a revitalizing serving of excellent carne guisada.  Delicious.  My husband loves the grilled shrimp tacos or the fish tacos with the fumi salad.  And we never fail to seek out their booth at the annual Shrimp Cook-off in Port Isabel.  They always have an award-winning concoction of goodness to sample.  The teen - he loves, loves, loves the big old half pound burger with fries.  Their fried shrimp is always a good call - with french fries and the delicious tart fumi salad (a vinegary yet sweet slaw - really pairs well with fried food).

The only complaint I have is having to do a u-turn to get there when coming from the bridge.  But, that's no biggie to get to a guaranteed good meal.  If they are busy, there's lots of stuff on the walls to look at - old photos, big fish, other nautical "stuff".  It's a small joint - but that's the way I like it.  The prices are reasonable, the waitstaff are courteous and friendly.  It's a great island spot!

SPI FLIP FLOP FOODIE RATING:
3 1/2 – Really Yummy - I feel my flip flops wanting to head back from time to time!

Cap'n Roy's on UrbanspoonStumbleUpon

Tuesday, September 28, 2010

PadreRitaGrill - Revisited!

My friend and I were in dire need of adult conversation and some time out of the house... so, we decided to hit PadreRitaVille for lunch Tuesday.  I suggested it in an email last week, and I baited my hook with a link to the Island Breeze article last week that had me salivating for most of the menu items mentioned.  She, being weak, like me, succumbed rapidly.  Yay! 

Today finally arrived and we hopped in the car and headed out to lunch.  I was nearly giddy with happiness!  I didn't even need to think about looking at the menu... but I did.... in great detail.  I knew, going in, that having to decide between a volcano of nachos and the Tuesday lunch special, Shrimp Scampi, was nigh impossible...but I managed.  Up until the last minute it was going to be the special and then I had a quick step switch to the Nachos.  My friend got the special so I can speak to both.

My 1/2 order of supreme nachos were delicious - I had beef this time since I had chicken before.  The chips were delicious, generous dollop of guacamole (freshly made) on top and fresh salsa, jalapenos, and sour cream on the side.  Piled high with beans, cheese, onion, (skipped the tomatoes), and a LOT of nicely-seasoned ground beef....overall, excellent.  I couldn't eat more than half of the half order.  It was an extremely generous serving.  The $6 lunch special my friend got was deemed very good (and I challenge you to find a lunch like that for the price anywhere else on the island).  It started with a mixed lettuce with tomato and red onion side salad.  The entree was served on a large, very attractive, pewter fish-shaped platter filled with pasta topped with shrimp and a tasty garlicky butter sauce; broccoli on the side, and garlic toast.  (there were other side choices, she chose broccoli)   My meal, with iced tea was in the $15 range and my friend's was $8 before tip.  She had a generous mug of freshly made French Roast coffee and said it was delicious.  I opted for iced tea and it was as good as I remember (despite the waitress topping it off with raspberry tea instead of regular tea - I'm not a raspberry tea fan - I didn't have the heart to tell her at that point).

I'm sure restaurant owners wish people would stop taking pictures of their food with their cell phones - I read an article in Bon Appetit magazine that said so - but I feel irresistibly compelled when something is so exciting to me that I think the whole world needs to see it!  I held off because I kept imagining my mother giving me the stern "big eyes" if she saw me.  I had my camera in my purse, but by the time the food was in front of me, I was starved and just dug in.  It was delicious.  Unfortunately, that leaves me - again - with no pictures from PadreRitaVille!

The follow-up visit was as good as the previous visit.  There was a slight mis-step in both of our orders arriving "not as ordered", but it was taken care of pretty darn quickly.  We weren't overly concerned because we were gabbing.  The shift manager checked in a couple of times and apologized for the beginning mis-step.  No problemo.  Regardless of the few service bleeps, I continue to totally enjoy the food here.  Really nice.

I want to come back for dinner - the "steak night" special has been luring me for a couple of weeks now.  However, I'm finding now that school is back in session, homework is abundant, and eating out on a week-night is just not feasible unless there is a special occasion (like no homework for the teen or a parade).  I also know I need to keep trying new places...but, by golly, I just want to go back to PadreRitaVille so I can try some more of their menu.  It all looks soooo good!

If you haven't made it by - you MUST go...  'nuf said!

UPDATE 1/3/2014
My son and I had a delicious lunch here on a gorgeous January day on the island.  Excellent prices for delicious food.  I continue to love PadreRittaGrill! (note name change)

Here's the slightly edited update from my Facebook page:

"Yummy lunch at PadreritaGrill Spi with Ian Hook. Outstandingly creamy and delicious Tomato Basil Soup with a plentiful and diverse Salad Bar for me. Generous Shrimp Po'Boy with fries for him. Mine was great and he said his was really good. (high praise from the usual shoulder shrug)  All for a reasonable price. "


SPI FLIP FLOP FOODIE RATING:
– Lip smackin’ - good quality – flip flops will definitely be parked under their table again!

PadreRitaVille on UrbanspoonStumbleUpon

Monday, September 27, 2010

Red Snapper en Papillote


Photo Source:  Google Images

As October approaches, it is one of the best fishing seasons of the year.  The weather is gorgeous, the Red fish are running, and speckled trout are plentiful.  October is also Red Snapper season.  Yum, yum!  Who could ask for anything more?  One of our favorite seafood dishes is derived from an Emeril Lagasse recipe and adjusted to our tastes.  The teen-ager "created" this particular recipe and I act as his Sous Chef on the evenings we make it.  He does enjoy telling me what to do!  One of our first efforts in 2008 is shown here, with freshly caught trout from the Laguna Madre, although we have tweaked it a bit since that time.  I've made it with jumbo Gulf Shrimp, I've made it with bay trout numerous times, and most recently, it's been Red Snapper.  If you want to impress your guests...this is a sure thing!
Bay Trout en Papillote ala Ian


Red Snapper en Papillote
Ingredients:

  • Whole Wheat Orzo (available at HEB in Port Isabel)

  • Chicken Stock                                   

  • White Fish (Red Snapper, Trout, Tilapia all work well) OR Jumbo Shrimp (just reduce cooking time to 15 minutes for shrimp)

  • Olive Oil for drizzling

  • Butter – 2 TBSP for orzo and 1 Tsp per piece of fish

  • Basil – about 3/4 cup, rolled and thinly chiffonade - do not use dried basil

  • Fresh Thyme if you have it – sometimes I can’t find it down here and do without

  • Green Onions – thinly sliced white and green sections – about 2 per serving (or thinly sliced shallots are a great substitute)

  • 1 large clove garlic for 4 servings– extremely finely chopped

  • Lemon Pepper to taste                                               

  • Lemon Slices – 3 per piece of fish – thinly sliced – seeds removed

  • Lemon halves to squeeze over fish

  • Crisp white wine (like Pinot Grigio or Sauvignon Blanc) - use what you need and drink the rest!

  • Parchment paper - one 18-20" sheet per serving to form individual packets

  • Baking sheets with edges  - half sheet pans - cookie sheets.
Prepare orzo in chicken stock instead of water per package directions – slightly undercook.
While orzo is cooking - prep all of the rest of your items so you can put the packets together without stress ;-)
Drain partially-cooked orzo and return to pan, toss with 2 TBSP butter, a pinch of salt, a handful of the chopped green onion, and some of the basil – set aside. 
Prepare packets by folding a large piece of parchment paper in half.  Lay it on the baking sheet so one side is down as a base, and the other side is a “top”.  Place a cup of prepared orzo inside the bottom half – close to the fold and place the fish in the center, on top of the orzo.  Season fish with lemon pepper and salt if desired.  Sprinkle with basil, a tiny sprinkle of garlic, green onions, and a bit of chopped fresh thyme if you have it… and top with lemon slices.  Squeeze lemon juice over it all (to taste).  Put pinched bits of butter all over and drizzle with Olive oil – sprinkle about a half tablespoon of wine over it all.  Fold the top (the cover) of parchment paper down so the sides meet.  Tuck the corners in at the fold, and starting at one of the folded sides, roll the parchment into a packet…working around to the other side, gathering and crimping as you go.  Roll it tightly, to the edge of the orzo.  Repeat for each packet – each cookie sheet will hold 2 packets, maybe 3.  If you can't get it to hold together - you can secure it by threading a toothpick to the end where the roll ends.  I've only had one packet leak...they hold together better than you imagine.
Photo Source:  Google Images

Bake at 350 degrees for 20 minutes or so depending on size and thickness of fish.   Place each packet directly on individual serving plates and open at the table.  With a sharp knife, carefully slice a steam vent in the center of the packet.  Cut the rest of the way across once steam is released and tear open the packet.  Eat directly from the packet on top of a dinner plate.
You can do the same process without the parchment packets by using a large chef’s skillet on the stovetop – put down a bed of partially cooked orzo, place the fish pieces on top, proceed as directed above, put the lid on the pan and cook on a medium low temperature until fish is done.  Will need a very large “fish spatula” to lift the servings onto serving plates, gathering up the orzo under the fish, and spoon the rest of the orzo onto the plate next to the fish servings.
We generally serve with a simple steamed vegetable, like broccoli, and a crusty loaf of hot bread.  Woo wee, them are some good eats!!!
Bon appetit y'all!
StumbleUpon

SPI Seafood and Music Festival

What are you doing next week-end?  October 1st and 2nd?  Yep, that's the date!

The South Padre Island Seafood and Music Festival is where you'll find me! 

I'm looking forward to hearing Vallejo on Friday evening as well as The Toadies and more!

Saturday will bring lots of sun screen and a hat, a free seafood basket if you are one of the first 5000 to be in line to get one, coastal and Texas art vendors, lots of festival food, and an all-day line up of excellent Texas music, including Kevin Fowler, that cutie Wes Hayden, The Trishas (they remind me of music I might hear at the Kerrville Folk Festival - really nice sound), and the very nice voice of Phoenix Hart.  There's more...check out the full line up on the festival's Facebook page or the website above.

Although you can hear him on a regular basis at PadreRitaVille, I look forward to cheering for South Padre local favorite,  J Micheal Laferty, who, I hear, will be playing Saturday afternoon from 1:30 -2:30 .  Can't wait!

If you can't make it down - well, you probably didn't try hard enough....but, if that IS the sad case... you can always spend some time surfing the best live web cams spread out over the island to see what a beautiful day you are missing!  They have some cool controls so you can control the cameras for short periods.

If you are still standing come Sunday morning, it wouldn't hurt to stop by for some fabulous fresh local products before heading home.  The South Padre Island Farmer's Market is held from 11:00 a.m. to 1:00 p.m. every Sunday, just north of the Convention Center Stage where you partied the previous day.  It has some of the best produce you'll find anywhere...so make a point to head that way before heading home!

As you are planning your trip - be sure to check out the archives here so you can be sure to pick a great restaurant for your dining pleasure.  And remember, what happens on the Island, stays on the island!
All Photos on this page are from my personal collection!

StumbleUpon

Sunday, September 26, 2010

It's Raining, It's Pouring...but I'm in my kitchen Cooking!

I got up and ready to go to the South Padre Farmer's Market ... picked up my purse, looked out the window and IT WAS POURING DOWN RAIN...Arrrggghhhh....<big sigh> I put the purse back down and did some laundry.  I wrote a blog post, felt hungry and thought I would go get some lunch....then read a Facebook post indicating that Padre Blvd was possibly flooded again.  So, maybe not :-(  We've had so much darn rain that there's no place for it to go!

So, when it rains, I always want to cook.  I had put out some ground beef for spaghetti and meat sauce for dinner tonight.  But, that didn't sound satisfying...so I called the teen in and we made meatballs together.  I was making small ones, and he demanded BIG ones...so we dumped them back in the bowl and started rolling again.  I think they will be great for dinner tonight!  I didn't really have a recipe, because the one I used to have was my ex-husband's family recipe and he grabbed it on his way out the door.  No problem - I figure I can make a meatball - I do know the basics!  I'll be serving them in a jarred sauce - but frankly, I love Bertolli sauces so, that's good enough for me.  The meatballs are waiting in the fridge for dinner time.

I've had the Cooking Channel going in the background - and that seems to make me want to cook.  Nigella Lawson is making desserts - so, me too!   :-)

I've laid out all the ingredients for Toll House cookies...just waiting for the butter to soften.  I had wanted to make Forgotten Cookies (a chocolate chip meringue cookie) but the returning rain has spoiled my chance for that option.  They just don't do well with this level of humidity.  I've made that recipe since the early 1970's, when my mom's friend gave it to me.  It is still on the recipe cards I wrote in my childish high school script.  I'll share it below - if you aren't here in the humidity with me, they are a great, easy cookie to make.  They store very well in a tightly sealed container.

Meanwhile, I think my butter is softened - I wonder if the teen has finished his homework?  Maybe he wants to make cookies with his Mom.  Not much else he wants to do in my company these days. <big sigh again>  Oh well, that's okay, I'll take whatever quality time I can get!

FORGOTTEN COOKIES

2 Egg Whites (room temperature)
Pinch of fine salt
3/4 cup fine sugar
6 oz pkg chocolate chips
3/4 cup chopped pecans (optional)

Preheat oven to 350 degrees.
Beat egg whites and salt until foamy.
Slowly add sugar and beat until stiff.
Stir in chocolate chips and pecans (if desired).
Drop on ungreased cookie sheet by
tablespoonful.
Place cookies in oven.  Turn off oven.
Leave overnight (hence, forgotten cookies)

Enjoy!


StumbleUpon

Blackbeards' Restaurant


Photo Source: Google Images


The first time I went to Blackbeard's on South Padre, over 10 years ago, we went for lunch at the end of the lunch rush on one of our early family vacation trips down here.  I fell in love with their fried shrimp po-boy.  It was so basic and simple...and so very delicious.  The next time we came down to the island was in February and we came to celebrate our anniversary and use up some Southwest Airlines tickets that were going to expire.  We had no idea it was such a winter-Texan haven and laughed about being the youngest on the island.  That time, since we were without children <hooray> we went to dinner at Blackbeards' and, while a little more crowded on this occasion, we were in such good spirits we didn't care.  We ordered drinks, we took our time, we were just glowing with the happiness only a parent of teens and pre-teens can relate to, on the exciting event of a week-end free of responsibility.  I selected Stuffed Shrimp - a delectable concoction of Gulf shrimp stuffed with a crabmeat dressing ...perfection on a plate.  There was so much on the plate, I couldn't even begin to put a dent in it.  It was superlative (or maybe I was intoxicated with Cosmos and Happiness).  Whatever it was, we went home happy. 

Photo Source: Blackbeards' Website


We made Blackbeard's a regular stop on our trips down to the island...until an unhappy meal in 2005.  You know how it is when you bring a crowd to a restaurant you've been raving about and on that particular day, it unfortunately sucks?  That's what happened to us.  After waiting in the unbelievable crush of a July dinner rush, having our food be nothing like I had raved about, my son getting sick afterwards...well, we just didn't go back again.

My sister and her husband and sons always rave about Blackbeards' and it is a "must have" when they are here on vacation...my brother-in-law gives his highest regards to the flounder particularly.  So, when we were down in April 2008, looking at real estate after our big decision to leave Austin, we decided it was time to give Blackbeards' another try.  My son had the red snapper - loved it.  I had fried shrimp - loved it.  I think my husband had the Shrimp 3-ways - loved it.  What we didn't love, was how crowded the tables were next to each other.  We couldn't talk, it was so loud and the wait staff could barely get through the tables without bumping our chairs.  We decided we didn't want to deal with that when there were so many other places we could go on this lovely island that didn't involve feeling like we were rubbing elbows with the tables next door.

Then, winter of 2010, the teen and I were driving along, scoping out a place to eat dinner when I swung right into the Blackbeards' driveway - which was half empty (or half full if you want to focus on optimism).  I thought, I miss Blackbeards' food - and since it wasn't crowded...

Photo Source: Blackbeards' Website
Sure enough - I had a lovely evening in one of the back areas where we were able to converse and I enjoyed a steak with shrimp and a lovely broiled fish for the teen.  Blackbeards' Restaurant had returned to my good graces. 

What I learned from this, is a lesson I've learned well since moving to the lower Laguna Madre...whether it is on the Island, or in Port Isabel...avoid eating out for dinner in July....go out on week nights only during most of the summer... and learn where the crowds are going to be and when they are going to be - and don't go there.  Lunch, during the summer is "a good thing".  It fulfills my need to dine out with minimal crowding (especially if you go to lunch as soon as they open).  Avoidance of crowds - THAT is what I've learned.

Photo Source:  Google Images
September and October are two of my favorite months at the coast.  Unhindered by those much-needed tourists and the beginning of a slight cooling in the atmosphere.  This is the time of year that moves me to euphoria on the island.  It's time to schedule a night out at Blackbeards' Restaurant again!

SPI FLIP FLOP FOODIE RATING:
3 – Pretty Yummy - I feel my flip flops wanting to head back from time to time!

Blackbeard's Restaurant on UrbanspoonStumbleUpon

Sunday, September 19, 2010

Quik Stop

Photo Source: Quik Stop Facebook Page
People ask me where I buy my shrimp when I have them over for dinner, or when they are in town and want to take some home.  I have two answers.  I'll write more on the other answer another day...but my number one answer is Quik Stop in Port Isabel.  I used to buy at the B&A shop when I was here on vacation - even used their mail order once.  Then, one day, after I'd moved down here, I went in for shrimp and they were sold out.  The woman said "just go across the street to Quik Stop...we own that too".  So, I did and that was the beginning of a happy relationship (good thing because they closed the B&A shop - I'm guessing they bought the business???).  Anyhooo...I buy my Red Snapper filets there when they have it.  I buy my Gulf Shrimp there - and they always seem to have it.  I've bought flounder filets there...when they have it.  You never know what's going to be in the case until you get there.  They have their own fleet of boats and many "secret sources" for the "occasional" offerings you'll find in the case.  All I know is I've never had anything but the best seafood from Quik Stop.  It smells fresh when I unpack it, like the ocean...the way seafood should taste.  They never mind packaging it in ice for me, to maintain the absolute freshest flavor.  And, the people are friendly :-)  Always a plus!

I also buy my son's fishing shirts there.  He likes the Guy Harvey tee shirts and they have a huge selection of shirts, hats, fishin' wall art...and usually they have something on sale.  My oldest son buys all of his live bait there - and the teen buys his frozen bait there.  It's one stop shopping!  I also bought my fishing license there (not that I use it...but when I go with the teen, I like to cast a few lines myself - gotta keep legal).  I have to question the name, though...Quik StopI think not.  Basically, it's hard to get the boys out of the store once we arrive.  They always want to browse the tackle, look at every kind of bait they have, look at all of their clever plaques on the wall, and look at the tee shirts.  Me, I'm there for some of the best local seafood every time!

When my oldest and his girlfriend were here this summer, I fixed a big Red Snapper dinner...and a big old "toss it on the table" shrimp boil another night.  They swear they liked those meals the best of all on their vacation (kiss, kiss... flattery will get you everywhere!).  I figure I fed the 5 of us a superb Red Snapper with Orzo entree, veggies, bread, and dessert for under $65 with wine!  I know the five of us couldn't have gone ANYWHERE for that price! 

It's a great solution if you are having guests and don't want to break the bank...or, if you just want to have some great, fresh tasting seafood at home.

I also enjoy their humorous signage which changes from time to time...I now see they have some great fishing "sayings" on their Facebook page.  Overall - a great family-operated place, at 501 Highway 100 in Port Isabel.  Ask for your bumper sticker next time you are there.  I need to send one to my son in Austin - I know he'd love it!


SPI FLIP FLOP FOODIE RATING:
4 – Lip smackin’ - good quality – flip flops will definitely be walking in their door again!
StumbleUpon

Thursday, September 16, 2010

Marcello's Italian Restaurant

Source: Google Images
After enjoying the small-town big event of the Port Isabel Homecoming Parade, we decided to avoid the immense traffic jam (people wandering the street, talking, no hurry to get out of the way) by eating dinner out before heading to the big bonfire.  Marcello's Italian Restaurant is on the corner of Hwy 100 and Tarnava on the Lighthouse Square and we were parked close by...win-win situation!  I've been to Marcello's several times and have always enjoyed it so we headed in for dinner and air-conditioning. 

It is an iconic family-owned restaurant and, at this time of year, filled with locals enjoying an evening out.  I like the atmosphere, which includes background music, subdued lighting, oil lamps on the table, white linens, and cloth napkins...kind of old European in atmosphere - nothing like the chain ambiance of the Olive Garden type of Italian restaurant.  Soothingly relaxing after the blaring horns of every police car and fire engine in the area leading the parade!  We were seated at my favorite table in the restaurant - square in front of the window looking out at the lighthouse.  Perfect!

Today, being the first day out to eat all week, I enjoyed the slight delay the apparently unexpected post-parade rush caused for the waitstaff.  Our waiter was great and handled the influx with friendly aplomb, expressing appreciation for our patience.  Our food actually came out quite promptly.  We started off with the included salad (mine with a wonderfully tangy tomato vinaigrette) and a generous basket of lightly toasted Italian bread with a dipping bowl of Marinara sauce.  I was in the mood for something fairly basic so ordered whole wheat spaghetti with meatballs and Marinara.  The teen ordered their seafood lasagna.  I was afraid he would not be hungry after plowing through most of the bread basket.  (We generally eat fairly early on school nights and it was 7:40 when we got to the restaurant - he was starved.)  I tried some of his seafood lasagna and boy was it good!  It was in a white sauce and completely covered with stringy delicious cheese.  I could identify crab and some shrimp in my one bite - the teen wasn't able to identify anything else, but did declare it was very good.  It was such a generous serving that he couldn't eat it all (especially having filled up on bread and Marinara!). 

My meal was all that I could ask for in a plate of spaghetti and meatballs.  Meatballs so big I could only eat one (I think there were two on the plate - under all that delicious Marinara) and a literal bowl of pasta sufficient for multiple servings.  We could have easily shared either dish.

In the past I've enjoyed their cheese ravioli in shrimp and lobster sauce - rich and decadent.  Last year when my family was here, we dined at Marcello's, and everyone loved their meal.  Good stuff - reasonably priced.  Our dinner tonight was $36 with non-alcoholic drinks and a tip.  For a nice dinner, that's a good price in my opinion.

I'm tired and pleasantly full (thankfully I only ate half the dish) and ready for bed.  The evening was so pleasant, we completely forgot about the bonfire!  We swung by on the way home and at least saw it, despite missing the actual activities...not sure what you do at a bonfire...but we were so stuffed and ready to fall into the post-pasta-induced slumbers, that we both said "okay - saw it - let's go home"...and we did.

Marcello's is a place we will go again and again...when we need a nice night out and want to stay on the Port Isabel side of the bridge.  It's definitely mangia bene!

SPI FLIP FLOP FOODIE RATING:
4 – Lip smackin’ - good quality – flip flops will definitely be parked under their table again!
Marcello's Italian Restaurant on UrbanspoonStumbleUpon

Monday, September 13, 2010

The Sugar Apple

Photo Source: Google Images
If you read my post about yesterday's visit to the Farmer's Market, you know I bought a couple of fruits I'd not tried before.  I was shocked to find my Sugar Apple, which was hard yesterday, was soft today and obviously ready to eat.  I tried to cut it, but frankly it was easier to pull it apart with my fingers.  The outside is kind of leathery feeling and did not slice easily.  It was, as described by the farmers, easiest to scoop out the insides and suck the seeds.  There is no obvious way to get to the fruit otherwise.  I used my fingers and plucked the seeds out one by one and then gently scraped the inside with a spoon.  That garnered less than a teaspoon of pulp (the scraping).  I took a couple of cell phone photos (I left my camera in the car and don't want to fight the mosquitoes to go get it right now).  You can see that there are a lot of black seeds with a thin coating of fruit.  The first bite tasted sweet, yet had an underlying starchy taste.  The texture is almost gelatinous.  I ate about 1/4 of the content and then went to Google the fruit to see what I could find out about it. 

I found this link from what looks to be a Purdue web site which gave a great amount of background on the fruit.  If you find one - and try it - don't swallow the seeds.  They are apparently toxic.  It's a lot of work for just a little bit of fruit.  However, it tasted sweeter and sweeter as I continued popping those seeds in and sucking off the pulp.  I am unsure whether or not I'll buy one again...but I'd LOVE to see this fruit as the Iron Chef America secret ingredient :-)


StumbleUpon