The South Padre Island Flip Flop Foodie Brownsville restaurants

Search The South Padre Island Flip Flop Foodie Blog!

Thursday, February 13, 2014

Valentine Cookies 2014


My husband asked me "who are all of these cookies for?" .... and I replied "oh, family and friends".  He just looked puzzled and walked away.  I asked him later, why did he ask?  Did he want to know if he could eat them, did he want to take some to work?  He said, "no, I just wanted to know why you made so many cookies."  My batches of cookie dough usually make about 2 1/2 dozen average sized cookies.  I baked off 2 1/2 batches of cookies and ended up with over 6 dozen undecorated cookies...then through trial and error, I ended up with about 5 dozen assorted sized cookies, decorated for Valentine's Day.


So, my dear, that is a good question!  Why DO I make so many?  I always have all of these ideas - and I want to try them all - and I plan them out.  Then, I end up going off in some different direction and I end up with lots of cookies.  My friends seem to be happy to be the recipients of the excess cookies.  My family enjoys getting them, and Mr. Flip Flop said "I wouldn't mind taking some to work".  All those cookies will be gone in no time!


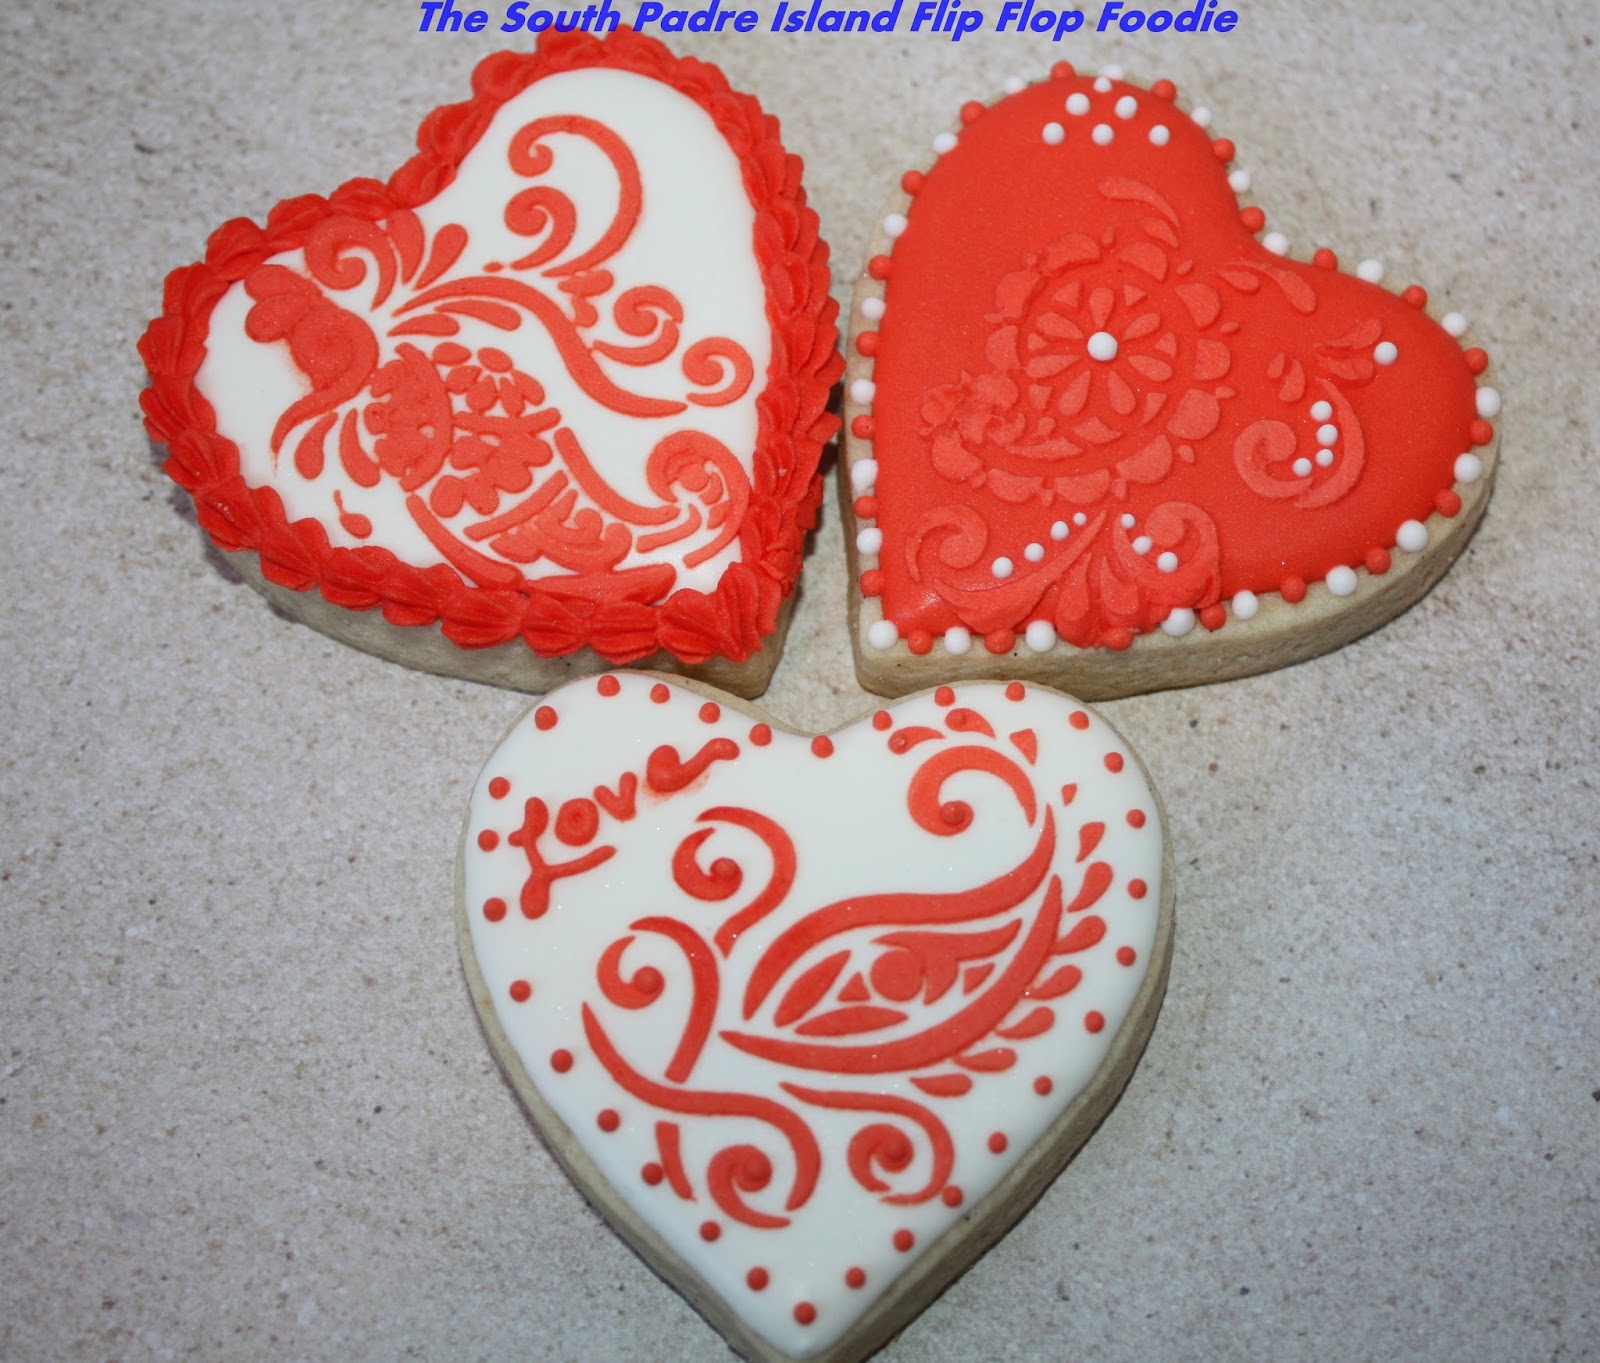
So, for the almost final batch of Valentine's Day cookies, I present my favorites of the Vanilla Bean Sugar Cookies for February 2014.  A lot of love in these cookies!  Enjoy show & tell  :-)

I am slightly addicted to DesignerStencils.  They are consistent
and beautiful and sturdy.  I have the least "trouble" with their
culinary stencils.  Nice people too!

I did a pearl spray over a stencil from Etsy seller StencilLand.  These
ended up being some of my favorite cookies and I actually put
them off to the end because I couldn't decide what to do with them.
White on white always seems so elegant to me.
Used various stencils - one from Designer Stencils and the other
two were just craft store purchases.  I enjoyed messing around with
"different" kinds of borders using my #13 Wilton tip.  I can't
find that tip anymore.  I'd like to have multiple tips.  I used a
#14 to alternate colors - they are nearly the same...but I can tell
the difference.

I kept my color palette fairly basic - pink, white, and red.
I thought about adding gray and soft pink but never
got around to it.  I like the traditional Valentine's Day
colors...and I love a very basic wet on wet technique.
Happy hearts!
These are a small sampling of the many "minis" I made this year.
Ian suggested stacking hearts (large up to small) but I make my
cookies so thick, it didn't look right.  I promised him I'd roll
and cut thinner cookies next year and try his idea.
For some reason, all of the polka dot double hearts I did reminded
me of men's boxer shorts.  Can't get it out of my head every time
I look at them.  (giggle)
Last, but not least, in my favorites were more stencils -
both pearl over red sprayed (stencil from Salsa Sweets)
and the pink on red from Designer
Stencils were larger stencils used on smaller cookies.
I also liked the simple royal icing rose in the center
of a red shell heart.  It reminds me of
a Valentine's card.

Well, those are my favorites of the ones I have finished.  I still have some large hearts to work on.  They were really big and hard to base coat...I'll see what I can do with them tomorrow!

Bon Appetit, Y'all!!!

StumbleUpon

Wednesday, February 12, 2014

Red Velvet Valentine Cookies


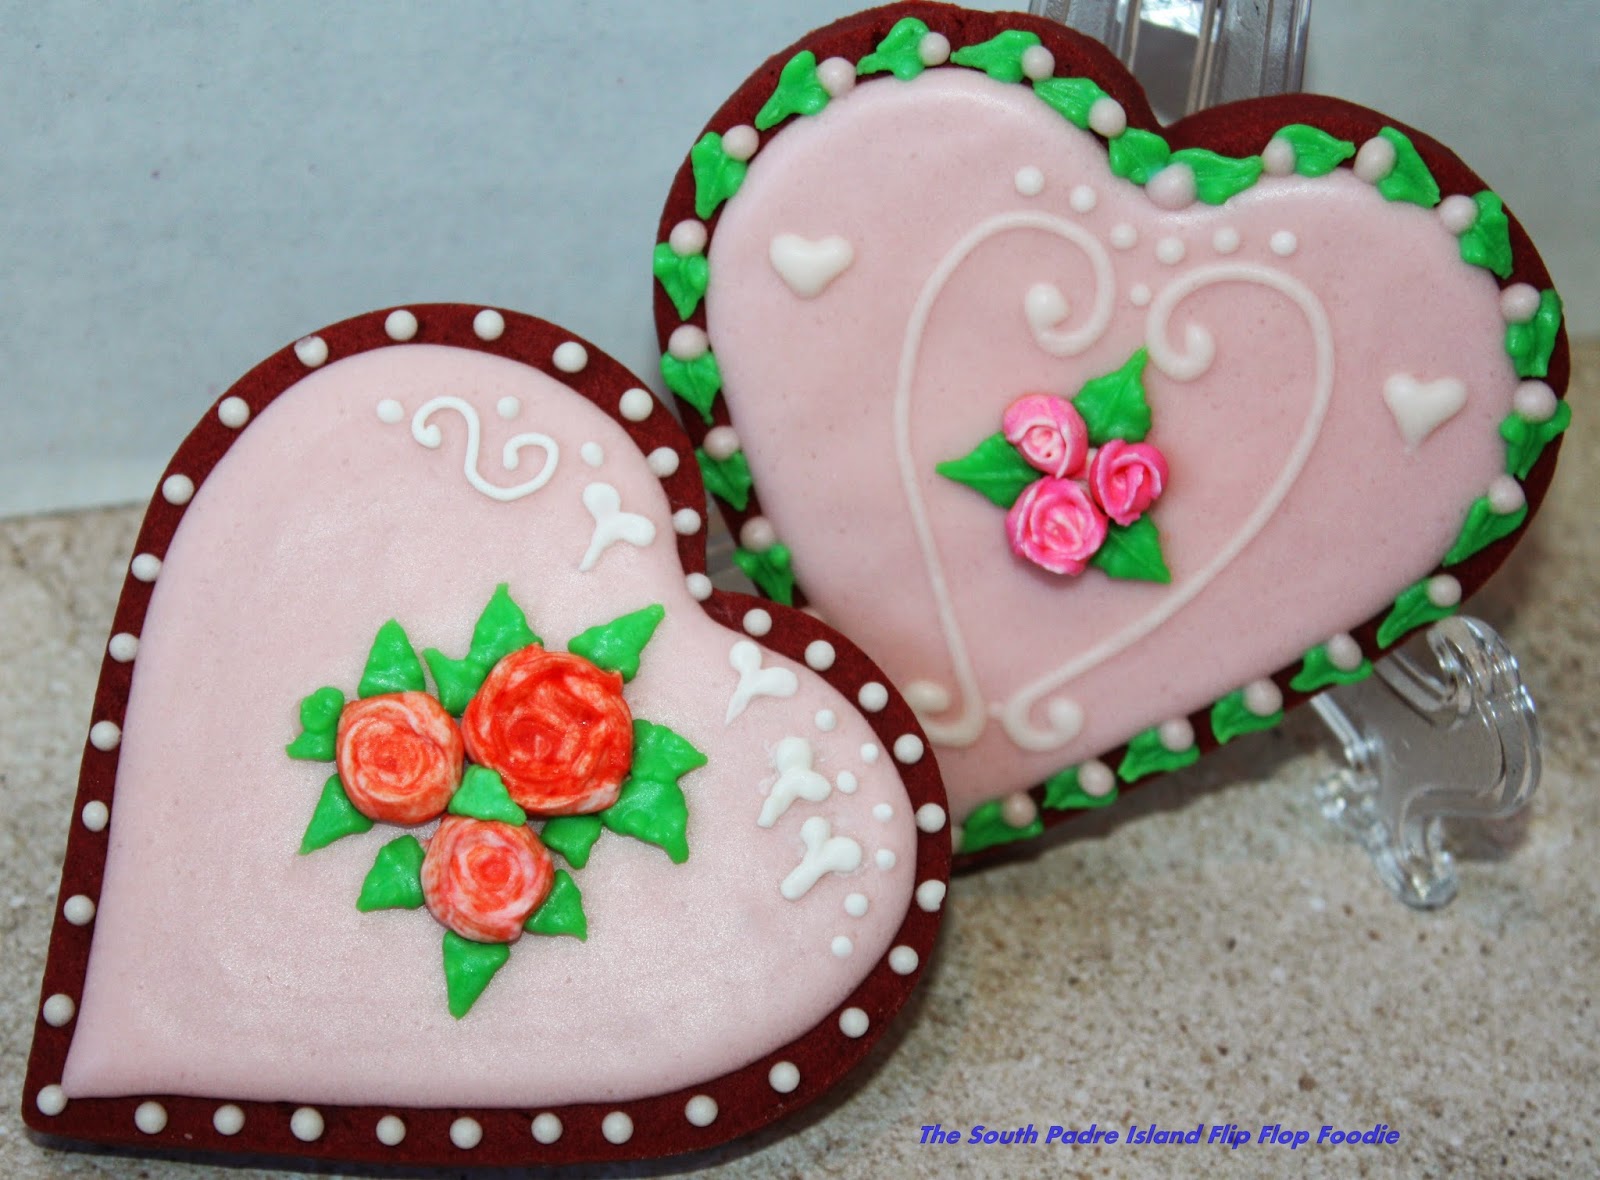
I was soooo excited to see Sweet Sugarbelle's recipe for Red Velvet Roll-outs.  She posted it on her website in 2012, but re-posted this year on Facebook for those of us who missed it.  I had been thinking about what flavors to do for Valentine's baking - I like to do at least two and, because my grandkids prefer them, I always include my Vanilla Bean Sugar Cookies in the mix.  I am linking the recipe above because I didn't change one tiny iota of the recipe.  It worked beautifully.  I rolled between parchment paper, wore gloves in fear of red food color hands, used her tip of mixing cocoa powder with flour for dusting when sticky.  Everything was smooth and beautiful.  Best of all, they smelled awesome when baking - enough to draw the boy from his man cave.  Best, BEST of all, they taste divine!  No red teeth thanks to the use of Lor-Ann's Red Velvet Emulsion instead of an entire bottle of liquid red food color, no bumps in the baked dough...smooth and delicious.  Ahhhhh.

So, as I moved on to thinking about decorating them, they were calling out to me, begging for a cream cheese icing.  Red Velvet must have cream cheese frosting/icing.  It's in the Southerner's Rules of Baking Book (if there is one, I'm sure it's in there).  The tastes just marry perfectly and, while I wanted to make them "purty", I did not want to top them with royal icing if I could possibly avoid it.  Let the science experiments begin!

I have previously used Karen's Cookies recipe for Meringue Powder Buttercream.  Gave a lovely mouth feel to piped icing.  However, it took three days to dry down in my humid May environment.  I knew I was going to be decorating a lot of cookies for family and friends, I was worried I would not have time.  My usual time frame takes five preparation days, including making the dough, baking, making the icing, and decorating in layers that require complete drying overnight between layers.  If I experimented and it didn't dry, I was afraid my cookies wouldn't be done until AFTER Valentine's Day! 

I cogitated about it a bit with a cup of coffee, sitting here cursing our weather, which is unusually cold this year (like the rest of the southern United States) and cut on the television to Food Network.  Now, my husband would say you can't cut anything on...you can turn it on, but only cut it off.  Yankee, what does he know?  All of us down south know you absolutely can cut on lights, cut on the a/c, cut on the fan, cut on the t.v. - right?  I digress.  On that television was Alton Brown, discussing cakes.  Red Velvet Cake in specific and the fact that the invention of cream cheese "saved the south" because it had a much higher melting point than butter so it became the standard in frosting in the very warm southern U.S. - light bulb goes off in my tiny little 'ole brain.  Maybe I could use cream cheese instead of shortening in Karen's recipe for MP Buttercream.  Instead of Almond extract, maybe I could use some of the Lor-Ann's Cream Cheese emulsion that I had in my cabinet.  Lastly I remembered I had not used the extra MP last time, Karen recommended double for humid environments...I would do that too.  Woo hoo, I was off to the races with my fingers crossed.

I got everything out, mixed it up, and shoulders slumped...it was too runny.  I added another cup or so of confectioner's sugar (maybe even one and a half) and beat it some more.  Now...that's what I'm talking about.  Perfect flood consistency icing.  So, I piped some on a naked cookie and halved the cookie with one of my food testers (Mr. Flip Flop) and we both agreed - yum!  Next to ice some more hearts and see if they would crust.  I put them under the fan and four hours later, the had a light crust, but my finger pressure broke the surface and it was still very "floody" underneath.    I left them untouched under the fan and the next morning I tried again.  They felt smooth for the most part, but still could be crushed.  I could work on them if I was careful and hope they'd continue to set up.  One of the things I noticed is the cookies closest to the fan had "waves" in them.  These were sacrificed to the taster and I allowed most of those wavy ones to continue to dry so I could check on drying status with ones I wasn't going to decorate...but then, I decorated a few to see if the wavy could be hidden by decor.  Actually, that worked pretty well!  Bottom line...the Cream Cheese MP Icing worked great.  Like the MP Buttercream, though, it did take 3 days to get dry all the way through to the point where I could package and stack them.  However, I could marble, I could make dot borders, and I could pipe some "designs" - although I did have a bit of running-together with that.  Anything that is bright white or a rose is royal icing.  The softer colors (and the green piped leaves) are all CC MP Icing!

So, here's the recipe, based on Karen's recipe, with my tweaks.  It's good, and if you have the time for them to dry, it's very, very tasty.  Fortunately, the Red Velvet cookies were so moist they stood up to the time under the fan.  Still soft to the tooth inside and incredibly delicious (I know because I just ate one to make sure ;-).


Cream Cheese MP Icing
Tested in a humid environment
Adapted from Karen's Cookies Recipe


Ingredients:

1/3 cup room temperature water
6 Tablespoons Meringue Powder (I use AmeriColor MP)
4 ounces regular cream cheese, room temperature
5 1/2 to 6 cups of sifted powdered sugar (sift first, then measure), divided
1 teaspoon pure vanilla extract
1/4 to 1/2 teaspoon Lor-Ann's Cream Cheese emulsion (shake before measuring)


Method:

Place three cups of the powdered sugar and the meringue powder in the bowl of a stand mixer with the whisk attachment engaged.  Turn the machine on and whisk the two dry ingredients together until thoroughly mixed.  With the mixer still on, slowly stream in the water.  Mix until everything is incorporated, scrape down the sides if needed.  Turn the mixer on high and whip until stiff peaks form.  Add flavorings and mix well.

Change to paddle attachment at this point.  Try to get as much off of your whisk attachment as possible.  Use a rubber spatula to help with that.

Add remaining powdered sugar and the cream cheese.  Whip for about 3 minutes - or until you get to flood icing thickness.  Don't whip any less to prevent separation.  I used this as my base.  Store icing in the refrigerator with plastic wrap laying on the surface to prevent crusting (I'm guessing here - that's how I do anything that crusts).

To make piping icing for the leaves, I added powdered sugar and some base together with the green food color (AmeriColor gel leaf green) until it was the consistency I was seeking.

I think you can see from the photos, that it worked really well.  It tastes delicious and worked...what more can you ask for?  Well, you could have asked me to test it more than once to ensure consistent results...but I don't have time.  I welcome any feedback if you try this.  I haven't found anything in a Google search that provides a similar recipe, so I was on untried ground as far as I could tell.

I did find that it was easier for me to do writing with royal icing and the roses are all royal icing transfers I made on another cold day last week.  They are great to have on hand and a good way to use up your unused royal icing.  They last forever if kept in an airtight container!

Well, that's it for the experimentation phase of my Valentine's Day cookie decorating.  I'm onward to the rest of the cookies, still hoping I will get finished in time!


Bon Appetit, Y'all!!!

StumbleUpon

Saturday, February 8, 2014

Run to Hear, Inc. is on AmazonSmile!!!


Do you shop on Amazon.com? 

I live in the boonies… I shop on Amazon a LOT.  The nearest big stores are 25 to 30 miles away from my home and the “better” big stores are over 65 miles away .  I quickly became an avid Amazon shopper.  I am a proponent of “shop local” and try to shop at local indie shops regularly, but for much of what I need; it simply is not to be found in a 250 mile radius of my home!  I am a specialty baker and Amazon has a lot of the specialty items I need.  They send most of it right to my door – so I’m a huge fan!  The big Amazon-in-the-sky gets lots of bad press…but here’s some press about the good they are also doing.

Imagine my delight when I found “AmazonSmile” AND found out that Run to Hear, Inc. was a qualified recipient of a percentage of almost everything I buy on Amazon!  All I had to do was sign up and use my regular account (just whatever account you use when you make purchases on Amazon regardless of whether or not it is AmazonPrime) BUT I saved the AmazonSmile portal on my favorites bar so I start my shopping there.  All of my eligible purchases cost the same as the other portal…but, because I designated Run to Hear, Inc. as my charity, they get a percentage of my purchase price as a donation.  No extra cost to me – it’s just Amazon, through their charitable foundation, doing a good deed.  I think it's the right thing for big business to do, don't you?  If so, then take advantage of it without delay!

Here’s a link to the FAQs about the program.  PLEASE sign up today…select Run to Hear, Inc. from their list of qualified charities, and get busy shopping.  Just remember, you must enter through the AmazonSmile portal when you shop… and you will see Run to Hear is listed as your charity at the top of the web page when you are logged in correctly.

It doesn’t cost you a penny…but, as one of the parents of a Run to Hear founder said “Mama told me never to pass up any free money. Golden crumbs....” and that is the absolute truth.  You can help Run to Hear without it costing YOU any extra pennies.  They are indeed golden crumbs for those in need of assistance with cochlear implants, hearing accessories, and assistive technologies…whatever it takes for the hearing impaired, who want to hear better, to access hearing. 

Thanks for helping out in any way you can…be an AmazonSmile contributor today!
R2H group from 2012
Photo courtesy of  Gerald Tow
While you are thinking about Run to Hear....have you signed up for the 2014 5k?  We're at Lake Pflugerville Park again this year and we've moved to a much better (hopefully cooler) day!  MAY 10, 2014 with an 8:00 a.m. start time.  Family friendly, but timed for those more competitive runners (like my granddaughter who won 3rd place in her category last year...yay rah Audrey!).  The sign-up link is on our web site RuntoHear.org - please visit and get yourself registered today.  Can't wait to see you there!

Audrey and her Dad (my son Will), crossing
the finish line with a good time despite arriving and
starting 5 minutes after the start.
Photo courtesy of Alex Labry


Thank you - now I'm back to decorating my Valentine's Day cookies - look for those in an upcoming post!

StumbleUpon

Sunday, January 26, 2014

The Mysterious Legendary Golden Booby

Well, here's the third and final installment of the Paragraphs Mysteries of the Golden Booby series for 2014.  If you want to know what it's all about, click on the link above and you can see what fun we've been having!

As I posted on Saturday, I stepped out of my comfort zone and made a cake for the finale...but, I also wanted to make cookies...and Griff had asked for a few cookies to use as prizes.  So, after weeks of planning I was ready to roll (pun intended).

My first thing to do was find a cookie cutter that could be workable for the Golden Booby...I found a penguin that I thought would do and ordered it.  Next, I worked with a wonderful Etsy Seller, CookiePixie, to get a custom edible wafer paper design I clipped from a photo I took of the book cover.  Wafer papers are an edible food product printed with from food color on printers only used for food production (you've seen photos on cakes - that is a similar process - there are sugar sheets and wafer papers).  They are made of potato starch and sugar and are meant to dissolve almost instantly when water hits them...so when you take a bite of a cookie or other food product that is decorated with a wafer paper, ideally it should dissolve fairly rapidly.  These performed beautifully when I tried one for breakfast the morning of the event! (Hey, you have to make sure the product is acceptable before you serve it to people - right?)

Once I received my cookie cutter, I pulled out my Coastal Living Magazine where I had found a photograph of a Blue-footed Booby on the Galapagos Islands.  I copied it and reduced it until it was the size that would fit in the space of my cookie cutter.  That was my "template", so to speak. I squeezed and pulled on the cookie cutter to get it to a better "booby fit".  My next task was to make royal icing transfers for the blue feet.  I wanted them to really stand out so a transfer is a way to make that happen.  I slid the picture under parchment paper and piped an outline of the feet, returning instantly to flood the center with thick icing...moving the picture around under the paper to get several sets of feet.  After letting that dry overnight, I piped the details on top of the feet to give them better definition.  Another night of drying required before I carefully peeled them off the parchment and stored them in an airtight container until ready to decorate.


Now it was time to bake cookies.  I selected my Acorn Squash Sugar Cookie Recipe because I knew one of the authors, Pat McGrath-Avery had enjoyed a Pumpkin Spice Madeleine I made for a previous event.  I hoped she would like this recipe as well.  She's the author who included me as a character in her portion of the book, so I was aiming to please!

I rolled and cut 9 birds and 21 rectangles.  I should have made more rectangles but it had been a really busy week and I decided this was going to have to be enough.  I used the entire batch of dough and if I waited to make another batch (butter softening and all of that) I would be behind schedule.  The rectangles were simple but the birds were a bit more challenging.  The tiny beak needed to be longer so I endeavored to add dough to that area.  It was harder than I expected.  I should have frozen the dough and then cut new beaks - hindsight is 20-20.  I, instead, tried to pat some dough around the existing beaks.  9 cookies became 8 when I broke a beak transferring from the racks to the storage container to await decorating.

I top coated the rectangles with white icing rectangles and allowed them to dry over night - you need a hard surface to apply the wafer papers.  Putting those aside, I started work on the remaining cut-out birds.  I took the photo and cut the beak out and traced around the beak on the birds (using an AmeriColor black edible marker).  Then, I cut the wings back and traced around everything to give me the general outline for my icing.


Now, the birds were ready to pipe.  I started with the beaks - let them dry.  After the crusted, I piped the white body...and then realized the head wasn't really white.  Hmmm.  I applied the feet while the white was still wet so they would sink into the bottom of the body.  I let them dry completely overnight as I thought on whether to paint the white head (with food color) or pipe over it.  The next morning I piped the yellow-gold wings and ended up piping over the white for the head - and that worked fine.  Another night of drying.  Final step for the birds was dry brushing the areas where color transitioned with bronze lustre dust...depth of color.  Then I top-painted the entire body with gold lustre dust mixed with vodka to give the entire bird a shimmer...it was a golden booby after all!

I so wish I had not been rushed and had stopped to take pictures.  However, once I started the decorating project, I was too busy to even think about photographs.  So, when I was at Paragraphs, I grabbed some photos of the finished products.  Not the best because they were wrapped individually in cello bags.  You get the gist though.

The wafer paper cookies were completed by cutting out the images from a sheet of printed images, painting the back of each image with Karo Syrup and applying them with perfectly clean and dry hands to each rectangle...and letting them dry overnight.  You have to keep rubbing them to ensure the corners stay down - this batch worked exceptionally well.  I only had one rogue that continuously curled up - and it was probably because my icing curved at that spot.  The next day I piped a white shell border over the edge of each wafer paper cut-out, and after allowing it to crust, I decorated half of the cookies with a blue dot border and the other half with a gold dot border.  I think they were very cute!  Another 2 beaks broke and I glued one of them back on with royal icing.  The other went in my tummy for quality assurance.  Therefore, I only ended up with 7 booby cut-out cookies.  One was given to each author, 2 were given as prizes and 1 was left for Griff - who was a grand Master of Ceremonies!

I wish I hadn't been so tired and achy from decorating for 2 weeks straight...I had purchased two sheets of transfers and had the intent of making many more cookies than I did...and since they were scooped up rapidly, I know they would have ALL been eaten had I just made myself make more.  However, I gave in to the aches and pains and stopped when my body said "enough".  The crowd was huge and the cookies and the cake were cleaned up to the last crumb.  I can't thank Joni and Griff, owners of Paragraphs on Padre, as well as the four participating authors, enough.  The fun and excitement that started in December and lasted for weeks was just what the island needed for a pick-me-up during an unusual number of cold Wintery days.  Can't wait to see what they come up with for next year!

Bon Appetit, Y'all!!!


StumbleUpon

Saturday, January 25, 2014

Chocolate Sour Cream Cake

What a day, what a day...  I have been in the midst of a baking frenzy to get together some treats, prizes, and more treats for the grand finale of Paragraph's Mystery Week on South Padre Island.  If you read my blog post about Paragraphs Mystery of the Golden Booby, then you know that this week is the grand finale when all four authors are at Paragraphs on Padre Blvd and clues and the mystery will be discussed.  Prizes are in order (I'll be bringing a cookie or two for a prize) and I want to do what I can to say thank you to the hard working book sellers and authors who were so enthusiastic about providing all of us a bit of Winter fun! 


I decided, several weeks ago, to try to make a Blue Footed Booby Cake (I am not a good cake decorator - I don't practice) so I found a cake pan on Amazon that I thought could be made into a Golden Booby shaped cake.  I had also been perusing recipes and, only today, decided to make it chocolate (a strong second was a pumpkin flavored cake, but since my cookies were the Acorn Squash Sugar Cookies which taste a lot like pumpkin spice, I opted for chocolate).  I found a couple of recipes and in my usual mash-up method, I ended up with a Chocolate Sour Cream Cake.  I made a sample cake - it was yummy - so I got started.


Adapted from Ghirardelli's Grand Fudge Cake Recipe


Ingredients:

2 cups unbleached all purpose flour
3/4 cup Ghirardelli Unsweetened Cocoa
1 tsp. baking powder
1 tsp. baking soda
1/2 tsp. kosher salt

1 cup butter, softened
1 3/4 cup granulated sugar
1 tsp. pure vanilla extract
2 large eggs, room temperature

1 cup sour cream
1/3 cup low fat milk
1 Tbsp. brewed coffee


Method:

Preheat oven to 350 degrees Fahrenheit.
Prepare two 9" pans by lightly greasing and flouring or use something like Baker's Joy spray.

In 4 cup measuring cup (or separate mixing bowl) mix the dry ingredients with a wire whisk.  Set aside.

In a 2 cup measuring cup (or separate small mixing bowl) mix the milk, sour cream, and coffee with a whisk.  Set aside.

In the bowl of a stand mixer, cream butter and sugar until light and fluffy (about 4 minutes).  Add vanilla and mix until incorporated.  Add eggs, one at a time, beating until incorporated after each egg added.

Add 1/3 of dry ingredients on low speed, alternating with 1/2 of the wet ingredients, ending with the dry ingredients.  Mix with each addition until well incorporated.  Scrape down to the bottom of the mixing bowl to insure everything is well incorporated.  Mix until smooth and fluffy.

Divide the batter into each pan and level with an offset spatula.  Bake for 30 to 35 minutes until a cake tester (or toothpick) comes out clean when inserted in the middle.

Allow to cool on rack (in pans) for 10 minutes.  Turn out onto cooling rack and allow to cool completely before frosting.


I used a Vanilla Bean Cream Cheese frosting and did a thin crumb coat on the bird after the cake had cooled completely.  It was another unusually cold day today, so the cake cooled fairly rapidly!  After the crumb coat had firmed up in the fridge I did another layer of butter cream, colored some frosting for the wings and some for the beak and tried my hardest to decorate a cake that looked vaguely like the fabled Blue-Footed Golden Booby.  I could not, however, bring myself to spray it gold.  I don't mind a bit of lustre dust on a cookie - but an entire cake?  I thought not.  While I was at it, I made some blue feet out of royal icing I had left from decorating the cookies.  I had made little blue feet RI transfers for some cookies and a big set of feet for the cake.  I was praying it wouldn't break when I removed it from the wax paper.  It didn't - but it did break when I put it on the slightly rounded cake...fragile RI transfer was flat - cake was round.  Not a good mix.  I glued everything back together with more blue RI.  Woo hoo!


I'll have written this over a two-day period....and the only photo of the cake I got was a fast one at the event, in not very good light.  So, here it is.  Don't laugh...I was really working outside my comfort zone. The blessing is, it was a darn good cake and nearly every crumb was scraped off the cake board!  Yay...I love it when a plan comes together!  If anyone has any cake photos, I'd love to have a copy!


I'll be sharing a post on the cookies I made - probably tomorrow or the day after.  This was an unusually hectic week and I didn't do my usual photos.  I will, however, share what I have!

Until then...

Bon Appetit, Y'all!!!
StumbleUpon

Wednesday, January 22, 2014

"Standard Deviation" and "Autism Awareness"

I had hoped to write this post after Book Club...but it got rescheduled...and I'll be out of town on the rescheduled date.  So.... this will be on-the-fly and slightly short, but sweet!


January's Book Club selection, Standard Deviation's, primary character is a young man with Asperger's Syndrome.  Many of my readers know I have a deaf son who hears with cochlear implants...and he also has Asperger's Syndrome.  As a result, Autism Awareness is a cause near and dear to my heart.  I am also a huge fan of the author, David Harry.


When I first met David, I had engaged in a conversation with his wife at a book signing event at Paragraph's on Padre several years ago.  David was not the author for that particular event, but had recently published The Padre Puzzle.  Since I had instantly bonded with his wife, we started talking about kids, and teen-age problems, and it circled around to autism.  She told me I had to meet her husband as he was writing a book where the character has ASD.  She brought him over to meet me and I ended up, after chatting with him, having the opportunity to read a draft of his new book a couple of years ago.  I love all of David's books - but Standard Deviation is particularly near and dear to my heart.


Book Club on Tuesday was not only featuring Standard Deviation, but the icing on the cookie was that David Harry was going to attend!  I decided to make some puzzle shaped cookies with some new cookie cutters I had obtained last year and never had the opportunity to use.  I wanted to take them to Book Club and share as we talked about this wonderful book.  I started on them a couple of days in advance and ended up with a simple Vanilla Bean Sugar Cookie top coated in white royal icing and then outlined and sugar dipped in primary colors, representing the "Puzzle that is Autism".  Why a puzzle piece?  the Autism Society's website describes it well.  "The puzzle pattern reflects the mystery and complexity of the autism spectrum. The different colors and shapes represent the diversity of the people and families living with the condition. The brightness of the ribbon signals hope — hope that through increased awareness of autism, and through early intervention and appropriate treatments, people with autism will lead fuller, more complete lives."


David, unfortunately, was quite ill so Book Club was rescheduled and I had a couple of dozen decorated cookies, representing the puzzle of autism, sitting in my car as I headed away from Paragraphs.  What to do?  What to do?


As I headed back towards the causeway, I picked up my phone and found a number for a friend I knew to be on the Autism Awareness Walk's planning committee.  I left a voice mail telling her to call me if they were going to meet this week and I'd supply some cookies. These cookies really needed to be eaten in the next couple of days because I didn't individually wrap and seal them (which makes them taste fresh much longer). She called me back in less than 5 minutes saying they were just walking into that very meeting.  "It must be meant to be" she said - and I agreed.  I headed to the Point Isabel ISD offices where they meet and crashed their meeting with cookies.  I ended up staying through the meeting so I could find out a bit of info for a future blog post.


One of the things I found out, is the date is April 5th, 2014.  There is to be a walk and a 5k fun run.  Most of the rest of the meeting was "planning" and details not finalized.  I'll just ask you to mark your calendar if you are a local, or live close enough to participate.  It is a huge community event with the funds raised going, in part, towards paying for sports programs for all disabilities in our district.  I remember the first year, we just wanted to raise awareness and it was tremendously successful - more than we ever dreamed.  I didn't help last year because of family issues, so it was interesting to see how they have grown and become more organized and efficient in the planning.  I just know the 2014 event will be a huge success.


I had gotten  "out of touch" with the autism community in our area because my son had headed to college and I sort of disconnected from the group.  I am currently seeking out new resources for my son and I hope to share that information with other parents in the near future.  I spent quite a while after the meeting catching up with one of my favorite people in the world, Elsa Garcia.  She cares so deeply for the special needs students at PI-ISD and it was good to see her again.  My friend, Stephanie, is right.  Sometimes things are just "meant to be".  This is one of those serendipitous events that allowed me to share cookies and reconnect.  It turned into a really wonderful day!  Who could ask for anything more?


Bon Appetit, Y'all!!!


StumbleUpon

Saturday, January 18, 2014

South Padre Island KOA Care Camps Auction

I donated a cookie basket and a couple of boxes of extra cookies to the SPI KOA for their fundraising event for KOA Care Camps.  I love helping people who want to help kids with special health issues enjoy a fun camp experience.  For so many years we searched out special camps for our youngest and it was almost always a wonderful experience for him and a respite for the parents!  It was nice to not have to explain his differences...and I'm sure that's how the kids feel when they go to cancer camp.  What a blessing!


I worked really hard to make a basket of cookies I hoped would be appealing enough that the bids, at auction, would exceed its $75 retail value.  I included a nice basket that can be reused, a dozen coastal décor Vanilla Bean Sugar Cookies detail-decorated in royal icing.  I added a dozen Meyer Lemon Ricotta Cookies baked in my favorite Nordic Ware coastal theme teacake pan, and I loosened my tight grip on a pound of Callebaut Sensations Marbled Chocolate drops (acquired at Central Market in Austin) and mixed up a batch of my favorite Chocolate Chip Cookie dough, substituting the marbled drops instead of chocolate chips.  I included a dozen of those in the basket as well! (Mr. Flip Flop said they were delicious...thankfully...because Belgium Chocolate is a true luxury in a chocolate chip cookie).  All of my baked goods are made with quality ingredients...real butter, King Arthur flours, Meyer Lemons (when I can get them), vanilla beans, and pure extracts.  A cookie has to taste as good as it looks...or what's the point?


Everyone send up good thoughts into the ether, that some generous cookie-loving soul will peel open their wallet and make a goodly sized bid for this basket of deliciousness.  KOA Care Camps is a worthy cause!


My cookie art, this time, included palm trees, scallop shells, sand dollars, and some very detailed star fish!  I thought they looked pretty, and I know they taste good.  I roll my cookies 3/8" thick to ensure a good thick cookie for stability as well as value, and all of the decorated cookies were between 3 and 4 1/2" in size.

Close-up of the decorated sugar cookies - the star fish was based on
a tutorial from Glorious Treats...I didn't follow it exactly, but the look
is Glory's (her cookie art is always so pretty).

I don't know if they will use the donations of an extra dozen of Callebaut cookies and the box of individually packaged Lemon Ricotta cakelets for the bake sale table, or if they will auction the boxes intact.  Either way - hope to help raise more money to fund a wonderful camp experience for kids with cancer.


I'm used to sharing my cookies with family and friends - I rarely sell my cookie art.  I admit to feeling nervous (the reason I rarely sell my cookies).  My fingers are crossed really hard.  Here's wishin' my cookies luck!


Bon Appetit, Y'all!!!


StumbleUpon

Thursday, January 16, 2014

THE CHEF HOUSE - 2014


MAY 2015 REPORTED CLOSED AT THIS LOCATION


I just have to say...WOW!  Talk about "movin' on up, to the East Side"!  The Chef House restaurant has moved to a new location on the island.  It's awesome!  The view is outstanding, the space is maybe 75% larger than the Port Isabel location....lots of changes.  What hasn't changed is the personalized and attentive service and their outstanding cuisine.
The view from our table by the window


My friends and I had lunch there today.  It was a gorgeous day, resulting in an outstanding view of the dunes, beach, and ocean outside their lovely windows.  We hung out for nearly two hours.  Thankfully, they weren't over-crowded and allowed us to sit and chat and sip tea and coffee without feeling rushed.  Since we don't seem to get together often enough, we had a lot to catch up with.
I love the 3 types of salsa and fresh tortilla chips
served before the meal.  Unusual and delicious!


Both of my lady friends had coffee with their meals (actually, one just had coffee - she rarely eats when we go out) and they both were happy with the nice large mug and delicious flavor of the coffee.  My first comment about my iced tea was "this is really good tea".  I hate it when I go out to eat and have iced tea that is bitter or watered down.  This tea tasted perfectly brewed...and I enjoyed having it served in a stemmed goblet.  Just felt more special.


Once we'd had a few minutes to chat, we busily perused the menu.  I had decided on the special of the day (an enchilada plate that sounded delicious) and then I realized we had a breakfast menu to look at as well!  I have been craving Eggs Benedict and I had no doubt The Chef House Eggs Benedict would be outstanding.  True to form, they were.  Prepared with high quality ingredients, the addition of some fresh spinach, both a Beurre Blanc sauce as well as a Hollandaise sauce over perfectly poached eggs....my eyes were rolling back in my head after the very first bite.  Add a tasty little potato cake and my meal was just incredible!


My friend who did eat, also ordered off the breakfast menu.  She had Ham and Egg Tacos on corn tortillas.  She said they were excellent.  It was quite a bit of ham and egg, so it was nice that two tortillas were provided.  Her meal also included a side of refried beans on the plate.  It looked quite yummy!


I'm so happy with the new location and the same fine cuisine.  Their hours are currently 8:00 a.m. to 3:00 p.m. and they are closed on Monday.  Beginning this very evening, they will start serving dinner on Thursday, Friday, and Saturday evenings from 6:00 p.m. to 10:00 p.m.


We all scanned their dinner menu and it looks to be delectable!  I can't wait to get there for an evening meal.  Hope you stop in and give them a try.  I don't think you will regret it!

Returned for lunch on January 25th with Mr. Flip Flop. He had a
Port Isabel Omelet (which he said was delicious) and I had
Beef Enchiladas with the Red Chili sauce.  Absolutely outstanding!


SPI FLIP FLOP FOODIE RATING:
5 – OMG – that was an outstanding meal!  I can’t wait to go back.


The Chef House Restaurant on Urbanspoon


StumbleUpon

Sunday, January 12, 2014

Island Happenings...

I love when the bay is calm and the birds' reflections are
so clearly visible!

The next couple of weeks are going to be busy on the island.  I'll be baking and reading and dancing...I expect, when I head to Austin for doctor appointments at the end of January, I will be ready for a break from so much fun!    Well, maybe not...I'm just trying to put a positive spin on annual exams and follow-ups.  Not my favorite things to do.

One of my regular Laguna Madre visitors

For now, however, we have lots of stuff on the agenda.  Plus, I'm trying out my new pocket-sized camera and my big camera, too.  There are glorious sunny days, plants blooming, birds hanging out on the bay outside my front door, and much beauty to be found on the beach.  It's really a photographer's paradise!

Winter visitors flock to the island!


I'll intersperse this post with my photos...hope you enjoy them.
My Christmas Cactus is in full bloom on my deck.
Living in the sub tropics makes for year-round blooming
plants and flowers!
Kalanchoe blooming on deck

Ice Plant blooming on the deck


This week I will be preparing some baked goods for the KOA Care Camps event at South Padre Island KOA.  They have a big week-end planned! 

Saturday, Jan 18th, there is a Zumbathon at the Olympian Fitness Gym of Port Isabel.  It gets started at 10:00 a.m. and entry is a $5 donation for the KOA Care Camps, to help send kids with cancer to camp.  I hope to be dancing my heart out with all the ladies and gents attending!  Join us, please!
Sunday, Jan 19th, there is an auction and raffle at the KOA Campground, primarily for KOA guests - and the donations are really mounting!  I'll be adding a basket of cookies to the auction and there may be a bake sale involved...I'll need to check more into that.  If there is, you know I'll have cookies there too!  This is such a great cause, everyone needs to participate and get those bids HIGH for the kids.  Remember, though, very minimal parking and seating...so take that into consideration.  It starts up at 6:00 p.m.
Birds fishing on South Padre Island

Activities from Paragraphs: Mysteries of the Golden Booby are ramping up this week, with the grand finale event on Saturday, January 25th.


Authors and Characters from the book will be hanging out at the following locations:

Monday Jan 13 Chefs House,   Noon, Griff and David Harry
Thursday Jan 16 Ted's 8:30am Griff and David Harry
Thursday Jan 23 Manuel's 9:00am Pat Avery and Joyce Faulkner
Thursday Jan 23 Sea Ranch Bar 6:00pm Pat Avery and Joyce Faulkner
Friday Jan 24 Padrerita Grill 6:30 all 4 authors, Griff, Sally
Saturday Jan 25 Paragraphs on Padre 2:00 Everyone they can fit into the bookstore!  The Cookie Lady (page 168 in the book) might be bringing some nibbles, all 4 authors will, of course, be there.
The Blue-footed Golden Booby
as depicted by local artist, Marne Law
Keep up with all of the activities and clues by liking their Facebook page!  If you don't know what the heck this is all about - check out my previous blog post on this exciting mystery event!


While I won't be in town for this one, I want to encourage support of one of my favorite charities, The Special Olympics.  On Saturday, February 1st, Clayton's Beach Bar, the 2014 Polar Plunge will be happening to benefit Special Olympics.  Here's a link to find out more...registration at 11:00, plunge at noon.  Show your support!


I know there are more things going on...but that's about all I can squeeze into my life! Here's a link to more local events and other great South Padre Island information. 


Hope you enjoyed the intermittent photos - if you aren't down here at the island or nearby - you are missing some gorgeous weather and beautiful birding!  Come on down!  As my Grandmother used to say, "ándale, ándale, daylight's a wastin'"

See you soon!

Bon Appetit, Y'all!!!


StumbleUpon