The South Padre Island Flip Flop Foodie Brownsville restaurants

Search The South Padre Island Flip Flop Foodie Blog!

Thursday, October 6, 2011

Peanut Butter Chocolate Chip Pound Cake

We were going over to my sister's condo for a swim, tennis, and a spaghetti dinner and I offered to bring homemade bread and a dessert.  It was a really busy day - meeting at school, missed bus, forgotten computer, Zumba, a couple of lengthy business calls that took longer than expected...and it all served to wreak havoc with my day!  I ended up throwing together a focaccia for the bread offering (it was really good so I am glad that worked out) and I got rolling on the cake between Zumba and the school meeting.  I knew my brother-in-law was a peanut butter fan so I searched around for a recipe to try (family doesn't mind being guinea pigs) and I came across a Chocolate Chip Peanut Butter Pound Cake on several blogs.  It sounded good so I decided to give it a try!

I printed off a recipe from pixelatedcrumb.com and she attributed the recipe to Recipe Girl.  I didn't mess with the cake too much - all I substituted was mixed chocolate chunks and chips inside the cake instead of straight chips...and I didn't use the Peanut Butter Glaze - I made a basic ganache and sweetened it up with a touch of powdered sugar and a hint of vanilla. 

Here's how it goes:

PEANUT BUTTER CHOCOLATE CHIP POUND CAKE
WITH GANACHE GLAZE

Ingredients:


Cake:

3 cups unbleached AP flour
1 teaspoon baking powder
1/2 teaspoon salt
1 cup creamy peanut butter (note - do not use the natural PB unless you have the no-stir kind)
1/2 cup butter, at room temperature
3 cups granulated white sugar
6 large eggs, room temperature
2 teaspoons pure vanilla extract
3/4 cup semi-sweet chocolate chips
3/4 cup semi-sweet chocolate chunks

Glaze:

1/2 cup semi-sweet chocolate chips
1/2 cup milk chocolate chips
3/4 cup heavy cream
1 teaspoon pure vanilla extract
1/3 cup sifted powdered sugar

Method:

Preheat oven to 325 degrees Fahrenheit.
Spray 10-cup bundt pan generously with nonstick spray.
In bowl of stand mixer, cream together peanut butter and butter.
Add sugar and beat for 5 minutes.
In separate bowl, whisk together the flour, baking powder and salt - set aside.
Add eggs, 1 at a time, and vanilla to butter and sugar mixture and beat until well combined.
Add dry ingredients a little at a time, beating just until incorporated.
Stir in chocolate chips on low.
Spoon batter into prepared bundt pan.
Smooth top of batter with spatula.
Tap the pan a couple of times on counter to ensure any air pockets settle.
Bake for 1 hour and check the cake to make sure it is not browning too quickly.
Cover loosely with foil if it is browing on the outside and not done on the inside... and bake 10-20 additional minutes or until toothpick inserted into the center comes out clean.
Allow cake to cool for 20 minutes then flip it onto a rack or platter and let it cool completely.


Glaze:

In top of double boiler, combine cream and chocolate, whisking continuously over simmering water.
When completely smooth, remove from heat and whisk in vanilla.
Sift sugar in thirds over the ganache and whisk until smooth.
When cake is completely cool, slide wax paper pieces under edges of cake to catch the ganache over-spill.
Spoon ganache over cake allowing to drip down sides and center.
Wait until ganache is setting up (maybe 10-15 minutes) and carefully remove wax paper from under cake.


The cake was incredibly tasty.  I think I over-baked it though - I let it go the entire hour and 20 minutes and was evaluating doneness by color.  The edges of the cake were almost chewy (tasty but chewy) - the crumb was dense and marvelous...I almost think this would have been more appropriate in a sheet pan and served as brownies (or blondies I guess).  I had to saw through the crust when serving.  Everyone said it tasted good - but the teen said it was too "hard" on the outside - yet my sister loved the "crust" and picked it off of my son's piece and ate it.  I had a piece for breakfast this morning (bad girl, bad girl) with my coffee...it was really delicious and had softened a bit over night.  This might be one of those cakes that tastes even better a couple of days down the road.  It's really rich - a small piece is just right - the people taking big pieces couldn't finish their pieces - just so darn rich!  If I make it again, I'll reduce the cooking time.  I think I am going to try this in a sheet pan, though, and serve it like a bar cookie - it's that dense.  Or maybe a mini cupcake...that could be a really good thing! 
Sounds like a potential addition to my Christmas cookie trays!


Bon Appetit, Y'all!

SHARED WITH:


Creations by Kara


Everyday Sisters Sharing Sundays #17


StumbleUpon

Saturday, October 1, 2011

Apples on Apples Upside-Down Layer Cake


I mentioned before that I started participating in FoodBuzz, a web community focused on bloggers sharing their blogs and recipes with other foodies, back in early August.  I had not been in the kitchen nor out to eat much in August, so I hadn't been writing as much as usual.  I needed some inspiration.  FoodBuzz has kick-started my urge to get back in the kitchen.  I've been seeing some incredible recipes through multiple daily visits to FoodBuzz and I saw this cake several weeks ago from one of my first "friends" on FoodBuzz.  I haven't been able to get it off my mind.  Seems to be the year for upside down cakes for me.  I made a yummy Peach Pecan Upside Down Cake...and a Fresh Pineapple Upside Down Cake...  now this cake is in the upside down neighborhood as well...but with an extra layer of flavor - and a different cake batter and topping.

The original recipe is from a blogger in Cyprus and has metric measurements and an ingredient I couldn't identify.  I converted the measurements as best I could, made some personal preference substitutions and additions, and decided my best choice was vanilla beans for what she called "a vanilla sachet" ...I think it all worked!  What didn't work was getting it all into one pan.  My cake ended up being a two-layer cake...

APPLES ON APPLES UPSIDE-DOWN LAYER CAKE
Adapted from Sinful Apple Madness on Eftychia's  Dream of Cakes blog


TOPPING:
(The upside down topping that you will see on top)

Note - the original recipe called for 1 kg total weight of peeled and cored apples for both topping and filling - that's 2.2 lbs total.  I actually used about two Granny Smiths for the "topping" and I mixed two Gala apples and one really big Fuji for the filling layer.  Also, her cake was one cake - not a layer...but my pan wasn't big enough to accommodate the whole shebang...thus, this recipe became a layer cake ;-p

Ingredients:

Two Granny Smith or other baking apples
1/4 cup granulated white sugar, separated
2 teaspoons ground cinnamon, separated
2 tablespoons turbinado sugar, separated
Juice from 1/2 Lemon
Enough nice pecan halves (or whatever nut used) to circle the pan

Method:

Peel and core apples.   Cut in quarters and put in a bowl of ice water with the juice of 1/2 lemon.  Hold at this point until ready to put the cake together.

APPLE FILLING:

Ingredients:

3-4 apples (I used 1 large Fuji and 2 Royal Gala for this part)
1/2 cup granulated white sugar
1/2 cup chopped pecans, walnuts, or almonds - whatever you prefer (I used pecans)
2 tablespoon Moscato or other sweet wine (original recipe called for 1 Tbsp Ouzo - I don't have that - but I had opened a bottle of flipflop Moscato two nights ago and hadn't finished it...so I used that)
1 tablespoon ground cinnamon
1/4 teaspoon freshly grated nutmeg

Method:

Peel and core apples. 
Dice two apples into small pieces and one or two apple into chunks (used the Fuji for the chunks).
Place apples and sugar into nonstick saucepan or skillet and cook over medium high heat for approximately 10 minutes. 
Add the wine and nuts and stir to coat, allowing to cook for another minute.
Remove from heat and allow to cool.
Do not add cinnamon or nutmeg yet.

CAKE BATTER

Ingredients:

1 cup butter (I used salted - and I noticed there was no other salt in the original recipe so no adjustment was needed...I always like a bit of salt in the sweet recipes)
1 cup granulated white sugar
1/2 cup turbinado sugar
3 large eggs (room temperature)
1 vanilla bean, split and scraped
2 1/2 cups white whole wheat flour (whole wheat pastry flour)
3/4 cup natural unflavored yogurt (room temperature)
1/4 cup milk (room temperature)

Method:

In the bowl of a stand mixer, beat both sugars and butter until light and fluffy.
Add eggs 1 at a time and mix until incorporated.
Add vanilla bean seeds and mix.
Mix one third of the flour into batter.
Whisk the milk and yogurt together and add half of it into the batter.
Mix the second third of the flour into the batter.
Mix the final half of the wet ingredients into the batter.
Add the final third of the flour into batter and mix to a smooth batter.

PREPARING THE CAKE

Preheat oven to 340 degrees Fahrenheit.
Prepare one 9" cake pan by spraying with vegetable spray and then inserting a circle of parchment paper, also sprayed with vegetable spray.  Arrange pecans in that pan and set aside. (this will be the one for the topping)
Prepare another 9" cake pan by spraying with vegetable spray and set aside.  (this will be the one for the filling layer)

From topping ingredients above, mix 1/8 cup granulated white sugar, 1 tablespoon turbinado sugar and 1 teaspoon ground cinnamon together and sprinkle in bottom of cake pan with pecans in it.   Make sure entire bottom of pan is covered with the sugar mixture.

Slice the topping apples thinly enough that they will, when placed, cover the entire bottom of the cake pan. Place them in an attractive design as this will become the top of the cake.
Sprinkle the apples with the remaining 1/8 cup granulated white sugar, mixed with 1 tablespoon turbinado sugar and 1 teaspoon ground cinnamon.

Spoon and smooth down one half of the cake batter over the apple slices.  Set pan aside.

Add cinnamon and nutmeg to cooled cooked apple mixture.  Spoon the cooked apple filling evenly over the bottom of the other cake pan.  Spoon and smooth down the final half of the cake batter over the filling.

Place cake pans on middle rack of oven and bake for 25 minutes. 
Reduce heat to 320 degrees and continue baking another 25-35 minutes.

Remove cakes from oven and place cake pans on rack to cool for 15 minutes.
Carefully run sharp knife around the outside edges to insure release.

You can see a little volcano eruption on the filling cake (left)
and some bubbling up the side on the topping cake (right)

Invert cake with "filling" onto serving plate.  Allow to cool for about 5 more minutes.
Invert the other cake (with topping) onto the filling layer.
Gently remove the parchment paper from the topping and allow cake to cool before slicing.
(I slid a knife along under the parchment because it was really sticky and I didn't want to lift the apples or pecans away with the parchment).
The filling layer on the left and the topping layer on the right.
I couldn't believe how much it caramelized.

This cake has no added leavening beyond the eggs (they aren't really a leavening agent, but they help facilitate the steam which comes from the liquid - mostly from the apples - thus causing what little rising that will occur - just to the edge of the cake pan).  It is very dense and delicious.  If I make it again, I don't know that I'll use all whole wheat flour...with no leavening and a heavy flour, it's really too dense for my taste.  A little baking powder wouldn't have gone awry I think.

Although this is a stand-alone cake, the original is shown with a sprinkling of powdered sugar - so I did that too...but you could serve it with vanilla ice cream, whipped sweet cream, a drizzle of caramel sauce or, like I did, with slightly warmed and drizzled Dulce de Leche for the "caramel apple" taste! (Admittedly, I had to have milk though - the Dulce de Leche kicked it up to a high level of richness that required milk or a good cup of coffee)


I hope you enjoy this wonderful rustic Autumnal cake.  It feels like we are getting ready for Fall despite it still being in the 90s down here in sweltering South Texas.  Sure am thankful for those glorious sea breezes and the little bit of rain we got overnight, which brought the morning temps down into the 70's...woo hoo!

Bon Appetit, Y'all!!!

SHARED WITH:


Creations by Kara


StumbleUpon

Friday, September 30, 2011

What's For Dinner?


After working all day, the dreaded question arrives...about the time you realize you have made no plans.  Too much homework to go out to eat...so the Mom stands in front of the open refrigerator, perusing the options.

Hmmm...a pound of ground pork - thawed yesterday - needs to be used.  1/4 pound of ground sirloin leftover from the previous night's dinner.  7 mushrooms that will begin shrinking within the next day or so...and a half of a white onion.  Oooookay.  What's in the cabinet?  Half a box of whole wheat pasta spirals and a jar of Bertolli pasta sauce.   Sounds like pasta and meatballs with a red sauce to me!

I got out a bowl, the aforementioned ingredients, tossed in the meats, chopped the onion, put half of the onion in with the meat, seasoned with some dried basil, salt, pepper, onion powder, and garlic powder...threw in an egg and about 1/2 cup seasoned bread crumbs.  Shaped some little meatballs and fried them off in olive oil.  Done.


Drained that pan and used a bit of the leftover oil to saute the sliced mushrooms and remaining onion - added the pasta sauce, brought to a gentle simmer.

Tossed the cooked pasta and the meatballs into the sauce mixture and  let it get snuggly for about 3 minutes.  Served topped with grated Parmesan.

We looked happily at our bowl of goodness...all ready in under 40 minutes.  Near disaster averted. (I almost ALWAYS have a menu planned in advance - this week has been crazy and I didn't get it done)  I am happy when an unplanned meal comes together!


Bon Appetit, Y'all!StumbleUpon

Wednesday, September 28, 2011

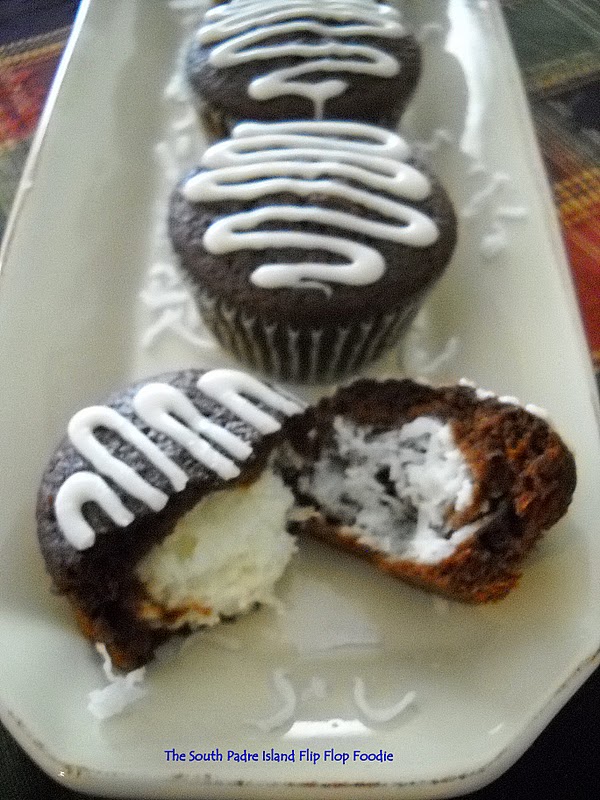
CHOCOLATE MACAROON CUPCAKES


I've been hankering for a chocolate cupcake or cake recipe with a coconut filling.  One that reminds me of the boxed cake my Mom used to make back in the 60's or 70's when Bundt pans sort of "came into fashion".  I read that a 2nd place winner in a 60's era Pillsbury Bake-off was a Bundt cake ...and thus the fashion began.  I remember my Mom making the chocolate one with a tunnel of coconut cake in the middle and a lovely vanilla glaze over the top.  I thought it was the height of "wowness" back in the day.  It tasted really wonderful!

I've browsed the online recipe catalogs without much success, and then when I was making the Marble Cheesecake a few weeks back, on the same page of "clipped recipes" from the Austin American-Statesman newspaper, I saw I had saved a recipe titled "Judith's Chocolate Macaroon Cupcakes".  I'd never made them but decided today would be the day.  I must have had this recipe since the 1980s or so...maybe even longer...although the newspaper wasn't quite as yellowed as the one from 1974 :-)

I just had the first "taster" cupcake, sans glaze...oh my goodness...that's a dang good cupcake!


I was worried because the recipe appears to be "low fat" - egg whites and applesauce - no butter - very little of the fat-laden yummies I usually include in my baked goods.  I did make two small changes...and they obviously turned out well.  I used whole eggs in the chocolate part of the cupcake and I used my own homemade Ricotta cheese...and it was not fat-free as called for in the recipe.  It was, however, made just with 2% milk instead of the usual cream and whole milk - so we'll call it low fat.

This does not taste like a cupcake where I skimped on the good stuff.  It is quite delicious.

Here's the way I did it:

CHOCOLATE MACAROON CUPCAKES

Filling:

1 cup low-fat ricotta cheese
1 egg white
1/4 cup granulated white sugar
1/3 cup sweetened shredded coconut (I wish I had chopped this a bit - I think it would have made the center a bit more cohesive)
1 teaspoon coconut extract

Cupcakes:

1 1/4 cups unbleached all-purpose flour
1 cup granulated white sugar
1/3 cup unsweetened cocoa powder (I used Hershey's)
1/2 teaspoon baking soda
3/4 cup low-fat buttermilk
1/2 cup applesauce (I used one of Mott's single serve 3.9 ounce containers)
2 large eggs
1 teaspoon pure vanilla extract

18 cupcake liners
Non-stick vegetable spray

Glaze:

1 cup sifted confectioner's sugar
1 teaspoon pure vanilla extract
2 tablespoons Half and Half (Just enough liquid to make a thick glaze)

Preliminaries:
Preheat oven to 350 degrees Fahrenheit.
Line muffin tins with 18 paper cupcake liners and lightly spray with non-stick vegetable spray.

Method:

Filling:  Combine ricotta cheese, egg white and sugar in a medium bowl.  Stir to combine.  Add coconut and coconut extract.  Stir to combine and set aside.


Cupcake Batter:  Combine flour, sugar, cocoa powder, and soda in the bowl of a stand mixer with paddle attachment.  On low, mix the dry goods gently.
In a small bowl or 2 cup mixing cup with spout (that's what I used), combine buttermilk, applesauce, 2 eggs, and vanilla extract.  Whisk to thoroughly combine.
Turn mixer on low and add wet goods in a thin stream into the flour mixture, beating on low until smooth.


Putting it Together:
Spoon batter into prepared liners - about 1/3 of the liner will be filled.  Top each with 1 tablespoon of filling.   Try not to touch the sides - keep the filling in the center of the cupcake batter.  I used a small cookie dough scoop that has a 1 tbsp volume. 

Spoon remaining batter mixture over filling. 

Bake for 25 to 30 minutes (25 was perfect for me) or until a wooden toothpick inserted in the center comes out clean.

Allow to cool in pan for 5-10 minutes and then remove to a rack for complete cooling.
Once cooled - mix the glaze and put in a pastry bag or a Ziploc bag, snipping the end, drizzle the cupcakes.

That part wasn't in her recipe.  I wanted the drizzle the way the memory was stored in my brain.

This is a great cupcake, even without the glaze, especially for those who don't want an overly sweet chocolate cake and enjoy a surprise inside.  With the glaze - it was almost exactly the way I remembered the Bundt cake!  YAY!

My next trial will be doubling this and making a Bundt cake ... I'll let you know how that works!  It's a really thin batter, so I'm thinking about maybe using another chocolate cake batter and using this filling.  It was just perfect for cupcakes though ...but, as I said above, I would have liked smaller pieces of coconut in the filling.  So, we'll see....

Bon Appetit, Y'all!!!


SHARED WITH:


Creations by Kara


StumbleUpon

Sunday, September 25, 2011

A Lovely Week-end

We made a heart together with our toes...isn't that sweet?

I know this will be shocking - but after Friday night's pizza, I didn't take a single photograph of food this week-end!  Oh, I cooked, but I have begun feeling the family irritation over delaying their meal while I take pictures...so I gave them a week-end off.  The Friday night pizza photos were snuck in while I was refilling plates :-)

We had gone over to the island Saturday afternoon and shopped a bit after Mr. Flip Flop got his hair cut.  Of all the stylists available to him in Austin, he has me get him an appointment with James whenever he is home and needs a trim.  James works at Virginia's across from the Light House in Port Isabel.  Both my man and my teen will only go to James!  So, after the shopping we were a bit tired (well, he was) so we stopped in at Pirate's Landing after crossing back to the mainland so he could get an espresso.  I had an excellent little Cappuccino also.  We then were tempted into adding cheesecake to the table - he had a caramel pecan fudgy thing and I had the Tuxedo cheesecake - a long time favorite.  We left sated and happy...I told him we needed to get back to the house because dinner was a 3 hour preparation!  Saturday night we had the teen-requested Braised Country Pork Ribs over Creamy Polenta made in a crockpot. (I wish I HAD taken photos - it was a much prettier presentation than my previous blog post for this recipe - as I've learned to tilt the pan so the fat drains down and I can get the reduced braised veggies spooned over the ribs and polenta without a pool of red grease...much prettier that way).  My husband had not been home the last couple of times I made it and he was very, very complimentary (thank you honey). Steamed broccoli on the side and some sliced toasted garlic bread I made with the leftover pizza dough from Friday night (I rolled it up and baked it off for a small French Loaf - dense, but very tasty).  We topped off dinner with slices of the still delicious Acorn Squash Streusel Cake.  I'd put it in the fridge several days ago to ensure it would keep until the hubs made it down to the coast - it keeps beautifully!  We waddled away from the table.  It's good that we skipped lunch (well, except for coffees and cheesecake) because dinner was very filling.

We caught up on all of the DVR'd season premiers and hit the hay later than normal...resulting in my sleeping until an almost-unheard-of 8:30 Sunday morning!  Daddy-o slept until 10:00 and the teen slept until 10:30!  Everyone was up sitting on the couch looking like zombies sipping our coffee when we all started laughing at each other.  That woke us up enough that I asked if they wanted "brunch" and they agreed they wanted omelets.  I fixed some really delicious veggie omelets with fresh mushrooms, beautifully ripe tomato, chopped green onion and a mix of sharp and mild cheddar cheeses.  An entire package of bacon got cooked (thinking I'd have leftovers for something else...but no), whole wheat toast with a 4-berry jam, and a big bowl of the most succulent sweet cantaloupe I bought a couple of days ago for a mere 78 cents.  We finished up around 12:15 and decided to leave the teen working on his homework and his laundry (yep, I'm the mean mom that makes the kid do his own laundry...he needs to know how!) and headed over to the island with cameras in hand.  We headed down to the North end of the island and parked at Access 4 to avoid the crowds...if you go down to 5 or 6 - lots of cars on the beach...South of Access 3 you start getting more week-end visitors...our selection was perfect for a nice long walk.  It was incredibly windy but the beach was mostly uninhabited, the water was gorgeous and blue (the Gulf usually looks kind of green or dark blue), and there were lots of little shells at the high tide line, as well as many birds.  Thanks to the Saturday beach-cleaning activity, it was quite clean and mainly free of trash (lots of horsey poop from a recent horseback ride on the beach - but we stepped carefully in that area!).  I admit I did not participate in the Saturday morning beach cleaning - I pick up trash every single time I visit the beach and I don't get to have my hubby home often...so I skipped out on the activity.  I appreciate the obvious work that was accomplished - the beaches looked great!

So, the hubby is headed back to work and I ate a bowl of Raisin Bran for dinner.  I'm tired (it was a really long walk) and need to sit down and read a good book.  Thank goodness the teen is self-sufficient in meal preparation, so long as the freezer and cabinets are full!!!

Here are a few of the photos I took today - no food photos - but it was some really nice scenery!

The waves at South Padre Island

Dunes with sea oats topping the crest

A bunch of little shells tossed together at the high tide line with the
tiniest edge of a wavelet trying to return them from whence they came!

My sister just arrived for some much-needed vacation time on the island...so I will be planning some treats to take over to her condo for her, and her guests...more to come on that over the next week or so!  Have a great upcoming week...and, as always...
Bon Appetit, Y'all!!!

StumbleUpon

Saturday, September 24, 2011

Friday Night Pizza - with WW and Flax Seed Crust


Friday night dinner in our house is pizza 95% of the time.  We are all trying to eat a bit healthier (not a lot - just paying a bit more attention to it) and I'm tweaking recipes where I can to get in more fiber and more natural and organic products.   This is a week-end where John is home so I decided to try to ramp up the pizza crust to something a bit more special than our regular offering.

I use the Martha Stewart Basic Pizza Dough recipe most of the time - sometimes I switch out AP flour for Whole Wheat.  This week, however, I purchased a package of Bob's Red Mill Ground Flax Seeds with the intention of adding a bit of fiber to a few recipes.  Our pizza turned out awesome!  I made a big batch of dough and then realized how visible the ground flax was, and I knew the teen would not eat it...so I made a quick recipe for him to use with just white whole wheat flour...and he never noticed the difference.

Here's how I tweaked the recipe...it was delicious! (BTW - you can half this easily)

WHOLE WHEAT WITH FLAX SEED PIZZA CRUST

Ingredients:

5 teaspoons Instant Yeast (that's two packets Active Dry Yeast if not using bulk instant)
1 1/2 cups hot tap water
2 teaspoons sugar
1/4 cup extra virgin olive oil (plus more to oil the rising bowl)
3 1/2 cups up to 3 3/4 cups white whole wheat flour (it is true whole wheat - look for the WHITE whole wheat - I use King Arthur brand - I like that they only use wheat grown in the U.S. - closest to home is best when possible)
1/2 cup Bob's Red Mill ground flax seed
Extra flour for kneading
Cornmeal for pizza pan

Method:

Instant Yeast doesn't need to be proved - but I do it out of habit - so that's how I started.  If you use any other type of yeast, you would need to do this step.  Instant can actually be mixed into the flour and go forth.

Pour hot tap water into bowl of stand mixer with dough hook attached.
Add yeast and sugar, turn on the mixer for about five seconds to get things mixed together.
Turn it off and leave it for about 5 minutes until foamy and active.
Add olive oil, 3 1/2 cups of flour, and the ground flax seed. Turn the mixer on low speed to allow the dough to come together.  Once you see you won't have fly-away flour, turn up to medium and allow to run until the dough has completely pulled away from the sides of the bowl - allow the mixer to knead the dough for about 5 minutes.  If it doesn't come together, or stays too sticky, sprinkle in more flour until it does.

Oil a large bowl.  With oiled fingers remove the dough from the dough hook and place into prepared bowl.  Cover with plastic wrap and set aside in a warm, draft-free place to rise (I heat my oven for just 10 seconds while the dough is kneading, then turn it off and leave the door closed...that is a perfect place in my kitchen for dough to rise because I have an a/c vent that really blows in the kitchen).  Allow to rise until at least double in size.  I let mine rise for one hour and it was about 2 1/2 times the original size.

Preheat oven to 450 degrees Fahrenheit with a rack placed in the middle position of the oven.  Do that now so when you are finished prepping your pizza the oven is nice and hot.

Using lightly floured hands, punch down and then divide the dough in half.  Turn half of the dough out onto a floured surface (re-covering the second half so a film doesn't form on the dough) and roll it out to the shape you desire.  We like a fairly thin crust so I rolled it the length of a cookie sheet.  I carefully rolled it onto the rolling pin, dusting with flour anyplace that looked potentially sticky (from where it sat on the counter) and carefully transferred it to the cornmeal dusted baking sheet.

I pinched up the edges of the dough, just slightly, to ensure no overflow of the sauce.  This time I used a store-brand of pizza sauce - and we really like it - it's a dollar cheaper than the name brand and we don't see the difference.  I spread about 1/3 of a jar of sauce all over the crust - you don't want too much or your crust will get soggy.  You want to be able to see the dough through the sauce for the most part.

I chose fresh mushrooms (cleaned and sliced) thinly sliced red onion, kalamata olive halves, pepperoni, and crumbled bacon for our toppings tonight.  I first laid down a layer of thinly sliced provolone all over the pizza sauce, then arranged the toppings evenly over the provolone.  Lastly I layered a good amount of grated mozzarella, asiago, and Parmesan to almost cover the toppings.  Four cheeses - yum!

Baked for 10-12 minutes, gently lifting the crust to ensure it was just lightly browned on the bottom.  Allowed to rest for a minute or two before slicing.

We had a salad while it baked and that was probably a good thing - we would have easily eaten the entire very large pizza by ourselves if we hadn't pre-filled our tummies with some nice romaine lettuce based salad!

This was really, really delicious.  You could see the flecks of flax seed and the crust was a nice brownish color - but it just tasted like a hearty pizza crust - I couldn't feel the flax seed at all.  I was so happy knowing it was a healthier version of our usual Friday night fare.  The teen made a calzone with his and we all settled in front of the television and watched the DVR'd double hitter of Big Bang Theory's season premier.  We laughed so hard we cried.  The teen was whooping and hollering over the sarcasm and innuendos (yay, he got them!).  I can't say how happy the evening made me.  The family together, good food, hilarious laughing together.  It was awesome!


Bon Appetit, Y'all

SHARED WITH:


StumbleUpon

Wednesday, September 21, 2011

OUTSIDE-IN BURGERS...on homemade buns!


Wednesday night's dinner plan was simply hamburgers because I'd been busy doing my "day job" most of the day.  Then I decided I'd make a batch of the homemade hamburger buns like I did last month (oh so freaking delicious and not too time consuming). 


THEN I decided to push the envelope a bit. (not a lot, we're not big envelope pushers around here)
The teen likes me to stuff his ground beef with chopped green onions before I make the burger patty and cook it... and while I was chopping the green onions and slicing some pickles I started thinking about stuffing the patties with some chopped up fried bacon and some cheese too. 

Sort of an outside-in or inside-out burger. 

Seasoned with some KC Masterpiece BBQ rub on one side and some season pepper on the other - yum, yum - easy to cook in a grill pan.

It turned out great!  (well, I did have cheese leakage from one patty...which burned on the bottom of the pan - but all-in-all really darn good)

Tonight was a casual dinner - burgers, deviled eggs, Fritos, and slices of apple...all made just a trifle more special with homemade yeasty burger buns and a different hamburger patty with goodies tucked inside.

Bon Appetit, Y'all!


SHARED WITH:

StumbleUpon