The South Padre Island Flip Flop Foodie Brownsville restaurants

Search The South Padre Island Flip Flop Foodie Blog!

Showing posts with label tutorial. Show all posts

Saturday, May 4, 2013

Dulce de Leche Banana Pie - Take Two!

A couple of summers ago I made a big recipe of Dulce de Leche Banana Cream Pie for a group of friends visiting the coast.  My husband was working out of town and could not join us and I just realized he had never had this pie.  As I searched my brain for a make-ahead dessert for our dinner, it popped into my mind because Cinco de Mayo (which is tomorrow) is always celebrated in our area.  This celebration of Mexican heritage always includes lots of yummy food so I was leaning towards finding something that might fit into such a celebration.  We live only 30 or so miles from the Mexico/Texas border...so we Caucasians are definitely in the minority here, but I try to embrace the culture of the area where I live because they have all embraced our family so very warmly.

I saw Marcela Valladolid make this on Food Network  back in 2011 and adjusted her recipe to suit our family.  This one is more like hers - the one I linked above was enlarged for a crowd!  I'll be serving it for dinner tonight after we get back from the beach - I have a roast in the slow cooker and this pie in the fridge... add some green beans, brown rice, and yeast rolls and our dinner will be a fast fix when we get back!

So, here's the smaller pie version of this delicious dish!


Dulce de Leche Banana Cream Pie Take Two
Adapted from Marcela Valladolid's recipe

Ingredients:

Crust:
Two 3.5 ounce packages of Maria crackers (I used a local store brand)
1 stick salted butter, melted (8 Tbsp)

Filling:
4 ounces cream cheese, room temperature
1/2 stick (4 Tbsp) butter, room temperature
2 Tbsp powdered sugar
2 tsp ground cinnamon
1 cup cold heavy whipping cream
One 13 ounce can Nestle La Lechera Dulce de Leche
3 medium bananas, sliced

Method:

First prepare the crust so it can chill.  Place the Maria crackers in the bowl of a food processor and process until well ground - I had to break a few cookies by hand to finish the process.  I tried to use the small bowl and blade of my KitchenAid food processor, but it wasn't a big enough blade to chop them all up... so I had to change bowls and blades (irritating).

Add the melted butter and pulse until well combined - scrape any butter that gets thrown on the side.  Pour the buttery crumb mixture into a glass pie dish, pressing the crust evenly across the bottom and up the sides with a flat bottomed metal measuring cup - it makes this a very easy process!  I held my fingers at the top of the pie dish so it didn't push up over the edge.  Be cautious not to over-pack the crust or it will be a challenge to cut through it when it is time to serve. 

Refrigerate for 20 minutes to solidify the butter.

Next prepare the cream filling.  I used my stand mixer.  Beat the cream cheese and butter until fluffy with minimal lumps.  Add the powdered sugar and cinnamon, whipping at low speed, until combined.  Scrape the bowl with a spatula and hand mix any lumps you still see.  Add the cream to the butter/cream cheese mixture and put on your whisk and whip to soft peaks.  It's a thick concoction so don't expect a texture of whipped cream.

Open your can of Dulce de Leche and get a small offset spatula ready then get your crust out of the fridge to assemble the pie.  Begin by spreading the dulce de leche on top of the chilled crust.  I worked straight from the can and was careful to not "lift" the crust - it works very well with a cold crust and an offset spatula.

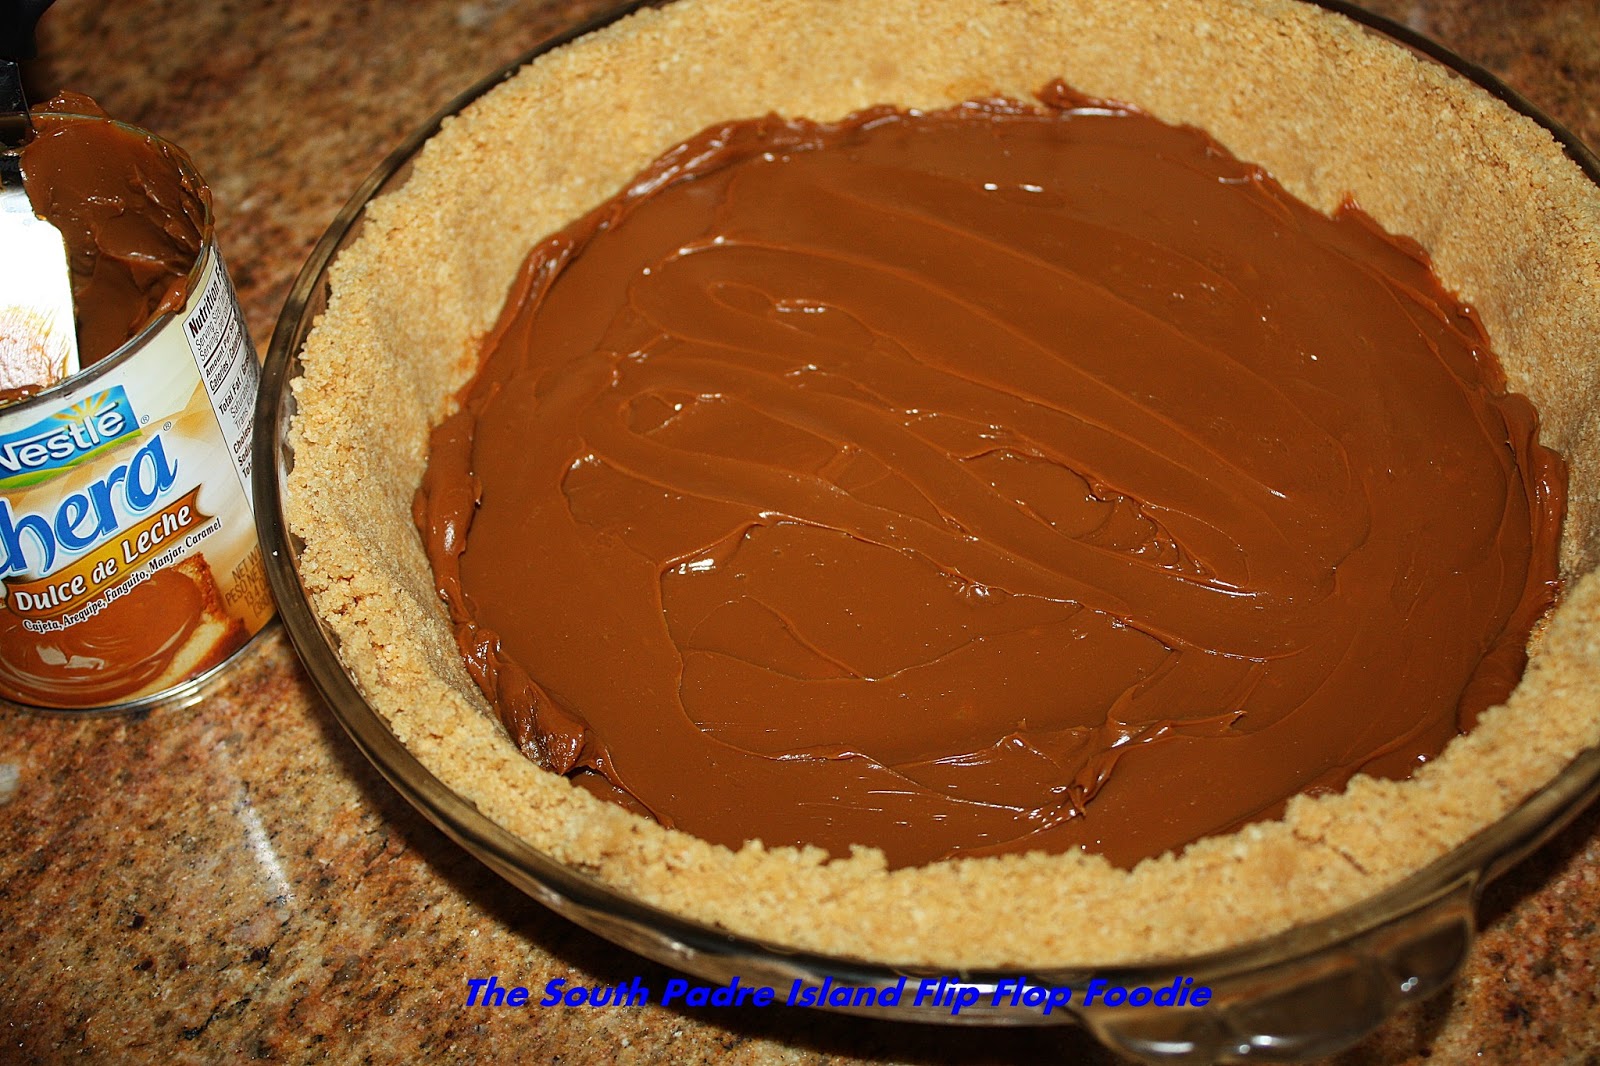
Once the dulce de leche is completely covering the bottom of your pie crust (and you have about 1/4 cup still left in the can for decorating the top), peel and slice your bananas, arranging them in an overlapping manner around the pie.  If you really love bananas, add a couple of more and make a double layer.  I kind of wish I had done another layer - I love the bananas in this pie.  

Next spread the whipped cream topping evenly over the banana layer being careful, again, not to pull the bananas up.  Another offset spatula, or even a rubber spatula, works perfectly for this.  

Place the remaining dulce de leche in a sandwich or piping bag and microwave it for just a few seconds until soft enough to squeeze.  Snip a bit off the sandwich bag and drizzle over the top of the pie.  If you don't think it is "drizzly" enough, you can warm the dulce de leche in a small pan on the stove top.  I was in a hurry and didn't get mine soft enough for the thin drizzle I desired.

Refrigerate and chill until set.  Remove from refrigerator 30-45 minutes before cutting - if the butter in the crust is slightly softened it will help the slices release from the pie plate.

This is a deliciously different banana cream pie - I hope you enjoy.  Thank you to Marcela Valladolid for such a wonderful recipe.  Her original version includes peanuts and you may find it on the Food Network website.

Bon Appetit, Y'all!!!

Shared With:
Our Delightful Home
StumbleUpon

Sunday, November 25, 2012

Pumpkin Pie with Leaf Crust

I am NOT a pie baker.  I make a good cake, really good cookies, and usually can follow a recipe with a positive result.  However, pies (especially the crust) are simply not my forte.  Imagine my dismay when my youngest son (aka The Teen) requests nothing more for Thanksgiving Dinner than... a pumpkin pie.

Now, I CAN make the inside ingredients work together...it's the crust that is the problem.  I just suck at rolled pie crust.  I think I overwork it.  I'm really pretty sure I overwork it.  I just avoid pie to avoid the problem.  If it doesn't have a graham cracker crust or something similar...it ain't happening in this house.

I begged to make a pumpkin cheesecake.  I made lovely sugar cookies filled with pumpkin pie spice.  I made chewy homemade chocolate chunk cookies.  No go.  He wanted a pie.

I admit to cheating.  I bought a Pillsbury refrigerated unroll-and-fill pie crust.  I used the Libby's canned pumpkin and followed their recipe exactly.  However, I did want to kick it up a bit to cover the fact that I cheated!  So, when in doubt - go to YouTube   I found a few videos that inspired me, so I made leaves from the second crust in the box.  About 26 leaves.

I cut them with a small leaf cutter and then used the back of a sharp knife to create "veins" in the leaves.  Placing them, overlapping, on the edge of the crust, gently pressing down to attach, they made a very attractive border.  Finished with a brushed on egg wash of beaten whole egg and water, which made for a nicely browned crust. (although they browned rapidly and I had to use a pie shield for the last half of baking).


I filled the crust and baked.

Half way through, I added a pumpkin cut-out somewhat unsuccessfully.  It would have been better to have baked it separately and then added it as final decoration.  It sank a bit and didn't brown up as well as the rest of the crust.

All in all, though, everyone said it was a good pie.  I feel a bit redeemed in the pie department.  Who knows what I will try next???  Hmmm, I'll probably go back to decorating cookies :-)

Bon Appetit, Y'all!StumbleUpon

Sunday, November 18, 2012

Turkey Cookies (a tutorial)

I have struggled with turkey cookies for years...just couldn't seem to "get it" because I'm not really an artist when it comes to drawing and painting on paper.  My drawings are rough and only used to guide me through the decorating process.  This year I must have looked at a hundred different examples from all over the Internet.  I even looked at photographs of real turkeys and turkey feathers (that just confused me even more).  I finally decided to "break it down".  First I did it on paper, using the cookie cutter for the outline...then I used a pencil (and used up an entire eraser) and I plotted the parts like I was doing plastic surgery!

Fortunately I only had 6 large turkey cookies baked...and nine minis.  I considered skipping the minis, but you can see from the photo above I pressed on.  Somehow this time it seems to have gelled for me.  If I'm unhappy with anything, it's that it seems like there should be a wing.  The core body looks bare.  Maybe next year I'll address that issue!

After preparing the royal icing (I'd prepped many colors because I had a total of 108 cookies to decorate).  For this particular project I used a lot of brown, small amounts of blue, orange, yellow, red, and white.  I primarily use squeeze bottles with a coupler that allow you to change decorating tips.  Sometimes I use piping bags too, especially with thick icing.  For this project, though, it was all bottle work.  All icing was roughly the same consistency.  Makes for an easier task!

I decided to start by drawing on my bare cookies.  Yes, draw.  I got out my little pack of Wilton Food Writer edible markers with fine tip...mostly just use them when I'm making turtle cookies.  I dot-outlined the areas I needed to pay attention to.  The body, the wattle, the beak, leaving room for the feet.  I wasn't really sure what those little feathery things to the left of the feet were (a photo showed them to be a series of white and gray feathers).  Maybe it was supposed to be the wing???


Then, I outlined and filled the body section on all of the large turkeys. I use a #2 tip for outline and filling - spreading out the fill with a toothpick until it touches the outline.  Then carefully hold the cookie with your fingers and give it a little shimmy shake to help everything even out.  I carefully placed, with craft tweezers, a black sugar ball in position for an eye while the first brown set was still very wet.  I pushed it in and it looked better than leaving it sitting on top of the icing.  It looked a little bug-eyed until I pushed down.


I set that rack over on the chair where I had a fan blowing.  This allowed that section to crust while I worked on other cookies.  You have to be careful - you can work on the next sections after crusting - but the icing is certainly not dry.  That takes many hours down here in humidity land.  Always at least over night.  Just let it get crusted.  You can "see" the difference - but don't touch it - you'll have an indentation - I promise (been there done that)!


Next I filled in the wattle on each turkey with red icing, taking care to leave room for the beak (as outlined in in the first step).  Using a #1.5 PME Supatube tip I completed all the wattles and then moved on to start on the tail and feathering.  Since you won't have fresh icing touching the red, you don't have to wait for it to crust...just be careful.  It was at this point I decided to leave the lower feathers unfilled.  You can see how I just outlined the tail section.  (Note - the brown icing ALWAYS darkens as it dries...this was the same bottle of icing!)


Since feathering is a wet-on-wet technique, you must move quickly before crusting begins on the tail section.  So, rapidly outline and flood brown on the tail, then pipe the 3 or 4 curved lines which will become your feathers, working on one bird at a time.


Taking a round toothpick, start at the top of the "tail" and drag the toothpick down through the wet icing.  Wipe the toothpick and move to the next feather, drag, wipe, repeat, circling around the tail...viola, you have tail feathers!  Set that tray of cookies aside and let the tail and wattle crust.


Next I decided to fill the lower feathers with brown and pipe three "sort of" horizontal white lines and, using the same feathering technique, pulled straight down to make the lower feathers.  Since the next section I worked wasn't touching anything that wasn't crusted,  I was able to go ahead and put a fine tip on my icing bottle (I used a #1 PME tip) and piped on some little feet and filled in the beak.


Ta da - that's all there was to it!  Just let them dry up overnight and they will be ready to package as a nice gift for your Thanksgiving guests to take home - or you could use some white icing to write names across the body and use them as placards for your Thanksgiving table...or, like my family is wont to do, grab them off the cookie plate...dig in and eat it!
Note how the browns all became the same color after the turkeys were dried!

The mini turkeys were much easier - I outlined and filled the entire body, leaving room for the wattle, beak, and feet.  I quickly feathered the tail and tweezed in a black sugar ball for the eye and set them aside to crust.  Next came the wattle...let it crust, then pipe in the feet and beak.  Easy peasy compared to the big birds!


These are fun and not too challenging once you break it down into "parts" and "steps".  I feel much better about my turkey-bility now that I've got this set under my belt!

Gobble, gobble!

Bon Appetit, Y'all!!!StumbleUpon

Tuesday, July 24, 2012

Scallop Sea Shell Cookies


Yesterday I showed how I completed the Conch Sea Shell cookies.  Info regarding the dough recipe and the royal icing recipe are included there. Today is a tutorial for the very simple Scallop Shells.  Even a novice decorator can do these.  They are very easy.  I used the same icing to pipe and flood.  I used a #2 tip to outline and a #4 to flood.  I used squeeze bottles for all of the various sea shell cookies.  Sometimes I use piping bags, but I was in the "keep it simple" mode for the past few days and bottles are an easy way to do this.  You can actually do all of these without the tips and just use squeeze bottles made by companies like Wilton.  I bought some bottles from Karen's Cookies that have a coupler which allows you to change tips.  They come in an 8 ounce size and a 2 ounce size.  They fit all standard decorating tips (Wilton, PME, etc.)  Karen is a wonderful resource for cookie decorating products and techniques...great tutorials!  You'll notice from previous blog posts that I love to feather wet on wet.  There's a reason for this.  I have trouble piping straight lines :-)  You can hide a plethora of boo boos with feathering.  See the next picture for an example (I reaaaaallllly can't pipe straight lines consistently).


Let's get to it!  You'll see how easy it is!!!


This is such an easy shape to do.  Outline the outside of the scallop but leave the bottom of the cookie un-iced for now.  Flood the center with white flood icing, pipe some alternating curved lines from the top of the cookie to the bottom.  Start the feathering, either up or down, in the center.  Use a toothpick and drag it from the bottom (or top - it doesn't matter which direction) and wipe the toothpick after completing the pass.  On either side of the center line, drag the toothpick the opposite direction of the line next to it.  Remember to wipe your toothpick (I use my alternate hand for wiping because it is quick) after each pass.


Here you can see the wet on wet stripes as they are turned into pretty feathering.  Next we fill the bottom portion - again, just outline and flood - with either of the two colors from the lines.  I then carefully place, using craft tweezers, five pink sugar pearls at the bottom of each scallop.  Do that while the icing is wet and they will stay put after drying.


Finish all the cookies and leave them to dry on a rack or tray.  Be very careful if moving.  That is one of the reasons I like to decorate on a rack in a baking sheet.  I just switch out racks and don't have to physically move the cookies.  I tend to run the a/c a little colder (it's humid here) when decorating as well as run a fan on the table with the cookies.  It helps my cookies not to pit and not to take days to dry to a point where they can be handled and packaged for "sharing".


I only made a dozen of these, and two got eaten, so I'm left with ten :-)  Easy and cute...you should try them!  I'm still deciding if I want to embarrass myself and write about the sand dollar cookies.  My piping sucked.  Some days it's good and some days...well, like I said, it's embarrassing!

I'll see how I feel about it tomorrow.  I've done scalloped cookies before...but never the conch or sand dollars.  I thought the sand dollars would be easy peasy.  Unfortunately, the devil is in the detail...and that is what tripped me up.  We'll see...we'll see!

Bon Appetit, Y'all!!!

SHARED WITH:


StumbleUpon

Monday, July 23, 2012

Sea Shell Cookies


This week-end I decided to pull the sugar cookie dough out of the freezer and bake some of the shapes from new cookie cutters... some of which I won in a "Giveaway" from Sweet Art Factory!  I elected to work with a conch shell cutter, a sand dollar cutter, as well as a scallop shell I already had on hand.

I used some of the vanilla and almond sugar cookie dough recipe I found on Lila Loa's blog and had stored for future use in the freezer.  I took out two slabs of pre-made, well-wrapped, and frozen dough and put it in the fridge.  Saturday evening I rolled and baked (after allowing them to sit out for 15 minutes before starting).  I have only used the World's Best Sugar Cookie Dough from the class I took at Central Market in Austin...so I was leery.  However, the chocolate recipe was so good, I went ahead and made the vanilla too.  So glad I did.  I really enjoyed how easy it was to roll and cut and it didn't seem to crack as much as my generally favored dough does. 

So, onward I went the next morning, prepping my royal icing... I kept it simple - lots of white, a little bottle of warm brown (was more like tan) and a little bottle of mauve (more like a light pink).  I used AmeriColor squeeze gel paste.

I started with the conch shells.


I am not much of an artist but it really helps me plan my icing and the project if I draw it out.  To do that, I just trace the cookie cutter and write out my idea.  I find I can make more consistent cookies if I do that.  Sometimes, like when I make Easter egg cookies, I don't want consistent cookies...they are all happily different.  No drawings required for those projects!


Step 1 - set up your decorating area.  I like to decorate on a rack over a baking sheet.
Step 2 - I outlined the parts that needed a white outline, with piping icing.
Step 3 - I filled the bottom portion of the shell with flood icing.
Step 4 - I gently nudged the icing to the edges and gave the cookie a shake.  Since I knew I was going to feather, I didn't worry overly about getting it perfectly flat or ridding myself of bubbles.

Step 5 - I piped horizontal lines of light brown icing while the white icing was still wet.  Feathering requires a "wet on wet" procedure.
Step 6 - Using a round toothpick (or you can use a boo boo stick from Karen's Cookies), draw the toothpick down through the line - I start slightly above the line, end before the beginning of the next line, raise the toothpick, wipe it on the palm of my left hand (OK - it's messy - but efficient) and move on down the line.  I keep a damp cloth handy as well as a bowl of water for wiping my hands and cleaning my fingertips.

Step 7:  Pipe the mauve that looks like pink icing on the inner lip of the shell.
Step 8:  Again, using wet on wet, pipe a stripe of the brown next to the white, but on top of the pink.
Step 9:  Using the toothpick again, drag the brown into the pink, and, as I was going for a shaded effect I didn't clean the toothpick between every swipe.  These were fast light pulls through the icing, all the way to the bottom of the brown line.  That method sort of shoved the pink icing higher on the edge, which gave it some dimension.
Step 10: Using some of the thicker piping icing, I filled the dome outlines which gave them a puffy effect.  Use a clean toothpick to drag it to the edge if it doesn't get there by itself.  Take care not to go over the "dam" you created or you will lose the puffy effect.
Step 11:  After the pink and brown edge has dried for about 5-10 minutes or so, lightly sprinkle with some pink disco dust (also available at Karen's Cookies) just on the pink portion.  My original intention was to let it dry completely and then paint on some wet pink lustre dust (mixed with clear extract or alcohol).  I decided I didn't want to wait :-)

Always challenging to see the sparkly disco dust in a photo
and I don't have a light box so I got reflection on the white.
Oh well - I'll try to do better.


I worked on the other cookies as well...but will write a post on those tomorrow.  I've got to get up and get going on something other than decorating cookies today!!!  Here's what will be coming tomorrow. (And, yes, I know...my sand dollars are not all that great.  I piped the centers today before coffee...major mistake.  AND, my holes didn't stay open correctly.) (BIG SIGH)


Bon Appetit, Y'all!!!

Shared With:

 
Chef In Training


Creations by Kara


Our Delightful Home
StumbleUpon