The South Padre Island Flip Flop Foodie Brownsville restaurants

Search The South Padre Island Flip Flop Foodie Blog!

Showing posts with label cake mix. Show all posts

Saturday, December 10, 2011

Berries and Almonds Cake Mix Muffins

It is a rainy Saturday morning here on the Texas Gulf Coast.  A light chop on the bay, the palm trees slightly agitated...ahhh, a day to stay inside all cozy and warm (well, it's not really cold outside, but still not a beach day!)

I've been up since 6:30...I accidentally out of ingrained habit, turned on my alarm clock as I slid into bed last night.  What a dummy!  It went off at 6:10 and try as I might, sweet dreams could not lure my brain back.  I was wide awake and gave in after 20 minutes of flopping around (and I could tell from the interrupted soft snores that I was disturbing my husband).  So, I hopped up and slid through my first cup of coffee with ease, caught up on some blog reading, watched a couple of DVR'd shows I know my husband despises and thought, around 9:30, that I heard activity in the back two rooms.  I must have been hallucinating because it is now 10:00 and not a creature is stirring...except me!

I decided I would bake some muffins for breakfast to go with some of our favorite Applewood Smoked bacon we'd picked up at Sam's Club before Thanksgiving.  It was a lot of bacon so it's been parked in the freezer...and I took it down this week, knowing Mr. Flip Flop would enjoy some this week-end.

I often have muffin mixes and I can sure make them from scratch, but I wondered if I could use one of my almost expired cake mixes to make muffins?  (the more I bake the less mixes I use, but I keep them on hand "in case")  A short Google away, I was fixed up with some really basic directions from eHow.com and thought about what I had in the cupboards and freezer to kick it up a notch or 3.

The teen has been learning to shop and keep a food budget for the past year or so (he's doing great) and he'd bought some blueberries for pancakes a couple of weeks ago.  He made them and still had half of the berries leftover.  I showed him how to spread them on a baking sheet, freeze them, and store them in a small Ziploc for future use.  These little tricks are things I hope he takes with him and will help him stretch his food dollars as he moves into adulthood.  So, when I was perusing the freezer, I thought I'd grab those out and make some blueberry muffins.

I only ended up with 3/4+ cup of berries so I decided to make half plain blueberry muffins - for the teen - and add some sliced almonds and dried cranberries to the other half of the mixture for me and the Dad.  Here's the recipe.

BERRIES AND ALMONDS CAKE MIX MUFFINS
Adapted from eHow.com

Ingredients:

1 2-layer boxed cake mix (I used a Betty Crocker Super Moist Golden Vanilla mix)
1/3 cup vegetable oil
1 Tablespoon water
3 eggs
1 teaspoon ground cinnamon
3/4 cup frozen blueberries

Additional ingredients for 6 of the muffins:
1/4 cup dried cranberries
1/4 cup sliced natural raw almonds

Method:

Pre-heat oven to 350 degrees Fahrenheit.  Makes 12 regular size muffins.  Either lightly grease and flour your pan, spray with Baker's Joy or similar product, or line with paper muffin cups.

In bowl of a stand mixer, with paddle attachment, mix the cake mix, oil, water, eggs, and cinnamon.

Batter will be thick - like peanut butter.  Scrape bowl well.


Gently stir in blueberries.

I had prepared a muffin pan with 6 liners of one color and 6 liners of another color so there would be no question of which ones did not have nuts ('cause the teen would have not been happy to bite into one of our muffins!)

Using a large cookie scoop, place one scoop of batter into each of the 6 muffin cups.

Add the cranberries and almonds to the rest of the batter and stir gently to incorporate.  Work quickly, if the blueberries thaw, they start to break up (I realized that when I squished one).

Using a large cookie scoop, place a generous scoop of batter into the remaining 6 muffin cups.

Bake 30-32 minutes in middle rack position of your oven.  Remove from oven and place on rack to cool until you can handle them. 

Serve with butter or just by themselves!

They were sweetly delicious - the nuts and berries a perfect complement to the mild cinnamon and vanilla flavors.  YUM...I will definitely make these again.  What a great way to use up some of my mixes that approach their maturity!

OVEN COOKED BACON

Line your baking sheet (must use the kind with edges) with foil for easier clean up.
Place your bacon on the baking sheet.
Place baking sheet in a cold oven, close door, turn oven on to 400 degrees Fahrenheit.
Leave it alone.  Check on it at 15 minutes - may take up to 20 minutes or longer to cook it to your preferred level of crispiness - depends on the thickness of your bacon as well!  My bacon was really thick.  I flipped it at the 20 minute mark and baked it 10 more minutes total... 30 minutes of cooking required for the thick sliced bacon.  My family likes it not crispy.  I like it very crispy.  So, I took theirs out a little sooner than mine.  We do what we must.

When done, remove from oven and transfer bacon to another baking sheet lined with paper toweling.

Allow the greasy bacon pan to sit until bacon grease starts solidifying and then you can just roll it up and throw it away.  Easiest bacon clean up ever.


Hope you are having a great week-end wherever you are.  I sure hope those dudes get up soon.  I may have to eat without them!  It's 10 freaking 30 guys.  Roll yourselves out.  Maybe I'll open the bedroom doors so the aroma of bacon and muffins can waft their way.
 Nyah-Nyah

 BON APPETIT, Y'ALL!!!

SHARED WITH:

My Thirty Spot


StumbleUpon

Wednesday, February 9, 2011

PINA COLADA CAKE

I have another day from hell  extremely busy day today.  Don't see much baking on my agenda.  Guess I'll be doing the work that brings in a paycheck instead of the work that brings me happiness.  Me and millions of others not born independently wealthy. :-)  Oh well, I always remember, at least I have a paycheck!  I am blessed!

I decided to share a previously tested cake that is delicious...and easy...hard to mess up.  If you need an easy-to-prepare, make-ahead, but outstanding dessert - this might be for you!  If you like a tres leches cake - you will very likely like this cake too! (this is not a tres leches cake because it is not a sponge cake...but is very similar at the end of the process)

PINA COLADA CAKE

Ingredients:

  • 1 package white cake mix (a moist one with pudding on the label - I've used Betty Crocker Super Moist French Vanilla - it's delicious)
  • 1 1/4 cups water
  • 1/2 cup vegetable oil
  • 3 large eggs
(If you use a different brand, the above ingredients may be different - use their instructions for baking the cake)
  • 1 can sweetened condensed milk
  • 1 cup  Coco Lopez Cream of Coconut (found in the wine/mixed drinks section of the grocery store - stir really well before measuring out this ingredient - refrigerate leftovers from the can)
  • 8 ounce container Cool Whip - thawed in refrigerator overnight (or may use 1 1/2 cups heavy cream, with 1/4 cup sifted powdered sugar, and 1 tsp. vanilla, whipped to peaks - but don't go to butter!!!)
  • Pineapple chunks, drained, for garnish (optional) - or, I have used crushed pineapple and spread a spoonful around the individual serving plate - OR mix some crushed pineapple in some whip cream and dollop it on top of the individual serving. These things are for garnish.  I've never put them in the whipped cream on top of the cake. 
Method:

Preheat oven to 350 degrees.
Grease bottom of 9x13x2 pan.
Beat cake mix, water, oil, and eggs in stand mixer, or in large bowl with hand mixer, on low speed for 30 seconds, then on medium speed 2 minutes.  Scrape bowl occasionally.
Bake for 30-35 minutes until golden brown and toothpick inserted in center comes out clean.
Do not remove cake from pan.
Mix the sweetened condensed milk and cream of coconut.
While cake is still hot, poke holes in the cake with a fork or with a skewer...lots of holes.
Pour the milk/coconut mixture all over the cake.
Let cool, cover, and refrigerate overnight.
When ready to serve, spread Cool Whip (or your homemade whipped cream) on top and garnish with drained pineapple chunks, if desired.... or either of the garnishes suggested above when serving,

If you like Pina Coladas...you'll like this cake.  No getting caught in the rain required :-)

Bon Appetit, Y'all!StumbleUpon

Thursday, November 11, 2010

Chocolate Cures Depression!


I've been slumping around the house today, with a headache, dealing with insurance companies and doctor's offices (hence the headache) and I just felt BLAHHH. 

I wanted something sweet to eat and nothing in sight was doing it for me.  I kept coming back to the computer but I had finished all of my "work" for the morning...so started mentally considering Thanksgiving goodies and what I'd be taking to my son's for our big meal in just TWO WEEKS!  That started to perk me up.  Really?  Just two weeks?  I love Thanksgiving!  I wanted to find a recipe I'd seen before for some Amaretti cookies so I scanned through the search results on Martha Stewart.com, JoyofBaking.com, and FoodNetwork.com.  All my favorite "jumping off" points for cooking and baking.  I didn't find the one I was looking for (I'll keep searching) but I ran across a recipe from Paula Deen for her Chocolate Gooey Butter Cookies....and that sounded real good!  <imagine me saying it with a drawling Paula Deen accent>

Now, I've been a fan of this particular concoction since the late 70's, long before anyone ever heard of Paula Deen or Food TV (as it was called in the beginning).  A co-worker of mine entered a recipe into a cookie contest at my old place of employment, Shoal Creek Hospital in Austin, and I have made it for nearly every holiday since then.  It's a bar cookie and it is basically the Ooey Gooey recipe Paula made so famous! (not this cookie recipe - but the actual cake)  Now, my friend's recipe is made in a pan and cut into bars - and uses a yellow cake mix.  She called them Chess Squares.  Paula's cookie recipe had the magical word "chocolate" in it...which I was in dire need of today.  I decided to give it a whirl.

So, I sat the butter and cream cheese out to soften and looked in my "baking" cabinet and found that I had a German Chocolate "moist" cake mix - so thought that would surely do.  I have the batter chilling in the fridge right now.  I think it's about right for rolling!  (hmmm...guess I'll eat that sample piece of dough) <hee hee hee> It tastes delicious.  So, I'll get to baking!


the prepared dough
the rolled dough
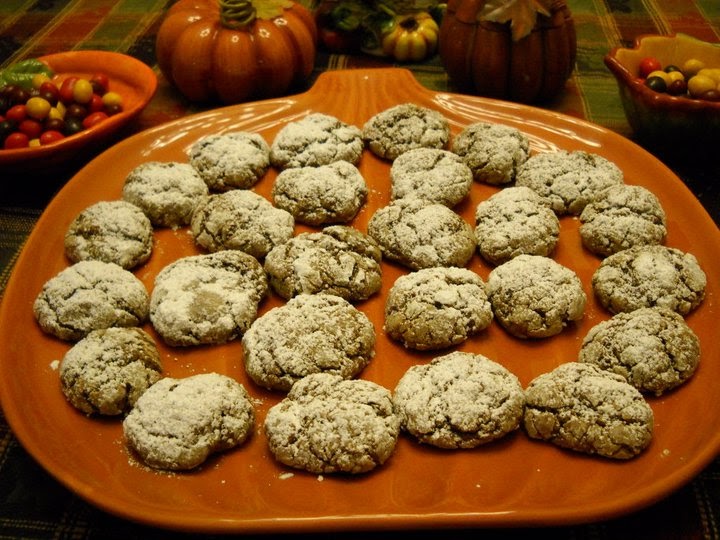
the cookies right out of the oven
Here's the recipe - it is oh-so-simple...and these are a yummy cookie. 

Chocolate Gooey Butter Cookies
Recipe from FoodNetwork.com courtesy of Paula Deen

Ingredients:
1 8-ounce brick cream cheese, room temperature
1 stick butter, at room temperature
1 egg
1 teaspoon vanilla extract
1 18-ounce box moist chocolate cake mix
Confectioners' sugar, for rolling and dusting

Directions:
In a large bowl with an electric mixer, cream the cream cheese and butter until smooth.  Beat in the egg.  Then beat in the vanilla extract.  Beat in the cake mix (I needed to scrape the bowl and beater a couple of times).  Cover and refrigerate for 2 hours to firm up so that you can roll the batter into balls.
Preheat oven to 350 degrees F.  Roll the chilled batter into tablespoon sized balls and then roll them in confectioner's sugar.  Place on an ungreased cookie sheet 2 inches apart (I used a baking mat).  Bake 12 minutes.  The cookies will remain soft and "gooey".  Cool completely and sprinkle with more confectioners' sugar if desired.

Now - here's what I found... the original recipe says to roll into tablespoon sized balls - and I did, using my 1Tbsp scoop.  My cookies look smaller than the picture on FoodNetwork.com.  The recipe also said it made 24 cookies.  Well, I rolled up and baked 24 cookies and I had about half the dough left...so I'm GUESSIN' they are more like 2 tablespoon cookies as shown in the online photo.  Since I like the smaller size, though, I'm sticking with the designated measurement and just counting it a bonus that there are more cookies than I expected!  When all was said and done - I had 3 and 1/2 dozen cookies.  Yay!

Guess what - these cookies are so good and chocolatey...I'm no longer down in the dumps and I no longer have a headache!  It's a miracle medicinal cookie :-)  You should try it!

Bon Appetit Y'all!!!StumbleUpon