The South Padre Island Flip Flop Foodie Brownsville restaurants

Search The South Padre Island Flip Flop Foodie Blog!

Showing posts with label cake. Show all posts

Sunday, August 5, 2012

Whole Wheat Spice Bundt Cake

The teen requested a spice cake for his birthday cake (which is almost the default cake for him - but sometimes he surprises me).  His birthday was earlier this week but since his Dad wasn't home, we opted to wait for him so we could celebrate together.  We went to a movie and shopped on his birthday and he said he had a good day...but it was a bit strange not to have a cake or presents that day.  He's 19 now, so I guess it was more my issue than his.  He wanted to wait.

The expected return for Mr. Flip Flop was the 10th...on Friday I got a text saying "Lucy, I'm Home!" and I threw on my flip flops and flew down the stairs nearly barreling us both down a flight of stairs when I pounced on him!  I'd talked to him earlier that day and he let me believe he was on his way to work when, in actuality, he was on the 350 mile drive home.  He doesn't manage to surprise me often, but when he does, it's a biggie!  Ian was so happy he gave him a big hug and smile (which is not the norm for him either)!  All-in-all, an excellent turn of events.  EXCEPT, I hadn't planned a cake, wrapped the gifts, nor spiffed up the house as I am wont to do when Papi comes home.  I always like things to look "nice".  I doubt he even notices.  So, since I could do nothing about the cleaning portion of the deficit, I focused on birthday preparations this morning when I got up.  We were going out to dinner, on the island I imagined, and we'd have cake and gifts when we get back.

I decided to go with a recipe that I've made before as mini bundts, but in a full-size bundt pan.  I made one boo boo and used baking powder instead of baking soda, so it was even more dense than expected.  I was freaking out a bit because it wasn't rising as much as I anticipated, but it all came out okay in the end.  This is a very dense cake anyway... it uses 100% whole wheat flour...but the white whole wheat, which is slightly lighter.  I also didn't have regular yogurt, so I used 1/2 fat free yogurt and 1/2 ricotta cheese.  I hate being risky when baking a birthday cake...but I knew if it just absolutely flopped, I had a chance to go to the store and start over.

So, here's the recipe... my husband loved it - ate several pieces.  Ian and I both would have preferred a less dense cake.  The flavor was excellent though!  I particularly liked adding some cinnamon to the vanilla bean glaze I used - perfect for the cake.  If you like a super dense cake - this is a good one.  I would, however, likely use baking soda next time, and not a fat-free yogurt!

WW SPICE BUNDT CAKE

Ingredients:

1 cup granulated vanilla sugar
1 cup turbinado sugar
1 cup room temperature butter
1/2 cup fat free vanilla yogurt (I used Dannon) - room temp
1/2 cup Ricotta Cheese - room temperature
3 large eggs - room temperature
1/2 Tablespoon Vanilla Bean Paste
2 1/2 cups White Whole Wheat Flour (I use King Arthur)
1 teaspoon ground cinnamon
1 teaspoon ground allspice
1/4 teaspoon freshly grated nutmeg
1/8 teaspoon ground cloves
1/2 teaspoon fine sea salt
1/2 teaspoon baking soda (not powder like I used)

Method:

Prepare a bundt pan with Baker's Joy or grease/flour preparation.  Make sure to get all the crevices and go all the way to the edge of the pan and the cone in the middle.  Preheat oven to 350 degrees.

In bowl of a stand mixer, cream both sugars and the butter until fluffy (I let it go about 3 minutes).

Add eggs one at a time, beating after each addition.  Add the vanilla bean paste and beat until incorporated.

In a bowl or large mixing cup, whisk together the dry ingredients.

In a small bowl, whisk together the yogurt and ricotta cheese until smooth.

Add 1/3 of the dry ingredients to the mixer bowl with the mixer running on low.
Add 1/2 of the yogurt/ricotta mixture
Add 2nd 3rd of the dry ingredients followed by the remaining yogurt/ricotta mixture.
Add the final 3rd of the dry ingredients.

Scrape the bowl and beat on medium high for 60-90 seconds until smooth and fluffy batter.

Use a large spoon to place the batter evenly around the bundt pan.  Smooth it with the back of the spoon.

Bake on the middle rack of the oven for 50-60 minutes.  Use a cake tester for doneness.  The cake was not ready at 50 minutes but 5 minutes later it had cracked (which was fine - it's the bottom) and became perfectly done with a cake tester.

Remove from oven to a cooling rack for about 15 minutes.  Turn onto a cake plate and allow to cool completely before frosting or glazing.

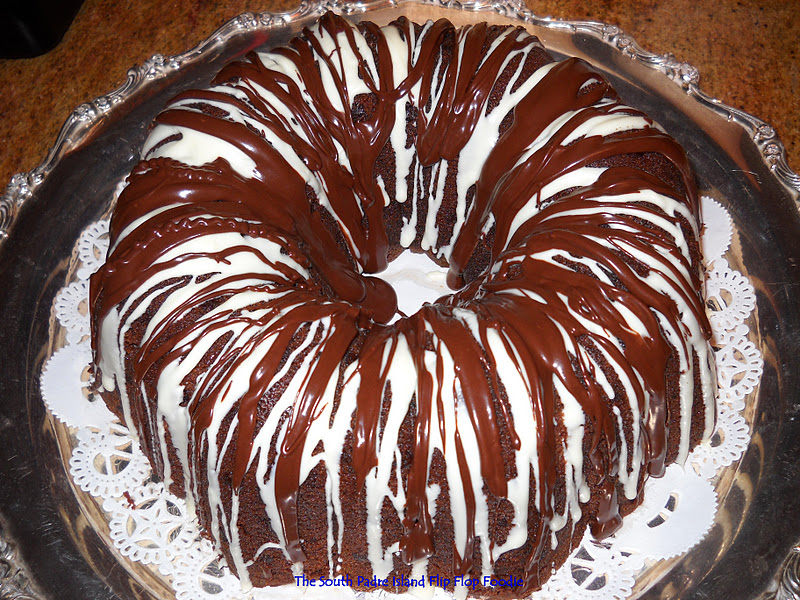
Ian elected a glaze since it was a bundt cake.

I made a Vanilla Bean and Cinnamon Glaze... very tasty with this cake!

VANILLA BEAN CINNAMON GLAZE

Ingredients:

1 cup sifted confectioner's sugar
1 tablespoon melted butter
2 teaspoons vanilla bean paste
1/2 teaspoon ground cinnamon
2 to 4 tablespoons of heavy whipping cream

Method:

In the small bowl of a food processor, with the small blade, pulse the sugar, butter, vanilla bean paste and cinnamon to mix.  Begin by adding 2 tablespoon of heavy cream to the mixture and pulse.  Carefully scrape the bowl, avoiding cutting your spatula on the blade, to ensure all of the sugar is off the sides and bottom.  Pulse again and add more cream to get it to the proper consistence you desire.  I wanted a thick enough glaze that it would drip down the side but not so loose that it would pool under the cake.  I wanted it on top of the cake!
The thickish glaze worked beautifully!
Admittedly, not my favorite cake - but it is definitely something I'd make again with a few tweaks (which actually go back to my original recipe!)

Bon Appetit, Y'all!StumbleUpon

Tuesday, February 14, 2012

Valentine Brownie Cake

This is not really a cake...yet, it is more than just a brownie.  It is so decadently sweet it just screams Valentine's Day.  I served it Sunday evening after a very filling meal...and it was almost a struggle for each piece to be totally consumed.  We needed a cup of coffee or a glass of milk.  It was rich!

I did use a boxed brownie mix - I really only planned to make some brownies for the week-end, then I got this idea to make it in a  round glazed pottery dish my Mom had given me for Christmas...and then, I got the idea to bring cream cheese frosting into play...and then I got the bright idea to cut the brownie to make it two layers (that was not the best decision I will say - it was hard to accomplish).

All-in-all, it is a holiday-worthy dessert.  I am no cake decorator that is for sure, but a very large star tip made everything either very easy or challenging, depending on which part I was working on.  The family thought it looked good and tasted good.  The teen forwent second servings of dinner to make sure he had room for dessert.  It was a satisfying result but quite the challenging endeavor.

Here's how I did it.

I prepared a box of Betty Crocker Fudge Brownie 13x9 Family Size, per package directions.  I wish I'd used 3 eggs instead of 2 to make it more cake-like.  I used a 10 inch round pan and I sprayed the bottom of that pan with vegetable oil spray, laid a round of parchment paper in the bottom, and then sprayed it too.  In went the batter and it baked for 36-37 minutes.

I allowed the brownie to cool overnight, on a rack, loosely covered with plastic wrap after it was cool to the touch...you don't want condensation under the plastic wrap.  The next morning I used a sharp knife to run around the edges to loosen the brownie from the pan.  I flipped it onto a "cake turner".

I then had to decide how best to cut the brownie into two layers.  My Wilton cake leveler was too tall and not sharp enough anyway.  I ended up with the cake on the cake stand on top of a cake decorating lazy susan.  I realized a serrated knife was going to be my best bet...even then, I had a slightly fudgy center which caused all sorts of problems.  I was able to cut it, then take the same cake lifter and lay it on top of the cake and lifted the cake plate and began a slow tilting motion.  I realized what I hoped for was indeed happening!  The bottom of the brownie was sticky enough to stay on the cake plate allowing the top layer to plop onto the cake lifter upside down.  Whew.

I had prepared some light pink Vanilla Bean Cream Cheese Frosting (recipe below) and placed it in a 16 inch piping bag with a large coupler.  I piped a filling of frosting on the bottom layer using a Wilton 1M Star Tip, leaving a border so the filling doesn't squish out. 

Next, I flipped the top of the brownie back onto the filled bottom.  A minor amount of cracking occurred but I was able to sort of squeeze it back into position since the brownie was really closer to fudgy than cakey.  I did have one spot where the filling seeped out to the edge.  I covered that with some piping on the sides. 

I did a few stars and swirls on top (again, I am not good with cake decorating so don't judge my inconsistent piping :-) and finally piped a heart in the middle. Standing back, it wasn't too bad. I could see all the booboos...but I knew the family probably wouldn't!


It was outstanding - but the slices should have been half the size I cut.  We will enjoy nibbling on it a bit more...and I'll need to share a slice or two with a neighbor to get it out of the house.  Eating it all would be a bad, bad thing!


Vanilla Bean Cream Cheese Frosting

Ingredients:

1/2 cup butter softened to room temperature (1 stick)
8 ounces cream cheese softened to room temperature
1 teaspoon pure vanilla bean paste
1 pound sifted powdered sugar (confectioners sugar)
1 teaspoon heavy cream - more if needed to get to spreading consistency
4 drops liquid red food coloring

Method:

Beat butter and cream cheese until light and fluffy.  Add vanilla bean paste until incorporated.
Add powdered sugar, beat on low until powder no longer flies, then increase beating speed and add cream and red food coloring to desired color and consistency.


Happy Valentine's Day to everyone.

Bon Appetit, Y'all!!!StumbleUpon

Friday, December 23, 2011

Christmas Cakelets - Marbled Red Velvet Pound Cake

I've been buying, or receiving as gifts, the annual Christmas with Southern Living editions for more years than I care to count.  When we moved from large house in Austin to tiny condo at the coast I had to stop - and I gave away all that I had. Storage is a problem so you do what you gotta do.  Still, it was a sad day! 

I follow a blogger, Sabrina, who writes LouLou Sucre, Inspirations for House and Home and I was so happy to see that she had made a beautiful cake from the 2009 edition.  I pinned it to my Pinterest recipe board with thoughts of incorporating the cake into my holiday baking.  The list had gotten long and somewhat overwhelming...but I kept the cake on, even when I started whacking some of the items that I didn't think I could manage in the short time left.

Wednesday night I decided it was close enough to bake cake, considering it was a moist pound cake and they can handle a couple of days pre-prep.  I decided, of the three choices I had listed, I was going with the Red Velvet Pound Cake I'd seen on Sabrina's blog.  I knew I wanted to miniaturize everything...using my Christmas shaped mini-pans, my small bundts, my mini bundts, and my tea cake pan.  I generally use these to bake Amish Friendship Bread...but I wanted something different, something moist, something pretty, and this ticked all the boxes.  I didn't want a frosting - it would hide the details of the pretty pans (assuming everything came out okay) but I decided a vanilla bean glaze would probably work quite nicely over this cake.  So, I proceeded.

I'm going to ask that you link back to Sabrina's blog for the recipe.  It wasn't changed at all (other than the frosting substitution) and it's the courteous thing to do. (As blogging of recipes evolves, we are all learning some basic courtesies for using other folks recipes and inspirations...things like give it a week or more before you copy something, link back to their blog if you are inspired by someone...common courtesies of blogging life.

This batter is so incredibly decadent, I could have dipped a spoon in and eaten it...it fairly glistened it was so lovely. 

I liked that the red velvet component was minimized for this recipe (it's a pretty cake in general, but it's not usually the best chocolate cake in the world, in my opinion) and that it used melted milk chocolate instead of cocoa powder.  Lots of red food coloring - as usual.  It's dramatic, I'll give you that!


The problem arose when I needed to swirl the red velvet batter into the vanilla/almond batter...in a tiny tea cake mold or a mini bundt pan.  It really just didn't work very well.  Nonetheless, it tastes FABULOUS as one would expect any Southern Living cake to be!  I expected it to be more dense in the tea cake molds...I struggle every year to find something that will display the crisp lines of the little molds.  This year was no more successful than past years.  I read somewhere that you needed to use a dense gingerbread or brownie or banana bread type of dough to get crisp lines...cake batters don't do the trick.  I'll try that next...month, or year!  For now though, I know from previous attempts, that the lines would be more visible if I put a little color in my glaze and kept it thin enough to coat but not cover up. 

I also followed the Nordic Ware instructions to fill 3/4 of each little opening...but, again, they rose over the edge leaving an ugly rim around the cakelets.  The same thing happened with my Christmas molds.  I let them cool and removed them from the pans...and then I stood there and carefully ran a paring knife around each and every cakelet.  I did this between 11:00 and midnight...boy howdy was I tired! 


After that I covered everything and glazed them Thursday morning...they took four batches of vanilla bean paste glaze to get everything covered (except the bottoms).  Lots of work, but oh so worth it after I sampled the snowman whose head fell off...poor Frosty's loss was my gain :-)

Here's the ratios I used for each batch of glaze:

Colored Vanilla Bean Glaze

3/4 cup (150g) powdered sugar - sifted
1 teaspoon vanilla bean paste
3  tablespoons water
3-4 drops of liquid food coloring (I used red)

Whisk together above ingredients until smooth.  Drizzle on with spoon or dip small tea cakes in to cover.  Allow to drip on a cooling rack into a baking sheet.


I can't wait to make this cake again, full size, with the cream cheese frosting.  Sometimes it's best not to mess with a good thing.  Mine turned out quite tasty, but at the expense of presentation!  A little lightly colored glaze and some edible glitter and disco dust seemed to pep things up though.  I'm sure no one but me...and you...will know what a trial it was to get to this point!

Here are the rest of the photos of the endeavor!

The small bundts (not mini) came out the best - cleanest and well marbled

The sole unglazed mini bundt in the left corner shows the difference
the glaze and sparklies make


A sprinkling of disco dust gives them
a little glimmer of Christmassy cheer

Viola, the finished products below...I can guarantee they taste incredibly moist and richly flavored with vanilla bean and a subtle background of almond.  I will be pleased to serve these at Christmas.  Thanks to Sabrina for bringing forth this wonderful inspiration recipe for my Christmas Cakelets!


BON APPETIT, Y'ALL...and Merry Christmas!


SHARED WITH:

PhotobucketStumbleUpon

Wednesday, November 23, 2011

DECADENT FUDGE CAKE

I've had this recipe in my binder for over 20 years...and I've never made it.  I saved it because the photograph of the presentation was so beautiful.  I never felt I was a good enough baker to make the cake successfully...and it had a lot of expensive chocolate in the listing...I never wanted to "take the risk".  This year is different.  My skills have improved.  I feel competent.  I called my sister and told her to bring me a silver platter...I was going to make a cake worthy of a silver platter.  She did...and here it is the Tuesday before Thanksgiving and I have done the deed.  If it makes the trip without crisis, we will see if the recipe lives up to its name and we'll see if I lived up to my belief in myself.

The recipe came from a Southern Living book and is dated 1990.  I only made one tiny adjustment.  I decided to go with the Ina Garten school of thought...espresso powder makes chocolate taste even more chocolatey!  I added a teaspoon of espresso powder - and I must say when I licked the spatula (yes, I don't care if I eat raw eggs) it was FABULOUS tasting.  Hope the baked cake is as good as the batter indicates it will be.

The only potential for failure is that I was listening to music and dancing while I baked...with an occasional Facebook break.  Might have gotten distracted.  However, I have checked and re-checked myself so I hope all is well!  Here's the recipe as I made it.

DECADENT FUDGE CAKE
Adapted from Southern Living Five Star Recipe Collection, 1990


Cake Ingredients:

1 cup butter, softened (I used salted as no other salt was included and that's what I like anyway)
1 1/2 cups granulated white sugar
4 eggs, room temperature
1/2 teaspoon baking soda
1 cup buttermilk
2 1/2 cups all-purpose flour (I used King Arthur's Unbleached AP)
1 cup semisweet chocolate mini-morsels, divided (I used Toll House mini chips)
2 (4-ounce) bars sweet baking chocolate, melted and cooled (I used Baker's German Sweet)
1 teaspoon instant espresso powder
1/3 cup chocolate syrup
2 teaspoons pure vanilla extract

Glaze Ingredients:

4 ounces quality white chocolate, chopped (I used Ghirardelli)
2 tablespoons shortening (I used Crisco)

1/2 cup semisweet chocolate mini-morsels
2 teaspoons shortening

Cake Method:

Preheat oven to 300 degrees Fahrenheit.  Prepare a 10-inch Bundt pan with Baker's Joy or a similar product (or grease and flour if desired...but get all the nooks and crannies if you do).  Spray all the way to the very top of the pan - this cake will rise to the edge of the pan - make sure to do the tube part all the way to the top too.

1.  Chop and melt sweet chocolate in double boiler (I used a metal bowl over a pan of simmering water).  Add espresso powder to melted chocolate, stir to incorporate, set aside to cool to room temperature.

2.  Cream butter in the bowl of a stand mixer.  Gradually add sugar, beating well at medium speed. (2-3 minutes until fluffy).

3.  Add eggs, one at a time, beating after each addition.

4.  Dissolve soda in buttermilk, stirring well.  Be ready for next step immediately - the soda begins reacting with the buttermilk immediately and it starts "growing" (make sure you measure your buttermilk in a container that allows growth... like a 2-cup measure).

5.  Add buttermilk mixture to creamed butter mixture alternating with flour, beginning and ending with flour. (1/3 flour, half the buttermilk, 2nd 3rd of flour, rest of buttermilk, and last of flour - keeping the stand mixer on low while you work).


6.  Add 1 cup mini-morsels, the melted and cooled sweet chocolate/espresso mixture, chocolate syrup, and vanilla.  Stir just until blended, do not over beat.  Really get down and scrape to the bottom of the bowl so that you don't have white streaks in your cake from unmixed batter.  I did a pulse motion just a few times with the stand mixer and finished by hand with a strong spatula.

7.  Spoon batter into prepared Bundt pan.  Smooth cake surface with offset spatula or back of a spoonula.

8.  Bake at 300 degrees for 1 hour and 25 to 35 minutes or until cake springs back when touched. (Mine took 1 hour 27 minutes)  Remove from oven and invert cake immediately onto a serving plate.  Allow to cool completely before drizzling.

Drizzle Method:

1.  Combine 4 ounces chopped white chocolate and 2 tablespoons shortening in top of a double boiler; bring water to a simmer.  Reduce heat to low; cook until mixture is melted and smooth.  Remove from heat.  Drizzle melted white chocolate mixture over cooled cake. (I recommend putting some wax paper or parchment pieces under the edge of the cake so you keep your serving plate somewhat clean)

2.  Melt remaining 1/2 cup mini-morsels and 2 teaspoons shortening in a small sauce-pan over low heat, stirring until smooth (or do it with double boiler method).  Remove from heat and let cool; drizzle on top of and in between white chocolate drizzle.  Allow to set up and remove protective paper.


If desired, garnish with chocolate and white chocolate leaves.  I had every intention of doing that - but the day just got away from me.  It simply isn't going to happen.  Sometimes you have to follow in Porky Pig's steps and say "that's all folks!"


Musical baking all day long...mp3 player on shuffle...included, but not limited to:
The Judds - Rockin With the Rythm of the Rain
Garth Brooks - Friends in Low Places
The Trishas - So Blue
Rachel Solomon - Rain on Me
Madonna - Material Girl
The Doors - Twentieth Century Fox
Bonnie Raitt - Real Man
James Taylor - How Sweet it is to be Loved by You
ACDC - Highway to Hell
Enya - The River Sings
Rolling Stones - Brown Sugar
Beatles - Help!
Mustang Sally - C'mon DJ
Aerosmith - Toys in the Attic
Patsy Cline - So Wrong
Donovan - Mellow Yellow
Hewlett Crist - Cross the Border
Gnarls Barkley - Crazy
Stevie Wonder and Paul McCartney - Ebony and Ivory (just like my cake!)
Simon and Garfunkel - America
and others too numerous to think of!

It's been a great day...hope everyone has a blessed Thanksgiving. 

I'm out of here for now!  See you on the other side of Thursday! 

I'm sure there will be tales to tell :-)

Gobble Gobble!
Photo added 11/26/2011 - the cake was moist and rich.
Personal preference - I would have rather had a cream cheese
frosting on this cake - with the drizzle on top.  It was too
much like a candy bar - not enough like cake :-)


BON APPETIT, Y'ALL


SHARED WITH:


StumbleUpon

Thursday, October 6, 2011

Peanut Butter Chocolate Chip Pound Cake

We were going over to my sister's condo for a swim, tennis, and a spaghetti dinner and I offered to bring homemade bread and a dessert.  It was a really busy day - meeting at school, missed bus, forgotten computer, Zumba, a couple of lengthy business calls that took longer than expected...and it all served to wreak havoc with my day!  I ended up throwing together a focaccia for the bread offering (it was really good so I am glad that worked out) and I got rolling on the cake between Zumba and the school meeting.  I knew my brother-in-law was a peanut butter fan so I searched around for a recipe to try (family doesn't mind being guinea pigs) and I came across a Chocolate Chip Peanut Butter Pound Cake on several blogs.  It sounded good so I decided to give it a try!

I printed off a recipe from pixelatedcrumb.com and she attributed the recipe to Recipe Girl.  I didn't mess with the cake too much - all I substituted was mixed chocolate chunks and chips inside the cake instead of straight chips...and I didn't use the Peanut Butter Glaze - I made a basic ganache and sweetened it up with a touch of powdered sugar and a hint of vanilla. 

Here's how it goes:

PEANUT BUTTER CHOCOLATE CHIP POUND CAKE
WITH GANACHE GLAZE

Ingredients:


Cake:

3 cups unbleached AP flour
1 teaspoon baking powder
1/2 teaspoon salt
1 cup creamy peanut butter (note - do not use the natural PB unless you have the no-stir kind)
1/2 cup butter, at room temperature
3 cups granulated white sugar
6 large eggs, room temperature
2 teaspoons pure vanilla extract
3/4 cup semi-sweet chocolate chips
3/4 cup semi-sweet chocolate chunks

Glaze:

1/2 cup semi-sweet chocolate chips
1/2 cup milk chocolate chips
3/4 cup heavy cream
1 teaspoon pure vanilla extract
1/3 cup sifted powdered sugar

Method:

Preheat oven to 325 degrees Fahrenheit.
Spray 10-cup bundt pan generously with nonstick spray.
In bowl of stand mixer, cream together peanut butter and butter.
Add sugar and beat for 5 minutes.
In separate bowl, whisk together the flour, baking powder and salt - set aside.
Add eggs, 1 at a time, and vanilla to butter and sugar mixture and beat until well combined.
Add dry ingredients a little at a time, beating just until incorporated.
Stir in chocolate chips on low.
Spoon batter into prepared bundt pan.
Smooth top of batter with spatula.
Tap the pan a couple of times on counter to ensure any air pockets settle.
Bake for 1 hour and check the cake to make sure it is not browning too quickly.
Cover loosely with foil if it is browing on the outside and not done on the inside... and bake 10-20 additional minutes or until toothpick inserted into the center comes out clean.
Allow cake to cool for 20 minutes then flip it onto a rack or platter and let it cool completely.


Glaze:

In top of double boiler, combine cream and chocolate, whisking continuously over simmering water.
When completely smooth, remove from heat and whisk in vanilla.
Sift sugar in thirds over the ganache and whisk until smooth.
When cake is completely cool, slide wax paper pieces under edges of cake to catch the ganache over-spill.
Spoon ganache over cake allowing to drip down sides and center.
Wait until ganache is setting up (maybe 10-15 minutes) and carefully remove wax paper from under cake.


The cake was incredibly tasty.  I think I over-baked it though - I let it go the entire hour and 20 minutes and was evaluating doneness by color.  The edges of the cake were almost chewy (tasty but chewy) - the crumb was dense and marvelous...I almost think this would have been more appropriate in a sheet pan and served as brownies (or blondies I guess).  I had to saw through the crust when serving.  Everyone said it tasted good - but the teen said it was too "hard" on the outside - yet my sister loved the "crust" and picked it off of my son's piece and ate it.  I had a piece for breakfast this morning (bad girl, bad girl) with my coffee...it was really delicious and had softened a bit over night.  This might be one of those cakes that tastes even better a couple of days down the road.  It's really rich - a small piece is just right - the people taking big pieces couldn't finish their pieces - just so darn rich!  If I make it again, I'll reduce the cooking time.  I think I am going to try this in a sheet pan, though, and serve it like a bar cookie - it's that dense.  Or maybe a mini cupcake...that could be a really good thing! 
Sounds like a potential addition to my Christmas cookie trays!


Bon Appetit, Y'all!

SHARED WITH:


Creations by Kara


Everyday Sisters Sharing Sundays #17


StumbleUpon

Saturday, October 1, 2011

Apples on Apples Upside-Down Layer Cake


I mentioned before that I started participating in FoodBuzz, a web community focused on bloggers sharing their blogs and recipes with other foodies, back in early August.  I had not been in the kitchen nor out to eat much in August, so I hadn't been writing as much as usual.  I needed some inspiration.  FoodBuzz has kick-started my urge to get back in the kitchen.  I've been seeing some incredible recipes through multiple daily visits to FoodBuzz and I saw this cake several weeks ago from one of my first "friends" on FoodBuzz.  I haven't been able to get it off my mind.  Seems to be the year for upside down cakes for me.  I made a yummy Peach Pecan Upside Down Cake...and a Fresh Pineapple Upside Down Cake...  now this cake is in the upside down neighborhood as well...but with an extra layer of flavor - and a different cake batter and topping.

The original recipe is from a blogger in Cyprus and has metric measurements and an ingredient I couldn't identify.  I converted the measurements as best I could, made some personal preference substitutions and additions, and decided my best choice was vanilla beans for what she called "a vanilla sachet" ...I think it all worked!  What didn't work was getting it all into one pan.  My cake ended up being a two-layer cake...

APPLES ON APPLES UPSIDE-DOWN LAYER CAKE
Adapted from Sinful Apple Madness on Eftychia's  Dream of Cakes blog


TOPPING:
(The upside down topping that you will see on top)

Note - the original recipe called for 1 kg total weight of peeled and cored apples for both topping and filling - that's 2.2 lbs total.  I actually used about two Granny Smiths for the "topping" and I mixed two Gala apples and one really big Fuji for the filling layer.  Also, her cake was one cake - not a layer...but my pan wasn't big enough to accommodate the whole shebang...thus, this recipe became a layer cake ;-p

Ingredients:

Two Granny Smith or other baking apples
1/4 cup granulated white sugar, separated
2 teaspoons ground cinnamon, separated
2 tablespoons turbinado sugar, separated
Juice from 1/2 Lemon
Enough nice pecan halves (or whatever nut used) to circle the pan

Method:

Peel and core apples.   Cut in quarters and put in a bowl of ice water with the juice of 1/2 lemon.  Hold at this point until ready to put the cake together.

APPLE FILLING:

Ingredients:

3-4 apples (I used 1 large Fuji and 2 Royal Gala for this part)
1/2 cup granulated white sugar
1/2 cup chopped pecans, walnuts, or almonds - whatever you prefer (I used pecans)
2 tablespoon Moscato or other sweet wine (original recipe called for 1 Tbsp Ouzo - I don't have that - but I had opened a bottle of flipflop Moscato two nights ago and hadn't finished it...so I used that)
1 tablespoon ground cinnamon
1/4 teaspoon freshly grated nutmeg

Method:

Peel and core apples. 
Dice two apples into small pieces and one or two apple into chunks (used the Fuji for the chunks).
Place apples and sugar into nonstick saucepan or skillet and cook over medium high heat for approximately 10 minutes. 
Add the wine and nuts and stir to coat, allowing to cook for another minute.
Remove from heat and allow to cool.
Do not add cinnamon or nutmeg yet.

CAKE BATTER

Ingredients:

1 cup butter (I used salted - and I noticed there was no other salt in the original recipe so no adjustment was needed...I always like a bit of salt in the sweet recipes)
1 cup granulated white sugar
1/2 cup turbinado sugar
3 large eggs (room temperature)
1 vanilla bean, split and scraped
2 1/2 cups white whole wheat flour (whole wheat pastry flour)
3/4 cup natural unflavored yogurt (room temperature)
1/4 cup milk (room temperature)

Method:

In the bowl of a stand mixer, beat both sugars and butter until light and fluffy.
Add eggs 1 at a time and mix until incorporated.
Add vanilla bean seeds and mix.
Mix one third of the flour into batter.
Whisk the milk and yogurt together and add half of it into the batter.
Mix the second third of the flour into the batter.
Mix the final half of the wet ingredients into the batter.
Add the final third of the flour into batter and mix to a smooth batter.

PREPARING THE CAKE

Preheat oven to 340 degrees Fahrenheit.
Prepare one 9" cake pan by spraying with vegetable spray and then inserting a circle of parchment paper, also sprayed with vegetable spray.  Arrange pecans in that pan and set aside. (this will be the one for the topping)
Prepare another 9" cake pan by spraying with vegetable spray and set aside.  (this will be the one for the filling layer)

From topping ingredients above, mix 1/8 cup granulated white sugar, 1 tablespoon turbinado sugar and 1 teaspoon ground cinnamon together and sprinkle in bottom of cake pan with pecans in it.   Make sure entire bottom of pan is covered with the sugar mixture.

Slice the topping apples thinly enough that they will, when placed, cover the entire bottom of the cake pan. Place them in an attractive design as this will become the top of the cake.
Sprinkle the apples with the remaining 1/8 cup granulated white sugar, mixed with 1 tablespoon turbinado sugar and 1 teaspoon ground cinnamon.

Spoon and smooth down one half of the cake batter over the apple slices.  Set pan aside.

Add cinnamon and nutmeg to cooled cooked apple mixture.  Spoon the cooked apple filling evenly over the bottom of the other cake pan.  Spoon and smooth down the final half of the cake batter over the filling.

Place cake pans on middle rack of oven and bake for 25 minutes. 
Reduce heat to 320 degrees and continue baking another 25-35 minutes.

Remove cakes from oven and place cake pans on rack to cool for 15 minutes.
Carefully run sharp knife around the outside edges to insure release.

You can see a little volcano eruption on the filling cake (left)
and some bubbling up the side on the topping cake (right)

Invert cake with "filling" onto serving plate.  Allow to cool for about 5 more minutes.
Invert the other cake (with topping) onto the filling layer.
Gently remove the parchment paper from the topping and allow cake to cool before slicing.
(I slid a knife along under the parchment because it was really sticky and I didn't want to lift the apples or pecans away with the parchment).
The filling layer on the left and the topping layer on the right.
I couldn't believe how much it caramelized.

This cake has no added leavening beyond the eggs (they aren't really a leavening agent, but they help facilitate the steam which comes from the liquid - mostly from the apples - thus causing what little rising that will occur - just to the edge of the cake pan).  It is very dense and delicious.  If I make it again, I don't know that I'll use all whole wheat flour...with no leavening and a heavy flour, it's really too dense for my taste.  A little baking powder wouldn't have gone awry I think.

Although this is a stand-alone cake, the original is shown with a sprinkling of powdered sugar - so I did that too...but you could serve it with vanilla ice cream, whipped sweet cream, a drizzle of caramel sauce or, like I did, with slightly warmed and drizzled Dulce de Leche for the "caramel apple" taste! (Admittedly, I had to have milk though - the Dulce de Leche kicked it up to a high level of richness that required milk or a good cup of coffee)


I hope you enjoy this wonderful rustic Autumnal cake.  It feels like we are getting ready for Fall despite it still being in the 90s down here in sweltering South Texas.  Sure am thankful for those glorious sea breezes and the little bit of rain we got overnight, which brought the morning temps down into the 70's...woo hoo!

Bon Appetit, Y'all!!!

SHARED WITH:


Creations by Kara


StumbleUpon