Pages

Thursday, November 27, 2014

Fresh Pumpkin Pie - take two!


So excited to have fresh canned pumpkin shipped to me by Mr. Flip Flop's sister, Ruth, in Indiana.  I used her recipe and pumpkin last year to make my first ever pie from fresh pumpkin.  It was, indisputably, the best pumpkin pie I have ever eaten.  Hope this year's lives up to the previous one.

I didn't have luck last year with my fancy pie crust border.  A few years ago I used a leaf cookie cutter and used a paring knife to mark the veins.  That was quite labor intensive, but looked beautiful IMHO, for a first attempt at a "fancy" crust.  I baked a piece of cut-out pumpkin shape dough on top of the pie - and it didn't work very well.

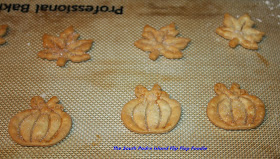
Last year, I used a Paula Deen plunge cutter - but the pieces were too big for a crust edge, they just draped down - not a bad look - but it didn't look like I expected, nor wanted.  I used an egg wash and a pastry brush on the crust top - and only had foil to cover my crust - I felt like the egg wash was too abundant and it browned too quickly.  I was darn well determined to find a pie crust protector instead of foil for future use. I used some extra dough to cut out pumpkins and baked them separately for embellishments.  They turned out quite well.  Every year is a learning experience.

So, this year?  I got out 3 different plunger cutters.  The pumpkin from last year, with thoughts of trimming the pieces (nope - too much work).

Another large maple-type leaf from the Paula Deen set I bought last year, but it looked too big also.

 My third choice was the one I used... a rose-leaf shaped fondant plunger (worked beautifully).  I also changed from a pastry bush and egg wash to a small paint brush and painted the crust with a conservative amount of heavy cream - lightly painted on each leaf to enhance the veins.

Additionally, I bought a pie crust shield (silicone) that ended up being too small to cover my crust once the leaves were on the edge and caused the 10 inch pan to actually extend to about 10 1/2 inch from leaf edge to leaf edge.

I turned the shield over and placed it on the crust between the 15 and 20 minute mark, and it worked just fine!

I used the maple leaf and the pumpkin leaf from the Paula Deen set to cut out some leftover dough for toppers.  Also painted those with cream and sprinkled on some sanding sugar for shine.

The toppers turned out quite nicely.

I've said it before - I am not a great pie baker, but with the right tools, even a mediocre pie baker can make a really nice pie presentation.  Like men have been saying for years "it's all about having the proper tools"... well, the same thing goes in my kitchen.  I try not to buy single use items, but the pie crust shield is a necessity for me.  I get so frustrated trying to cover an edge of a pie without messing up the pie or the crust and having to worry that it is going to fall off.  Not worth the stress and anxiety.  So, this is going to be one of those "one use" products I do recommend.  Too bad I can't find one that actually fits my glass pie pan.  But, hey, upside down worked, so I will just go with it.

Everything came together and was placed in the oven on a cookie sheet.  (just in case of high rise overflow)  I took it off the cookie sheet for the last 10 minutes to ensure the bottom of the crust was done enough.  It is perfectly browned.  I'm so pleased.  Oh, and in case you are wondering?  Pillsbury refrigerated rolled pie crust.  I simply can't make it any better and this is very consistent.  Another de-stressing choice for me on holidays.  I have not had great luck with store-brand rolled pie crust...so Pillsbury it is!


A little freshly whipped sweetened vanilla bean cream, a cute topper, and one delicious pie, ready to serve.  The full recipe is on the 2013 blog post which you can find here.  If you have the chance to make a pumpkin pie using fresh pumpkin, it is really something special!  If you don't have the inclination, canned pumpkin is great - I've used it for years...but give these pie crust decorations a try - easy enough to do, and makes a simple pie look special!


Happy Thanksgiving everyone...

Bon appetit, Y'all!!!

Wednesday, November 19, 2014

Thanksgiving Cookies 2014

We are having our Thanksgiving on the Saturday before Thanksgiving... because nurses rarely get time off around the holidays...and my husband is a nurse.  Hospitals are 24/7 and you are all glad they are when you need them.  Like other service providers - police, fire, EMS, hospital, military - and any others I left out, well, the families learn to be flexible.  We learn it isn't the specific day we celebrate, it's celebrating the season in whatever special way we make it.  I'm kind of used to it now...still don't like it, but I'm used to it.  We are driving to spend time with some of our Austin family and to make our presence known with the Indiana family, I sent cookies (what else).


I've been working on these for days - and they are bagged, sealed, bubble-wrapped, and boxed with a prayer that they make it through the US Mail system to the Indiana crew.  If there are broken cookies, well, look at the photos and enjoy the taste.  I'm always wanting my cookies to taste better than they look.  A cookie is to be enjoyed both visually and by taste...but really, primarily taste, right?

I got my leaf inspiration and my cute turkey inspiration from enrolling in the online version of McGoo U.  That Arty McGoo has put together a first class cookie instruction/entertainment/share fest and I'm so thrilled to be a subscriber.  I have watched all of the October and November videos and the dotted and painted (with food coloring) leaf project was part of the long class for November.  Then, the precious seated turkey, looking somewhat alarmed and bug eyed (with those cuteeee feet) was the project from visiting Professor Georganne Bell aka LilaLoa, in the segment "Expert Lab" in November's sessions.

I doubt I really did either cookie artist/instructor justice, because I had to adjust each for my "tastes"...but I admit to feeling somewhat proud of my watercolor leaves!  It gave me the courage to try it different ways, despite not having a good color palette of Wilton gel colors to use.  I stopped buying Wilton several years ago and have been a devotee to AmeriColor with a few sidesteps to ChefMaster from time to time.  I will absolutely admit though, Arty McGoo is right on.  I had left some AmeriColor gel colors on the palette from maybe 6 months ago, in a plastic baggie.  The darn things were still sticky to the touch!  I set up a palette with the Wilton and they are dry and not sticky at all.  I'm going to re-stock my Wilton colors, just for painting!  My leaves look a bit psychedelic because I really didn't have the recommended colors.  Nonetheless, I like them...I am embracing my inner kindergartner who enjoys playing with water colors.

Let me just say... CHECK OUT McGOO U ONLINE!!!  If you want to step up your cookie decorating game, this is a great way to do it.  Internationally renown cookie artist, Arty McGoo, shows you step by step how to make some really cool cookie sets.  You can try it out on a monthly basis or there is a reduced price for annual subscriptions.  I'm changing my monthly to annual as soon as I finish paying for Christmas!!!  My gift to myself. (Although I may sound like it, I am not a paid endorser, nor stalker of these people...LOL!!!)

I haven't stenciled in a while, so I tried a few different plaques and stencils and sprays and thick RI...I learned, once again, that my cookies are not flat - but I still liked the overall look of these cookies.  My favorite is the large leaf with a pearlized spray over a Designer Stencils paisley stencil I picked up at CookieCon.  It looks simple, yet elegant.


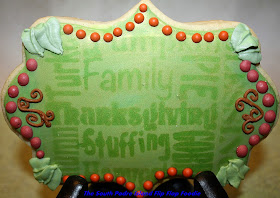
I also really like the Cookie Countess subway art and leaf stencils.  They turned out nothing like I expected, but absolutely love they way they look in the end (the gold tint is from an epic fail on my part by over-saturating spray which I quickly wiped off - to result in a gold overtone to the light green cookie - then I sprayed darker green on top of gold green...turned out kind of cool.


Simple leaf was stenciled with thick royal icing, just blobbed
on in layers, then scraped upwards to make the
color changing Autumn leaf!

The stencil for this plaque cookie is from Designer Stencils obtained last year.  The berries along the edge were also sort of learned in McGoo U - I had never thought about dropping another color inside a berry.  That was from the October tutorial with visiting professor, Maryann Rollins, aka The Cookie Artisan.  I also used foodcolor from my palette and a fine tip brush to paint some copper/brown leaf veins and acorn tops.  I need to get over being afraid of painting things - especially when icing just won't do.  I'm gonna be stretchin' my wings, y'all!


I got this tall pumpkin cutter earlier this Fall and I must say I am in love with it.  The ivory pumpkins turned out just the way I envisioned them in my head.  I got it, and a stencil genie, from Creative Cookier.  Unfortunately, my big plaques were too large for the genie...but the paisley stencil on the leaf worked beautiful...Literally hands-free stenciling!  So excited to use it on some of the Christmas cookies I am planning.  Wheeee!!!  I'm getting wound up just thinking about it :-)

Thanks for stopping by and checking out my playtime with cookies.  I baked and decorated 80 cookies (I ate two - one red velvet and one vanilla bean sugar - just to ensure quality control!).  I can't wait to share the goodies with my family members, both near and far.

Good thing we are empty nesters and don't eat at our
kitchen table...because where the heck would I spread out
my cookies while decorating?
I cropped out as much of the surrounding area as
 possible - you just cannot imagine the mess I make
when decorating.  It's an embarrassment!


Happy Thanksgiving everyone!!!

Bon Appetit, Y'all!!!