 |
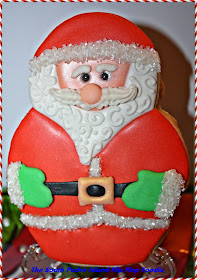
| My take on Montreal Confections' Nesting Santa Cookies |
I've been learning to decorate cookies via many YouTube tutorials. One of the stand-out teachers, though, is Marlyn from Montreal Confections. She is awesome! So many of her fabulous tutorials, I'm just not ready for that level yet...but I'm getting there...eventually.
A couple of weeks ago she posted this adorable Santa Claus tutorial using a Matryoshka nesting doll cookie cutter. Hers was from eCrandal, which makes gorgeous copper cutters...but right before Christmas it felt a little out of my price range. I contacted the folks at a Houston, TX small business, asking if they could make a similar one for me with their nifty plastic printer. They made it slightly different than one's I have seen, but they made it in 3 different sizes and I got it in a very reasonable time frame for a fair price. It worked just fine! I've not been a big fan of plastic cutters in the past, but I must say these were very sharp. They cut the dough very nicely. Thank you to Truly Mad Plastics. They have quite an inventory of products - they make your cutter when you order, so not instantly available, but still quite timely...check them out!
I didn't really photograph my progress...you can see every step of the process on Marlyn's YouTube tutorial (linked under the top photo and on her blog). I only have photos of my final cookies. I did take three small detours from Marlyn's very detailed instructions. I didn't use non-pareils...instead, I used sparkly sugar crystals for the "fur" on Santa's jacket and hat. I didn't have one of those nifty food color paint pens she used to color the belt buckle gold so I sprayed with Wilton Gold Color Mist. (not very successful - barely gold) I also decided, since I have curly hair, that Santa should have a curly beard. It just looked right to me! The big fail I had was that my Wilton black sugar pearls bled into the face icing while it was drying overnight. I was really bummed. Santa had black eyes...looked like he'd been in a fight or was going Goth. I actually scraped off one of the faces, using a boo-boo stick, to re-pipe and flood the face but it had really dried hard and I was gouging out my cookie. I fixed the one, but elected to just accept that Santa was going to have "depth of color" around his eyeballs on the other 9 cookies. Sweet Sugarbelle always says a booboo is an opportunity for an embellishment. Therefore, I made the eyebrows a bit larger and closer to the eye in hopes of "hiding" a bit of the bleed. I think they look okay after the eyebrows and hat trim were added. My husband says I focus on perfection way too much! He's probably right. However, this was a 5 day project, so I think it's acceptable to want it right! Day 1, make the Vanilla Bean Sugar Cookie dough and chill. Day 2, roll, cut, bake and cool (the final cookies are 3/8" thick and over 5" tall). Three days of decorating. It's a project! Well worth the effort though! I'll absolutely make these again...I'll just pipe eyes on afterwards or use a FooDoodler pen and draw eyes on. I'm pretty sure it's the humidity down here that causes this kind of issue. Not much I can do about the humidity beyond what I already do to handle it. (a constant fan on the drying cookies and cranking up my a/c...but since it was 40 degrees outside, the a/c wasn't an option) I have a nice dehydrator on my Christmas Wish List (hey Santa!).
Mr. Flip Flop will be taking these to his co-workers as little holiday gifts. I suspect they won't notice the eyes and will be, instead, overwhelmed by the cuteness of Marlyn's design. At the end of her tutorial, she said "isn't he CUTE?" ...I must say, YES, he's really cute! Thanks for providing such a great tutorial.
Bon Appetit, Y'all!!!


No comments:
Post a Comment
Comments are moderated - you should see it within a few hours if approved! Spam or marketing comments are immediately deleted. Thank you!!!