Pages

Tuesday, November 29, 2011

R & R Bar-B-Que


UPDATE March 2013
Out of Business... a new BBQ restaurant has opened in that location.  Getting rave reviews from locals.  I'll stop in soon and see what's up!

UPDATE December 8, 2011:
Stopped in for some BBQ for dinner (take-out) and they let me know they were having smoked turkeys again for Christmas!  My son was so happy to hear that and has requested another one be delivered to his house for our Christmas dinner!  I think I can make that happen :-)

November 2011
Last week I tried one of the new bar-b-que joints in Port Isabel.  I stopped in after some last minute grocery shopping prior to heading off to the family Thanksgiving, mostly because I was simply starving.  I forgot to eat breakfast and I had been to Zumba and I had a nail appointment in an hour.  Since my last stop was at Wal-mart I glanced over to the small strip shopping center and saw wood smoke curling in the air from the little gazebo built to house the pit for R&R Bar-b-que.  It smelled so good I decided now was the time to stop!  I was so tired I could barely read the menu.  I'd wanted a sandwich and my eye just went right over them and stopped at the 2-meat plate.  I decided that would be better than loading up with a big old bun!  I ordered pork ribs and brisket - and then had to decide if I wanted chopped brisket (the good moist stuff) or the lean sliced.  I went for moist.  I'm pretty basic with my bar-b-que likes...so my sides were potato salad and cole slaw.

While I waited I was chatting with the young man behind the counter and he told me they were busily getting ready to smoke turkeys for Thanksgiving.  I asked about the price - found them to be reasonable - and gave a shout out to my sister to see if she wanted me to get one to bring.  We had just discussed the fact that she was concerned her 20 pound turkey, a ham, and a brisket were not going to be enough meats for the group of 36!  When she found it out was under $30 for the turkey she said "yes, bring it on"!

I decided I would take my to-go lunch with me and "test the waters" so to speak.  I wanted to make sure the food was good before ordering anything else!  They told me to let them know that day if I wanted to pick it up on Tuesday evening (as we were leaving crack-of-dawn Wednesday).  They told me they could have it chilled and in a baking bag with instructions for warming if I picked it up Tuesday evening.  I told them I'd be back with them if I wanted to do that.

I wasn't sure if it was because I was so hungry or WHAT...but that was some of the best tasting brisket and tender, fall-off-the-bone pork ribs that I'd eaten in a good long time.  The sauce was delicious as well, just the way I like it with a bit of sweetness in it.  I admit, I would have preferred the sauce on the side and a bit more of it (my husband laughingly says I have a little meat with my bar-b-que sauce and it's true!).  But, other than that, I had nothing I could complain about in the meat department.  I liked the cole slaw - creamy and sweetly tart the way I like it.  The potato salad was a bit bland.  I like mine with onion and more crunch (pickles) than they had.  It was just "okay"...but I tore up some of my onions they served on the side, stirred it in, and I was happy. 

I had heard, from a couple of different people, that their servings were too small for the price.  I felt like it was "just right" for the $9.95 plate.  I was full and satisfied.

That brought me back to the R&R BBQ to place my order.  I paid, got my receipt, and was told to be there by 7:00 Tuesday evening...which I was.  The teen was with me then and he wanted to try their sausage plate - with mac and cheese and beans as his sides.  He said the sausage and sauce were great, the beans "pretty good", and he didn't like the mac and cheese.  You have to understand though...it was closing time and it did look a little dry...AND, my son likes Kraft in a blue box mac and cheese.  Anything else will always be graded "not as great".  So, we got his meal and I got my turkey and off we went the next morning with the turkey happily ensconced in my cooler.

Seven and a half hours of grueling holiday traffic later, I dropped it off with my son so he could re-heat it Thanksgiving morning and bring it out to my sister's house for the big meal.  It was BEAUTIFULLY moist - freaking DELICIOUS - and every single bite of that turkey was eaten up.  Who knew...smoked turkey ruled the day among a huge quantity of realllly tasty meats all around. We were such piggies I didn't get a chance to snap a photo of the turkey before it was demolished...but it was sure purty!

I can't say how highly I would recommend ANYONE wanting an awesome smoked turkey...to hie themselves on over to R&R Bar-b-que in Port Isabel.  If you can find the Wal-mart, you can find R&R.  They aren't open real late so check their sign for the current operating hours.  I'd recommend lunch! 

The people were nice, friendly, and eager to please.  I will definitely be going back.  I hope they make it.  It's in the old Quizno's location (dang, I loved Quizno's) next door to Mickey's.  They might be affiliated with Mickey's...that's what my receipt had at the top.  I've never been to Mickey's so I don't really know what's up with that.  I do know, however, that those folks know how to really smoke some good meats...tender, good smoke ring, good sauce.  That's all I need!


SPI FLIP FLOP FOODIE RATING:

3 1/2 – Pretty Yummy - I feel my flip flops wanting to head back from time to time!
(It would have been a 4 for the meat - but the sides were not as high of a quality as the meats...gotta have it all for a 4 or more!)
R&R Bar-B-Que on Urbanspoon

Friday, November 25, 2011

SOUR CREAM CRESCENT ROLLS


My friend, Ann Smith, promptly replied to my shout out for a yeast roll recipe where the dough might travel well.  She suggested a recipe she found in a 1989 Bon Appetit magazine and said she had traveled with it without problems - because you chilled it overnight and you could just load the chilled dough into an ice chest for travel.  That sounded good to me.

It's always quite daring (or maybe ill-advised) to try a new recipe for a huge family occasion...so I planned to make a batch prior to travel.  However, I got overwhelmed with all I needed to do and it just did not happen.  I decided to just trust that Ann was a good cook, knew what she was talking about, and I just traveled with the ingredients and made the double batch of dough when I arrived at my sister's house Wednesday late afternoon. 

The dough was soft and tender and yeasty so I felt very positive when I went to bed that night.  My only concern was that I'd never made anything with a refrigerated dough (overnight rising) and I am not a good roller.  I didn't need to worry - upon checking the next morning, it had doubled in size and was ready to be punched down and prepared for rising. This recipe (doubled) required rolling out 8 ten-inch circles and cutting each one into 12 triangles.  What I learned is that I had just cause to be concerned with all that rolling and my apparent inability to make 12 even triangles.  Who knew THAT would be so hard!


I ended up with a tray of small crescents and two trays of large crescents...and at some point I just got tired of crescents (after the third full tray) and decided to make a pan of rolls that I could roll into a ball and plunk into the pan!  Totalled about 85 rolls with my larger pan rolls taking more dough than the crescents.

Except for the one crisis of burning the bottom of one tray of rolls (dang that pissed me off) because I was unfamiliar with my sister's oven and its idiosyncrasies, they turned out beautiful and, most importantly, delicious.  They were rich tasting, light and airy, browned beautifully, and everyone ate at least two.  Even the tray that had burned bottoms had people pulling the over-browned (not really black burned - just too dark) bottoms off and eating the perfectly done tops.

Here's the recipe.  I do think it will be our family's new holiday tradition for rolls.  They were that good!

SOUR CREAM CRESCENT ROLLS
From Bon Apetit Magazine, 1989 (per Ann Smith)


Ingredients:

 3/4 cup butter, divided

 1 (8-oz.) container sour cream (bring to room temperature - my note)

 1/2 cup sugar

 2 (1/4-oz.) envelopes active dry yeast

 1/2 cup warm water (100 degrees F to 110 degrees F)

 4 cups all-purpose flour

 1 teaspoon salt

 2 large eggs, beaten

 Directions:

 1. Melt 1/2 cup butter in a small saucepan over medium heat. Remove from heat; stir in sour cream and sugar. Pour mixture into a large mixing bowl; cool to 100 degrees F to 110 degrees F.

 2. Combine yeast and warm water (100 degrees F to 110 degrees F) in a 1-cup glass measuring cup; let stand 5 minutes.

 3. Whisk together flour and salt in a bowl. Whisk eggs into sour cream mixture. Stir yeast mixture into sour cream mixture. Gradually add flour mixture, stirring well. Cover and chill at least 8 hours.

 4. Punch dough down, and divide into 4 equal portions. Roll each portion into a 10-inch circle on a floured surface. Microwave remaining 1/4 cup butter at HIGH 1 minute or until melted. Brush dough with melted butter. Cut each circle into 12 wedges; roll up each wedge, beginning at wide end. Place on greased baking sheets, point sides down.

 5. Cover and let rise in a warm place (85 degrees F), free from drafts, 45 minutes or until almost doubled in bulk.

 6. Preheat oven to 375 degrees F. Bake rolls at 375 degrees F for 10 to 12 minutes or until golden brown.

Note:

Dough for Sour Cream Crescent Rolls may be baked in other shapes such as cloverleaf and pan rolls.

Makes 4 dozen rolls
I didn't take photos of the mixing process... I was so tired from the 6 hour drive taking 7 1/2 hours due to intense holiday traffic that I was lucky to get the dough made.  Plus, when you are working in someone else's kitchen, it's just not as easy as being at home in a familiar environment.  I didn't even think about photos until the next day when I was making rolls!

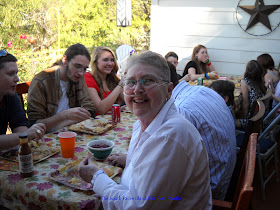
It was a gloriously beautiful day in Central Texas.  We ate casually, on paper plates, out on my sister's beautiful back patio and the temperature was pleasant, the food abundant, the thanks for all we were blessed with perfectly evident in the smiling faces of our children and their parents and grandparents.  It was all a Thanksgiving should be. 

We've had fancy Thanksgiving dinners with fine china, the good silver, and crystal glasses on linen cloths...but outdoors, buffet style, long tables everyone could see down, drinking our sodas out of a can from the ice chest...it was a good ol' family dinner - I will likely remember it more fondly than the 50+ Thanksgivings I have experienced.  There were a few cooking crisis, easily handled.  Slight delays, a few skinned knees and a bleeding elbow...but what was missing were angry words, drama, irritation, and upset.  I will remember the Thanksgiving where everyone really seemed to be thankful that we were able to gather and we were filled with love for our family.

The buffet table with my Mom - the family matriarch
The kids segregated themselves - they want to talk to their cousins!
My big sister, Cynthia.  I think she had a good day :-)
There were so many people I could not capture them all! 
28 for dinner - 6 more came later for football and snacks!


Bon Appetit, Y'all!

SHARED WITH:

Wednesday, November 23, 2011

DECADENT FUDGE CAKE

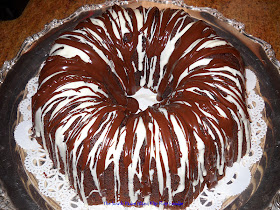
I've had this recipe in my binder for over 20 years...and I've never made it.  I saved it because the photograph of the presentation was so beautiful.  I never felt I was a good enough baker to make the cake successfully...and it had a lot of expensive chocolate in the listing...I never wanted to "take the risk".  This year is different.  My skills have improved.  I feel competent.  I called my sister and told her to bring me a silver platter...I was going to make a cake worthy of a silver platter.  She did...and here it is the Tuesday before Thanksgiving and I have done the deed.  If it makes the trip without crisis, we will see if the recipe lives up to its name and we'll see if I lived up to my belief in myself.

The recipe came from a Southern Living book and is dated 1990.  I only made one tiny adjustment.  I decided to go with the Ina Garten school of thought...espresso powder makes chocolate taste even more chocolatey!  I added a teaspoon of espresso powder - and I must say when I licked the spatula (yes, I don't care if I eat raw eggs) it was FABULOUS tasting.  Hope the baked cake is as good as the batter indicates it will be.

The only potential for failure is that I was listening to music and dancing while I baked...with an occasional Facebook break.  Might have gotten distracted.  However, I have checked and re-checked myself so I hope all is well!  Here's the recipe as I made it.

DECADENT FUDGE CAKE
Adapted from Southern Living Five Star Recipe Collection, 1990


Cake Ingredients:

1 cup butter, softened (I used salted as no other salt was included and that's what I like anyway)
1 1/2 cups granulated white sugar
4 eggs, room temperature
1/2 teaspoon baking soda
1 cup buttermilk
2 1/2 cups all-purpose flour (I used King Arthur's Unbleached AP)
1 cup semisweet chocolate mini-morsels, divided (I used Toll House mini chips)
2 (4-ounce) bars sweet baking chocolate, melted and cooled (I used Baker's German Sweet)
1 teaspoon instant espresso powder
1/3 cup chocolate syrup
2 teaspoons pure vanilla extract

Glaze Ingredients:

4 ounces quality white chocolate, chopped (I used Ghirardelli)
2 tablespoons shortening (I used Crisco)

1/2 cup semisweet chocolate mini-morsels
2 teaspoons shortening

Cake Method:

Preheat oven to 300 degrees Fahrenheit.  Prepare a 10-inch Bundt pan with Baker's Joy or a similar product (or grease and flour if desired...but get all the nooks and crannies if you do).  Spray all the way to the very top of the pan - this cake will rise to the edge of the pan - make sure to do the tube part all the way to the top too.

1.  Chop and melt sweet chocolate in double boiler (I used a metal bowl over a pan of simmering water).  Add espresso powder to melted chocolate, stir to incorporate, set aside to cool to room temperature.

2.  Cream butter in the bowl of a stand mixer.  Gradually add sugar, beating well at medium speed. (2-3 minutes until fluffy).

3.  Add eggs, one at a time, beating after each addition.

4.  Dissolve soda in buttermilk, stirring well.  Be ready for next step immediately - the soda begins reacting with the buttermilk immediately and it starts "growing" (make sure you measure your buttermilk in a container that allows growth... like a 2-cup measure).

5.  Add buttermilk mixture to creamed butter mixture alternating with flour, beginning and ending with flour. (1/3 flour, half the buttermilk, 2nd 3rd of flour, rest of buttermilk, and last of flour - keeping the stand mixer on low while you work).


6.  Add 1 cup mini-morsels, the melted and cooled sweet chocolate/espresso mixture, chocolate syrup, and vanilla.  Stir just until blended, do not over beat.  Really get down and scrape to the bottom of the bowl so that you don't have white streaks in your cake from unmixed batter.  I did a pulse motion just a few times with the stand mixer and finished by hand with a strong spatula.

7.  Spoon batter into prepared Bundt pan.  Smooth cake surface with offset spatula or back of a spoonula.

8.  Bake at 300 degrees for 1 hour and 25 to 35 minutes or until cake springs back when touched. (Mine took 1 hour 27 minutes)  Remove from oven and invert cake immediately onto a serving plate.  Allow to cool completely before drizzling.

Drizzle Method:

1.  Combine 4 ounces chopped white chocolate and 2 tablespoons shortening in top of a double boiler; bring water to a simmer.  Reduce heat to low; cook until mixture is melted and smooth.  Remove from heat.  Drizzle melted white chocolate mixture over cooled cake. (I recommend putting some wax paper or parchment pieces under the edge of the cake so you keep your serving plate somewhat clean)

2.  Melt remaining 1/2 cup mini-morsels and 2 teaspoons shortening in a small sauce-pan over low heat, stirring until smooth (or do it with double boiler method).  Remove from heat and let cool; drizzle on top of and in between white chocolate drizzle.  Allow to set up and remove protective paper.


If desired, garnish with chocolate and white chocolate leaves.  I had every intention of doing that - but the day just got away from me.  It simply isn't going to happen.  Sometimes you have to follow in Porky Pig's steps and say "that's all folks!"


Musical baking all day long...mp3 player on shuffle...included, but not limited to:
The Judds - Rockin With the Rythm of the Rain
Garth Brooks - Friends in Low Places
The Trishas - So Blue
Rachel Solomon - Rain on Me
Madonna - Material Girl
The Doors - Twentieth Century Fox
Bonnie Raitt - Real Man
James Taylor - How Sweet it is to be Loved by You
ACDC - Highway to Hell
Enya - The River Sings
Rolling Stones - Brown Sugar
Beatles - Help!
Mustang Sally - C'mon DJ
Aerosmith - Toys in the Attic
Patsy Cline - So Wrong
Donovan - Mellow Yellow
Hewlett Crist - Cross the Border
Gnarls Barkley - Crazy
Stevie Wonder and Paul McCartney - Ebony and Ivory (just like my cake!)
Simon and Garfunkel - America
and others too numerous to think of!

It's been a great day...hope everyone has a blessed Thanksgiving. 

I'm out of here for now!  See you on the other side of Thursday! 

I'm sure there will be tales to tell :-)

Gobble Gobble!
Photo added 11/26/2011 - the cake was moist and rich.
Personal preference - I would have rather had a cream cheese
frosting on this cake - with the drizzle on top.  It was too
much like a candy bar - not enough like cake :-)


BON APPETIT, Y'ALL


SHARED WITH:


Monday, November 21, 2011

Black and White Chocolate Chip Cookies


Continuing with my Thanksgiving baking - I knew I needed to make some sort of chocolate chip cookie that didn't include nuts or fruits nor anything that would cause the teen to turn up his nose (same goes for my oldest - no nuts allowed).  I wanted something other than the ever-delicious Toll House cookie but...close to that type of recipe.  My decision was to add the white chocolate chips I had leftover from the Chock-ful-o-Goodness Oatmeal Cookies I baked first and some semi-sweet chunks I had on hand.  I also decided to try just a bit of cinnamon in with the dry goods for a hint of background warmth.  Not enough to identify there was cinnamon in the cookies...just a faint "difference" in the taste...hopefully for the better!

Black and White Chocolate Chip Cookies
Adapted from Toll House Recipe
Ingredients:

2 1/4 cups unbleached all-purpose flour
1 teaspoon baking soda
1 teaspoon Kosher salt
1/2 teaspoon ground cinnamon

3/4 cup light brown sugar
3/4 cup white granulated sugar
1 cup (2 sticks) unsalted butter - softened to room temperature
2 large eggs
1 1/2 teaspoons pure vanilla extract

1 cup Ghirardelli White Chocolate morsels
2 cups semi-sweet chocolate chunks (I used Nestle's)
1 cup chopped nuts (optional - I did not use)


Method:

Preheat oven to 375 degrees F.

Prepare baking sheets with Silpat or Parchment Paper.

Set up cooling racks.

In medium bowl, whisk together flour, salt, cinnamon, and baking soda - set aside

In bowl of stand mixer, mix butter and both sugars until lightened. Add vanilla extract. Beat until blended.

Add eggs, 1 at a time, mixing to incorporate after each addition.

Lower mixer speed and add the flour mixture by thirds, incorporating after each addition.

Add both chocolates and do a couple of low rotations to get the chocolate mixed in and finish up by hand.  If you are adding nuts, now is the time to do that.  Use a sturdy spoon and make sure to scrape the bottom of the bowl!

Using small to medium sized cookie scoop, place 1 dozen cookies on each baking sheet.  I used a medium scoop and the recipe made 39 cookies...some were a bit bigger than others even with the scoop.  That won't happen to you if you scrape the scoop against the edge of the bowl.  Sometimes I get going and leave a mound on the scoop!  Oops.

Place in oven for 9 to 11 minutes.

Remove from oven and place baking sheet on rack to cool for 10 minutes. Remove from baking sheet to cooling rack until all the way cooled.

The teen was happy to give these a try - he was relieved to see something other than the oatmeal cookies on the cooling racks!  Love it when my kids are happy! 

Musical Baking for this recipe compliments of the Carly Siimon album Live From Martha's Vineyard.  My sons listened to it every night to go to sleep when they were little dudes (nearly 25 years ago I guess...wowser).  My middle child would wait for Itsy Bitsy Spider to come on before he'd fall all the way to sleep.  Chocolate chip cookies and kid memories...warm and fuzzy.  Guess it's the Thanksgiving vibe :-)  REALLY looking forward to seeing all my children and grandchildren this week!!!  Woo Hoo!!!  Think I'll eat a cookie in "anticipation...anticipation... is making me late...is keepin' me waiting"...


Bon Appetit, Y'all

Sunday, November 20, 2011

Chock-ful-o-Goodness Oatmeal Cookies


I'm rolling on my holiday baking this week-end.  I have to travel and it's too chaotic to bake in someone else's kitchen while they are trying to do their thing at the same time.  I know my husband loves some good oatmeal cookies and I saw a couple of recipes on FoodBuzz and Pinterest highlighting Cranberries, White Chocolate and Oatmeal as ingredients.  I've made some great oatmeal cookies in the past...and I've added chocolate chips to them too.  I've steered away from raisins - I'm just not a fan of baked raisins.  I am, however, a huge fan of dried sweet cranberries and happened to have some in my pantry.  I also bought some Ghirardelli white chocolate chips this week because there was a coupon!  I love Ghirardelli products.  It was one of the highlights of my trip to San Francisco to see the original factory.  I've been hooked ever since.  These cookies will be good "keepers" so long as I get them into an airtight container.  I've timed all of my baking to make the things that don't last to be done right before hopping into the car!  These nice dense cookies keep well for several days.

I'll give a nod here to Erin at Dinners, Dishes, and Desserts for the base idea and the many people pinning a variety of cranberry and white chocolate cookies on Pinterest this week!  I did pin a recipe from Risa at Baked Perfection on my Recipe Board.  I didn't use either of their recipes, but they did poke the idea into my brain!  Thanks ladies :-) 

CHOCK-FUL-O-GOODNESS
CRANBERRY, WHITE CHOCOLATE,
PECAN, AND OATMEAL COOKIES
Adapted from Stephanie Jaworski's recipe at joy of baking Oatmeal Cookies
further credited to Jane Rodmell's 'Best Summer Weekends Cookbook'


Ingredients:

3/4 cup salted butter, softened at room temperature
1 cup light brown sugar, firmly packed
1 large egg, at room temperature
1 teaspoon pure vanilla extract
3/4 cup of flour - measured thus:
1/3 cup of all purpose unbleached flour spooned into a graduated measuring cup
and the balance of the measure (just 3/4 total) filled with White Whole Wheat flour.
1/2 teaspoon baking soda
1/2 teaspoon salt
1 teaspoon ground cinnamon
3 cups old-fashioned rolled oats (not instant)
1 heaping cup Ghirardelli White Chocolate Chips
1/2 cup dried cranberries
1/2 cup roughly chopped pecans (make sure they are fresh)


Method:

Preheat oven to 350 degrees. Prepare cookie sheets with parchment paper or Silpat.

In the bowl of your stand mixer, beat the butter and sugar until creamy and smooth (about 2-3 minutes).
Add the egg and vanilla extract and beat to combine.
Scrape down sides of bowl.
In a separate bowl, whisk together the flours, baking soda, salt, and ground cinnamon.
Add the flour mixture to the creamed mixture and beat until incorporated. Scrape the bowl, getting down into the center at the bottom, not just the sides.
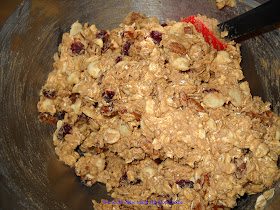
Stir in the oats.  I mixed them just a few times around with the stand mixer then mixed the rest by hand.
Add in the chips, cranberries, and pecans.  Again, let the mixer do a couple of laps around the bowl to get the basic incorporation going and then finish by hand with a sturdy wooden spoon or spoonula.

For large cookies, use about 1/4 cup of batter (I used a 1 1/2 liquid ounce scoop which equals 3 tablespoons - I ended up with 19 cookies).

Space the cookies about 2 inches apart on the baking sheet. I actually hand-rolled the scooped cookies into a ball because some pieces were falling apart. I then flattened the cookies to about 1/2 to 3/4 inch thick with my hands.

Bake the cookies for about 12-15 minutes (mine were perfect at 13-14 minutes) or until barely light golden brown around the edges but still soft in the centers.  They don't acquire a lot of color and if you want them chewy, don't over-bake.

Remove from oven and let the cookies cool a few minutes on the baking sheet before transferring to a wire rack to cool.

These are some awesome cookies.  I can't wait for my hubby to try them...I think he's gonna like 'em!!!

Musical Baking today compliments of the album Nick of Time by Bonnie Raitt.  Loved listening to it 21+  years ago when I fell in love with my honey...and love it still today. (of course it was on cassette back then - now it's on the mp3 player!)

Enjoy the cookies - they are definitely going to be on my annual Thanksgiving cookie list from here on out!

Bon Appetit, Y'all!!!

SHARED WITH:


Saturday, November 19, 2011

Double Stuff Oreo Thanksgiving Turkeys!


Back sometime around Halloween, someone on a blog somewhere, posted a cute craft/recipe for using Oreos and candy to make really precious Thanksgiving turkeys.  I've seen some people posting that they were using them as place holders, others as activities with their kids...and I decided, when I saw them on Pinterest, to pin them to my Recipes Board.  I am so bad about seeing things "somewhere" and not remembering where...Pinterest helps me organize those things I stumble over.  I wasn't sure if I would actually make them...but gosh they were cute.

Then, I saw The Brown Eyed Baker post her activity with her kids on FoodBuzz .  She used the Oreo Turkeys as cupcake toppers - such a cute idea! Since I was on the way out the door to Wal-mart, I decided I would get the things I needed and make them this week-end to take with me to Thanksgiving with the extended family. 

I don't know what is wrong with me lately, too much on my mind I guess.  I skimmed the ingredients and failed to notice "DOUBLE STUFF" Oreos...and I bought regular.  I also had somehow stuck in my head the need for Rolos...which are NOT in the instructions.  Didn't realize that until I had already peeled a bunch of Rolos and taken ingredient photos.  Oh bother says Pooh!  Who is going to eat all those peeled Rolos now???  :-)

When I was back on Pinterest checking the original link from Our Best Bites blog I saw some kind of treat using Rolos and pecans...I think I'd seen that before going to Wal-mart...hence, the connection in my mind to Rolos!  Oh well...it seems to be that kind of week.  I'm kind of confuseled!

I'm going to suggest you follow the link to Our Best Bites for an outstanding tutorial.  I have a few photos of my escapades - but I didn't use the dark tube frosting like she did, and I didn't use the yellow frosting behind the beak (hers look so much better) and I, of course, didn't use the Double Stuff - so I had cracked cookies.  Some I glued back together BUT you can't tell because they are on the back side while others fell apart...so I ended up with about 12 instead of 19 or 20.  I also had trouble using the little tubes of yellow icing - it would have been so much easier with royal icing.  The eyes kept running so I gave up and used some little sugar balls I had and attached them using tweezers.  I first tried to use some partially dried yellow icing as glue - didn't work very well - so I used the chocolate frosting, which worked fairly well - but not perfect.  I dabbed the center with a black food marker since I couldn't find any sprinkles with black balls in them that I could pick out.  Whew, the whole thing just seemed to be cursed! 

I was going to go get some of the correct cookies, but I just decided I'd been to the store enough.  I wasn't driving a 10 mile round trip for Double Stuff Oreos!  Considering how messy these look anyway, I'm REALLY glad I didn't make the trip.  Actually, my grandchildren will not know the difference, and if they make it through the car trip, then it will be happiness and if they don't, well, then they will "disappear", never to be seen by anyone but my readers!!!

They are really cute - despite the many snafus of getting them completed and the overall messiness of the project.  I'd like to do these again when my grandchildren can do the project with me.  I think they are old enough now that they'd have fun with it.  By next year, I know they will be able to do it and I'll select "glue" I know will work for me!

Enjoy the photos - and hope everyone is having a good time preparing for Thanksgiving!


Ingredients:
DOUBLE STUFF Oreos
Mini Peanut Butter Cups
Candy Corn
Whoppers
Dark Colored Chocolate Frosting "for glue"
Yellow icing for feet (royal would work better than these tubes)
Red icing for the wattle (the tube worked fine)
Ignore the Rolos - they don't belong...but they taste good!

Step 1 - Run a bead of chocolate frosting down the
middle of the Oreo and insert five candy corns.
Allow to dry laying down.

What happens if you don't use Double Stuff Oreos :-)

Put a little blob of frosting on a cookie laying down and
press the other Oreo with the candy corn into it

Support them against the edge of a bowl, your back splash, a box or
whatever - but they do need some support while they dry.

While the turkey pieces are firming up - cut a sliver off the edge of
each peanut butter cup.  Lay it with the large (top) side down and use
a sawing motion so the cup doesn't shatter.  I also found it helpful to
put the peeled cups in the freezer for 10 minutes because it was
in the 80's here today and they were melting while i handled them.
Next, lay the turkeys on their backs and glue (with chocolate
frosting) the peanut butter cup and the whopper and allow to firm up.

Next, cut the white tip off of candy corns to make beaks.  Glue them
on with frosting (yellow or chocolate - I used chocolate but yellow looks better).
Make a wattle with the red tube of frosting and allow everything to set up.

Now, add the eyes - you might see my previous notes about that
little challenge!

Last but not least, draw some little feet on the bottom
Oreo with the yellow tube of frosting.
Bon Appetit, Y'all!!!

SHARED WITH:

Friday, November 11, 2011

Chewy Chocolate Meringues

It is 11-11-11, it's a gorgeous day, and I needed to bake something to take over for coffee with a friend this afternoon.  I had about 1 1/2 hours available and I took a peak at my "list of things I want to bake" and the item on the top was a recipe I'd saved from Bakerella's website some weeks ago.  I am a meringue lover - I'll eat it raw I love it so much.  So the Chewy Chocolate Meringues were what I decided upon.  They looked wonderful, and blessedly fast.  They are supposed to be cracked and crispy on the outside and soft and chewy on the inside.  Yummmmm.

I was intrigued because I usually have to leave meringues in my oven to cure - but these appeared to be fast bakers and I thought I could whip them up and out before having to get dressed and hit the road for Zumba.

First, I'll share the things that I did different and a few things that went wrong. 

I didn't take my laptop in the kitchen, nor print off the recipe.  I ran back and forth like an idiot, peeking at the recipe to make sure I was on point.  Uh, not advisable.

I didn't have chocolate nibs - so I decided to double the chocolate - and I decided I didn't have time to chop block chocolate, so I used Ghirardelli Milk Chocolate Chips.  I almost always prefer milk chocolate to dark anyway.  I prayed that would not mess things up.

I re-read the recipe 3 times...and still missed the part that said "rotate and bake another 8-9 minutes".

It was a cold morning, no rain, so I didn't check the humidity here on the Texas Gulf Coast until AFTER I baked the cookies.  Whew...only 62%.  That'll do.  I don't usually make that mistake with meringues...I have ruined some lovely piped meringues on a 90% humidity day!  They literally wept that day.

I had to scramble upon realization that I had screwed up the baking time and needed to re-insert the tray I'd just removed, despite now having two trays already in the oven - I had to scurry and create another level with a cooling rack to get all 3 trays in my oven that only fits two trays.  Holy crap people.  I was red in the face, praying, and cursing all at the same time.

The scariest thing I did, however, was using a carton of pasteurized egg whites instead of fresh egg whites.  I was in a hurry, I'd read a recent blog that said they worked just fine, and I just decided I'd take the risk - it is, after all, 11/11/11, a supposedly good day!

All said, they still turned out okay!  Better than okay.  They look and taste exactly as I had hoped.  Chewy, yet fluffy on the inside, crisp on the outside, and full of chocolaty deliciosity!  They looked like the pictures from Bakerella and the book, Home Baked Comfort...so I felt good about the whole thing!

 
Chewy Chocolate Meringues
(adapted from Salty Tart via Home Baked Comfort via Bakerella)
1 cup pasteurized egg whites (I used a local store brand - H.E.B.) or 1 cup of fresh egg whites if you prefer
2 cups granulated sugar
5 tbsp natural unsweetened cocoa powder (I used Hershey's)
8 oz Ghirardelli Milk Chocolate chips (orig recipe called for 4 oz. chopped semi-sweet chocolate and 4 oz. of chocolate nibs - I started with 4 oz. of chips then added another 4 oz.)
Method:
  • Preheat oven to 350 degrees.
  • Line baking sheets with parchment paper or a very clean silicon baking sheet (Silpat).

  • Measure out all of your ingredients.

  • In the metal bowl of your stand mixer, whisk together egg whites and sugar by hand. Set over, but not touching, simmering water in a saucepan.

  • Whisk constantly until the sugar is completely dissolved and remove from heat. (I rubbed some between my fingers to make sure I didn’t feel any sugar granules.)

  • Put the bowl onto your stand mixer with whisk attachment.  Beat the eggs on high until stiff and glossy.

  • Sift cocoa over the meringue. (I forgot to sift - I just sprinkled it on - worked out okay because I had nice fresh cocoa with next to no lumps...whew!)  Fold into meringue with a spatula.

  • Sprinkle chocolate chips on top. Fold together with spatula until combined.  Fold, don't mix.


  • Use a scoop to drop even amounts of batter onto prepared baking sheets about two inches apart.

  • Bake for about 8-9 minutes. Rotate the pans and bake for another 8-9 minutes until the cookies are fluffy and full of cracks.

  • Transfer the cookies, leaving them on the parchment paper or silpat, to wire racks to cool.

Meringues you don't have to worry about cracking...because they are supposed to be cracked...who wouldn't love that?  The insides are kind of gooey - and they taste delicious. 

My batch made 48 cookies.  The ones that I kept at 12 to a sheet seemed to be the best.  The trays that I had a bit more crowded were slower in getting "done".  Next time, I'm going to take the time to chop semi-sweet chocolate...the milk chocolate and the large amount of sugar together was a bit too sweet (I know, you can't believe I'm saying such a thing!).  I'm happy to add these to my meringue repertoire!


Bon Appetit, Y'all!!!

SHARED WITH: