The South Padre Island Flip Flop Foodie Brownsville restaurants

Search The South Padre Island Flip Flop Foodie Blog!

Friday, December 31, 2010

Happy New Year's Eve!

  • Iceberg Lettuce Salad with scallions, chunks of perfectly ripe avocado, crispy crumbled bacon, cucumber chunks, tomatoes, and Home-made Vinaigrette for me - Honey Mustard for the hubby
  • Pork Tenderloins wrapped in bacon and seasoned with Mesquite Seasoning Mix - seared stove-top to a lovely crispy brown and finished in the oven - sooooo tender and juicy
  • Baked sweet potatoes with butter and brown sugar for me and the hubby - baked russet potato with butter and scallions for the teen
  • Cornbread Muffins slathered with room temperature butter <groan - soooo good>
  • Holiday Grapes from Central Market for a palate cleansing dessert


A simple and delicious New Year's Eve meal!  Now we will move on to the special bottle of wine John got in Roswell, NM at the little wine bar... a small bottle of St. Clair Winery's New Mexico Cab-Zin - produced and bottled in Deming, NM where he lived for a few months when he was a very young man trying to help start a commune (that's my sweet old hippie man :-) and a bottle of my favorite, Santa Margherita Pinot Grigio....and a movie with the teen.  Happy New Year's Eve to us!StumbleUpon

Thursday, December 30, 2010

A Day of Trial and Error - Pastry Puffs Redux

Before Christmas I wrote a blog post about making pastry puffs - or cream puffs.  I never got around to filling and topping them despite my best intentions, so they remained in my freezer...until today.  I wanted a treat of some kind and the teen had asked for a cherry-filled puff, so I decided to do that today.  I pulled the puffs (the larger one) out and let them come to room temp and then I re-toasted them at 350 degrees for about 4 minutes.  Perfect.

I put a can of cherry pie filling through some food processor action, and my sampling determined it was a delicious tasting filling.  I made some chocolate ganache for a topping.  I poked a hole in the bottom of each puff...and I was ready to fill.  I put all of the cherry filling into a piping bag with a wide-mouthed tip.  First mistake.  Should have used a smaller tip.  The first one, I filled too rapidly and it nearly exploded.  I laughed at myself and carried on.  Working a bit more carefully, I filled all of the puffs and there was just enough to do them all.

Problem #2 - it was really too thin after processing.  It needed to be more gelatinous...more like just the jelly part of the pie filling.  When I processed the cherries, it added too much juice to the jellied part.  Tasted good, but I knew it was going to be a problem.

Once they were all filled, I carefully dipped each puff upside down into the ganache.  Okay, now that's pretty.  Nice and shiny like you expect a good ganache to be.  No problem there!

Ganache coated, cherry filled puffs
The next step, was to try one, of course!  I am so glad I was standing at the kitchen counter because red cherry jelly squirted out everywhere when I bit into the pretty puff :-)  Lesson learned!  Maybe we'll eat these with a fork!  Another lesson - should have used this filling for the petite puffs, which you could just pop in your mouth whole...and use the jar of lemon curd for the medium puffs...I bet it would have worked much better...OR a whipped cream filling...anything more firm than cherry pie filling.  Oh well, you live and learn. 

The big question...would the teen think they were good?  He's picky, so you never know.  I offered a plate and a fork.  He took a bite...he ate one.  Then he said he didn't like the cherry and the chocolate flavors together.  <huge sigh>  John and I have a lot of cherry chocolate puffs to eat!  Hope he likes them :-)

Cherry filling - not thick enough for a puff!

I'll share the good, the bad, and the ugly with you...because the cooking arts are not a perfect science.  I'd like to see Food Network do a chef bloopers show.  You KNOW it happens...but we never get to see it.  My kitchen activities are rife with blooper examples.  I just laugh at myself and move on...most of the time!

Bon Appetit, Y'all!StumbleUpon

Zucchini Appetizers

Photo Source:  Google Images
This recipe comes from my ex-mother-in-law; she gave it to me wayyyy back in 1976.  It is still delicious today - but I rarely see it being served any longer.  It's another one of those Bisquick recipes that were so popular in the '70s.  I find it is a great recipe to prepare using a mandolin for the zucchini slicing; it's better than slicing them by hand if you have one available!  Another plus is it is so basic anyone can make it and not mess it up (that would be me in 1976...I needed easy, so I wouldn't mess it up).  You really just dump all the ingredients in one bowl, stir, transfer to baking pan, and bake.  DONE, Finished, Easy! 

I was searching for images to use, and sure enough...there it is on the Betty Crocker website!  I read the reviews...yikes, some people didn't like it...but lots more did.  As always, I tweak my recipes.  I like this one with more onion, garlic, and cheese.  Give it a try if you haven't had this before.  My family loved this served as a snack back when the older boys were small.  The teen doesn't like vegetables...I can't even sneak them in this recipe because he can see the green :-)  I hope YOU like it...enjoy!

ZUCCHINI APPETIZERS

Ingredients:

3 cups thinly sliced unpeeled zucchini
1 cup Bisquick Baking Mix
1/2 cup finely chopped onion (I have used more onion - up to 3/4 cup)
1/2 cup grated Parmesan cheese (I used 3/4 cup of freshly grated - or you can use 1/2 cup of the green can stuff)
2 Tbsp snipped parsley
1/2 tsp salt
1/2 tsp Season Salt
1/2 tsp dried marjoram or dried oregano (I used oregano)
1/8 tsp ground black pepper
1 clove garlic, finely chopped or pressed (I used 2 cloves of garlic - because I like it garlicky)
1/2 cup vegetable oil
4 eggs, beaten (original recipe doesn't say what size - I think large is the standard to use)

Method:

Pre-heat oven to 350 degrees.  Grease oblong pan 13x9x2 (or use a smaller casserole if you want thicker pieces - and adjust baking time).  Mix all ingredients, spread in pan.  Bake about 25 minutes (may take longer - look for a medium brown color around the edges, light brown on top - see photo).  Allow to cool.  Cut into pieces about 2"x1".  Serve room temperature.

Bon Appetit Y'all!StumbleUpon

Wednesday, December 29, 2010

Hey Grandpa, What's for Supper??? Cowboy Beans! Yum, Yum!!!

Only people "of a certain age" likely remember the country television show, Hee Haw.  Being of that certain age, my husband and I use that phrase from time to time when we are wondering what's on the menu for supper!  In the skit, Grandpa would then describe all the goodies to be served ...usually good old Southern ingredients, some sounding like "road kill" or hillbilly grub ;-p.  Then the crowd would end with "Yum Yum" drawled good and loud.  I don't know why, but it makes me smile :-)

My friend, Suzanne, made a particularly tasty, yet very simple, casserole dish for a party last summer...it was called Cowboy Beans.  I think it is the epitome of a Texas-style casserole...can picture it being eaten by cowboys on the range after a hard day on a cattle drive.  While it doesn't have a huge amount of meat in it, there is some...if you wanted it meatier, I think you could just add more.  It was really delicious, and would be a wonderful one-dish-meal for a cool Winter's night...or a grand addition to a pot-luck party...or even better, in a pot over a campfire!

Photo Source: Google Images
I bow to Suzanne (a master blogger herself) for graciously sharing such a tasty recipe.  It is definitely some "good grub".... and I would loudly say "Yum, Yum" after finishing a helping of this dish.  If you like a satisfying baked bean dish, this is definitely something you should try!

Photo by Debbi Hook

COWBOY BEANS

1/3 pound ground beef, browned
1/2 pound bacon, cooked and crumbled
1 cup onion, diced
1 large can pork and beans, or baked beans
1 can Lima beans, drained
1 can kidney beans, drained
1/2 cup white granulated sugar
1/2 cup ketchup
1/2 cup brown sugar
1 tsp salt
1tsp wet mustard (I guess that could be any kind you favored!  We like yellow)
2 tsp vinegar

Mix all the ingredients together and bake at 350 degrees for 40 minutes.

Photo by John Hook

Really now, doesn't that make you think of the old west?  Remember though, if you are hunkerin' down by a camp fire... don't squat with your spurs on!

Bon Appetit Y'all!!!StumbleUpon

Hot Peas...side, salad, or dip!

The Austin American-Statesman's Wednesday FOOD section provided me with so many recipes over the years.  Here's one I clipped for my New Year's Day collection :-)  Yep - it's black-eyed peas!  This time the title has to do with the spice, not the temperature!  This is similar to what we call Texas Caviar (except Texas Caviar usually has an Italian Dressing base)...it's one of those dishes we nibbled on all day on the 1st.  Gotta get our good luck going! 

HOT PEAS

2 (15oz) cans black-eyed peas
1 (10oz) can Ro-Tel spicy tomatoes, chopped
1/4 cup margarine
1 cup chopped onion
1 cup chopped celery
1 cup chopped green bell pepper (or 1/2 cup red and 1/2 cup green)

Combine black-eyed peas and tomatoes.
In medium skillet, melt margarine and saute onion, celery, and bell pepper.
Add sauteed vegetables to the pea mixture.
Stir well to mix.
Pour into serving dish, cover, and chill until served.
This dish is best served at room temperature and can function as either a salad or a dip.  Serves 4 to 6.

You could throw in some chopped jalapenos (marinated or fresh) to make for a spicier "kick".  I've served this as a side dish - I didn't chill it - just warmed everything and served hot.  It's a good way to kick up a can of black-eyed peas without a lot of trouble!

Bon Appetit Y'all!StumbleUpon

Tuesday, December 28, 2010

Chicken and Noodles...For My Main Squeeze

You may recall my November 2010 post about the Indiana branch of the family making homemade noodles a part of their holiday meals.  We had them at Thanksgiving (yum) and we were on the road Christmas Day...so no big Christmas meal.  We had a huge Christmas breakfast at Katz's in Austin...because after 31 years in business, they are shutting their doors on January 2nd.  Katz's is an Austin institution, so we felt we had to pay homage before they closed their doors.  John, the teen, my middle son, and myself waited in a 25 minute very chilly line, waited over an hour for our food, and never felt cranky.  The people in line, the wait staff, our family...all reminiscing about the closing of a 24-hour-a-day New York-style Jewish deli in the heart of Austin's 6th street music scene and theatre scene.  No pork products sold there!  But, they ARE open on Christmas...one of the few places you'll find serving breakfast Christmas morning in Austin, Texas!  Their sign says "Katz's Never Kloses!"  Unfortunately, bankruptcy and not paying their payroll taxes begged to differ.  I'm really glad we got to say farewell...but that brings us back to "Christmas dinner", or lack thereof.

I had 1/2 the batch of hand-rolled noodles in the freezer just waiting for my hubby to get home...and when I told him we had noodles and I would make them tonight, he was one happy dude!  Even the teen agreed he would try them (he was a "no go" on Thanksgiving noodles...so I was unsure if he would ever give them a try).  I asked him if he would try them if I put mushrooms in them?  He reluctantly agreed, but I wasn't sure he would actually follow through.

So I went to H.E.B. and bought 3 bone-in chicken breasts, with the skin on (something I never buy) and decided I would roast them off.  I covered a baking tray with aluminum foil, sprinkled the chicken breasts, skin side up, with onion powder, garlic powder, salt, and pepper.  Then, I sliced up 1/2 of a yellow onion and sprinkled the slices all over the chicken.  Roasted at 375 degrees for 55 minutes.

While that was roasting, and filling the house with a wonderful scent, I added 1 quart of chicken stock and 1 quart of water to a Dutch Oven on the stove top.  I popped in about 1/3 of a stick of butter, salt, pepper, and about 2 teaspoons of poultry seasoning.  Left it sitting there and ready for me.  I prepped an 8oz container of button mushrooms (cleaned with a damp paper towel and sliced).  I also prepped a couple of crowns of broccoli for steaming...that would be our vegetable side dish.  Wheat biscuits were made ready for baking.  I rinsed and drained 2 packages of fresh blackberries on a paper towel....and whipped up some cream with finely granulated sugar and vanilla to top the berries.  A tasty dinner was well on the way.

Once the chicken was cooked, I carefully drained all the "drippings" into the Dutch Oven for more flavor and scraped all of the roasted onion pieces into the pot as well.  I put the chicken breasts on a cutting board to cool to a point I could handle them.  At that point, I turned on the burner to get the broth to a boil.  Once it was boiling, I dropped the frozen noodles a handful at a time, and all of the flour that was in the Ziploc bag with them, straight from the freezer, stirring after each addition, bringing back to a boil after each addition.  Never want to let those babies thaw before dropping in the boiling liquid...they clump together if you do.

Once the noodles were boiling happily, I lowered the heat to medium so we'd have a steady but not overly vigorous boil.  I then removed the skin from the chicken and let my husband have the crispy parts as an appetizer (he would have just died if I'd thrown that away...he loves crispy chicken skin).  I removed the chicken from the bone and cubed it, ready to go in the last 5 minutes or so.  At the point I determined the noodles would be done in about 10 minutes, I dropped the mushrooms in, checked for seasoning, added more salt and pepper, and then added the chicken for about 5-7 more minutes of cooking time.  The broth was thickening due to the noodles and I could tell this was going to be a primo dinner.

I served the chicken and noodles in pasta bowls, and guess who ate two bowls full?  The teen.  The picky eater finally showed his Indiana genetic roots.  I doubt he will ever turn them down again.  The broccoli was perfect, the biscuits with butter and honey were perfect, the berries and whipped cream were dyn-o-mite...but the star of the night was a simple pot of chicken and noodles...you'd have thought I'd served my people prime rib...I doubt they would have been any happier!

So, there I was looking at all the empty plates and realizing...oh crap...no pictures, once again.  Bad blogger, bad blogger :-)  So, you get a photo of the leftovers...but you can definitely see the yumminess shine through.


A ladle full of homemade chicken and noodles

If you want a delicious homey dinner - check out the November post on how to make the "Indiana Noodles by Way of Texas" and make a big pot of chicken and noodles.  Your family will thank you for it, I can almost guarantee! (and in the time it took me to get this post written, I see my husband has gone and gotten a bowl of the leftovers...he loves him some homemade noodles!!!)


Bon Appetit Y'all!!!StumbleUpon

Three Bean Shoepeg Salad - with a New Year's Day alternative addition!!!

My friend, Trudie H., shared this recipe and it is my hands-down favorite 3-bean salad recipe.  My father-in-law loves it...and I always get requests for the recipe whenever I take it to a pot-luck dinner.  It's really simple but the secret is in preparing the dressing just exactly the way Trudie instructed me.  It's tart and sweet at the same time...yum...makes my mouth water when I think about it.  I frequently make it without the shoepeg corn.  However, the original recipe calls for it, so that's the way I'll post it.

Now - here's my New Year's Day trick...Southerners consider it mandatory for good luck in the new year, to eat black-eyed peas on New Year's Day.  There's all sorts of thoughts on how this got started, and you can read all about it on this web site.  I'm not a HUGE fan of having a bowl of hot black-eyed peas.  It's "okay", but not my favorite.  So, what I like to do is make this a 4-bean salad by skipping the shoepeg corn and replacing it with a can of rinsed and drained black-eyed peas...just on New Year's Day.  That meets the standard for "good luck" and makes me happy too :-)

Here's the recipe:

TRUDIE'S THREE BEAN SHOEPEG SALAD

Prepare dressing and set aside:
Mix 1/2 cup Apple Cider Vinegar, 1/2 cup granulated sugar, 1 tsp salt, and 1 tsp pepper until sugar and salt are dissolved.  Whisk in 1/3 cup vegetable oil once sugar and salt dissolved.

Drain and thoroughly rinse (in colander):
1 can french cut green beans
1 can shoepeg corn (OR, black-eyed peas if New Year's Day!)
1 can wax beans
1 can kidney beans

Thinly slice and halve one red onion (use the whole onion, but end up with half-moon slices).

Toss beans, corn, and red onion with dressing.  Refrigerate at least 24 hours before serving.

I put it in a plastic container with a tight lid - I shake everything several times during the 24 hours.

DE-FREAKING-LICIOUS!!!!

Bon Appetit Y'all!!!StumbleUpon

Monday, December 27, 2010

Salmon Spread

I found this Xerox copied recipe folded up and squished down in my recipe box.  I'm so happy to be finding some of my lost recipes!  This is obviously cut from a newspaper or magazine...and considering the age of the paper, I'm betting it is from the 80's.  This is probably the last dip recipe I'll post prior to New Year's Day.  I have another appetizer, a salad, and black-eyed peas to share as well!

This recipe is just titled Salmon Spread.  My husband really likes salmon and so does the teen.  I'm not a huge fan.  I do like salmon croquettes (oh yeah, fry something up and I'm bound to like it!).  I remember liking this dip though - I wish I could remember who shared it with me!  It uses a canned salmon and can be made ahead...two pluses during the holiday season!  So, here's the recipe:


Photo Source:  Google Images

Salmon Spread

Ingredients:

15 ounce can red salmon
8 ounce package cream cheese, softened
1 tablespoon fresh lemon juice
1 tablespoon grated onion
1 teaspoon celery seed
1 teaspoon prepared horseradish
1/4 teaspoon sea salt
Coarsely ground black pepper to taste
Tabasco sauce to taste
3/4 cup finely chopped pecans

Method:

Drain salmon, removing bones and skin; flake with a fork.
Combine next eight ingredients and mix well.
Stir in salmon.
For a smoother consistency, especially if molding, blend in a food processor.

Spoon mixture into a well-oiled 2 cup or 3-cup mold and chill overnight.  Unmold on to serving platter and gently pat pecans onto surface.  Garnish with some sprigs of parsley, curls of lemon rind, and/or green onion curls.  If you don't want to mold it, simply sprinkle the pecans on the surface of your dip in a low, wide-mouthed serving bowl. 

If you are looking to make some tasty individual appetizers - cut some 1/2" thick rounds of cucumber and put a dollop of salmon spread on top of each slice and top with a sprinkle of chopped pecans.  Also, you might try a more adult version of "ants on a log"...pipe a line of salmon spread in a 3" piece of celery and sprinkle with chopped pecans. 

Serve with assorted crackers....or carrot and celery sticks.  This is a very flexible dip!

Green Onion Curls:
Place green onion on cutting board
With a very sharp paring knife, remove root end of onion and most of green end...leaving half white and half green...about 3 to 4 inches in length.
Make lengthwise cut up center of onion to about the halfway point
Repeat to slice green end into thin slivers
Place onion in cold (not ice) water until ends curl slightly
Remove from water and drain well.


A blurry photo from my cell phone - sorry

Ta Da!  Easy Peasy!

Bon Appetit Y'all!!!StumbleUpon

Black Bean Dip

I'm rockin' and rollin' through my old dip recipes...it's like a walk down memory lane :-)  I remember the parties and good times that went along with some of these recipes.  I hope you try them - and that they add to your memory book of good foods and good times.

Photo Source:  Google Images
Today's offering is a Black Bean Dip.  I used to make this during "diet days"...it says it is only 11 calories for a tablespoon...but I can't swear to it.  I don't positively remember the source of this recipe (it's on a very old recipe card) and I don't EVER try to calculate the accuracy of calorie content in my recipes...usually it would scare the crap out of me because most of my recipes are NOT low cal at all!  For me - if it's party time - I'd rather not know.  I THINK this recipe was from a public television show that I used to watch way before the days of Food Network.  It was a female dietitian making recipes (70s and 80s) using a hot plate and a toaster oven.  All of her recipes were nutritious and diabetic-friendly.  Boy howdy, how cooking shows have changed!

Here's the recipe:

BLACK BEAN DIP

Ingredients:

2 Tbsp chopped green chili (I like Hatch Green Chilies in the can - usually available at our local H.E.B. grocery)
1 small onion, chopped  (about 1/2 cup)
1 large clove garlic - smashed
15 ounce can black beans, drained (I like Progresso brand - commonly available locally)
1/2 cup plain non-fat yogurt (more if it is too thick)
1 tsp ground cumin (cominos)
1/4 tsp salt


Method:

In food processor, pulse green chilis, onion, garlic, and beans until almost smooth.  Stir in the yogurt, cumin, and salt.  Serve hot or cold with baked pita triangles (which may be found on this blog post link) or homemade tortilla chips.  I've tried this simple toasted tortilla chip recipe from Cooks.com.

HOMEMADE TORTILLA CHIPS

1 pkg. flour/corn tortillas (10-12 in a package)
Nonstick cooking spray
1/8 tsp. paprika
1/8 tsp. cayenne pepper
1/8 tsp. chili powder

Spray each tortilla with cooking spray. Sprinkle lightly with spices. Stack tortillas and cut in half, in quarters, in eighths. Single layer on cookie sheet. Bake or broil 5 minutes at 350 degrees. A tasty, lower fat, low salt alternative.
I've made these without the spices - and just sprinkled with salt.  That's the way I like them ;-)

You can easily mess around with such a basic recipe... for more kick - add a pinch of cayenne pepper to the dip when you add the cumin.  You could also stir in some chunky salsa from a jar for another level of flavor with almost no calorie addition (if that is important to you).  If you aren't sure what you want to add, grab a teaspoon and put a dab in a ramekin, stir in a tiny bit of the additional flavoring and give it a taste to make sure you like the adjustment...before adding a lot!

The dip is, however, a healthy alternative to the heavy-with-cream-cheese dips often found on a holiday table.  You could also use whole wheat pitas and/or whole grain tortillas for making the chips - another nod to more healthy choices.  It's also inexpensive to make.  Those two things alone make it a worthwhile addition to your dip choices!
Bon Appetit Y'all!!!
StumbleUpon

Sunday, December 26, 2010

Shrimp Dip or Mold


Photo Source:  Google Images
I was flipping through my recipe box looking for potential New Year's Eve dips when I found a recipe I thought was long-lost.  My mom used to serve this dip at parties and I loved it.  I wrote it on a recipe card...and it got stuck to another one in the recipe box...and I didn't realize it was there.  The last time I made it was in the early 90's...haven't been able to find it since.  Today, I took all the recipe cards in the appetizer section out of the box, and lo and behold, there it was!

This is one of those recipes where I went "HUH, really???" when I saw the ingredients.  Not what I was expecting...but it really tastes good.  I got lots of compliments back in the day when I made it regularly for parties.

I don't have personal photos to show you, because it's way too much to make for one family of 3...but if you have a crowd, this is a tasty and unusual dip to serve.  I usually molded it, using gelatin, in a fish-shaped copper mold...and surrounded the molded dip with crackers on a nice big platter.  Once I sliced green onions into very thin ovals (on a diagonal) and lay them on the fish (one by one) like fish scales.  Made for a pretty presentation!  I Googled some images and found a sample of something very similar...and a picture of a copper mold almost identical to mine...my fish was not quite so arched...but darn close!  So, this will give you some ideas anyway :-)
 
Photo Source:  Google Images

SHRIMP DIP, OR MOLDED DIP

Ingredients:

2 8-ounce bricks cream cheese
2 10 1/2 oz. cans Campbell's Tomato Soup
2 cups onion, finely chopped
2 cups celery, finely chopped
2 cups red bell pepper, finely chopped
3 cans baby shrimp - drained (I've also used freshly boiled shrimp which I chopped into small pieces)

Method:
Melt together cream cheese and tomato soup, stirring (and then whisking) constantly until smooth.
Add onion, celery, and bell pepper - mix well.
Stir in drained shrimp until evenly distributed.

May serve, chilled as a dip
OR
May mold by:
Dissolve 3 envelopes plain gelatin in 1/2 cup hot water.  Allow to bloom.
Whisk into hot cream cheese and tomato soup mixture, then add the rest of the ingredients as above.
Pour into mold and refrigerate for several hours or over-night.
May lightly oil mold prior to pouring in mixture if you have concerns about unmolding (especially if it has lots of little nooks and crannies).

Now that I've typed this...and since I haven't made it in a long time...maybe I'll halve the recipe.  I think we might be having it for New Year's Eve after all! 

Bon Appetit Y'all!!!StumbleUpon

Another Hot Artichoke Dip!

Here we are...Christmas is over...time to start thinking of New Year's Eve celebrations.  Need a New Year's Eve dip?  Here's a GREAT option!


We'd already dug in when I thought..."yikes - didn't take a photo!"  So we set up a few staged photos.

One of the gastronomical hits of my son's Christmas Eve party was my friend, Trina's, recipe for a hot artichoke dip.  She brought it to a party earlier in the month and I asked her to send me the recipe.  It is quite delicious - and not too difficult to make.  She said it is from the Pampered Chef's 2009 Fall/Winter Cookbook.  I looked online and didn't find it currently posted.  Trina sent her recipe...and I tweaked it a bit (some on purpose, some by accident).  The dip is served in a bread bowl, and we both used the Pampered Chef bread tubes to bake our own shaped loaves...which we sliced into little toasts and crisped in the oven.  I had to buy the bread tubes on eBay because I didn't find them in the online Pampered Chef catalog either!  Never fails - I find something cool - and it is out of production.  Thanks goodness for eBay!

So, here's what I did.

First, after receiving my bread tubes, I sprayed the inside with cooking spray, and used refrigerated Pillsbury Country Italian Bread dough.  In retrospect, I would have cut off about 3 inches of the raw dough as both bread tubes had bread expanding to the point of the top coming off the baking tube while in the oven.  I used the scalloped bread tube and the star bread tube.  I followed the instructions enclosed in the Pampered Chef Bread Tube packaging for making "toasts".  Once the bread had cooled completely, I cut the loaf into 1/4" thick slices.  I did this 3 days in advance and just stored the bread tubes in a Ziploc bag after they were thoroughly cooled.  You are making crispy toasts, so it doesn't need to be "freshly baked same day".  The night of preparation, I laid them out on a cookie sheet, sprayed them with a Canola Oil mister and toasted at 400 degrees until I could see the edges browning, then I flipped them until they were lightly brown and toasty.  I removed them and set them aside.

I had purchased a good sized round of artisan Sourdough bread from Central Market in Austin.  They are particularly delicious...but, since you aren't eating the bread (in my situation) it would be absolutely acceptable to go with a cheaper bread bowl!  I sliced the top off the bowl and scooped out all the soft insides... my son saved the insides in a freezer bag for future bread crumbs.  I set the bread bowl and the lid to the side.


Artichoke Bread Bowl Dip:

8 oz cream cheese, softened (original recipe called for 4 oz. - but I used 8 oz.)
1/2 cup milk
1 can artichoke hearts in water, drained
1 - 1.4 oz envelope or one 1.8 oz box (2 envelopes) dried vegetable soup mix (I used Knorr's brand)
1 large garlic clove, pressed
1 lemon
8 oz sour cream
Fresh grated Parmesan cheese - not the powdery canned kind - you want the thicker grated pieces

Preheat oven to 450 degrees.

Whisk cream cheese until smooth in microwaveable bowl.
Add milk, whisk until smooth.
Chop artichokes, soup mix, and garlic and mix well. Microwave on high 5-7 minutes or until hot (do not boil).

Juice lemon to measure 2 tbsp juice. Stir lemon juice and sour cream into mixture and pour into bread bowl.

OK, truth time... I got confused in a hectic small kitchen - forgot to soften the cheese - so I zapped it in the microwave to soften, then added the milk and whisked - I didn't microwave any further - I just added everything else, whisking thoroughly...and it turned out beautifully...so there's the "recipe" and my "tweak" - do it however you want - both ways tasted good!

Place bread bowl and lid on a baking tray.  Spritz lid and outside of bowl with Canola Oil mister. Sprinkle Parmesan cheese over the dip that is inside the bread bowl. Lean lid against bread bowl (I just laid it upside down on the tray). Bake 13 - 15 minutes or until dip is golden brown. Remove from oven and serve.  Surround with toasts.

The original recipe called for using two bread bowls and cutting up one of the bowls and the innards of the other for bread cubes - which you toast at the same time as the dip (sprayed with oil) to make "dipping cubes".  Since I used the shaped toasts, I didn't need to do that.  If you wanted shaped toasts and don't want to try to hunt down a Pampered Chef's bread tube on eBay, you could alternatively purchase sliced sourdough bread, use a star shaped cookie cutter or scalloped biscuit cutter to cut out these shapes (or any shape of your choice), and go through the spraying and toasting process described above.
It was really good.  Worth the effort to make the little toasts too...but would likely have been quite tasty with some crackers or Melba Toast rounds (and a whole lot less effort)!  I really like going the extra mile for a holiday recipe.  It makes me feel good to get the oohs and aahs from the guests.  Makes it all feel worthwhile!  You should try this recipe...I bet you love it!

BON APPETIT Y'ALL!!!StumbleUpon

Friday, December 24, 2010

Blackbeard's Revisited

http://www.blackbeardsspi.com
The teen and I were finishing up our holiday shopping on the island, at Paragraph's on Padre Blvd, and noticed it was approaching time to eat dinner - our meals had been sporadic that day and we were starved!  We were driving south and he pointed to Blackbeard's and said "hey - they don't have a crowd - no wait!" so I did a quick lane change and u-turn at the next block to return to the intersection of Esperanza and Padre Blvd.  It was 5:30 and early enough that it was, indeed, not crowded at all.  That's always a plus for me :-)

We were promptly seated in the "no smoking" section and our very efficient, and friendly, waitress took our drink orders and pointed out specials...and left us to peruse the menu.  The first question out of the teen's mouth was the oh-so-scary "hey Mom, do you have plenty of cash?"  Uh, why do you ask???  One of the specials was a steak and shrimp combo, which was not all that expensive.  I gave him the thumbs up if that was what he wanted. We also heard the table next to ours raving about the all-you-can-eat shrimp special they were enjoying. 

Despite the many good options, the teen went with a British Burger (1/2 pound burger with bacon and cheddar cheese).  He's so funny - because I knew it would be ordered "hold the cheese"....and it was.  I will say, the burger was huge and loaded HIGH with bacon.  The boy was in bacon burger heaven.  A big old  pile of fries...what teen wouldn't be happy with that?  He informed me we would be returning...it was a really good burger.

I ordered a chicken-fried steak, with green beans and mashed potatoes (how Texan of me, huh?).  I am here to tell you ladies and gentlemen...that hand-breaded chicken fried stick was enough to feed a farmer after a hard day working in the fields...two pieces of meat, enough green beans to serve 3 or 4 by FDA food pyramid standards, and a double dollop of mashed taters.  Cream gravy on the side (thank you very much - I hate it when the whole thing is coated with gravy before it hits the table).  Very possibly, this is a chicken-fried steak that rivals my Mom's. I've ordered this at several restaurants (because I get sick of seafood every so often) and I rank this the #1 chicken-fried steak in the Lower Laguna Madre area. (at least of the places I've visited...if you know of one I should try...comment please!!!)  I like gravy on my mashed potatoes and ketchup with my chicken-fried steak.  That's the way we ate it growing up.  I ate both pieces of the meat...completely...and scrounged for any crispy pieces that might have fallen off. 

And the green beans?  Tasted like fresh green beans and cooked the way I like them...some nice soft onion in them - and perfectly seasoned. Well-cooked...not under-done as is popular it seems - I like mine thoroughly cooked!  I ate every single bean in that very large serving!  Delicious :-)  I don't like frozen green beans...they squeak on my teeth...I was so happy these were not frozen as so often served at family-type restaurants.  I ate half of the mashed potatoes...they weren't bad - they just weren't primo...and I was so filled with meat and green beans and a big piece of buttery Texas Toast that I couldn't possibly have finished them even if they were the finest potatoes in the land :-p

Business started picking up as we were leaving, so I was so happy to have been early-birds.  Excellent service, excellent food, and all for a reasonable price.  That's the way I like my night to roll!

If you are on the island visiting, or a local...give Blackbeard's a try if you haven't been recently.  Open since 1978, we've seen some ups and downs...but this visit, we were very happy campers!

Bon Appetit Y'all!

Blackbeard's Restaurant on UrbanspoonStumbleUpon

Wednesday, December 22, 2010

Peanut Butter Blossoms

Here's the easiest thing I've done all day :-)

My kids LOVE the peanut butter cookies with a Hershey Kiss stuck in the middle.  I've made them for more years than I can count...only learned they had a name a couple of years ago...  Peanut Butter Blossoms!

I've tried a variety of PB Cookie recipes as well...and you know what I do?  I buy a roll of Pillsbury's Peanut Butter refrigerated cookie dough...it works perfectly every time - I don't have to mix anything - it's my seasonal short cut during a time of year when I don't take many short cuts. 

Of course, I "dress them up" for the holidays by using a mixture of red and green sparkly sugar...and the smiles on the happy faces of my family are all the better because I didn't have to break my back measuring, mixing, and all that stuff.  They are no more happy if I make these from scratch than they are when I make these from the refrigerated dough purchased at the grocery store.  Win-win situation.  To make it even better - I caught a couple of rolls on sale earlier this year...for $1.00 if you can believe it!  Popped those into the freezer, pulled them down to my fridge 2 days ago for thawing...and perfecto!

It's easy peasy...and a great thing to make any time of the year.  Here's how I do it:

Preheat the oven to 350 degrees F.
Prepare two cookie sheets with a non-stick Silpat or parchment paper for easy release.
Cut the end off the tube of dough and run a knife all the way down the side so you can scoop out the dough.

Using a small cookie scoop, form about 24 balls (I scoop first and roll after all scooped).  I ended up with 26 this time.
Space them evenly on the two cookie sheets, leaving adequate space for them to spread - at least 2 inches apart.
Lightly flatten, using a fork dipped in sugar (rub your fork over the dough remnants to get some of the oil on the fork - it will allow the sugar to adhere for the first application of sugar).  Form a criss-cross pattern on the top of the cookie (dip between each placement of the fork).  I put red and green sugar together in a low edged ramekin - works perfect.


Bake 9-14 minutes (mine took exactly 10 minutes).  Don't over-bake - you want fairly soft cookies.
While they are baking, unwrap enough Hershey Kisses to put one on each cookie.

When they come out of the oven, place tray on a cooling rack and while they are hot and still poofed up - gently push one unwrapped Hershey Kiss into the middle of each cookie.

Allow to cool at least 5-10 minutes then remove from cookie sheet to cooling rack, being careful not to touch the Kiss.  Like I said, easy!

So, give yourself a break and take a short cut when you can.  Especially good for those times you want the kids to join in for cookie baking...they can roll the balls, they can dip the fork in sugar, they can peel the candies...Pillsbury refrigerated cookie dough...it's a good thing any time of the year!

Bon Appetit Y'all!!!StumbleUpon

Tuesday, December 21, 2010

Christmas Cake Pops and Cake Balls

Monday:  Today I'm baking the Red Velvet Cake as I prepare to make Christmas Cake Pops and/or Cake Balls.  Never made a Red Velvet cake before...dang, that is some RED batter!  I hope I am successful in making some Christmas Tree shapes for the grandchildren, as well as just some cake balls to have out for munching...without sprinkles.  My older boys said they were just too sweet with white chocolate and sugar sprinkles both...so I'll dip some in milk chocolate too!  They always end up looking more like a truffle and I find the adults go for them first.

I had every intention of making two batches...but I found myself overwhelmed with the things I have to do today and the following 2 days...so one batch it is!  Today, after the cake cools, I'll crumble the cake and add the frosting...and I'll make some cone shapes and some round balls.  Dipping will be Tuesday.

Monday Evening:  OK - let me be heard loud and clear...I will never roll Red Velvet Cake Balls again!!!  My hands are stained red and I've washed 3 times (and several times during the course of the activity)!  Oh my.  Well, they're rolled out (more balls than trees - it's not as easy to make a cone as it is to make a ball).  I made 20 cone shapes (either hats and/or trees - we'll see what tomorrow brings)...and a huge number of balls...well, it felt like a huge number.  It's been a long day - up since 6:00 a.m. wrapping 20 gifts, made 4 dozen rolled, cut and baked sugar cookies, wrote and posted a blog about the sugar cookies, baked the Red Velvet cake and made the "stuff" to roll into all those soon-to-be luscious cake ball treats!  I'm pooped, so I'll continue writing this Tuesday and post it after I finish the dipping and decorating...and fit in going to lunch with my girl friends (I deserve that, don't you think?)!!!

Tuesday Afternoon:  I was up until 3:00 a.m. (Monday night/Tuesday morning) watching the Winter Solstice Lunar Eclipse...awesome experience...but I "slept in" until 8:30 and was a zombie when I finally got up...no way I was getting started on any cake pop or cake ball dipping until after my fun lunch with my girlfriends...we went to Steamers on the Bay - it was a glorious day, tons of pelicans and gulls perching within yards of our table.  It was just what I needed. 

I came home and was ready to get started.  I've only dipped a few balls, Christmas Tree pops, and one round pop and I'm already needing a break.  So, I took a few photos and will finish up this blog post before I return to finish the many I have left to do!  This may take me two days to accomplish...or else it will be a late evening.  I feel sluggish today.  However, tomorrow is the final baking day before I head to Austin, so better get some caffeine in my system and get rolling...uh, I mean dipping :-)

Here are some photos of the first attempt at trees and a couple of the balls I've done.  I tasted one for QC...must say they are indeed tasty.  I do like spice cake balls better though.  I just thought the red velvet would be a good look for the holidays.

I'm liking the trees a lot!  After the plain ones are dry - will add balls

The first cake balls of the Christmas batch...not as smooth as I'd like
I hope my readers are busily baking and creating Christmas treats ... but don't forget to take time for yourself so that you are not so worn out from the preparations that you can't enjoy Christmas.  Well, break time is over - back to the dipping.

Bon Appetit Y'all!!!

(See comments below)

28 cake pops and cake pop Christmas trees...whew!

Holiday Cake Balls - I cut the piping bag too far up...way too thick for "drizzle"

Messy ones were the early ones - then I got into the swing of things :-)

FOR STEP-BY-STEP INSTRUCTIONS - CHECK OUT THE BAKERELLA VIDEO HERE!  Scroll down to "Related Media".  She shows you how to make the basic cake pop!StumbleUpon

Monday, December 20, 2010

World's Best Sugar Cookies

Several years ago I took a cookie decorating class at Central Market Cooking School in Austin.  It was one of my favorite cooking classes of the several I've taken!  It was hands-on and everyone walked away with about 1/2 dozen nicely decorated sugar cookies.

The instructor, Laurie Mather, is a pastry expert with a great ability to teach the uninitiated the complete basics of baking and decorating some darn fine sugar cookies.  She called her cookie recipe the World's Best Sugar Cookies and I have to say I agree.  I've tried many sugar cookie recipes and hers is just about fool proof (me being the fool!).

Here's the recipe:

Laurie Mather's World's Best Sugar Cookies

Ingredients:
1 cup butter (use real butter - not margarine)
1 cup sugar
1 Tbsp good Vanilla
2 Tbsp Cream
1 Egg
3 cups flour
1 1/2 tsp. baking powder

Method:
Cream butter and sugar together until fluffy.  Add egg, vanilla, and cream together.  Add in baking powder and 1 cup of the flour.  Mix until well combined.  Add in second cup of flour and mix until well combined.  Add last cup of flour and mix by hand. (I confess, I do the entire thing in the stand mixer)


Creamed butter and sugar - turns light yellow - fluffy texture

There is no need to chill the dough before rolling out.  However, chilling does make a sharper edge on the cookie during baking.

Bake at 350F for 8-10 minutes or until very lightly browned.

So, I made the dough - and because I wanted a sharp edge on the cookie, I let them chill in the fridge.
Sugar Cookie dough resting in refrigerator
I am not decorating these cookies today - I rolled, cut, baked, cooled, and will be storing them in an airtight container for transport to my family's home in Austin...where the grandchildren, their parents, their Aunts and Uncles, and me and Grandpa Cranky will enjoy a multi-generational cookie decorating activity Christmas Eve.  That shit stuff warms the cockles of my heart (what exactly are the cockles of my heart???)  They love to decorate cookies and I take frosting and lots of candies and sprinkles for them...and I'll make some royal icing for me to play with.

A tip on rolling the dough - I have the best success with a well-floured wooden dowel rolling pin...and I roll the dough in small portions.  Like pancakes - the first set usually sucks...I end up throwing it back...or baking it off and wishing I'd thrown it back.  Then, I get "the feel" of the dough...and it starts going without a hitch.  Tip #1 - don't roll too thin - you will have a heck of a time getting them off the rolling surface.  About 1/8" thick dough seems "just right" for me.  I flour my granite counter top and roll there.  Enough to cut out about 4 or 5 medium size cookies...then I get some more dough and go again.  I've done this for years and if I try to make it larger, I always mess up a few cookies.  Tip #2 - bake like-size cookies on a cookie sheet.  If you are baking large cookie cutter sizes - only put large cookies on that cookie sheet.  I tend to mix large and small cookies in the baking batch - but not on the baking sheet.  If I try to sneak a smaller one on - it always has over-crisped edges.  The cookies should have barely browned edges.

Here are some rolled and cut, but unbaked...

rolled and cut - similar sizes - needed to clean up the edge of the snow flakes!

And here are some just out of the oven - not much change in color you can see...and that is just right.

baked - with just a hint of brown on the edges
Laurie taught us to outline the cookie with royal or glace icing, and flood the inside of the outline after allowing to dry for a few minutes.  To outline, start at the 9 o'clock position and go counter clockwise around the cookie.  Hold the bag at a 45 degree angle.  Touch the surface of the cookie and squeeze.  Gently lift about 1 inch from the surface and let the icing fall.  Let the icing fall slightly ahead on the cookie.  As you get close the starting point, lower your hand to meet the beginning.  Toothpicks are one of the most valuable tools after your piping bag and tips.  She taught us to make our own parchment paper piping bags...but I figured out soon enough, I do better with disposable piping bags.  Flooding is simply a matter of cutting a small hole on a pastry bag and squeezing icing gently onto the cookie.  Start in the center and move to the edges.  Push the icing to the edge of the outline with a toothpick.  Don't touch the edges with the toothpick.  Work quickly to achieve an even surface (uh, my surfaces are not smooth - I need to work on that).   Decorating the cookies comes after you allow the flood icing to set up so that the colors don't run together (unless you want them to, of course).  If you want to put on sprinkles or other things that need to "stick" - those you do while it is damp.  I also found a pair of tweezers was invaluable for gently placing sprinkle shapes and sugar pearls.

I'd love to take her classes again...I just don't think I can drive 375 miles to do that :-)  I see that she is having a Valentine Cookie Decorating class in February 2011...and there are currently seats available in her class...but they don't last long!  MAN, I'd like to be there and take that class...she'll be teaching pretty borders and flowers this time.  Unfortunately, it's not to be for me!  I'm glad I was able to take with me the things she taught...here are a couple of the cookies I made last year. 


A huge problem at the coast is our high humidity...royal icing does not dry fast (if at all) in high humidity...that was a problem!  They were still quite pretty IMHO.  I am still a real novice...mostly because I don't do them often enough.  As with all things, one improves with practice.  I tend to do this maybe 3 times each year...at MOST!  I'll never be an expert that way - but that's okay...my granddaughters always oooh and ahhh and it makes me feel like the Cookie Queen when they do :-)

Here are the recipes for a couple of decorating icings for the cookies (also provided by Laurie in the class):

Glace' Icing

1 lb 10x sugar (confectioners sugar)
3/8 cup milk
3/8 cup light corn syrup

Options:  Flavored oil, lemon, almond, orange, etc.  Only use alcohol based extracts.

Mix sugar and milk until it is very creamy.  Then add the corn syrup until just combined.  This makes a very shiny icing, but takes a little while to dry.  You can substitute water for the milk, and it will last even longer.  Keeps 2 weeks in the refrigerator when made with milk, and 3 when made with water.  To store, cover icing directly with plastic wrap, then cover bowl tightly.  Stir the icing to soften before using.  You may microwave briefly if needed.

Glace' Outline Icing  (always outline first!)

1/2 cup glace' icing
6-8 Tbsp powdered sugar

Mix until very stiff.  Store the same as above.  Keeps 2 weeks in the refrigerator

Royal Icing

1/4 cup meringue powder (you can buy this in Wal-mart in the back party section with Wilton products)
1/2 cup cold water
1 lb Powdered sugar

Optional:  Flavoring, vanilla, lemon, almond, etc.

Add meringue powder to cold water and beat for 2-3 minutes to soft peaks.  Add sugar 1 cup at a time beating between each addition.  Add flavoring if using at this point.  Beat an additional 3-5 minutes to stiff peaks.  Cover with plastic and store in the refrigerator for several weeks.

This icing can be thinned down to glaze the cookies.  It dries very quickly, but isn't as shiny as the glace'.  It doesn't taste quite as wonderful either, but it works great.

Royal Flood Icing

1 cup Royal Icing
1/8 - 1/4 cup water or pasteurized egg whites (this makes the icing shinier)

Mix thoroughly.  To check consistency, run a knife through it.  it should come together at 10 seconds.  Any less than 7 seconds, add more liquid.  Use in 3-5 days.  Store in glass container with plastic directly on the icing, then covered tightly.  Store in refrigerator up to one week.

Have Christmassy fun - and Bon Appetit Y'all!!!
StumbleUpon

Sunday, December 19, 2010

The Scents of Christmas

I bake a lot during the time between Thanksgiving and Christmas - so for me, the smells associated with the holidays are visceral reminders of happy times...an automatic boost to my mood.  It is such a powerful olfactory association that I keep a small can of concentrated room spray out year round...The Scent of Christmas.  April, July, any month of the year...if I need a boost of happy mood - I give my rooms a little squirt and the reaction is immediate.  I don't do it too often - because I want it to be special.  But, when I do...wow, instant smile.

Part of my baking process frequently ends up with lots of apple peels, cinnamon sticks, cloves, leftover juice from a recipe, citrus rinds, ginger root knobs and peels...all that "stuff" that goes to the garbage, down the disposal unit, or down the drain (I live in a condo - so compost is not an option).  It's citrus season down here in the Rio Grande Valley, so I tend to have lots of orange and grapefruit peels to "trash".  Not in my house, though!  Another man's trash is this woman's treasure :-)

Yesterday, I wrote that I was keeping a plastic bag lined bowl for my apple and pear peels.  I also tossed in the used cinnamon stick.  Today, I'll be adding lime peels and pulp leftover from squeezing limes for limeade I'm making.  Also a few cloves leftover from Christmas before last and some bay leaves that are going to be past their prime soon.

Apple-Pear Butter Remnant Bowl
What do I do with all of this "trash"?  I store the bag in the fridge, or freezer if I have a lot...and I put a pot on the stove - 3/4 filled with water and leftover juices - throw in a handful of "stuff" from my "trash bag of remnants" - toss in some cloves and any dried spices that might be towards the end of their life (don't you have spices that are really past their prime...but hate to waste?  I do - because they say if it is over 6 months old, it's losing its flavor...ruh roh...I have stuff way older than that!).  I put this on to simmer all day long during the holidays - mostly on the week-ends.  My house smells delicious.  At the end of the day, I pull out the wooden parts and send everything else down the disposal...and start over again the next morning.

When I lived in a cooler climate and had to use the heater a lot - this was a wonderful way to add moisture and good scents to the air....and a "natural" way of recycling seasonal smell-good waste.  People would always come into my house and say "wow, your house smells so good"...."it smells so Christmassy"!

Don't want to deal with watching it on the stove?  Do you have an old slow cooker you don't use and it is just taking up space somewhere?  Designate it the "potpourri" cooker and throw the stuff in the crock pot, fill it to the top with water - put it on low - leave the lid off and it will scent your home for hours and hours. (I use crock pot liners and re-use them for simmering - I hate scrubbing a crock pot!)

If you are really industrious - there are many web sites which can instruct you on how to make, and bottle, liquid potpourri for personal use or for gifts.  With just a quick search I found an ehow article and another from a woman who makes homemade "stuff".  There are pages and pages out there, if you want to get fancier than using your leftovers!

But, for me...it's not rocket science - if it smells good and sweet when you are cooking it - those ingredients will smell good in a liquid simmering potpourri.  So, don't throw away those scent-sational remnants...use them to make your home smell sweet and delicious...and welcoming to your family and your holiday guests!

Happy Holidays my friends!StumbleUpon

Saturday, December 18, 2010

Slow Cooker Apple-Pear Butter

The Morning:

You would think, the first morning of school vacation, Mom would sleep in...like the teen.  Oh no, I woke up at 5:49 a.m. with my heart pounding because I thought a spider was on my pillow.  Turns out it was a couple of pieces of my long curly hair drifting against my arm in the draft of the ceiling fan.  I tried to lay back down after turning off the light (I had to make sure it wasn't a spider...so I turned on the light and searched my bed - Lordy I am bordering on neurotic :-)

Anyway, my feet hit the floor at 6:00 for the day - I could tell I was wide awake - no sense laying there.  Out of habit, I had set the coffee pot to brew at 5:45...so I wonder if my nose hoisted me out of REM sleep, where I then became aware of spider legs hair floating against my arm.  Who knows, but since it happened, it sure was nice to have freshly brewed coffee awaiting me in my carafe!  I'm treating myself to a White Chocolate Mocha creamer this week instead of the usual Half and Half in my coffee.  So, my Starbucks Breakfast Blend, and this luscious creamer made me almost bounce, I was so ready to get going on my day!
First order of the day was getting the crock pot filled with cinnamony apple goodness - today I'm making the Slow Cooker Apple-Pear Butter recipe I found in the Everyday Food magazine...and of course, because I always tweak things - I'm doing the same here.  I plugged in the Christmas tree lights, put on 5 Christmas CDs in the player, opened the blinds, cracked the deck door to let in the cool morning air...and got down to business.

Let's start with my rendition of the recipe:

Ingredients:
2 1/2 pounds apples (I used a mixture of Gala and Granny Smith)
2 1/2 pounds pears (I used a mixture of ripe and moderately firm Bartlett)
1 cup firmly packed dark brown sugar
1/2 tsp coarse salt (I used Kosher salt)
1 cinnamon stick
1/4 teaspoon ground cloves
1/4 teaspoon ground Allspice
Grating of nutmeg (not even 1/4 tsp - 3 or 4 quick rasps)


Equipment:
I found it helpful to make a plastic bag-lined bowl for peels and cores (more on that later).
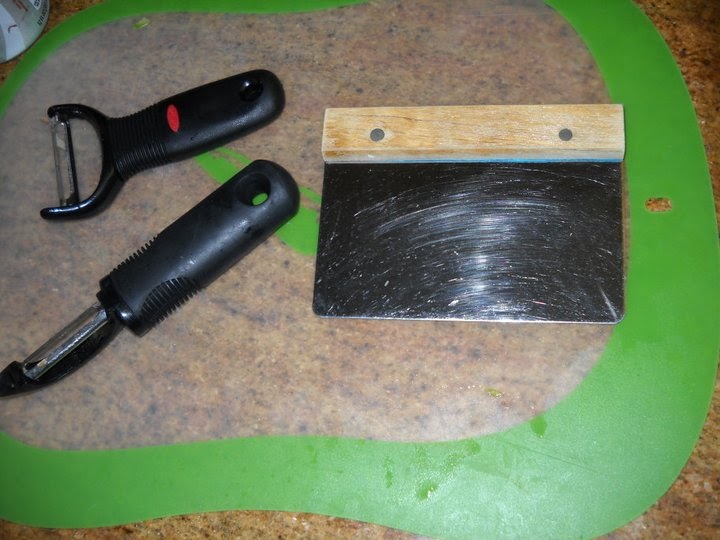
Cutting board, paring knife, larger Santoku-style knife, 2 different peelers, and a bench scraper
A bowl to put the peeled fruit in
A food processor with grating disk and large bowl set up
A silicone scraping spatula
A 5 quart (or larger) crock pot - I used a crock pot liner to avoid clean-up issues - I have an 18 year old crock pot and it is NOT easy to clean.

Method:

Apples and Pears Quartered and Cored - Ready to Roll!

Peel, quarter, and core apples and pears (don't worry if they start to brown - they are going to end up dark brown when all is said and done - so oxidation is not an issue if you are getting it all done fairly quickly).
In food processor, grate fruit (I had to do it in 2 batches).  The original recipe calls for small grate...but apparently my food processor only has one grater.  Since you are going to process it again - I'm not concerned.
Transfer grated fruit to crock pot.  Stir in dark brown sugar, salt, and cinnamon stick.
Cover and cook on high for 4 hours.

At end of first 4 hours, remove cinnamon stick (reserve) and carefully transfer mixture to food processor bowl with chopper blade (I did it in 2 batches) and pulse until smooth (I didn't over-process - I wanted mine to look pulpy).  Return processed mixture to crock pot, add cinnamon stick back to the batch.  Cook on high UNCOVERED for 2 more hours.  Add the ground allspice, ground cloves, and nutmeg.  Cook uncovered until mixture is thick and brown - about 2 more hours.  The spices at this point are my addition to the recipe.  I like a spicy apple butter.
Discard cinnamon stick and allow mixture to cool.
Transfer to airtight containers and refrigerate up to 3 weeks, or freeze up to 3 months.
Makes 6 cups (well, mine didn't - it made about 4 1/2 cups and I took it out 30 minutes early).


So - I had a new peeler I had not used very often.  I didn't feel adept at using it...I've used a swivel peeler for most of my life and after I acquired the Oxo Swivel Peeler, I thought I'd never use anything else.  However, all the cooking show chefs seem to use a Y-peeler...so I bought one about a year or so ago.  Just felt awkward to me.  Today, however - I got both out and set up my work station.  First I weighed the fruit to get a full 5 pounds using my nifty sorta new EatSmart Precision Pro kitchen scale I got from Amazon.  It is a perfect little scale, and doesn't take up much room on the counter...or fits easily in a drawer.  I tared out the bowl and piled in apples and pears until I got a couple of ounces over 5 pounds.  Good to go!

I started peeling with the Y-peeler...wow, it was GREAT on the pears.  Really fast.  The apples were a bit of a challenge, but I got better the more I used it.  A couple of times I thought I had nicked my fingernail but it must have just bumped it.  One apple was not peeling smoothly so I switched to my swivel peeler - I was shocked that it didn't feel as good now that I'd gotten accustomed to the Y-peeler.  Ha!  Now I know...like Momma always said "practice makes perfect"!  To make things speedier (cause that's a LOT of fruit to peel) I peeled everything first, using the bench scraper to clear my cutting board between each piece of fruit (love that tool) then went back and quartered and cored each piece.  I found it was easiest to use a paring knife to core the pears and the larger knife to lay the apple quarters on their side and cut the core out on an angle.

Peeled Apples and Pears


Grated in Food Processor

In slow cooker - ready to go
The food processor grating was a fast process - and the bowls were a quick cleanup because it was just fruit - rinsed out rapidly. (I hate the clean up process - so this is a plus)  I put a liner in my crock pot and added the apples and pears in two batches, scraping the processor bowl with a spatula.  Added the sugar, salt, and cinnamon stick, covered and set it on high.

Entire morning process...less than one hour...the length of time it took to listen to The Mormon Tabernacle Choir's Christmas Album...my favorite Christmas album from childhood.  My Mom used to wake us up at Christmas time blasting that album :-)  Good memories.  Good to cook to.  Clean up and "blog post part A" all finished by 9:00 a.m.!

The Afternoon (Blog Post Part B):


4 hour mark - before processing
after the processing step
I stirred about every hour - not in the recipe - but I enjoyed wafting the smell into the house!  At the 4 hour mark, I moved the slow cooker over by the food processor and very carefully ladled half of the partially cooked product into the food processor bowl and gave it a quick whirl.  It was about the consistency of applesauce. 


Six hours on high - added extra spices for last bit of cooking time
Then at the 6 hour mark I tasted it (tasted like cinnamony applesauce at that point) so added the additional spices.  It is really darkening at this stage and smells awesome.  I tasted it at 6 1/2 hours to check for spices...definitely better...more like apple butter!  I keep stirring because it is reducing significantly and I don't want it to burn.  Since it was cooking without the lid at this point, the caramelization was more rapid and the flavor more intense.

While I waited, I looked up why it is called apple butter when it doesn't have any dairy in it.  According to Wikipedia, it is because it is spread on bread...like butter...or used as a condiment.  That and the thick consistency.  It said it wasn't commonly used on sandwiches now - but it was historically.  Well, heck, they didn't grow up at my house!  My Momma routinely made peanut butter and Bama Apple Butter sandwiches.  It is one of my favorites to this day!  Yummm...when I typed those words it made me kind of hungry and I needed some protein.  I snitched a little of that hot apple-pear butter and cooled it down in the freezer in a ramekin...and made me a samich! OMG...delicious!  I felt like it was ready...but turned the crock pot to low and let it go another hour and wow, wow, wow.  This is some really good stuff.

So, ladies and gentlemen...I present my homemade apple-pear butter.  Will I make it again?  Oh yes - but only for special occasions.  It is a lot of prep work.  Definitely will become one of my holiday traditions!

Cooling - these are 2 cup containers and it filled about 1 1/2 cups of each container

So, Bon Appetit Y'all!!!


StumbleUpon